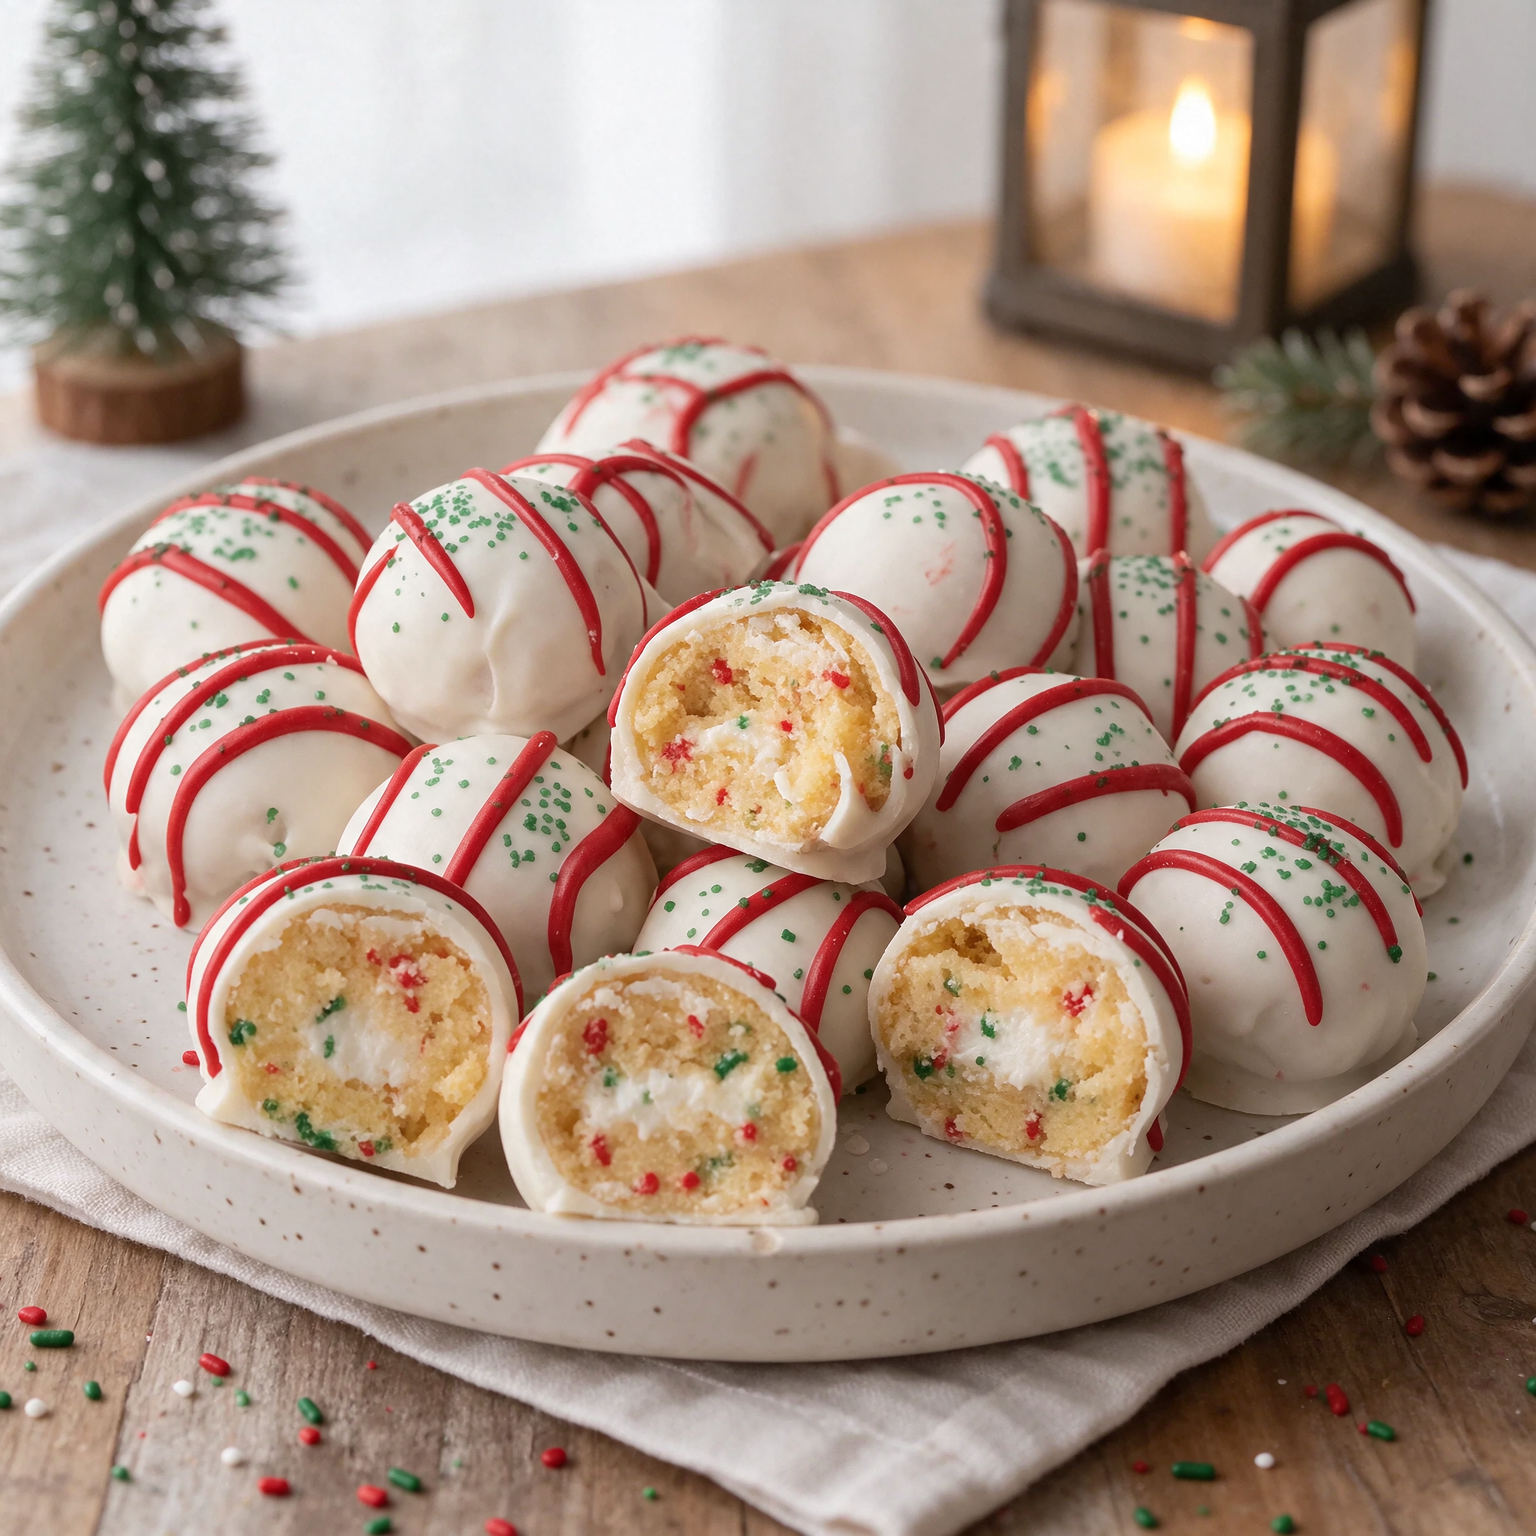
If you’re looking for an easy, delicious, and festive dessert to make this holiday season, these Little Debbie Christmas Tree Cake Balls are guaranteed to become a new Christmas favorite! Made with everyone’s favorite Little Debbie Christmas Tree Cakes, creamy filling, and a smooth white chocolate coating, these adorable little treats are sweet, rich, and absolutely irresistible.
They combine the delicious vanilla cake, creamy filling, and festive flavor of the classic Christmas Tree Cakes into bite-sized dessert balls that are perfect for sharing. Each little truffle is covered in a beautiful white chocolate coating and decorated with red and green holiday sprinkles, making them look just like miniature Christmas treats.
The best part about this recipe is that you don’t need to bake a cake from scratch. Little Debbie Christmas Tree Cakes already contain everything you need to create a delicious cake truffle filling. Simply crumble the snack cakes, mix them with a little cream cheese if needed, roll them into balls, chill, and dip them in melted white chocolate.
These Christmas Tree Cake Balls are perfect for Christmas parties, holiday dessert tables, cookie exchanges, family gatherings, school celebrations, and homemade edible gifts. They are also a wonderful make-ahead dessert because you can prepare them in advance and keep them refrigerated until you’re ready to serve.
Whether you’re a longtime fan of Little Debbie Christmas Tree Cakes or simply looking for a fun new holiday dessert, this recipe is an easy way to turn a classic Christmas snack into something extra special.
Get ready to make a batch of these delicious little Christmas treats. They are so simple, festive, and delicious that everyone will be asking for another!
Ingredients
You only need a few simple ingredients to make these delicious Little Debbie Christmas Tree Cake Balls.
For the Cake Balls
- 10 Little Debbie Christmas Tree Cakes (approximately 10 individually wrapped snack cakes).
- 2–4 ounces (55–115 g) softened cream cheese, optional, depending on the consistency of the mixture.
- 1 teaspoon vanilla extract, optional.
For the White Chocolate Coating
- 2 cups (approximately 340 g) white chocolate melting wafers or white candy melts.
- 1 teaspoon coconut oil or vegetable shortening, optional, to thin the coating if necessary.
For Decoration
- ½ cup red candy melts or red decorating icing.
- ½ cup green candy melts or green decorating icing.
- Red and green Christmas sprinkles.
- White sanding sugar, optional.
- Extra melted white chocolate for decorating.
Ingredient Notes
Little Debbie Christmas Tree Cakes: These are the star ingredient. Their vanilla cake layers, creamy filling, and festive icing create a delicious base for the cake balls. Both regular-sized and seasonal varieties can work.
Cream Cheese: This is optional because Christmas Tree Cakes are already moist and contain creamy filling. Add a small amount only if your mixture needs extra moisture or help holding together.
White Chocolate Melting Wafers: These create a smooth, beautiful coating that gives the cake balls their classic Christmas appearance. Candy melts are especially convenient because they are designed for dipping.
Red and Green Candy Melts: These are perfect for creating traditional Christmas decorations and adding colorful details.
Christmas Sprinkles: Red, green, and white sprinkles make the finished cake balls look festive and attractive.
Preparation
Follow these easy step-by-step instructions to prepare your homemade Little Debbie Christmas Tree Cake Balls.
Step 1: Prepare the Christmas Tree Cakes
Begin by unwrapping all 10 Little Debbie Christmas Tree Cakes.
Place them in a large mixing bowl.
Using clean hands, a fork, or a potato masher, crumble the cakes into small pieces.
Continue breaking them apart until the mixture resembles soft, moist cake crumbs.
Make sure the white icing and creamy filling are mixed evenly throughout the cake crumbs.
You don’t need to remove the icing or filling because they add sweetness, moisture, and flavor to the finished cake balls.
If the mixture already feels moist and holds together when pressed, you may not need any additional cream cheese.
Step 2: Mix the Cake Ball Filling
Check the consistency of the crumbled cake mixture.
If it feels dry or doesn’t hold together easily, add 2 tablespoons of softened cream cheese.
Mix thoroughly until the cream cheese is evenly incorporated.
Add a little more cream cheese only if necessary, using small amounts at a time.
The mixture should be soft, slightly sticky, and easy to shape without falling apart.
If desired, add one teaspoon of vanilla extract for an extra hint of flavor.
Avoid adding too much cream cheese because the Christmas Tree Cakes already contain creamy filling. Too much moisture can make the mixture difficult to roll and dip.
Step 3: Roll into Cake Balls
Line a large baking sheet with parchment paper or wax paper.
Using a small cookie scoop or tablespoon, scoop portions of the cake mixture.
Roll each portion gently between your palms to create smooth, round balls.
Try to make all the balls approximately the same size so they look uniform and are easy to coat.
Place each cake ball on the prepared baking sheet, leaving a little space between them.
Continue until all the cake mixture has been used.
Depending on the size of your portions, you should get approximately 20–24 cake balls.
Step 4: Chill the Cake Balls
Place the baking sheet in the refrigerator for approximately 45–60 minutes, or until the cake balls are firm.
If you’re short on time, you can place them in the freezer for approximately 15–20 minutes instead.
Chilling is an important step because it helps the cake balls maintain their shape when dipped into melted white chocolate.
Avoid leaving them in the freezer for too long, as extremely frozen cake balls can sometimes cause the coating to crack as they warm up.
Step 5: Melt the White Chocolate
Place the white chocolate melting wafers in a microwave-safe bowl.
Microwave in 20–30-second intervals, stirring between each interval until the chocolate is completely melted and smooth.
If the chocolate seems too thick, add a small amount of coconut oil or vegetable shortening and stir well.
Continue until the coating reaches a smooth consistency that is easy for dipping.
You can also melt the chocolate using a double boiler if you prefer.
Be careful not to overheat the white chocolate because it can become thick and difficult to work with.
Step 6: Dip the Cake Balls
Remove the chilled cake balls from the refrigerator.
Using a dipping fork or two regular forks, carefully dip each cake ball into the melted white chocolate.
Make sure the entire surface is covered.
Lift the cake ball gently and allow the excess chocolate to drip back into the bowl.
Place each coated cake ball on the parchment-lined baking sheet.
If you notice small uncovered areas, use a spoon to add a little extra melted chocolate.
Continue until all the cake balls are coated.
Step 7: Add the Christmas Decorations
While the white chocolate coating is still slightly wet, sprinkle the cake balls with red, green, and white Christmas sprinkles.
For a beautiful holiday appearance, you can also drizzle red and green melted candy coating over the top.
To make the drizzle, melt the red and green candy melts separately in small microwave-safe bowls.
Transfer each color into a piping bag or a small zip-top bag with a tiny corner cut off.
Drizzle thin lines across the white chocolate coating.
You can create zigzag patterns, stripes, or small Christmas-inspired designs.
For an extra festive touch, add a few white sugar crystals or tiny Christmas sprinkles.
Step 8: Chill Until Set and Serve
Once all the cake balls have been decorated, place the baking sheet back in the refrigerator for approximately 15–20 minutes.
Allow the chocolate coating and decorations to become completely firm.
Carefully transfer the finished Little Debbie Christmas Tree Cake Balls to a festive serving platter.
You can place each cake ball in a mini cupcake liner for a beautiful presentation.
Your delicious no-bake Christmas cake balls are ready to enjoy!
Variations
One of the best things about Little Debbie Christmas Tree Cake Balls is how easy they are to customize. You can experiment with different coatings, flavors, and decorations to create your own festive versions.
1. Chocolate Christmas Tree Cake Balls
Instead of white chocolate, dip the cake balls in melted milk chocolate or dark chocolate.
The rich chocolate coating pairs wonderfully with the sweet vanilla cake filling.
Finish with a white chocolate drizzle for a beautiful contrast.
2. Christmas Tree Cake Truffles
Make slightly smaller cake balls and coat them completely in white chocolate.
Decorate with tiny red and green sprinkles to create elegant bite-sized Christmas truffles.
These are perfect for holiday dessert platters and homemade gifts.
3. Red and Green Christmas Cake Balls
Divide your melted candy coating into separate bowls.
Color one portion red and another green using appropriate candy coloring.
Dip different cake balls in each color for a bright and festive Christmas dessert display.
4. Christmas Tree Cake Pops
If you prefer cake pops, insert a lollipop stick into each chilled cake ball.
Dip the cake pops in melted white chocolate and decorate with festive sprinkles.
Allow the coating to set upright in a cake pop stand or a piece of foam covered with food-safe wrapping.
5. Peppermint Christmas Cake Balls
Add a small amount of peppermint extract to the cake mixture or sprinkle crushed peppermint candies over the white chocolate coating.
This creates a delicious winter-inspired flavor combination.
6. Christmas Sprinkle Cake Balls
For an extra colorful dessert, roll the chilled cake balls in Christmas sprinkles before dipping them in white chocolate.
You can also add sprinkles directly to the melted coating for a fun festive appearance.
COOKING Note
- Use fresh Little Debbie Christmas Tree Cakes for the best flavor and texture.
- Crumble the cakes thoroughly so the mixture becomes smooth and easy to shape.
- Do not automatically add cream cheese. The snack cakes are already moist and may hold together without it.
- If the mixture feels dry, add cream cheese gradually, one tablespoon at a time.
- Avoid adding too much cream cheese because it can make the cake balls overly soft.
- Chill the cake balls before dipping to help them maintain their shape.
- Use white chocolate melting wafers for an easier and smoother coating.
- Melt the chocolate slowly to prevent overheating.
- Add coconut oil only if the coating needs thinning.
- Allow excess chocolate to drip off before placing each cake ball on parchment paper.
- Add sprinkles while the coating is still wet so they stick properly.
- Refrigerate the finished cake balls until the coating becomes firm.
- Store the finished treats in an airtight container because the optional cream cheese requires refrigeration.
Serving Suggestions
These Little Debbie Christmas Tree Cake Balls are perfect for holiday celebrations and festive dessert tables.
Here are some delicious ways to serve them:
Christmas Dessert Platters: Arrange the cake balls alongside Christmas cookies, brownies, fudge, chocolate truffles, and peppermint bark.
Holiday Parties: Place each cake ball in a mini cupcake liner and arrange them on a decorative Christmas tray.
Christmas Cookie Exchanges: Package several cake balls in small treat boxes and share them with friends, family, and neighbors.
Hot Chocolate Bar: Serve these sweet cake balls alongside hot chocolate, whipped cream, marshmallows, and candy canes.
Christmas Movie Nights: Enjoy them with popcorn, cookies, and other holiday snacks while watching your favorite Christmas movies.
Homemade Christmas Gifts: Place the cake balls in decorative tins or clear treat bags, add a festive ribbon, and give them as delicious homemade gifts.
Holiday Dessert Buffet: Display them in different sizes and colors to create an attractive Christmas dessert centerpiece.
Tips for Perfect Little Debbie Christmas Tree Cake Balls
Want your cake balls to turn out perfectly every time? Follow these helpful tips.
1. Don’t Add Too Much Cream Cheese
Christmas Tree Cakes already contain creamy filling, so additional cream cheese may not be necessary. Start with a small amount only if the mixture needs extra binding.
2. Make Uniform Cake Balls
Use a small cookie scoop to create evenly sized portions. This gives the finished treats a professional appearance and ensures consistent serving sizes.
3. Chill Before Dipping
Cold cake balls are easier to handle and less likely to fall apart when dipped into melted chocolate.
4. Use Good-Quality White Chocolate
Melting wafers or candy melts are ideal because they create a smooth coating without complicated tempering techniques.
5. Avoid Overheating the Chocolate
Melt the chocolate slowly in short intervals and stir frequently. This prevents the coating from becoming thick or grainy.
6. Decorate Immediately
Add sprinkles while the white chocolate is still wet. If the coating sets too quickly, the decorations may not stick.
7. Keep the Cake Balls Refrigerated
Because these treats contain cream cheese when added, refrigeration is the safest storage option.
8. Prepare Them Ahead of Time
Make the cake balls a day before your Christmas celebration. You can refrigerate them and serve them when needed.
Prep Time, Cooking Time, and Total Time
| Category | Time |
|---|---|
| Prep Time | 25 minutes |
| Cooking Time | 0 minutes |
| Chilling Time | 60 minutes |
| Decorating Time | 20 minutes |
| Total Time | 1 hour 45 minutes |
No baking required!
Estimated Yield: 20–24 cake balls.
Nutritional Information
The following nutritional information is estimated per cake ball, assuming the recipe makes approximately 24 pieces and includes white chocolate coating and decorations.
| Nutrient | Amount |
|---|---|
| Calories | 185 kcal |
| Protein | 2 g |
| Total Fat | 10 g |
| Saturated Fat | 6 g |
| Carbohydrates | 23 g |
| Sugar | 17 g |
| Sodium | 115 mg |
Note: Nutritional values are approximate and may vary depending on the size of the cake balls, the amount of white chocolate used, and the specific ingredients.
Storage Instructions
Refrigerator: Store the finished Little Debbie Christmas Tree Cake Balls in an airtight container in the refrigerator for up to 5 days. Keep them chilled until serving.
Freezer: These cake balls can be frozen in a freezer-safe airtight container for up to 2 months for best quality. Place parchment paper between layers to protect the chocolate coating and decorations.
Thawing: Transfer frozen cake balls to the refrigerator and allow them to thaw overnight before serving.
Make-Ahead Tip: You can prepare the cake mixture, roll the balls, and refrigerate them a day before your celebration. Dip them in white chocolate and add decorations when you’re ready.
Frequently Asked Questions (FAQs)
1. Do Little Debbie Christmas Tree Cake Balls need to be baked?
No! This is a completely no-bake dessert. The Christmas Tree Cakes are already baked, so you only need to crumble them, shape the mixture into balls, chill, dip, and decorate.
2. Do I need cream cheese for Christmas Tree Cake Balls?
Not necessarily. Little Debbie Christmas Tree Cakes already contain creamy filling and are naturally moist. You can often make the cake balls without cream cheese. If the mixture feels too dry or doesn’t hold together, add a small amount gradually.
3. Can I use different Little Debbie snack cakes?
Yes! You can experiment with other Little Debbie snack cakes, including vanilla, chocolate, or seasonal varieties. The flavor and texture will change depending on the snack cakes you choose.
4. Why are my Christmas Tree Cake Balls too soft?
The mixture may be too soft because too much cream cheese was added or the cake balls haven’t chilled long enough. Refrigerate them until firm before dipping.
5. Can I use almond bark instead of white chocolate?
Absolutely! White almond bark works very well for dipping cake balls. It melts smoothly and creates a beautiful coating.
6. How do I keep the white chocolate coating smooth?
Use good-quality melting wafers and melt them slowly in short microwave intervals. Stir between each interval and avoid overheating. Add a little coconut oil if necessary to thin the coating.
7. Can I make Christmas Tree Cake Balls ahead of time?
Yes! These treats are perfect for preparing ahead. Make them one or two days before your Christmas celebration and store them in an airtight container in the refrigerator.
8. How many cake balls does this recipe make?
This recipe makes approximately 20–24 cake balls, depending on how large you roll them.
9. Can I freeze Little Debbie Christmas Tree Cake Balls?
Yes! Place them in a freezer-safe airtight container with parchment paper between layers. They can be frozen for up to 2 months for best quality.
10. What decorations work best for Christmas Tree Cake Balls?
Red and green sprinkles, white sanding sugar, melted red candy coating, and green candy melts are wonderful choices. You can also drizzle extra white chocolate over the top for a beautiful finish.
11. Can I make these into Christmas Tree Cake Pops?
Yes! Insert lollipop sticks into the chilled cake balls before dipping them in melted white chocolate. Allow the coating to set upright before serving.
12. Why are my cake balls falling apart?
The mixture may not be moist enough or may not have been chilled properly. Make sure the cakes are thoroughly crumbled and mixed. Add a little cream cheese if necessary and refrigerate before shaping.
13. How long do Christmas Tree Cake Balls last?
When stored properly in an airtight container in the refrigerator, they generally stay fresh for up to 5 days.
14. Can I use milk chocolate instead of white chocolate?
Yes! Milk chocolate and dark chocolate both make delicious coatings. However, white chocolate gives these treats their classic festive appearance and allows the colorful decorations to stand out.
15. Are Little Debbie Christmas Tree Cake Balls good for Christmas gifts?
Definitely! These adorable treats make wonderful homemade Christmas gifts. Arrange them in decorative boxes or clear bags with festive ribbons and share them with friends and family.
Conclusion
These Little Debbie Christmas Tree Cake Balls are everything you want in an easy Christmas dessert: sweet, creamy, festive, and incredibly simple to make!
With delicious vanilla snack cakes, creamy filling, smooth white chocolate coating, and beautiful red and green decorations, every bite is full of holiday flavor.
The best part is that you don’t need to bake anything from scratch or spend hours preparing complicated desserts. A few simple ingredients, a little chilling time, and some festive decorations are all you need to create these irresistible holiday treats.
Whether you’re making them for a Christmas party, a family gathering, a cookie exchange, or homemade edible gifts, these no-bake cake balls are sure to impress everyone.
Prepare a batch ahead of time, keep them chilled, and enjoy sharing these delicious little treats throughout the holiday season.
Once everyone tastes them, don’t be surprised if they ask you to make another batch!
Happy Christmas baking – without turning on the oven! 🎄❤️
Print
Little Debbie Christmas Tree Cake Balls – The Ultimate Easy Christmas Treat!
- Total Time: 1 hour 45 minutes
Description
these Little Debbie Christmas Tree Cake Balls are guaranteed to become a new Christmas favorite! Made with everyone’s favorite Little Debbie Christmas Tree Cakes, creamy filling, and a smooth white chocolate coating, these adorable little treats are sweet, rich, and absolutely irresistible.
Ingredients
For the Cake Balls
- 10 Little Debbie Christmas Tree Cakes (approximately 10 individually wrapped snack cakes).
- 2–4 ounces (55–115 g) softened cream cheese, optional, depending on the consistency of the mixture.
- 1 teaspoon vanilla extract, optional.
For the White Chocolate Coating
- 2 cups (approximately 340 g) white chocolate melting wafers or white candy melts.
- 1 teaspoon coconut oil or vegetable shortening, optional, to thin the coating if necessary.
For Decoration
- ½ cup red candy melts or red decorating icing.
- ½ cup green candy melts or green decorating icing.
- Red and green Christmas sprinkles.
- White sanding sugar, optional.
- Extra melted white chocolate for decorating.
Instructions
Step 1: Prepare the Christmas Tree Cakes
Begin by unwrapping all 10 Little Debbie Christmas Tree Cakes.
Place them in a large mixing bowl.
Using clean hands, a fork, or a potato masher, crumble the cakes into small pieces.
Continue breaking them apart until the mixture resembles soft, moist cake crumbs.
Make sure the white icing and creamy filling are mixed evenly throughout the cake crumbs.
You don’t need to remove the icing or filling because they add sweetness, moisture, and flavor to the finished cake balls.
If the mixture already feels moist and holds together when pressed, you may not need any additional cream cheese.
Step 2: Mix the Cake Ball Filling
Check the consistency of the crumbled cake mixture.
If it feels dry or doesn’t hold together easily, add 2 tablespoons of softened cream cheese.
Mix thoroughly until the cream cheese is evenly incorporated.
Add a little more cream cheese only if necessary, using small amounts at a time.
The mixture should be soft, slightly sticky, and easy to shape without falling apart.
If desired, add one teaspoon of vanilla extract for an extra hint of flavor.
Avoid adding too much cream cheese because the Christmas Tree Cakes already contain creamy filling. Too much moisture can make the mixture difficult to roll and dip.
Step 3: Roll into Cake Balls
Line a large baking sheet with parchment paper or wax paper.
Using a small cookie scoop or tablespoon, scoop portions of the cake mixture.
Roll each portion gently between your palms to create smooth, round balls.
Try to make all the balls approximately the same size so they look uniform and are easy to coat.
Place each cake ball on the prepared baking sheet, leaving a little space between them.
Continue until all the cake mixture has been used.
Depending on the size of your portions, you should get approximately 20–24 cake balls.
Step 4: Chill the Cake Balls
Place the baking sheet in the refrigerator for approximately 45–60 minutes, or until the cake balls are firm.
If you’re short on time, you can place them in the freezer for approximately 15–20 minutes instead.
Chilling is an important step because it helps the cake balls maintain their shape when dipped into melted white chocolate.
Avoid leaving them in the freezer for too long, as extremely frozen cake balls can sometimes cause the coating to crack as they warm up.
Step 5: Melt the White Chocolate
Place the white chocolate melting wafers in a microwave-safe bowl.
Microwave in 20–30-second intervals, stirring between each interval until the chocolate is completely melted and smooth.
If the chocolate seems too thick, add a small amount of coconut oil or vegetable shortening and stir well.
Continue until the coating reaches a smooth consistency that is easy for dipping.
You can also melt the chocolate using a double boiler if you prefer.
Be careful not to overheat the white chocolate because it can become thick and difficult to work with.
Step 6: Dip the Cake Balls
Remove the chilled cake balls from the refrigerator.
Using a dipping fork or two regular forks, carefully dip each cake ball into the melted white chocolate.
Make sure the entire surface is covered.
Lift the cake ball gently and allow the excess chocolate to drip back into the bowl.
Place each coated cake ball on the parchment-lined baking sheet.
If you notice small uncovered areas, use a spoon to add a little extra melted chocolate.
Continue until all the cake balls are coated.
Step 7: Add the Christmas Decorations
While the white chocolate coating is still slightly wet, sprinkle the cake balls with red, green, and white Christmas sprinkles.
For a beautiful holiday appearance, you can also drizzle red and green melted candy coating over the top.
To make the drizzle, melt the red and green candy melts separately in small microwave-safe bowls.
Transfer each color into a piping bag or a small zip-top bag with a tiny corner cut off.
Drizzle thin lines across the white chocolate coating.
You can create zigzag patterns, stripes, or small Christmas-inspired designs.
For an extra festive touch, add a few white sugar crystals or tiny Christmas sprinkles.
Step 8: Chill Until Set and Serve
Once all the cake balls have been decorated, place the baking sheet back in the refrigerator for approximately 15–20 minutes.
Allow the chocolate coating and decorations to become completely firm.
Carefully transfer the finished Little Debbie Christmas Tree Cake Balls to a festive serving platter.
You can place each cake ball in a mini cupcake liner for a beautiful presentation.
Your delicious no-bake Christmas cake balls are ready to enjoy!
Notes
- Use fresh Little Debbie Christmas Tree Cakes for the best flavor and texture.
- Crumble the cakes thoroughly so the mixture becomes smooth and easy to shape.
- Do not automatically add cream cheese. The snack cakes are already moist and may hold together without it.
- If the mixture feels dry, add cream cheese gradually, one tablespoon at a time.
- Avoid adding too much cream cheese because it can make the cake balls overly soft.
- Chill the cake balls before dipping to help them maintain their shape.
- Use white chocolate melting wafers for an easier and smoother coating.
- Melt the chocolate slowly to prevent overheating.
- Add coconut oil only if the coating needs thinning.
- Allow excess chocolate to drip off before placing each cake ball on parchment paper.
- Add sprinkles while the coating is still wet so they stick properly.
- Refrigerate the finished cake balls until the coating becomes firm.
- Store the finished treats in an airtight container because the optional cream cheese requires refrigeration.
- Prep Time: 25 minutes
- Chilling Time: 60 minutes
Nutrition
- Calories: 185 kcal
- Sugar: 17 g
- Sodium: 115 mg
- Protein: 2 g
