Description
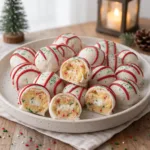
these Little Debbie Christmas Tree Cake Balls are guaranteed to become a new Christmas favorite! Made with everyone’s favorite Little Debbie Christmas Tree Cakes, creamy filling, and a smooth white chocolate coating, these adorable little treats are sweet, rich, and absolutely irresistible.
Ingredients
For the Cake Balls
- 10 Little Debbie Christmas Tree Cakes (approximately 10 individually wrapped snack cakes).
- 2–4 ounces (55–115 g) softened cream cheese, optional, depending on the consistency of the mixture.
- 1 teaspoon vanilla extract, optional.
For the White Chocolate Coating
- 2 cups (approximately 340 g) white chocolate melting wafers or white candy melts.
- 1 teaspoon coconut oil or vegetable shortening, optional, to thin the coating if necessary.
For Decoration
- ½ cup red candy melts or red decorating icing.
- ½ cup green candy melts or green decorating icing.
- Red and green Christmas sprinkles.
- White sanding sugar, optional.
- Extra melted white chocolate for decorating.
Instructions
Step 1: Prepare the Christmas Tree Cakes
Begin by unwrapping all 10 Little Debbie Christmas Tree Cakes.
Place them in a large mixing bowl.
Using clean hands, a fork, or a potato masher, crumble the cakes into small pieces.
Continue breaking them apart until the mixture resembles soft, moist cake crumbs.
Make sure the white icing and creamy filling are mixed evenly throughout the cake crumbs.
You don’t need to remove the icing or filling because they add sweetness, moisture, and flavor to the finished cake balls.
If the mixture already feels moist and holds together when pressed, you may not need any additional cream cheese.
Step 2: Mix the Cake Ball Filling
Check the consistency of the crumbled cake mixture.
If it feels dry or doesn’t hold together easily, add 2 tablespoons of softened cream cheese.
Mix thoroughly until the cream cheese is evenly incorporated.
Add a little more cream cheese only if necessary, using small amounts at a time.
The mixture should be soft, slightly sticky, and easy to shape without falling apart.
If desired, add one teaspoon of vanilla extract for an extra hint of flavor.
Avoid adding too much cream cheese because the Christmas Tree Cakes already contain creamy filling. Too much moisture can make the mixture difficult to roll and dip.
Step 3: Roll into Cake Balls
Line a large baking sheet with parchment paper or wax paper.
Using a small cookie scoop or tablespoon, scoop portions of the cake mixture.
Roll each portion gently between your palms to create smooth, round balls.
Try to make all the balls approximately the same size so they look uniform and are easy to coat.
Place each cake ball on the prepared baking sheet, leaving a little space between them.
Continue until all the cake mixture has been used.
Depending on the size of your portions, you should get approximately 20–24 cake balls.
Step 4: Chill the Cake Balls
Place the baking sheet in the refrigerator for approximately 45–60 minutes, or until the cake balls are firm.
If you’re short on time, you can place them in the freezer for approximately 15–20 minutes instead.
Chilling is an important step because it helps the cake balls maintain their shape when dipped into melted white chocolate.
Avoid leaving them in the freezer for too long, as extremely frozen cake balls can sometimes cause the coating to crack as they warm up.
Step 5: Melt the White Chocolate
Place the white chocolate melting wafers in a microwave-safe bowl.
Microwave in 20–30-second intervals, stirring between each interval until the chocolate is completely melted and smooth.
If the chocolate seems too thick, add a small amount of coconut oil or vegetable shortening and stir well.
Continue until the coating reaches a smooth consistency that is easy for dipping.
You can also melt the chocolate using a double boiler if you prefer.
Be careful not to overheat the white chocolate because it can become thick and difficult to work with.
Step 6: Dip the Cake Balls
Remove the chilled cake balls from the refrigerator.
Using a dipping fork or two regular forks, carefully dip each cake ball into the melted white chocolate.
Make sure the entire surface is covered.
Lift the cake ball gently and allow the excess chocolate to drip back into the bowl.
Place each coated cake ball on the parchment-lined baking sheet.
If you notice small uncovered areas, use a spoon to add a little extra melted chocolate.
Continue until all the cake balls are coated.
Step 7: Add the Christmas Decorations
While the white chocolate coating is still slightly wet, sprinkle the cake balls with red, green, and white Christmas sprinkles.
For a beautiful holiday appearance, you can also drizzle red and green melted candy coating over the top.
To make the drizzle, melt the red and green candy melts separately in small microwave-safe bowls.
Transfer each color into a piping bag or a small zip-top bag with a tiny corner cut off.
Drizzle thin lines across the white chocolate coating.
You can create zigzag patterns, stripes, or small Christmas-inspired designs.
For an extra festive touch, add a few white sugar crystals or tiny Christmas sprinkles.
Step 8: Chill Until Set and Serve
Once all the cake balls have been decorated, place the baking sheet back in the refrigerator for approximately 15–20 minutes.
Allow the chocolate coating and decorations to become completely firm.
Carefully transfer the finished Little Debbie Christmas Tree Cake Balls to a festive serving platter.
You can place each cake ball in a mini cupcake liner for a beautiful presentation.
Your delicious no-bake Christmas cake balls are ready to enjoy!
Notes
- Use fresh Little Debbie Christmas Tree Cakes for the best flavor and texture.
- Crumble the cakes thoroughly so the mixture becomes smooth and easy to shape.
- Do not automatically add cream cheese. The snack cakes are already moist and may hold together without it.
- If the mixture feels dry, add cream cheese gradually, one tablespoon at a time.
- Avoid adding too much cream cheese because it can make the cake balls overly soft.
- Chill the cake balls before dipping to help them maintain their shape.
- Use white chocolate melting wafers for an easier and smoother coating.
- Melt the chocolate slowly to prevent overheating.
- Add coconut oil only if the coating needs thinning.
- Allow excess chocolate to drip off before placing each cake ball on parchment paper.
- Add sprinkles while the coating is still wet so they stick properly.
- Refrigerate the finished cake balls until the coating becomes firm.
- Store the finished treats in an airtight container because the optional cream cheese requires refrigeration.
- Prep Time: 25 minutes
- Chilling Time: 60 minutes
Nutrition
- Calories: 185 kcal
- Sugar: 17 g
- Sodium: 115 mg
- Protein: 2 g