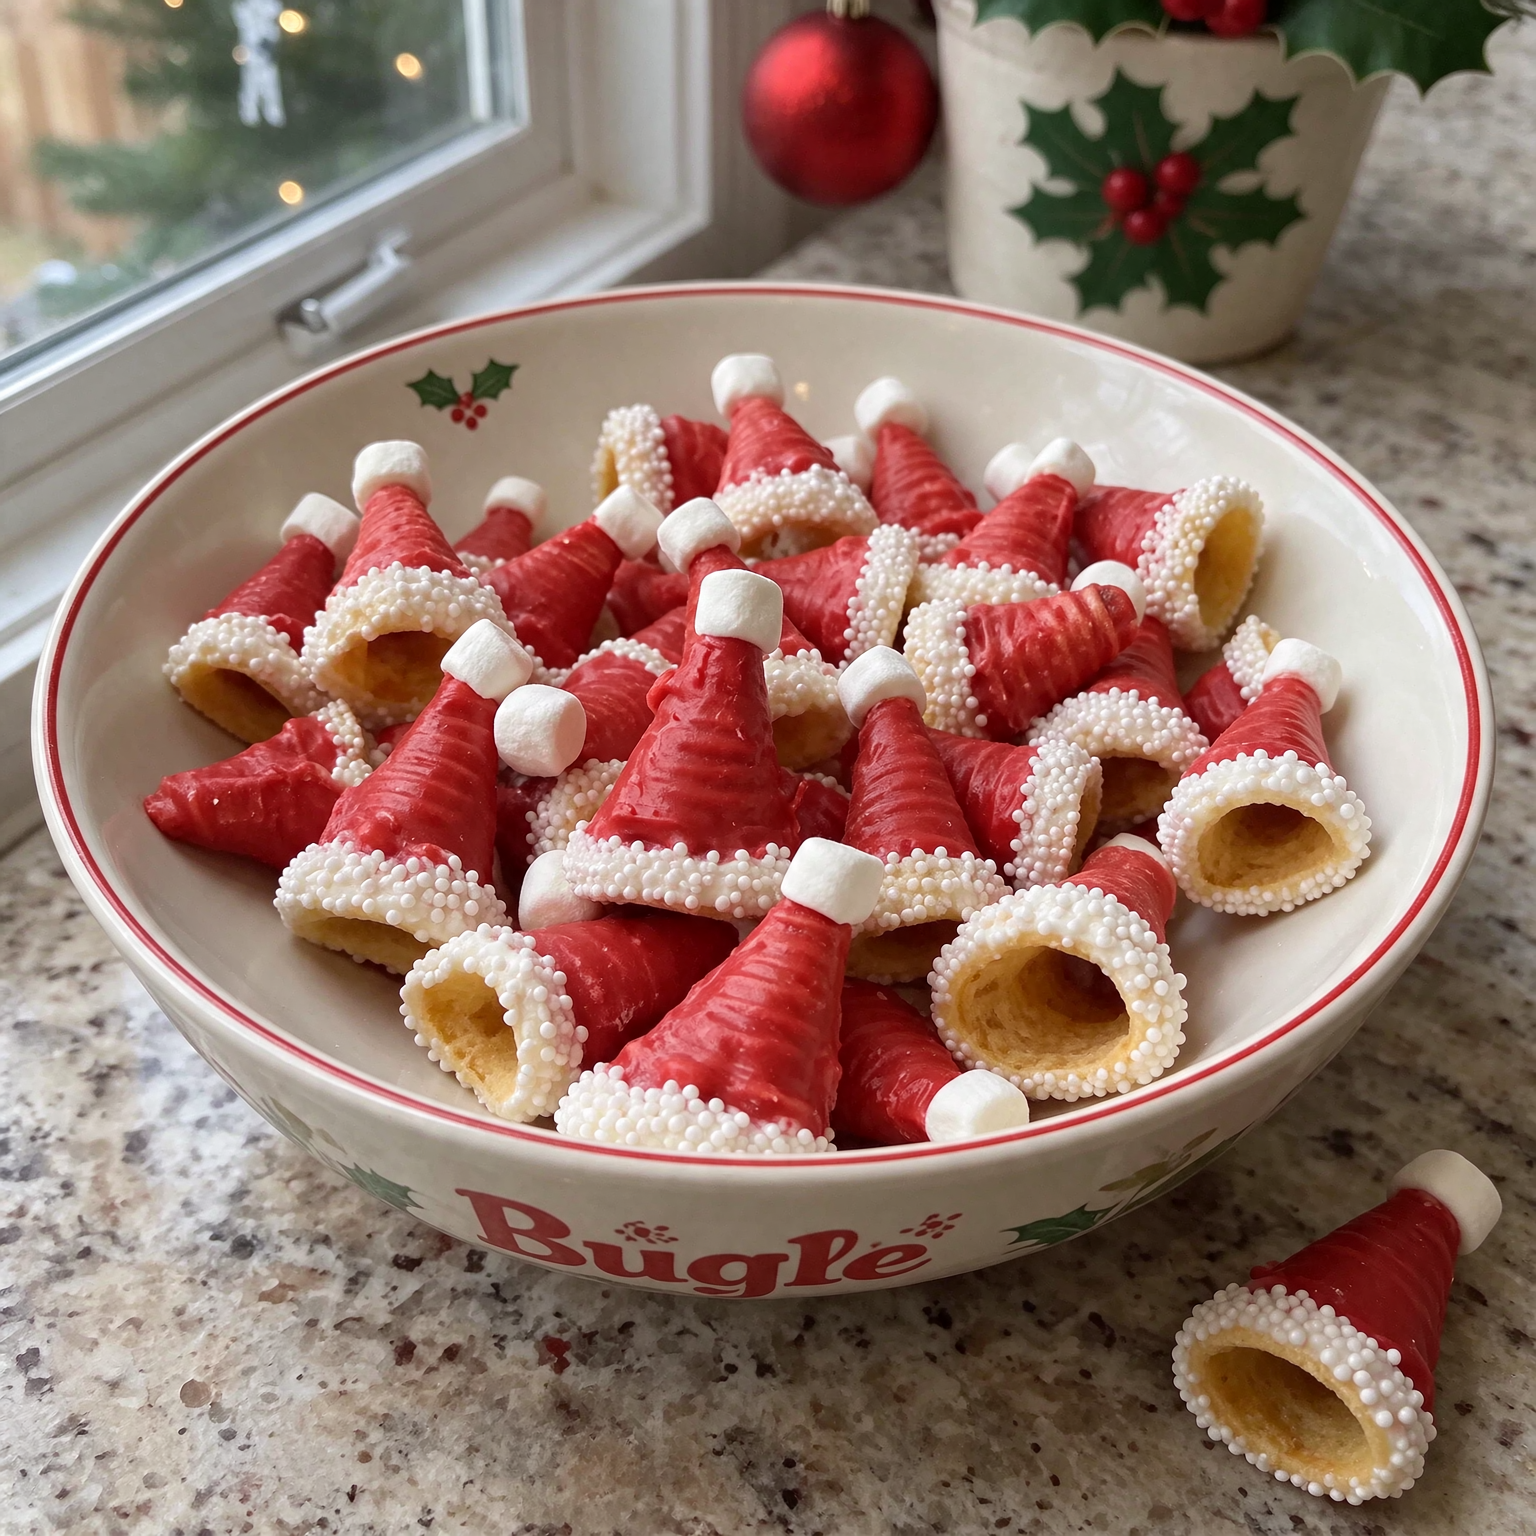
Looking for a fun, festive, and incredibly easy Christmas treat that everyone will love? These Bugle Santa Hats are the perfect addition to your holiday dessert table! Made with crunchy Bugles corn snacks, sweet red candy coating, and adorable white chocolate decorations, these little Santa hats are as delicious as they are cute.
If you love simple Christmas recipes that don’t require baking, this is one you’ll definitely want to add to your holiday collection. With just a handful of ingredients and a little decorating time, you can transform ordinary Bugles into adorable miniature Santa hats that look beautiful on Christmas platters.
The secret to this recipe is the natural cone shape of Bugles. Their pointed tops and wider openings make them look just like tiny Santa hats! Once dipped in melted red candy coating and decorated with a white chocolate trim and a little white pom-pom, they become the cutest holiday treats.
These Bugle Santa Hats are perfect for Christmas parties, school celebrations, family gatherings, holiday movie nights, cookie exchanges, and festive dessert buffets. They are also a wonderful recipe to prepare with children because the decorating process is simple, creative, and lots of fun.
Another reason to love this recipe is that it requires absolutely no oven time. Simply melt, dip, decorate, and allow the candy coating to set. You can even prepare them ahead of time, making holiday entertaining much easier.
Whether you’re looking for a quick Christmas snack, an adorable edible gift, or something different from traditional Christmas cookies, these Bugle Santa Hats are guaranteed to bring a little extra holiday magic to your celebrations!
Ingredients
You only need a few simple ingredients to create these adorable Christmas Santa hats.
Main Ingredients
- 1 bag (approximately 7.5 ounces) Bugles original corn snacks.
- 12 ounces red candy melts or red melting wafers.
- 1 teaspoon coconut oil or vegetable shortening, optional.
- ½ cup white chocolate melting wafers.
- ½ cup mini marshmallows, for the Santa hat pom-poms.
- 2 tablespoons white nonpareils or white decorating sprinkles, optional.
Ingredient Notes
Bugles Corn Snacks: Original Bugles are the best choice because their cone shape naturally resembles a Santa hat. Choose whole, unbroken pieces for the prettiest results.
Red Candy Melts: Red candy melts create the traditional Santa hat color. They are easy to melt and usually provide a smooth coating that sets firmly.
White Chocolate: White chocolate melting wafers create the fluffy-looking trim around the bottom of each Santa hat.
Mini Marshmallows: These make perfect little white pom-poms for the pointed tops of the hats. You can also use small white candy balls.
Coconut Oil: A little coconut oil or vegetable shortening can help thin the red candy coating if it becomes too thick.
White Sprinkles: These are optional but add a beautiful snowy texture to the white chocolate trim.
Preparation
Follow these simple steps to make your homemade Bugle Santa Hats.
Step 1: Prepare the Bugles
Begin by opening the bag of Bugles and carefully sorting through the pieces.
Choose whole, unbroken Bugles that have a nice cone shape. These will become your miniature Santa hats.
Place the selected Bugles on a baking sheet lined with parchment paper or wax paper.
Make sure the pointed ends are facing upward and the wider openings are easy to reach.
Set the tray aside while preparing the candy coating.
Helpful tip: Handle the Bugles gently because they are delicate and can break easily. It’s always a good idea to select a few extra pieces in case some break during dipping.
Step 2: Melt the Red Candy Coating
Place the red candy melts in a microwave-safe bowl.
Microwave in 20–30-second intervals, stirring thoroughly after each interval.
Continue heating until the candy melts are completely smooth and glossy.
If the coating seems too thick, add approximately one teaspoon of coconut oil or vegetable shortening and stir until incorporated.
The coating should be smooth enough to cover the Bugles without leaving thick clumps.
Avoid overheating the candy melts because excessive heat can make the coating thick and difficult to work with.
Step 3: Dip the Bugles in Red Candy Melts
Carefully hold each Bugle by its wider opening or use a dipping fork to coat it in the melted red candy.
Dip the entire outside of the Bugle, making sure it is evenly covered.
Lift it gently and allow any excess coating to drip back into the bowl.
Place the coated Bugle on the parchment-lined baking sheet with the pointed end facing upward.
Repeat the process with the remaining Bugles.
Try to maintain an even red coating for a beautiful Santa hat appearance.
If you notice any small uncovered spots, use a spoon or clean food-safe brush to add a little extra melted candy coating.
Allow the red coating to set slightly before adding the white decorations.
Step 4: Add the White Santa Hat Trim
Melt the white chocolate wafers in a separate microwave-safe bowl.
Heat in 20-second intervals, stirring between each interval until smooth.
Once melted, transfer the white chocolate into a small piping bag or use a spoon to apply it.
Carefully pipe or drizzle a thick white ring around the wider bottom edge of each red Bugle.
This creates the fluffy-looking white fur trim that gives the treats their classic Santa hat appearance.
While the white chocolate is still wet, you can sprinkle a few white nonpareils over the trim for extra texture.
Allow the decoration to set before moving to the next step.
Step 5: Add the Santa Hat Pom-Poms
Now it’s time to add the cutest detail!
Take one mini marshmallow for each Santa hat.
Using a small amount of melted white chocolate, attach a mini marshmallow to the pointed tip of each red-coated Bugle.
Press gently to make sure the marshmallow stays in place.
If you prefer a more rounded appearance, you can use small white candy balls instead of mini marshmallows.
Allow the white chocolate to harden completely.
Repeat with the remaining Bugles until all your miniature Santa hats have their fluffy white pom-poms.
Step 6: Let the Santa Hats Set
Once all the decorations are complete, leave the Bugle Santa Hats on the parchment-lined baking sheet.
Allow them to sit at room temperature until the candy coating and white chocolate are completely firm.
If your kitchen is warm, place the tray in the refrigerator for approximately 10–15 minutes to help the decorations set.
Once firm, carefully lift each Santa hat from the parchment paper.
Arrange them on a Christmas serving platter, in mini cupcake liners, or inside a festive holiday treat box.
Your adorable Bugle Santa Hats are ready to enjoy!
Variations
One of the best things about these Bugle Santa Hats is how easy they are to customize. Here are some fun variations to try during the holiday season.
1. White Chocolate Santa Hats
Instead of red candy melts, dip the Bugles in white chocolate. Add red sprinkles and a white marshmallow pom-pom for a snowy Christmas-inspired version.
2. Chocolate Santa Hats
Use melted milk chocolate or dark chocolate instead of red candy coating. Decorate with white chocolate trim and mini marshmallows for a delicious chocolate version.
3. Strawberry Santa Hats
Add a little strawberry flavoring to a suitable red candy coating or use strawberry-flavored red melting wafers. This creates a fun fruity twist.
4. Sparkling Santa Hats
Before the red coating sets, sprinkle the hats with edible red decorating sugar. This gives them a beautiful sparkling finish that looks wonderful on Christmas dessert tables.
5. Mini Santa Hat Bites
Use smaller Bugles or broken cone-shaped snack pieces to create miniature versions. These are perfect for bite-sized holiday party snacks.
6. Coconut Santa Hats
Sprinkle finely shredded coconut over the white chocolate trim before it sets. The coconut creates a fluffy, snowy appearance.
7. Peppermint Santa Hats
Add finely crushed peppermint candies to the white chocolate trim for a festive peppermint flavor and a little extra crunch.
COOKING Notes
- Always choose whole Bugles without cracks or broken tips.
- Original Bugles are recommended because their flavor pairs well with sweet candy coating.
- Melt candy coating slowly to prevent overheating.
- Stir frequently to maintain a smooth consistency.
- Add coconut oil gradually if the red coating is too thick.
- Make sure the Bugles are completely covered for the best appearance.
- Allow the red coating to set slightly before decorating with white chocolate.
- Use a piping bag for neat and even white chocolate trim.
- Attach the mini marshmallows while the white chocolate is still soft.
- Avoid handling the decorations too much while they are setting.
- Keep the finished Santa hats in a cool, dry place to protect the candy coating.
- Work in small batches if your kitchen is warm because candy melts can begin to set while decorating.
Bugle Santa Hats – An Easy and Adorable No-Bake Christmas Treat!
- Total Time: 55 minutes
Description
These Bugle Santa Hats are the perfect addition to your holiday dessert table! Made with crunchy Bugles corn snacks, sweet red candy coating, and adorable white chocolate decorations, these little Santa hats are as delicious as they are cute.
Ingredients
- 1 bag (approximately 7.5 ounces) Bugles original corn snacks.
- 12 ounces red candy melts or red melting wafers.
- 1 teaspoon coconut oil or vegetable shortening, optional.
- ½ cup white chocolate melting wafers.
- ½ cup mini marshmallows, for the Santa hat pom-poms.
- 2 tablespoons white nonpareils or white decorating sprinkles, optional.
Instructions
Begin by opening the bag of Bugles and carefully sorting through the pieces.
Choose whole, unbroken Bugles that have a nice cone shape. These will become your miniature Santa hats.
Place the selected Bugles on a baking sheet lined with parchment paper or wax paper.
Make sure the pointed ends are facing upward and the wider openings are easy to reach.
Set the tray aside while preparing the candy coating.
Helpful tip: Handle the Bugles gently because they are delicate and can break easily. It’s always a good idea to select a few extra pieces in case some break during dipping.
Step 2: Melt the Red Candy Coating
Place the red candy melts in a microwave-safe bowl.
Microwave in 20–30-second intervals, stirring thoroughly after each interval.
Continue heating until the candy melts are completely smooth and glossy.
If the coating seems too thick, add approximately one teaspoon of coconut oil or vegetable shortening and stir until incorporated.
The coating should be smooth enough to cover the Bugles without leaving thick clumps.
Avoid overheating the candy melts because excessive heat can make the coating thick and difficult to work with.
Step 3: Dip the Bugles in Red Candy Melts
Carefully hold each Bugle by its wider opening or use a dipping fork to coat it in the melted red candy.
Dip the entire outside of the Bugle, making sure it is evenly covered.
Lift it gently and allow any excess coating to drip back into the bowl.
Place the coated Bugle on the parchment-lined baking sheet with the pointed end facing upward.
Repeat the process with the remaining Bugles.
Try to maintain an even red coating for a beautiful Santa hat appearance.
If you notice any small uncovered spots, use a spoon or clean food-safe brush to add a little extra melted candy coating.
Allow the red coating to set slightly before adding the white decorations.
Step 4: Add the White Santa Hat Trim
Melt the white chocolate wafers in a separate microwave-safe bowl.
Heat in 20-second intervals, stirring between each interval until smooth.
Once melted, transfer the white chocolate into a small piping bag or use a spoon to apply it.
Carefully pipe or drizzle a thick white ring around the wider bottom edge of each red Bugle.
This creates the fluffy-looking white fur trim that gives the treats their classic Santa hat appearance.
While the white chocolate is still wet, you can sprinkle a few white nonpareils over the trim for extra texture.
Allow the decoration to set before moving to the next step.
Step 5: Add the Santa Hat Pom-Poms
Now it’s time to add the cutest detail!
Take one mini marshmallow for each Santa hat.
Using a small amount of melted white chocolate, attach a mini marshmallow to the pointed tip of each red-coated Bugle.
Press gently to make sure the marshmallow stays in place.
If you prefer a more rounded appearance, you can use small white candy balls instead of mini marshmallows.
Allow the white chocolate to harden completely.
Repeat with the remaining Bugles until all your miniature Santa hats have their fluffy white pom-poms.
Step 6: Let the Santa Hats Set
Once all the decorations are complete, leave the Bugle Santa Hats on the parchment-lined baking sheet.
Allow them to sit at room temperature until the candy coating and white chocolate are completely firm.
If your kitchen is warm, place the tray in the refrigerator for approximately 10–15 minutes to help the decorations set.
Once firm, carefully lift each Santa hat from the parchment paper.
Arrange them on a Christmas serving platter, in mini cupcake liners, or inside a festive holiday treat box.
Your adorable Bugle Santa Hats are ready to enjoy!
Notes
- Always choose whole Bugles without cracks or broken tips.
- Original Bugles are recommended because their flavor pairs well with sweet candy coating.
- Melt candy coating slowly to prevent overheating.
- Stir frequently to maintain a smooth consistency.
- Add coconut oil gradually if the red coating is too thick.
- Make sure the Bugles are completely covered for the best appearance.
- Allow the red coating to set slightly before decorating with white chocolate.
- Use a piping bag for neat and even white chocolate trim.
- Attach the mini marshmallows while the white chocolate is still soft.
- Avoid handling the decorations too much while they are setting.
- Keep the finished Santa hats in a cool, dry place to protect the candy coating.
- Work in small batches if your kitchen is warm because candy melts can begin to set while decorating.
- Prep Time: 15 minutes
- Melting and Decorating Time: 20 minutes
Nutrition
- Calories: 65 kcal
- Sugar: 6 g
- Sodium: 45 mg
- Fat: 3 g
- Protein: 0.5 g
Serving Suggestions
These Bugle Santa Hats are perfect for Christmas celebrations because they are small, colorful, and easy to serve.
Here are some fun ways to present them:
Christmas Dessert Platters: Arrange the Santa hats alongside Christmas cookies, brownies, chocolate truffles, and peppermint bark for a beautiful holiday dessert spread.
Holiday Party Snacks: Serve them in mini cupcake liners on a festive red and green tray. This makes them easy for guests to grab.
Christmas Movie Nights: Pair them with hot chocolate, popcorn, marshmallows, and other holiday snacks.
School Christmas Parties: These adorable treats are a fun addition to classroom celebrations and winter parties.
Christmas Dessert Tables: Place the Santa hats in small groups around your dessert table for a cute and colorful decoration.
Homemade Holiday Gifts: Package several Santa hats in clear treat bags or decorative Christmas boxes. Add a ribbon and a small holiday gift tag.
Christmas Cookie Exchanges: Include them alongside homemade cookies and candies for something different and memorable.
Tips for Perfect Bugle Santa Hats
Want your Santa hats to look beautiful and professional? Keep these helpful tips in mind.
1. Choose the Best Bugles
Select Bugles that have a clear cone shape and an intact pointed tip. This makes decorating easier and gives each treat a recognizable Santa hat appearance.
2. Avoid Overheating the Candy Melts
Heat the candy coating slowly and stir often. Overheating can make it thick and difficult to work with.
3. Use a Dipping Fork
A dipping fork helps you coat the Bugles evenly and allows excess candy coating to drip away.
4. Make the White Trim Thick
A slightly thicker white chocolate ring creates the appearance of fluffy Santa hat fur.
5. Attach the Marshmallows Carefully
Use a small amount of melted white chocolate to secure the marshmallow pom-poms. Allow them to set before moving the hats.
6. Work on Parchment Paper
Parchment paper prevents the candy coating from sticking to your work surface and makes removing the finished treats much easier.
7. Make Them Ahead
Prepare the Santa hats a day before your Christmas celebration. Store them properly in an airtight container in a cool, dry place.
8. Decorate in Small Batches
If you are making a large quantity, work with a few Bugles at a time. This helps prevent the candy coating from setting before you finish decorating.
Prep Time, Cooking Time, and Total Time
| Category | Time |
|---|---|
| Prep Time | 15 minutes |
| Cooking Time | 0 minutes |
| Melting and Decorating Time | 20 minutes |
| Setting Time | 20 minutes |
| Total Time | 55 minutes |
Estimated Yield: 35–45 Bugle Santa Hats, depending on the number of whole Bugles in the package.
Difficulty: Easy
Recipe Type: No-Bake Christmas Treat
Nutritional Information
The following nutritional information is estimated per Santa hat, assuming approximately 40 finished pieces.
| Nutrient | Amount |
|---|---|
| Calories | 65 kcal |
| Protein | 0.5 g |
| Total Fat | 3 g |
| Saturated Fat | 2 g |
| Carbohydrates | 9 g |
| Sugar | 6 g |
| Sodium | 45 mg |
Note: Nutritional values are approximate and will vary depending on the brand of Bugles, candy melts, marshmallows, and the amount of coating used.
Storage Instructions
Room Temperature: Store the finished Bugle Santa Hats in an airtight container in a cool, dry place for approximately 3–5 days. Keep them away from heat and direct sunlight.
Refrigerator: Refrigeration is generally unnecessary once the candy coating has completely set. However, if your kitchen is particularly warm, you can refrigerate them in an airtight container. Allow them to come to room temperature before opening the container to help prevent condensation.
Freezer: Freezing is not recommended because moisture and condensation can affect the crunchy texture of the Bugles and the appearance of the candy coating.
Make-Ahead Tip: Prepare these treats one day before your Christmas party. Once the decorations have completely set, store them carefully in an airtight container until serving.
Frequently Asked Questions (FAQs)
1. What are Bugle Santa Hats made of?
Bugle Santa Hats are made using crunchy Bugles corn snacks dipped in red candy melts and decorated with white chocolate trim and mini marshmallow pom-poms.
2. Do Bugle Santa Hats need to be baked?
No! This is a completely no-bake Christmas recipe. You only need to melt the candy coating, dip the Bugles, decorate them, and allow everything to set.
3. Can I use white chocolate instead of red candy melts?
Yes! You can use white chocolate and add oil-based red candy coloring to create a red coating. Make sure to use coloring specifically designed for chocolate because regular water-based food coloring can cause chocolate to seize.
4. Why is my red candy coating too thick?
Candy melts can become thick if overheated or if the coating naturally has a thicker consistency. Add a small amount of coconut oil or vegetable shortening and stir until smooth.
5. Can I use regular marshmallows instead of mini marshmallows?
Yes! Cut regular marshmallows into smaller pieces to create little white pom-poms. Mini marshmallows are more convenient because they are already the perfect size.
6. How do I keep the marshmallows attached?
Use a small amount of melted white chocolate as edible glue. Place the marshmallow on the pointed tip and hold it gently until it begins to set.
7. Can I make Bugle Santa Hats ahead of time?
Absolutely! These treats are perfect for preparing one day ahead. Once the coating has completely hardened, store them in an airtight container in a cool, dry place.
8. How long do Bugle Santa Hats stay fresh?
They are best enjoyed within 3–5 days when stored properly in an airtight container away from heat and moisture.
9. Can I use different colors?
Definitely! You can use green, white, or even blue candy melts to create different Christmas-inspired designs. Red remains the most traditional choice for Santa hats.
10. Are Bugle Santa Hats good for Christmas parties?
Yes! They are easy to make, simple to serve, and look adorable on holiday dessert tables. Their small size makes them perfect for parties and gatherings.
11. Can children help make these treats?
Yes! Children can help select Bugles, add sprinkles, and decorate the finished hats. Adults should handle the melting chocolate and any hot bowls.
12. What can I use instead of coconut oil?
You can use vegetable shortening to thin the candy coating. Add a small amount at a time until you reach the desired consistency.
13. Why are my Bugles breaking during dipping?
Bugles are delicate corn snacks, so they should be handled gently. Avoid squeezing them too tightly, and use a dipping fork or small spoon to help support them while coating.
14. Can I freeze Bugle Santa Hats?
Freezing is not recommended because condensation during thawing can soften the Bugles and affect their crunchy texture. Fresh preparation gives the best results.
15. What is the best way to package Bugle Santa Hats as gifts?
Place them carefully in small cupcake liners inside a sturdy Christmas gift box. Use tissue paper or dividers to prevent them from moving around and damaging their decorations.
Conclusion
These Bugle Santa Hats are the perfect combination of crunchy, sweet, festive, and fun! With their adorable cone shape, bright red candy coating, fluffy white chocolate trim, and tiny marshmallow pom-poms, they bring all the magic of Christmas into one simple little treat.
Whether you’re preparing snacks for a Christmas party, creating a festive dessert platter, hosting a family movie night, or looking for an easy homemade holiday gift, this no-bake recipe is sure to be a hit.
The best part is how easy they are to make. You don’t need an oven, complicated ingredients, or special baking skills. Just dip, decorate, and let them set!
Make a batch with your family, arrange them on your Christmas dessert table, and enjoy these adorable little Santa hats throughout the holiday season. They’re festive, delicious, and almost too cute to eat!
Happy Christmas baking… or should we say, no-baking! 🎅🎄❤️
