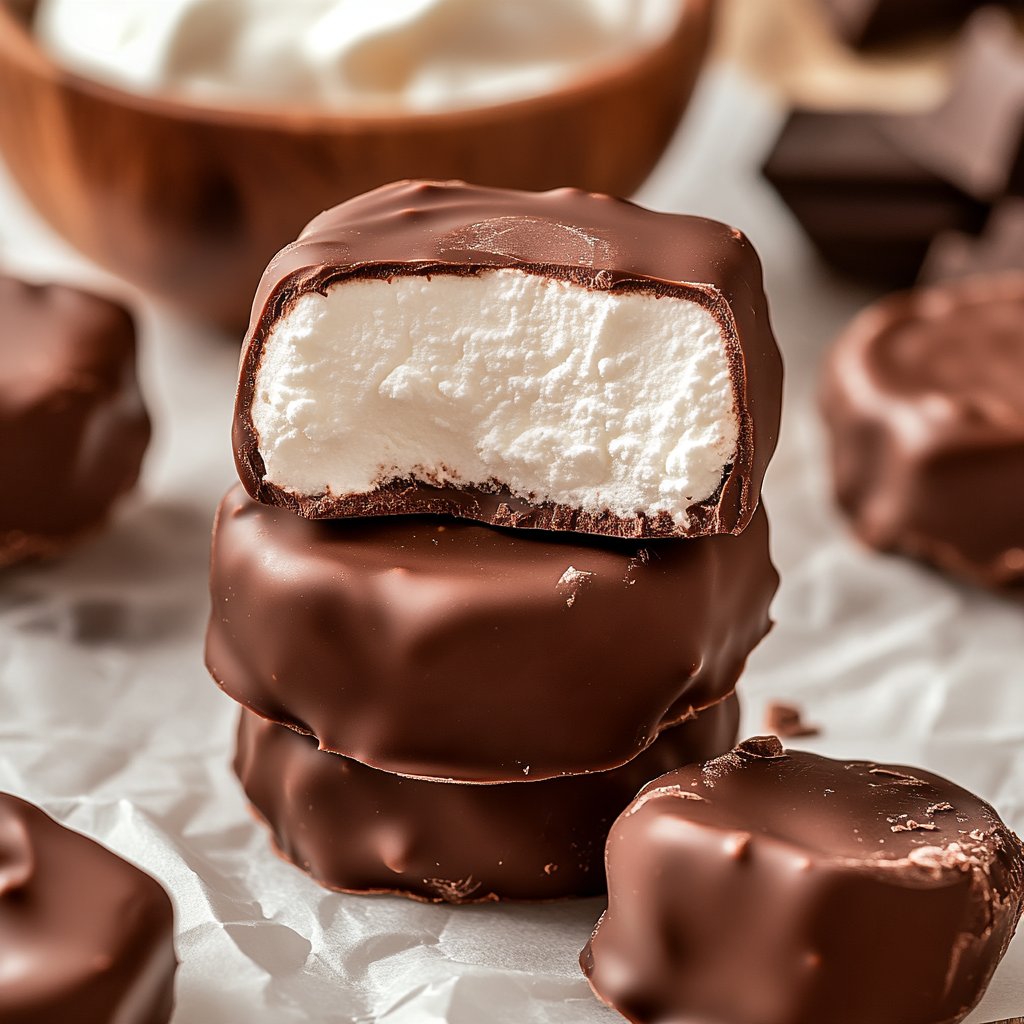
If you love easy homemade sweets, this 3-Ingredient Cool Whip Candy is a delicious treat to add to your recipe collection! Made with just three simple ingredients, these creamy chocolate candies are rich, smooth, and wonderfully easy to prepare. The combination of fluffy whipped topping and melted chocolate creates a soft, truffle-like center that makes every bite feel special without requiring complicated candy-making techniques.
This no-bake recipe is perfect for busy holidays, family gatherings, potlucks, and last-minute dessert cravings. Instead of spending hours measuring ingredients or standing over a hot stove, you can prepare the chocolate mixture in minutes, chill it until firm, and cut it into bite-sized pieces. A final chocolate coating gives each candy a beautiful finish and an extra layer of rich chocolate flavor.
The secret to this recipe is using the right proportions and allowing enough chilling time. Cool Whip adds a light, creamy texture, while melted chocolate provides sweetness and structure. Chocolate melting wafers create a smooth outer shell that makes the finished candies look like little homemade truffles.
Whether you’re preparing a Christmas candy tray, making sweet gifts for friends, or simply looking for an easy chocolate dessert, this recipe is a wonderful choice. You can even change the chocolate flavor to create different versions without adding complicated steps.
Why You’ll Love This 3-Ingredient Cool Whip Candy
- Only three ingredients: You need chocolate, Cool Whip, and chocolate coating for a simple homemade candy.
- No baking required: There is no need to turn on the oven or prepare a complicated sugar syrup.
- Creamy chocolate texture: The chilled center has a soft, truffle-like consistency.
- Perfect for holidays: These little candies look beautiful on Christmas dessert trays and party platters.
- Easy to customize: Use milk chocolate, semisweet chocolate, or dark chocolate to suit your taste.
- Great for making ahead: Prepare the candies in advance and keep them chilled until serving.
- Beginner-friendly: With a few basic kitchen tools and careful chilling, the recipe is straightforward to follow.
Ingredients for 3-Ingredient Cool Whip Candy
This recipe makes approximately 24–36 small candies, depending on how you cut them.
Ingredients
- 2 cups semisweet chocolate chips, approximately 12 ounces
- 1 container (8 ounces) Cool Whip whipped topping, thawed and cold
- 12 ounces chocolate melting wafers, for coating
Ingredient Notes
Semisweet chocolate chips: These provide the main chocolate flavor and help the filling become firm when chilled. Semisweet chocolate creates a balanced result that is not overly sweet.
Cool Whip: Use an 8-ounce container of whipped topping that has been thawed in the refrigerator. Avoid using it while frozen, and do not substitute liquid heavy cream without adjusting the recipe.
Chocolate melting wafers: These create a smooth outer shell and are convenient for dipping. You can choose milk chocolate, semisweet chocolate, or dark chocolate wafers depending on your preference.
Helpful Equipment
You will need a microwave-safe bowl, a silicone spatula, an 8-inch square pan or similar shallow container, parchment paper, a sharp knife, and a fork or candy-dipping tool.
A refrigerator is essential because the filling needs to become firm before cutting and dipping. A small cookie scoop can also help if you prefer to shape the filling into individual balls instead of squares.
Preparation: How to Make 3-Ingredient Cool Whip Candy
Step 1: Melt the Chocolate Chips
Place the semisweet chocolate chips in a microwave-safe bowl. Microwave in 20–30-second intervals, stirring thoroughly after each interval until the chocolate is mostly melted.
Continue stirring until the remaining pieces melt from the residual heat. The chocolate should be smooth and glossy, not hot enough to burn your finger if you accidentally touch the outside of the bowl.
Let the chocolate cool for a few minutes before adding the whipped topping. If the chocolate is too hot, it may melt the Cool Whip and create a thin mixture that takes much longer to set.
You can also melt the chocolate using a double boiler. Place the chocolate in a heatproof bowl over a saucepan of gently simmering water, making sure the bowl does not touch the water. Stir until smooth and remove from the heat.
Step 2: Fold in the Cool Whip
Make sure the Cool Whip is thawed and cold before beginning this step.
Add a small portion of the Cool Whip to the melted chocolate and gently stir to loosen the mixture. Then add the remaining whipped topping in two or three additions, folding with a silicone spatula until the mixture is evenly combined.
At first, the chocolate may become thicker or look slightly uneven. Continue folding gently until the mixture becomes a uniform chocolate color with no large streaks of whipped topping remaining.
Avoid vigorous mixing because you want to keep the mixture as light as possible while ensuring that the chocolate is evenly distributed.
The finished filling should be thick and creamy. If it seems soft, do not worry immediately; chilling will help it firm up.
Step 3: Chill the Chocolate Mixture
Line an 8-inch square pan or another shallow container with parchment paper, leaving a little overhang on the sides to make removal easier.
Spread the chocolate mixture evenly into the pan. Smooth the top with a spatula, then cover the pan and refrigerate for approximately 3–4 hours, or until the filling is firm enough to cut cleanly.
For a firmer filling, you can refrigerate it overnight. Avoid leaving the mixture uncovered in the refrigerator for extended periods because it may absorb odors or dry out on the surface.
The filling should feel firm when gently pressed but remain creamy when eaten. If it is still too soft to cut, give it more time to chill.
Step 4: Cut the Candy into Pieces
Lift the chilled filling from the pan using the parchment paper. Place it on a clean cutting board and use a sharp knife to cut it into small squares.
For neat pieces, wipe the knife with a warm, dry cloth between cuts. If the filling starts softening while you work, return it to the refrigerator for 10–15 minutes.
You can also roll small portions into balls if you prefer a truffle-style appearance. Work quickly and keep the remaining filling cold so it holds its shape.
Place the cut pieces on a parchment-lined baking sheet and refrigerate them for another 15–20 minutes before dipping. Cold pieces are easier to coat and less likely to fall apart in the melted chocolate.
Step 5: Dip in Chocolate and Let Set
Place the chocolate melting wafers in a clean microwave-safe bowl. Heat in short intervals, stirring between each one, until the coating is completely melted and smooth.
Using a fork or dipping tool, lower one chilled candy piece into the chocolate. Turn it gently to coat all sides, then lift it out and allow the excess chocolate to drip back into the bowl.
Transfer the coated candy to the parchment-lined tray. Repeat with the remaining pieces, reheating the coating gently if it begins to thicken.
For decoration, drizzle a little extra melted chocolate over the tops before the coating sets. This is optional and does not require an additional ingredient if you reserve a small amount of the coating chocolate.
Refrigerate the candies until the outer shell is firm, usually about 20–30 minutes. Store the finished candies in an airtight container in the refrigerator until ready to serve.
Variations to Try
Milk Chocolate Cool Whip Candy
Use milk chocolate chips for the filling and milk chocolate melting wafers for the coating. This creates a sweeter, creamier candy that is especially appealing to chocolate lovers.
Dark Chocolate Cool Whip Candy
Choose dark chocolate for a richer flavor and a less sweet finish. The contrast between the dark chocolate and the light whipped topping makes this version feel elegant enough for special occasions.
White Chocolate Cool Whip Candy
Replace the semisweet chocolate chips with white chocolate chips and use white chocolate melting wafers for the coating. White chocolate can be more sensitive to heat, so melt it gently and stir frequently.
Christmas Cool Whip Candy
Use semisweet chocolate for the filling and decorate the coated pieces with a drizzle of contrasting chocolate. You can also add festive sprinkles before the shell sets, although that would make the recipe more than three ingredients.
Cool Whip Chocolate Truffles
Instead of cutting the chilled filling into squares, scoop it into small portions and roll them into balls. Dip each ball in melted chocolate for a classic truffle appearance.
Two-Tone Chocolate Candy
Dip the candies in semisweet chocolate, allow the coating to set, and then drizzle with melted white chocolate. This creates an attractive finish for gift boxes and holiday dessert trays.
Cooking Notes for the Best Results
Let the melted chocolate cool slightly. Chocolate that is too hot can deflate or melt the whipped topping, making the filling too soft.
Fold rather than beat. Gentle folding helps combine the ingredients without unnecessarily removing the air from the whipped topping.
Chill long enough. The filling must be firm before cutting. If the pieces crumble or stick heavily to the knife, they probably need more refrigeration.
Keep the candy cold while dipping. Work in small batches and leave the remaining pieces in the refrigerator.
Use chocolate melting wafers for the coating. They are designed for dipping and often produce a smoother finish than ordinary chocolate chips.
Keep moisture away from melted chocolate. Water can cause chocolate to seize and become grainy. Make sure all bowls and utensils are completely dry.
Avoid overheating. Heat chocolate in short intervals and stir frequently. Gentle heating produces a smoother coating and helps prevent scorching.
Remember that the center stays soft. This candy has a creamy, truffle-like texture rather than the firm bite of traditional hard candy.
Serving Suggestions
3-Ingredient Cool Whip Candy is delicious straight from the refrigerator and can be served in several ways.
- Christmas candy trays: Arrange the pieces alongside fudge, peanut butter balls, chocolate-covered pretzels, and cookies.
- Homemade gifts: Place the candies in food-safe mini liners inside a decorative gift box.
- Party desserts: Serve the pieces on a small platter for birthdays, potlucks, or family celebrations.
- Coffee breaks: Enjoy one or two pieces with coffee, tea, or hot chocolate.
- Dessert tables: Combine the candies with brownies, truffles, and other bite-sized treats for variety.
- After-dinner sweets: Serve small portions after a holiday meal when guests want a little chocolate without a full dessert.
For the best presentation, allow the chocolate shell to set completely before arranging the candies on a platter. Keep them chilled until shortly before serving.
Tips for Perfect Cool Whip Candy
Start with properly thawed Cool Whip. Thaw it in the refrigerator rather than leaving it at room temperature for an extended period.
Use good-quality chocolate. Since chocolate is the main flavor, choose a brand you enjoy eating on its own.
Line the pan carefully. Parchment paper makes it much easier to remove the chilled filling without breaking it.
Cut consistent portions. Small, even squares look more professional and are easier to dip.
Keep your knife clean. Wiping it between cuts helps create smooth edges.
Do not rush the chilling stage. The mixture needs enough time to firm up before you attempt to cut or dip it.
Store the candies properly. Because the center contains whipped topping, refrigeration is important for maintaining texture and freshness.
Prepare ahead for busy occasions. Make the filling the day before a party, then cut, dip, and set the candies when convenient.
Prep Time, Cooking Time, and Total Time
- Prep Time: 20 minutes
- Cooking Time: 5 minutes
- Chilling Time: 3–4 hours
- Chocolate Setting Time: 20–30 minutes
- Total Time: Approximately 4 hours
- Yield: 24–36 candies
These times are estimates. The actual chilling time depends on the thickness of the filling and your refrigerator temperature.
Nutritional Information
Estimated values per candy, assuming a yield of approximately 30 pieces:
- Calories: 150
- Protein: 2 grams
- Sodium: 20 milligrams
Actual nutrition depends on the type of chocolate, the amount used for coating, and the size of each piece. These figures are estimates rather than laboratory-verified values.
Frequently Asked Questions
What are the three ingredients in Cool Whip Candy?
This version uses semisweet chocolate chips, Cool Whip whipped topping, and chocolate melting wafers for the outer coating. Together, they create a creamy chocolate center with a firm chocolate shell.
Does Cool Whip Candy need to be refrigerated?
Yes. The filling contains whipped topping and is designed to remain chilled. Store the finished candies in an airtight container in the refrigerator and avoid leaving them at room temperature for extended periods.
Why is my Cool Whip candy mixture too soft?
The chocolate may have been too hot when the whipped topping was added, or the mixture may not have chilled long enough. Refrigerate it for additional time before cutting. The exact firmness also depends on the chocolate used.
Can I use homemade whipped cream instead of Cool Whip?
Not as a direct one-for-one substitution without adjusting the recipe. Homemade whipped cream has a different water and fat balance and may produce a softer filling. For the most predictable results with this three-ingredient version, use the specified whipped topping.
Can I make Cool Whip Candy ahead of time?
Yes. You can prepare the filling and refrigerate it until firm, then cut and dip it later. Finished candies can also be prepared a day or two before an event and stored in the refrigerator.
Can I freeze 3-Ingredient Cool Whip Candy?
Freezing may be possible, but thawing can affect the texture and create condensation on the chocolate shell. If you choose to freeze the candies, place them in a sealed freezer-safe container and thaw them in the refrigerator while covered.
What chocolate is best for this recipe?
Semisweet chocolate is a good choice for the filling because it balances sweetness and richness. Chocolate melting wafers are convenient for the outer coating because they melt smoothly and are designed for dipping.
Can I make this candy without dipping it in chocolate?
Yes. You can serve the chilled chocolate filling as small squares or roll it into balls without an outer coating. However, the recipe would then use only two ingredients, and the finished texture would be softer.
How long does Cool Whip Candy last?
For best quality, keep the candy refrigerated in an airtight container and enjoy it within approximately 3–5 days. Follow the storage guidance on your whipped topping and chocolate packaging, and discard any candy that has been stored improperly or shows signs of spoilage.
Why did my chocolate coating become thick or grainy?
Chocolate can become thick if it is overheated or comes into contact with water. Use completely dry utensils, heat it in short intervals, and stir frequently. If the chocolate becomes grainy from moisture, it may not be suitable for a smooth dipping coating.
Conclusion
3-Ingredient Cool Whip Candy is an easy no-bake chocolate treat that proves homemade candy does not have to be complicated. With chocolate chips, fluffy whipped topping, and a smooth chocolate coating, you can create bite-sized sweets with a creamy center and an irresistible chocolate shell.
The most important steps are allowing the melted chocolate to cool slightly before folding in the Cool Whip, chilling the filling until firm, and keeping the candy cold while dipping. Once you have mastered this simple method, you can experiment with milk chocolate, dark chocolate, white chocolate, or a truffle-style shape.
Make a batch for Christmas, share it at your next family gathering, or keep a container in the refrigerator for a convenient chocolate treat. This simple recipe is a delicious addition to any collection of easy homemade candy favorites.
Print
3-Ingredient Cool Whip Candy
Ingredients
- 2 cups semisweet chocolate chips, approximately 12 ounces
- 1 container (8 ounces) Cool Whip whipped topping, thawed and cold
- 12 ounces chocolate melting wafers, for coating
Instructions
Place the semisweet chocolate chips in a microwave-safe bowl. Microwave in 20–30-second intervals, stirring thoroughly after each interval until the chocolate is mostly melted.
Continue stirring until the remaining pieces melt from the residual heat. The chocolate should be smooth and glossy, not hot enough to burn your finger if you accidentally touch the outside of the bowl.
Let the chocolate cool for a few minutes before adding the whipped topping. If the chocolate is too hot, it may melt the Cool Whip and create a thin mixture that takes much longer to set.
You can also melt the chocolate using a double boiler. Place the chocolate in a heatproof bowl over a saucepan of gently simmering water, making sure the bowl does not touch the water. Stir until smooth and remove from the heat.
Step 2: Fold in the Cool Whip
Make sure the Cool Whip is thawed and cold before beginning this step.
Add a small portion of the Cool Whip to the melted chocolate and gently stir to loosen the mixture. Then add the remaining whipped topping in two or three additions, folding with a silicone spatula until the mixture is evenly combined.
At first, the chocolate may become thicker or look slightly uneven. Continue folding gently until the mixture becomes a uniform chocolate color with no large streaks of whipped topping remaining.
Avoid vigorous mixing because you want to keep the mixture as light as possible while ensuring that the chocolate is evenly distributed.
The finished filling should be thick and creamy. If it seems soft, do not worry immediately; chilling will help it firm up.
Step 3: Chill the Chocolate Mixture
Line an 8-inch square pan or another shallow container with parchment paper, leaving a little overhang on the sides to make removal easier.
Spread the chocolate mixture evenly into the pan. Smooth the top with a spatula, then cover the pan and refrigerate for approximately 3–4 hours, or until the filling is firm enough to cut cleanly.
For a firmer filling, you can refrigerate it overnight. Avoid leaving the mixture uncovered in the refrigerator for extended periods because it may absorb odors or dry out on the surface.
The filling should feel firm when gently pressed but remain creamy when eaten. If it is still too soft to cut, give it more time to chill.
Step 4: Cut the Candy into Pieces
Lift the chilled filling from the pan using the parchment paper. Place it on a clean cutting board and use a sharp knife to cut it into small squares.
For neat pieces, wipe the knife with a warm, dry cloth between cuts. If the filling starts softening while you work, return it to the refrigerator for 10–15 minutes.
You can also roll small portions into balls if you prefer a truffle-style appearance. Work quickly and keep the remaining filling cold so it holds its shape.
Place the cut pieces on a parchment-lined baking sheet and refrigerate them for another 15–20 minutes before dipping. Cold pieces are easier to coat and less likely to fall apart in the melted chocolate.
Step 5: Dip in Chocolate and Let Set
Place the chocolate melting wafers in a clean microwave-safe bowl. Heat in short intervals, stirring between each one, until the coating is completely melted and smooth.
Using a fork or dipping tool, lower one chilled candy piece into the chocolate. Turn it gently to coat all sides, then lift it out and allow the excess chocolate to drip back into the bowl.
Transfer the coated candy to the parchment-lined tray. Repeat with the remaining pieces, reheating the coating gently if it begins to thicken.
For decoration, drizzle a little extra melted chocolate over the tops before the coating sets. This is optional and does not require an additional ingredient if you reserve a small amount of the coating chocolate.
Refrigerate the candies until the outer shell is firm, usually about 20–30 minutes. Store the finished candies in an airtight container in the refrigerator until ready to serve.
Notes
Let the melted chocolate cool slightly. Chocolate that is too hot can deflate or melt the whipped topping, making the filling too soft.
Fold rather than beat. Gentle folding helps combine the ingredients without unnecessarily removing the air from the whipped topping.
Chill long enough. The filling must be firm before cutting. If the pieces crumble or stick heavily to the knife, they probably need more refrigeration.
Keep the candy cold while dipping. Work in small batches and leave the remaining pieces in the refrigerator.
Use chocolate melting wafers for the coating. They are designed for dipping and often produce a smoother finish than ordinary chocolate chips.
Keep moisture away from melted chocolate. Water can cause chocolate to seize and become grainy. Make sure all bowls and utensils are completely dry.
Avoid overheating. Heat chocolate in short intervals and stir frequently. Gentle heating produces a smoother coating and helps prevent scorching.
Remember that the center stays soft. This candy has a creamy, truffle-like texture rather than the firm bite of traditional hard candy.
