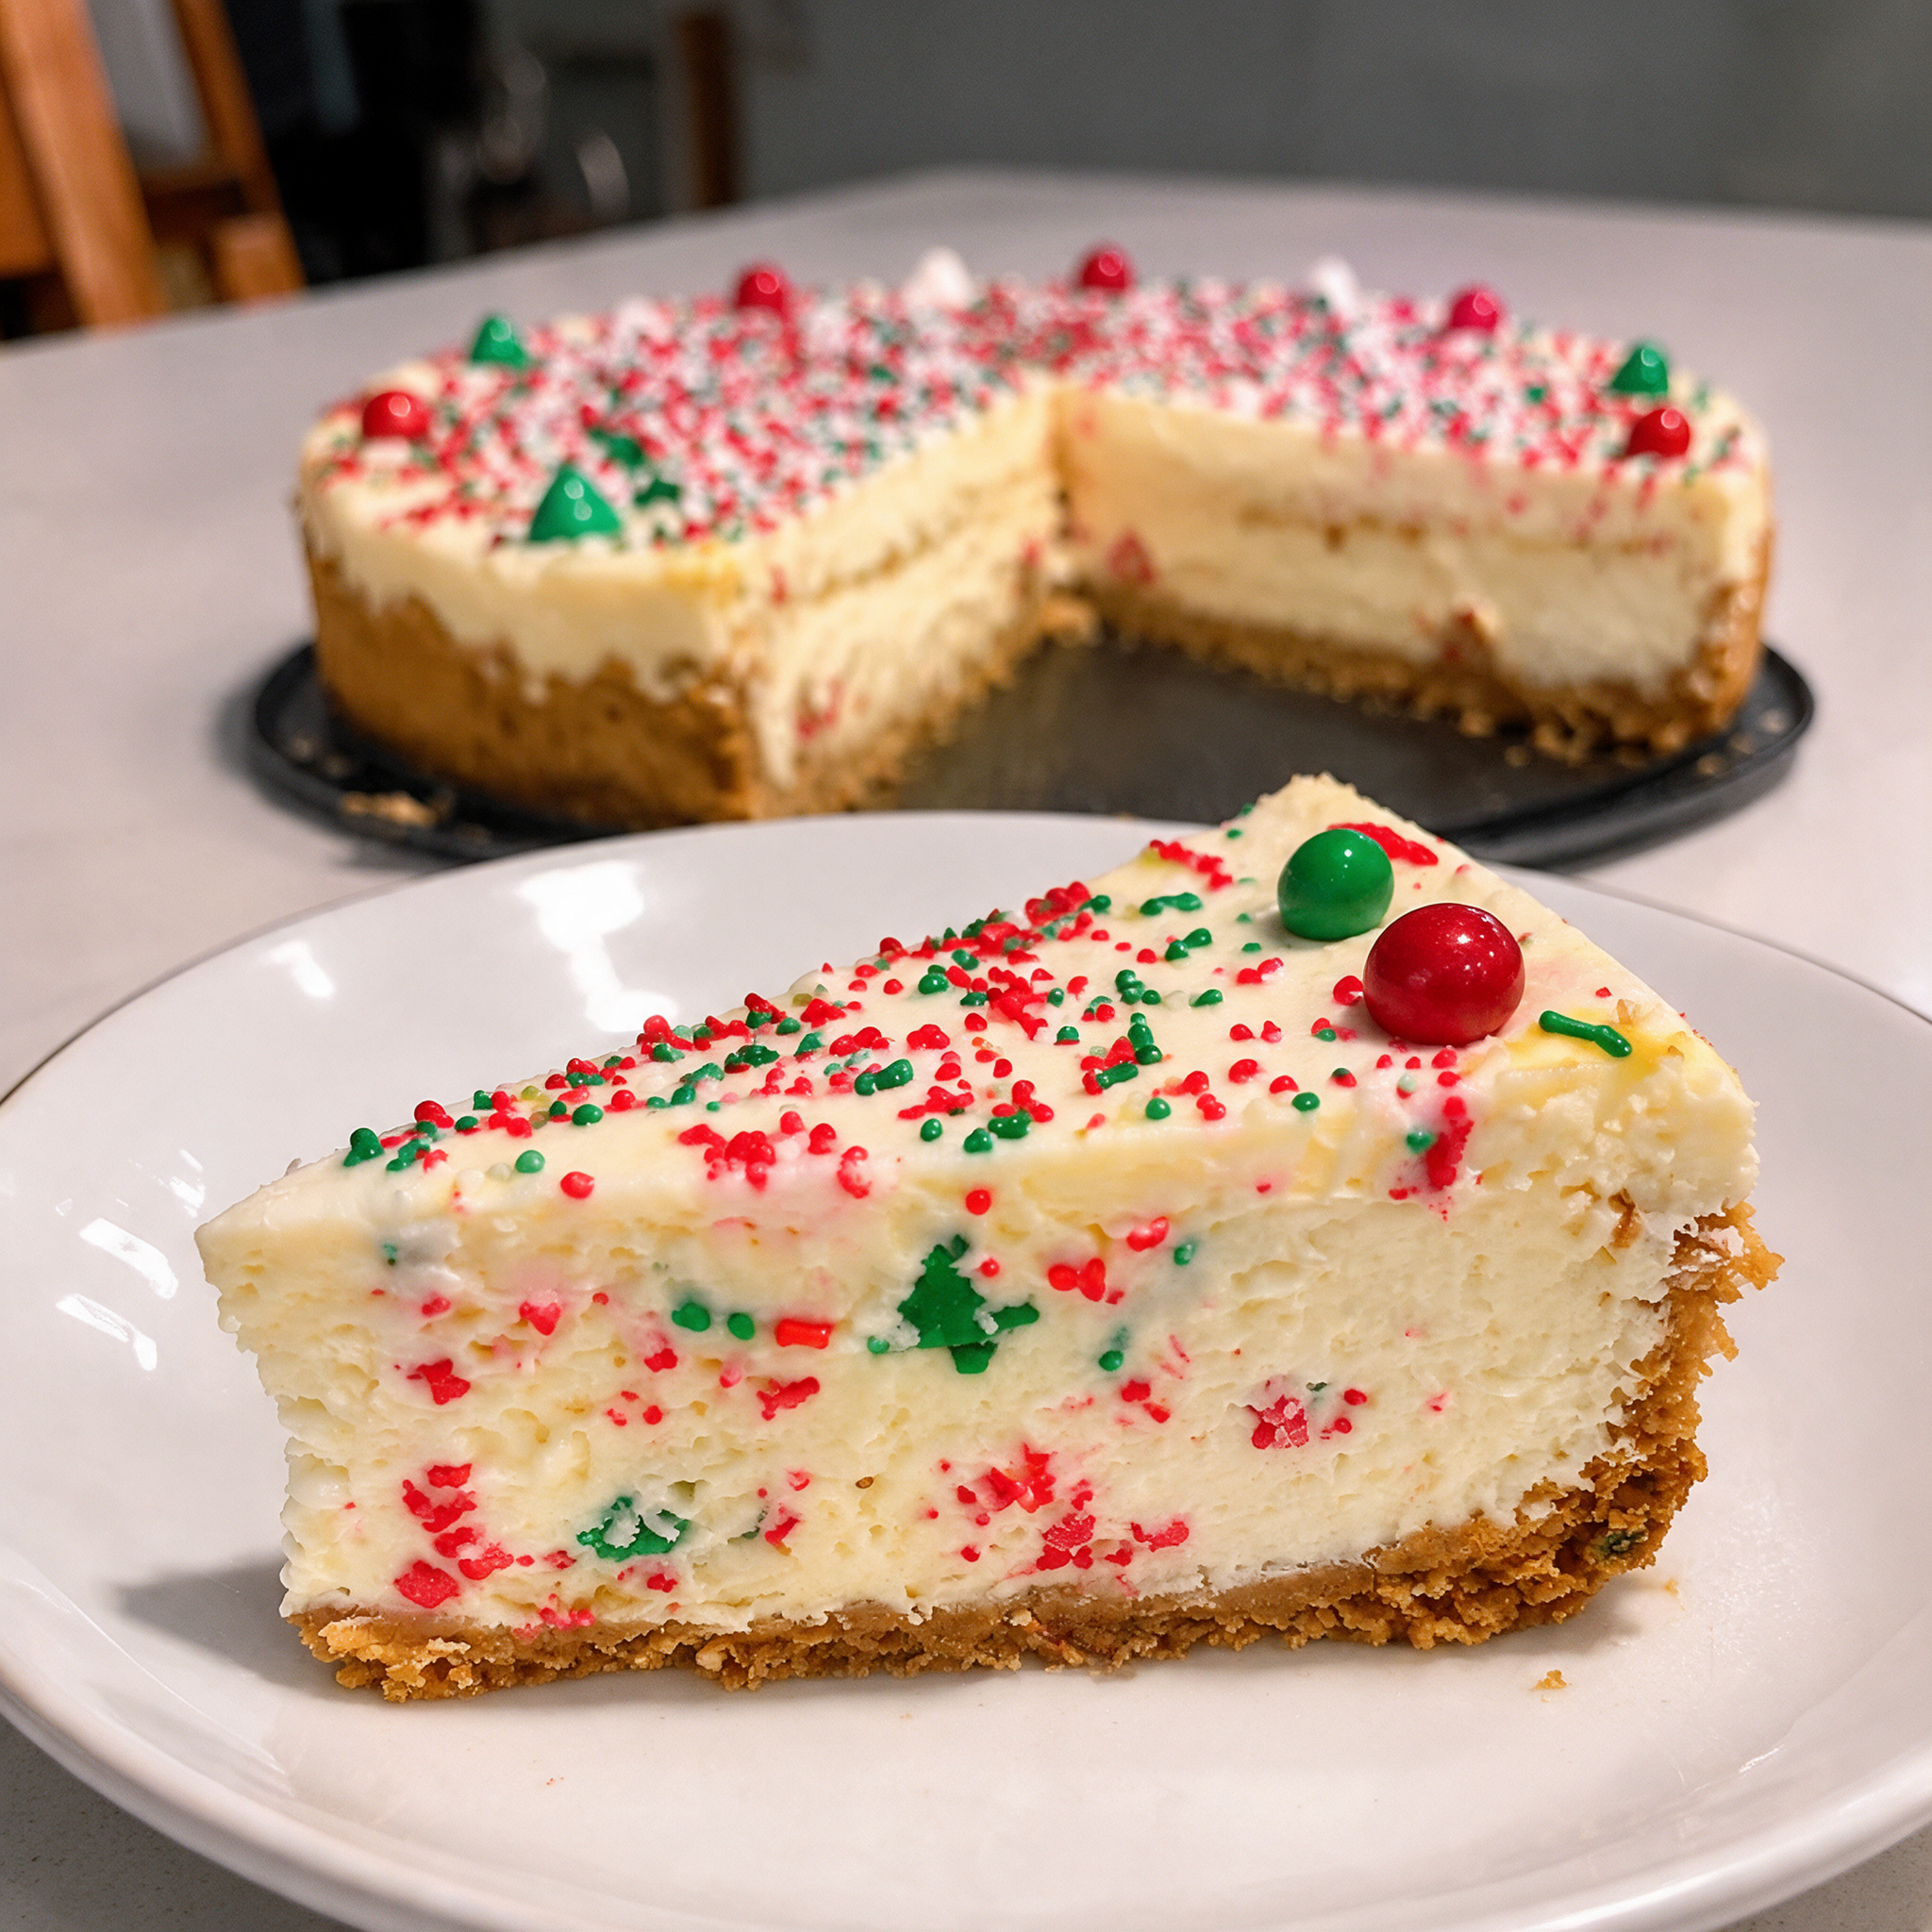
If you love Little Debbie Christmas Tree Cakes and creamy homemade cheesecake, this Little Debbie Christmas Tree Cheesecake is the perfect holiday dessert to add to your Christmas baking list! Combining the nostalgic taste of the famous seasonal snack cakes with a rich, smooth cheesecake filling and a delicious buttery crust, this festive dessert is guaranteed to bring smiles to your holiday table.
Every December, Little Debbie Christmas Tree Cakes become one of the most recognizable seasonal treats. Their soft golden cake layers, sweet creamy filling, white icing, and festive red and green decorations make them a holiday favorite for children and adults alike. This Christmas Tree Cake Cheesecake transforms those familiar flavors into an extra-special dessert that looks beautiful and tastes absolutely irresistible.
The best part about this recipe is that it combines two beloved desserts into one. Traditional cheesecake is known for its rich cream cheese filling and buttery crust, while Little Debbie Christmas Tree Cakes bring a soft, sweet, nostalgic flavor. When combined, they create a deliciously creamy dessert with little pieces of festive snack cake throughout every slice.
This Little Debbie Christmas Tree Cheesecake is ideal for Christmas parties, holiday dinners, family gatherings, cookie exchanges, potlucks, and winter celebrations. It also makes a wonderful centerpiece for your holiday dessert table. The festive appearance, creamy texture, and familiar Christmas flavors make it a dessert everyone will want to try.
Another reason to love this Christmas cheesecake recipe is its versatility. You can prepare it as a no-bake cheesecake for convenience or use a traditional baked cheesecake method if you prefer a firmer, classic texture. You can also decorate the top with whipped cream, white chocolate, red and green sprinkles, and additional Little Debbie Christmas Tree Cakes.
Whether you grew up enjoying these seasonal snack cakes or simply love trying creative Christmas desserts, this recipe is a fun and delicious way to celebrate the holidays. It is rich, creamy, sweet, and filled with the nostalgic flavor of one of America’s favorite Christmas treats.
Prepare this Little Debbie Christmas Tree Cheesecake ahead of your holiday celebration, let it chill until perfectly set, and serve beautiful slices that everyone will remember.
Ingredients
The following ingredients create a creamy no-bake cheesecake with a buttery graham cracker crust and plenty of Little Debbie Christmas Tree Cake flavor.
For the graham cracker crust
- 2 cups graham cracker crumbs: Create a buttery, slightly crunchy foundation for the cheesecake.
- 1/2 cup unsalted butter, melted: Holds the crumbs together and adds richness.
- 2 tablespoons granulated sugar: Adds a little sweetness and helps balance the crust.
- 1 pinch of salt: Enhances the buttery flavor.
For the cheesecake filling
- 24 ounces cream cheese, softened: The main ingredient that creates a rich, creamy cheesecake texture.
- 1 cup powdered sugar: Sweetens the filling while keeping it smooth.
- 1 teaspoon vanilla extract: Adds classic cheesecake flavor.
- 1 1/2 cups heavy whipping cream, cold: Creates a light, fluffy texture when whipped.
- 6 Little Debbie Christmas Tree Cakes, chopped: Provide the signature festive cake flavor and sweet creamy filling.
- 1/2 cup sour cream: Adds a subtle tang and makes the cheesecake filling taste richer.
- 1 tablespoon lemon juice, optional: Balances the sweetness and enhances the cream cheese flavor.
For the topping and decoration
- 1 cup white chocolate chips: Creates a smooth, sweet topping.
- 2–3 tablespoons heavy cream: Helps melt the white chocolate into a drizzleable consistency.
- 2 Little Debbie Christmas Tree Cakes: For festive decoration.
- 1 cup whipped cream: Creates decorative swirls around the cheesecake.
- Red and green sprinkles: Add a colorful Christmas finish.
- Mini red candy pieces: Optional decorations inspired by the original snack cakes.
You can adjust the decorations according to your preference. For a simple presentation, white chocolate drizzle and a few red and green sprinkles are enough to make the cheesecake look festive.
Preparation: How to Make Little Debbie Christmas Tree Cheesecake
Step 1: Prepare the graham cracker crust
Begin by preparing a 9-inch springform pan. Lightly grease the sides and line the bottom with parchment paper if desired. This will make removing the cheesecake much easier once it has chilled.
Place the graham crackers in a food processor and pulse until they become fine crumbs. If you do not have a food processor, place the crackers in a sealed plastic bag and crush them with a rolling pin.
Transfer the crumbs to a medium mixing bowl. Add the melted butter, granulated sugar, and a pinch of salt.
Stir until the mixture resembles wet sand. Every crumb should be lightly coated with butter so that the crust holds together when pressed.
Pour the mixture into the prepared springform pan. Use the bottom of a measuring cup or a flat glass to press the crumbs firmly across the bottom.
Make sure the crust is evenly distributed, especially around the edges. A firm crust will make slicing and serving much easier.
Place the pan in the refrigerator for approximately 20–30 minutes while you prepare the cheesecake filling.
For an extra-firm crust, you can bake it at 350°F (175°C) for approximately 8–10 minutes. Allow it to cool completely before adding the filling.
Step 2: Prepare the Little Debbie Christmas Tree Cakes
Unwrap the Little Debbie Christmas Tree Cakes and place them on a cutting board.
Chop six cakes into small bite-sized pieces. You want the pieces to be large enough to provide recognizable cake texture but small enough to distribute evenly throughout the cheesecake.
Reserve two additional cakes for decorating the top.
Avoid chopping the cakes into extremely fine crumbs. Small chunks create delicious layers of soft cake and creamy filling throughout the cheesecake.
If the cakes are very soft or sticky, place them in the refrigerator for a few minutes before cutting. This can make them easier to handle.
Set the chopped cakes aside while preparing the cream cheese mixture.
Step 3: Beat the cream cheese until smooth
Place the softened cream cheese in a large mixing bowl.
Using an electric mixer, beat the cream cheese on medium speed for approximately 2–3 minutes until smooth and creamy.
Scrape down the sides and bottom of the bowl to remove any lumps.
Add the powdered sugar gradually, mixing until completely incorporated.
Pour in the vanilla extract and add the sour cream and optional lemon juice.
Continue mixing until the filling is smooth, fluffy, and creamy.
Make sure the cream cheese is at room temperature before mixing. Cold cream cheese can create lumps that are difficult to remove, even with an electric mixer.
Do not overbeat the mixture. Once everything is combined, stop mixing.
Step 4: Whip the heavy cream
In a separate chilled mixing bowl, pour the cold heavy whipping cream.
Using a clean electric mixer with a whisk attachment, beat the cream on medium-high speed until stiff peaks form.
This usually takes approximately 3–5 minutes, depending on the temperature of the cream and the strength of your mixer.
Stiff peaks mean that when you lift the beaters, the whipped cream holds its shape without immediately falling over.
Be careful not to overwhip the cream, as it can become grainy and begin turning into butter.
Properly whipped cream is important because it gives the no-bake Christmas cheesecake a light, airy texture while helping it hold its shape.
Step 5: Combine the cheesecake filling
Add approximately one-third of the whipped cream to the cream cheese mixture.
Gently fold it in with a spatula to loosen the mixture.
Add the remaining whipped cream in two additions, folding gently after each addition.
Use a slow folding motion, moving the spatula from the bottom of the bowl toward the top.
Avoid stirring aggressively because this can deflate the whipped cream and make the cheesecake filling dense.
Once the mixture is smooth, light, and fluffy, add the chopped Little Debbie Christmas Tree Cakes.
Gently fold the cake pieces into the filling until they are evenly distributed.
Try to keep some visible pieces throughout the mixture so that every slice has plenty of festive cake flavor.
Step 6: Assemble the cheesecake
Remove the chilled graham cracker crust from the refrigerator.
Spoon the cheesecake filling over the crust and spread it evenly with a spatula.
Work carefully around the edges to make sure there are no large air pockets.
Smooth the top of the cheesecake using an offset spatula or the back of a spoon.
Tap the pan gently against the countertop a couple of times to help release any trapped air bubbles.
If you want an extra-decorative cheesecake, reserve a few small pieces of Christmas Tree Cake and gently press them into the top of the filling.
Cover the pan carefully with plastic wrap without allowing it to touch the surface.
Step 7: Chill until completely set
Place the cheesecake in the refrigerator for at least 6–8 hours.
For the best texture, allow it to chill overnight.
During this time, the cream cheese filling will firm up, the whipped cream will help stabilize the structure, and the graham cracker crust will become easier to slice.
Do not rush this step. A cheesecake that has not chilled long enough may be too soft and difficult to remove from the pan.
If you want particularly neat slices, you can place the cheesecake in the freezer for approximately 20–30 minutes before serving, but do not freeze it completely.
Step 8: Prepare the white chocolate topping
Place the white chocolate chips in a microwave-safe bowl.
Add the heavy cream and microwave in 15–20-second intervals, stirring between each interval.
Continue until the chocolate is melted and smooth.
Do not overheat white chocolate because it can become thick or grainy.
If the mixture seems too thick, add a small amount of warm heavy cream until it reaches a smooth drizzling consistency.
Allow the white chocolate mixture to cool slightly before decorating the cheesecake.
Step 9: Decorate the Christmas Tree Cheesecake
Carefully remove the sides of the springform pan.
Transfer the cheesecake to a serving plate or cake stand.
Drizzle the melted white chocolate over the top, allowing some of it to fall naturally down the sides.
Arrange the reserved Little Debbie Christmas Tree Cakes on top of the cheesecake.
Add decorative whipped cream swirls around the edges using a piping bag fitted with your favorite decorating tip.
Finish with red and green sprinkles for a festive holiday appearance.
For an extra-special Christmas presentation, add small red candy decorations and a few additional white chocolate drizzles.
Keep the decoration balanced so the cheesecake remains the star of the dessert table.
Step 10: Slice and serve
For clean slices, dip a sharp knife into warm water and wipe it dry before cutting.
Repeat this process between slices.
The cheesecake should be creamy but firm enough to hold its shape.
Serve chilled and enjoy the combination of buttery graham cracker crust, creamy cheesecake filling, soft cake pieces, and sweet white chocolate.
This Little Debbie Christmas Tree Cheesecake is especially delicious when served with coffee, hot chocolate, or a cold glass of milk.
Variations
One of the best things about this Christmas Tree Cake Cheesecake recipe is how easy it is to customize. You can change the crust, filling, topping, and decorations to create different versions for your holiday celebrations.
1. Baked Little Debbie Christmas Tree Cheesecake
If you prefer traditional cheesecake, prepare a baked cheesecake filling using cream cheese, sugar, eggs, sour cream, vanilla, and chopped Christmas Tree Cakes.
Pour the filling over the graham cracker crust and bake in a water bath at approximately 325°F (163°C) until the edges are set and the center still has a slight wobble.
Cool gradually, then refrigerate for several hours or overnight.
Add the decorative cakes and whipped cream after the cheesecake has completely chilled.
2. Christmas Tree Cheesecake with Oreo Crust
Replace the graham cracker crust with crushed chocolate sandwich cookies.
Combine approximately 2 cups of cookie crumbs with 5–6 tablespoons of melted butter.
Press the mixture into the bottom of the springform pan and chill before adding the filling.
The chocolate cookie crust creates a delicious contrast with the sweet vanilla cake and creamy filling.
3. White Chocolate Christmas Cheesecake
For a richer dessert, add 4 ounces of melted and cooled white chocolate to the cream cheese mixture before folding in the whipped cream.
This creates an even creamier flavor that pairs beautifully with the Little Debbie Christmas Tree Cakes.
4. Strawberry Christmas Tree Cheesecake
Add a thin layer of strawberry sauce or strawberry preserves between the crust and cheesecake filling.
You can also swirl a few tablespoons of strawberry sauce through the filling before chilling.
The fruity flavor complements the vanilla cake and creates a beautiful holiday dessert.
5. Mini Christmas Tree Cheesecakes
Instead of making one large cheesecake, prepare individual portions using a muffin tin lined with paper cupcake liners.
Add a small amount of graham cracker mixture to each liner and press it down firmly.
Divide the cheesecake filling between the cups and refrigerate until set.
Decorate each mini cheesecake with white chocolate, whipped cream, and small pieces of Christmas Tree Cake.
6. Chocolate Christmas Tree Cheesecake
Add 1/4 cup cocoa powder or melted semisweet chocolate to the cream cheese mixture.
Use an Oreo crust for an extra-rich chocolate dessert.
The combination of chocolate cheesecake and Little Debbie Christmas Tree Cakes creates a delicious holiday treat.
7. Peppermint Christmas Cheesecake
Add a small amount of peppermint extract to the cheesecake filling and finish with crushed peppermint candies.
Use peppermint sparingly because its flavor can quickly become overpowering.
This version is perfect for anyone who enjoys classic Christmas peppermint desserts.
8. Christmas Cheesecake Bars
Prepare the recipe in a rectangular baking dish instead of a springform pan.
Spread the crust evenly across the bottom, add the cheesecake filling, and chill until firm.
Cut into squares and decorate each bar individually with white chocolate and festive sprinkles.
These cheesecake bars are convenient for holiday parties and dessert buffets.
9. Red Velvet Christmas Tree Cheesecake
Add a thin layer of red velvet cake crumbs over the graham cracker crust or incorporate a small amount of red velvet cake into the filling.
The beautiful red color creates an especially festive dessert.
10. No-Bake Christmas Tree Cheesecake Cups
Layer crushed graham crackers, cheesecake filling, and chopped Christmas Tree Cakes in individual dessert cups.
Repeat the layers and finish with whipped cream, white chocolate drizzle, and festive sprinkles.
This variation requires no slicing and is perfect for parties.
Cooking Note
For the best Little Debbie Christmas Tree Cheesecake, pay attention to the temperature of your ingredients and the chilling process.
Use softened cream cheese. Room-temperature cream cheese blends more smoothly and prevents lumps in the cheesecake filling.
Keep the heavy cream cold. Cold cream whips more easily and creates better volume.
Fold gently. When combining whipped cream with the cream cheese mixture, use a spatula and gentle movements to preserve the airy texture.
Do not overmix. Excessive mixing can deflate the whipped cream and make the filling less stable.
Chop the Christmas Tree Cakes carefully. Small chunks distribute evenly and create delicious pieces throughout the cheesecake.
Allow enough chilling time. A no-bake cheesecake needs sufficient refrigeration to become firm. Overnight chilling is ideal.
Use a springform pan. This makes removing the cheesecake easier and helps preserve its beautiful shape.
Decorate just before serving when possible. Whipped cream decorations and some toppings look freshest when added shortly before presentation.
Keep refrigerated. Since this dessert contains cream cheese and whipped cream, it should be stored in the refrigerator and not left at room temperature for extended periods.
Serving Suggestions
This Little Debbie Christmas Tree Cheesecake is a beautiful dessert on its own, but you can make your holiday dessert table even more special with a few delicious serving ideas.
1. Serve with Hot Chocolate
A warm cup of hot chocolate pairs perfectly with the creamy vanilla flavor of the cheesecake.
Add whipped cream or marshmallows to the hot chocolate for an extra-festive combination.
2. Pair with Fresh Strawberries
Fresh strawberries add a refreshing fruity flavor that balances the sweetness of the cheesecake.
Arrange sliced strawberries beside each serving for a simple and elegant presentation.
3. Serve with Coffee
A cup of freshly brewed coffee or a latte is an excellent accompaniment.
The slightly bitter flavor of coffee complements the sweet white chocolate and creamy cheesecake filling.
4. Add Extra Whipped Cream
A small swirl of homemade whipped cream on each slice creates an attractive bakery-style presentation.
You can also sprinkle red and green sugar crystals over the whipped cream.
5. Make It the Centerpiece of Your Christmas Dessert Table
Place the cheesecake on a cake stand and decorate the surrounding area with Christmas decorations, candy canes, and festive plates.
Its white topping, red and green decorations, and recognizable Christmas Tree Cakes make it a beautiful holiday centerpiece.
6. Serve with Caramel Sauce
A light drizzle of caramel sauce adds another layer of sweetness and creates a delicious contrast with the vanilla cheesecake.
Use a small amount so it does not overpower the flavor of the Christmas Tree Cakes.
7. Add a Glass of Cold Milk
Cold milk is a classic pairing for Little Debbie Christmas Tree Cakes.
It also complements the rich cream cheese filling and buttery crust.
Tips for the Best Little Debbie Christmas Tree Cheesecake
- Always use full-fat cream cheese for the richest cheesecake texture.
- Allow cream cheese to soften before mixing.
- Keep heavy whipping cream refrigerated until ready to whip.
- Use a chilled mixing bowl for better whipped cream results.
- Do not overbeat the heavy cream.
- Fold the whipped cream gently into the cream cheese mixture.
- Chop the Little Debbie Christmas Tree Cakes into small, even pieces.
- Reserve extra cakes for decorating the top.
- Press the graham cracker crust firmly into the pan.
- Refrigerate the crust before adding the filling.
- Allow the cheesecake to chill overnight whenever possible.
- Use a springform pan for easy removal.
- Avoid adding warm white chocolate directly to the cheesecake filling.
- Use a warm, clean knife to create neat slices.
- Add sprinkles and decorations shortly before serving for the freshest appearance.
- Keep the cheesecake refrigerated until serving.
- Store leftovers in an airtight container.
- Do not skip the chilling step because it is essential for a stable no-bake cheesecake.
- If the filling seems too soft, check that the heavy cream was whipped to stiff peaks.
- Use a thick white chocolate drizzle rather than a very thin sauce for a beautiful finish.
Prep Time
- Preparing the crust: 10 minutes
- Preparing the filling: 20 minutes
- Chopping and folding in the cakes: 5 minutes
- Decorating: 10 minutes
Total Active Prep Time: Approximately 45 minutes.
Cooking Time
Cooking Time: 0 minutes for the no-bake version.
The graham cracker crust can optionally be baked for 8–10 minutes if you prefer a firmer base. Allow it to cool completely before adding the cheesecake filling.
Total Time
- Active Preparation: 45 minutes
- Refrigeration: 6–8 hours or overnight
- Decoration: 10 minutes
Total Time: Approximately 7–9 hours, including chilling.
Nutritional Information
The following nutritional information is an approximate estimate for one serving when the cheesecake is divided into 12 slices.
- Calories: Approximately 550–650
- Protein: Approximately 6–8 g
- Sodium: Approximately 300–450 mg
Nutritional Breakdown
Calories: Most calories come from cream cheese, heavy whipping cream, butter, powdered sugar, white chocolate, and Little Debbie Christmas Tree Cakes.
Protein: Cream cheese, whipping cream, and cake ingredients provide small amounts of protein.
Sodium: Sodium comes mainly from the cream cheese, graham crackers, butter, and packaged snack cakes.
Actual nutritional values depend on the specific brands and quantities used. These figures are estimates rather than laboratory-tested nutrition information.
Frequently Asked Questions About Little Debbie Christmas Tree Cheesecake
1. What is Little Debbie Christmas Tree Cheesecake?
Little Debbie Christmas Tree Cheesecake is a festive dessert inspired by the popular Little Debbie Christmas Tree Cakes. It combines a creamy cheesecake filling, chopped seasonal snack cakes, and a buttery graham cracker crust, often finished with white chocolate and Christmas decorations.
2. Can I make Little Debbie Christmas Tree Cheesecake without baking?
Yes! This recipe is designed as a no-bake cheesecake. The cream cheese filling is combined with whipped heavy cream, spread over a prepared crust, and refrigerated until firm.
It is a convenient option when you want a special Christmas dessert without turning on the oven.
3. How long does Christmas Tree Cheesecake need to chill?
For the best results, refrigerate the cheesecake for at least 6–8 hours. Overnight chilling is even better because it allows the filling to become firm and easier to slice.
4. Can I use a different crust?
Absolutely. Graham cracker crust is a classic choice, but you can use crushed vanilla wafers, golden sandwich cookies, or chocolate sandwich cookies.
Each option creates a slightly different flavor and texture.
5. Where can I find Little Debbie Christmas Tree Cakes?
Little Debbie Christmas Tree Cakes are seasonal snack cakes commonly sold in grocery stores and supermarkets during the Christmas season.
Availability can vary by location and time of year. If they are unavailable, vanilla snack cakes with a creamy filling can be used as a substitute.
6. Can I make this cheesecake ahead of time?
Yes! This cheesecake is an excellent make-ahead Christmas dessert.
Prepare it the day before your celebration and refrigerate it overnight. Add the final decorations shortly before serving for the freshest appearance.
7. How should I store leftover cheesecake?
Store leftover cheesecake in an airtight container in the refrigerator.
Because the filling contains cream cheese and whipped cream, keep it refrigerated and enjoy it within approximately 3–4 days.
8. Can I freeze Little Debbie Christmas Tree Cheesecake?
Yes, you can freeze the undecorated cheesecake.
Wrap it securely in plastic wrap and place it in a freezer-safe container. Freeze for approximately 1 month for best quality.
Thaw it in the refrigerator before serving. Add whipped cream and fresh decorations after thawing.
9. Why is my no-bake cheesecake too soft?
A soft cheesecake may result from insufficient chilling, underwhipped cream, or an overly loose filling.
Make sure the heavy cream reaches stiff peaks and refrigerate the cheesecake long enough before slicing.
10. Can I use Cool Whip instead of heavy whipping cream?
Yes. Thawed whipped topping can be used as a convenient alternative.
Fold it gently into the cream cheese mixture. The final texture and sweetness may differ slightly from a cheesecake made with freshly whipped heavy cream.
11. Can I use homemade whipped cream for decoration?
Yes. Homemade whipped cream is delicious and creates beautiful decorative swirls.
For better stability, you can use a stabilized whipped cream recipe or a small amount of whipped cream stabilizer.
12. Can I make this recipe in individual cups?
Yes! Divide the graham cracker crumbs between small dessert cups, add the cheesecake filling, and layer in chopped Christmas Tree Cakes.
Refrigerate until firm and decorate each cup individually.
This is a wonderful option for Christmas parties and large gatherings.
13. What can I use instead of white chocolate?
You can use melted vanilla baking chips, white candy melts, or a simple whipped cream topping.
For a chocolate variation, use melted milk or semisweet chocolate instead.
14. Can I make this cheesecake with reduced-fat cream cheese?
You can, but full-fat cream cheese generally creates a richer and more stable filling.
Reduced-fat varieties may produce a softer texture, particularly in no-bake recipes.
15. How do I remove cheesecake from a springform pan?
Run a thin knife gently around the inside edge of the pan before releasing the springform sides.
Make sure the cheesecake is completely chilled before removing the ring. This helps prevent the sides from sticking or breaking.
16. Can I make the cheesecake sweeter or less sweet?
Yes. You can slightly adjust the powdered sugar according to your preference.
Remember that Little Debbie Christmas Tree Cakes and white chocolate are already sweet, so taste the filling before adding extra sugar.
17. Can I add more Little Debbie Christmas Tree Cakes?
Absolutely. You can add extra chopped cake pieces to the filling or use more for decoration.
However, avoid adding too many pieces because they can make the cheesecake filling difficult to spread and slice.
18. Is this a good dessert for Christmas parties?
Definitely! Its festive appearance, creamy texture, and nostalgic flavor make it perfect for Christmas parties, family dinners, office celebrations, and holiday potlucks.
You can prepare it a day ahead, which makes entertaining easier.
19. Can I make a chocolate version?
Yes. Add melted chocolate or cocoa powder to the cheesecake filling and use an Oreo crust.
You can still decorate the top with Little Debbie Christmas Tree Cakes for a fun chocolate-and-vanilla holiday dessert.
20. How do I get perfect cheesecake slices?
Make sure the cheesecake is fully chilled. Dip a long, sharp knife into warm water, wipe it dry, and cut straight down.
Clean the knife between each slice for neat, professional-looking portions.
Conclusion
This Little Debbie Christmas Tree Cheesecake is the ultimate festive dessert for anyone who loves creamy cheesecake and the nostalgic taste of Little Debbie Christmas Tree Cakes. With its buttery graham cracker crust, fluffy cream cheese filling, soft cake pieces, and beautiful white chocolate decoration, every slice delivers a delicious combination of holiday flavors.
The no-bake preparation makes it especially convenient during the busy Christmas season. You can prepare it the day before your celebration, refrigerate it overnight, and decorate it just before serving.
Whether you are hosting a Christmas dinner, attending a holiday potluck, or simply looking for a fun seasonal dessert to share with your family, this Christmas Tree Cake Cheesecake is a wonderful choice.
The festive colors and familiar snack cake flavor make it especially appealing to children and adults. You can also customize it with Oreo crust, peppermint, strawberry sauce, chocolate, or individual dessert cups.
For the best results, use softened cream cheese, cold heavy whipping cream, and plenty of time for chilling. These simple details will help you achieve a smooth, creamy cheesecake that slices beautifully.
Bring a little extra Christmas magic to your dessert table with this irresistible Little Debbie Christmas Tree Cheesecake. Make it for your next holiday gathering, share it with loved ones, and enjoy every creamy, sweet, festive bite!
Print
Little Debbie Christmas Tree Cheesecake – A Creamy and Festive Holiday Dessert
- Total Time: 7–9 hours
Description
this Little Debbie Christmas Tree Cheesecake is the perfect holiday dessert to add to your Christmas baking list! Combining the nostalgic taste of the famous seasonal snack cakes with a rich, smooth cheesecake filling and a delicious buttery crust, this festive dessert is guaranteed to bring smiles to your holiday table.
Ingredients
For the graham cracker crust
- 2 cups graham cracker crumbs: Create a buttery, slightly crunchy foundation for the cheesecake.
- 1/2 cup unsalted butter, melted: Holds the crumbs together and adds richness.
- 2 tablespoons granulated sugar: Adds a little sweetness and helps balance the crust.
- 1 pinch of salt: Enhances the buttery flavor.
For the cheesecake filling
- 24 ounces cream cheese, softened: The main ingredient that creates a rich, creamy cheesecake texture.
- 1 cup powdered sugar: Sweetens the filling while keeping it smooth.
- 1 teaspoon vanilla extract: Adds classic cheesecake flavor.
- 1 1/2 cups heavy whipping cream, cold: Creates a light, fluffy texture when whipped.
- 6 Little Debbie Christmas Tree Cakes, chopped: Provide the signature festive cake flavor and sweet creamy filling.
- 1/2 cup sour cream: Adds a subtle tang and makes the cheesecake filling taste richer.
- 1 tablespoon lemon juice, optional: Balances the sweetness and enhances the cream cheese flavor.
For the topping and decoration
- 1 cup white chocolate chips: Creates a smooth, sweet topping.
- 2–3 tablespoons heavy cream: Helps melt the white chocolate into a drizzleable consistency.
- 2 Little Debbie Christmas Tree Cakes: For festive decoration.
- 1 cup whipped cream: Creates decorative swirls around the cheesecake.
- Red and green sprinkles: Add a colorful Christmas finish.
- Mini red candy pieces: Optional decorations inspired by the original snack cakes.
Instructions
Begin by preparing a 9-inch springform pan. Lightly grease the sides and line the bottom with parchment paper if desired. This will make removing the cheesecake much easier once it has chilled.
Place the graham crackers in a food processor and pulse until they become fine crumbs. If you do not have a food processor, place the crackers in a sealed plastic bag and crush them with a rolling pin.
Transfer the crumbs to a medium mixing bowl. Add the melted butter, granulated sugar, and a pinch of salt.
Stir until the mixture resembles wet sand. Every crumb should be lightly coated with butter so that the crust holds together when pressed.
Pour the mixture into the prepared springform pan. Use the bottom of a measuring cup or a flat glass to press the crumbs firmly across the bottom.
Make sure the crust is evenly distributed, especially around the edges. A firm crust will make slicing and serving much easier.
Place the pan in the refrigerator for approximately 20–30 minutes while you prepare the cheesecake filling.
For an extra-firm crust, you can bake it at 350°F (175°C) for approximately 8–10 minutes. Allow it to cool completely before adding the filling.
Step 2: Prepare the Little Debbie Christmas Tree Cakes
Unwrap the Little Debbie Christmas Tree Cakes and place them on a cutting board.
Chop six cakes into small bite-sized pieces. You want the pieces to be large enough to provide recognizable cake texture but small enough to distribute evenly throughout the cheesecake.
Reserve two additional cakes for decorating the top.
Avoid chopping the cakes into extremely fine crumbs. Small chunks create delicious layers of soft cake and creamy filling throughout the cheesecake.
If the cakes are very soft or sticky, place them in the refrigerator for a few minutes before cutting. This can make them easier to handle.
Set the chopped cakes aside while preparing the cream cheese mixture.
Step 3: Beat the cream cheese until smooth
Place the softened cream cheese in a large mixing bowl.
Using an electric mixer, beat the cream cheese on medium speed for approximately 2–3 minutes until smooth and creamy.
Scrape down the sides and bottom of the bowl to remove any lumps.
Add the powdered sugar gradually, mixing until completely incorporated.
Pour in the vanilla extract and add the sour cream and optional lemon juice.
Continue mixing until the filling is smooth, fluffy, and creamy.
Make sure the cream cheese is at room temperature before mixing. Cold cream cheese can create lumps that are difficult to remove, even with an electric mixer.
Do not overbeat the mixture. Once everything is combined, stop mixing.
Step 4: Whip the heavy cream
In a separate chilled mixing bowl, pour the cold heavy whipping cream.
Using a clean electric mixer with a whisk attachment, beat the cream on medium-high speed until stiff peaks form.
This usually takes approximately 3–5 minutes, depending on the temperature of the cream and the strength of your mixer.
Stiff peaks mean that when you lift the beaters, the whipped cream holds its shape without immediately falling over.
Be careful not to overwhip the cream, as it can become grainy and begin turning into butter.
Properly whipped cream is important because it gives the no-bake Christmas cheesecake a light, airy texture while helping it hold its shape.
Step 5: Combine the cheesecake filling
Add approximately one-third of the whipped cream to the cream cheese mixture.
Gently fold it in with a spatula to loosen the mixture.
Add the remaining whipped cream in two additions, folding gently after each addition.
Use a slow folding motion, moving the spatula from the bottom of the bowl toward the top.
Avoid stirring aggressively because this can deflate the whipped cream and make the cheesecake filling dense.
Once the mixture is smooth, light, and fluffy, add the chopped Little Debbie Christmas Tree Cakes.
Gently fold the cake pieces into the filling until they are evenly distributed.
Try to keep some visible pieces throughout the mixture so that every slice has plenty of festive cake flavor.
Step 6: Assemble the cheesecake
Remove the chilled graham cracker crust from the refrigerator.
Spoon the cheesecake filling over the crust and spread it evenly with a spatula.
Work carefully around the edges to make sure there are no large air pockets.
Smooth the top of the cheesecake using an offset spatula or the back of a spoon.
Tap the pan gently against the countertop a couple of times to help release any trapped air bubbles.
If you want an extra-decorative cheesecake, reserve a few small pieces of Christmas Tree Cake and gently press them into the top of the filling.
Cover the pan carefully with plastic wrap without allowing it to touch the surface.
Step 7: Chill until completely set
Place the cheesecake in the refrigerator for at least 6–8 hours.
For the best texture, allow it to chill overnight.
During this time, the cream cheese filling will firm up, the whipped cream will help stabilize the structure, and the graham cracker crust will become easier to slice.
Do not rush this step. A cheesecake that has not chilled long enough may be too soft and difficult to remove from the pan.
If you want particularly neat slices, you can place the cheesecake in the freezer for approximately 20–30 minutes before serving, but do not freeze it completely.
Step 8: Prepare the white chocolate topping
Place the white chocolate chips in a microwave-safe bowl.
Add the heavy cream and microwave in 15–20-second intervals, stirring between each interval.
Continue until the chocolate is melted and smooth.
Do not overheat white chocolate because it can become thick or grainy.
If the mixture seems too thick, add a small amount of warm heavy cream until it reaches a smooth drizzling consistency.
Allow the white chocolate mixture to cool slightly before decorating the cheesecake.
Step 9: Decorate the Christmas Tree Cheesecake
Carefully remove the sides of the springform pan.
Transfer the cheesecake to a serving plate or cake stand.
Drizzle the melted white chocolate over the top, allowing some of it to fall naturally down the sides.
Arrange the reserved Little Debbie Christmas Tree Cakes on top of the cheesecake.
Add decorative whipped cream swirls around the edges using a piping bag fitted with your favorite decorating tip.
Finish with red and green sprinkles for a festive holiday appearance.
For an extra-special Christmas presentation, add small red candy decorations and a few additional white chocolate drizzles.
Keep the decoration balanced so the cheesecake remains the star of the dessert table.
Step 10: Slice and serve
For clean slices, dip a sharp knife into warm water and wipe it dry before cutting.
Repeat this process between slices.
The cheesecake should be creamy but firm enough to hold its shape.
Serve chilled and enjoy the combination of buttery graham cracker crust, creamy cheesecake filling, soft cake pieces, and sweet white chocolate.
This Little Debbie Christmas Tree Cheesecake is especially delicious when served with coffee, hot chocolate, or a cold glass of milk.
Notes
For the best Little Debbie Christmas Tree Cheesecake, pay attention to the temperature of your ingredients and the chilling process.
Use softened cream cheese. Room-temperature cream cheese blends more smoothly and prevents lumps in the cheesecake filling.
Keep the heavy cream cold. Cold cream whips more easily and creates better volume.
Fold gently. When combining whipped cream with the cream cheese mixture, use a spatula and gentle movements to preserve the airy texture.
Do not overmix. Excessive mixing can deflate the whipped cream and make the filling less stable.
Chop the Christmas Tree Cakes carefully. Small chunks distribute evenly and create delicious pieces throughout the cheesecake.
Allow enough chilling time. A no-bake cheesecake needs sufficient refrigeration to become firm. Overnight chilling is ideal.
Use a springform pan. This makes removing the cheesecake easier and helps preserve its beautiful shape.
Decorate just before serving when possible. Whipped cream decorations and some toppings look freshest when added shortly before presentation.
Keep refrigerated. Since this dessert contains cream cheese and whipped cream, it should be stored in the refrigerator and not left at room temperature for extended periods.
- Prep Time: 40 minutes
- Refrigeration: 6–8 hours
- Cook Time: 0 minutes
Nutrition
- Calories: 550–650
- Sodium: 300–450 mg
- Protein: 6–8 g
