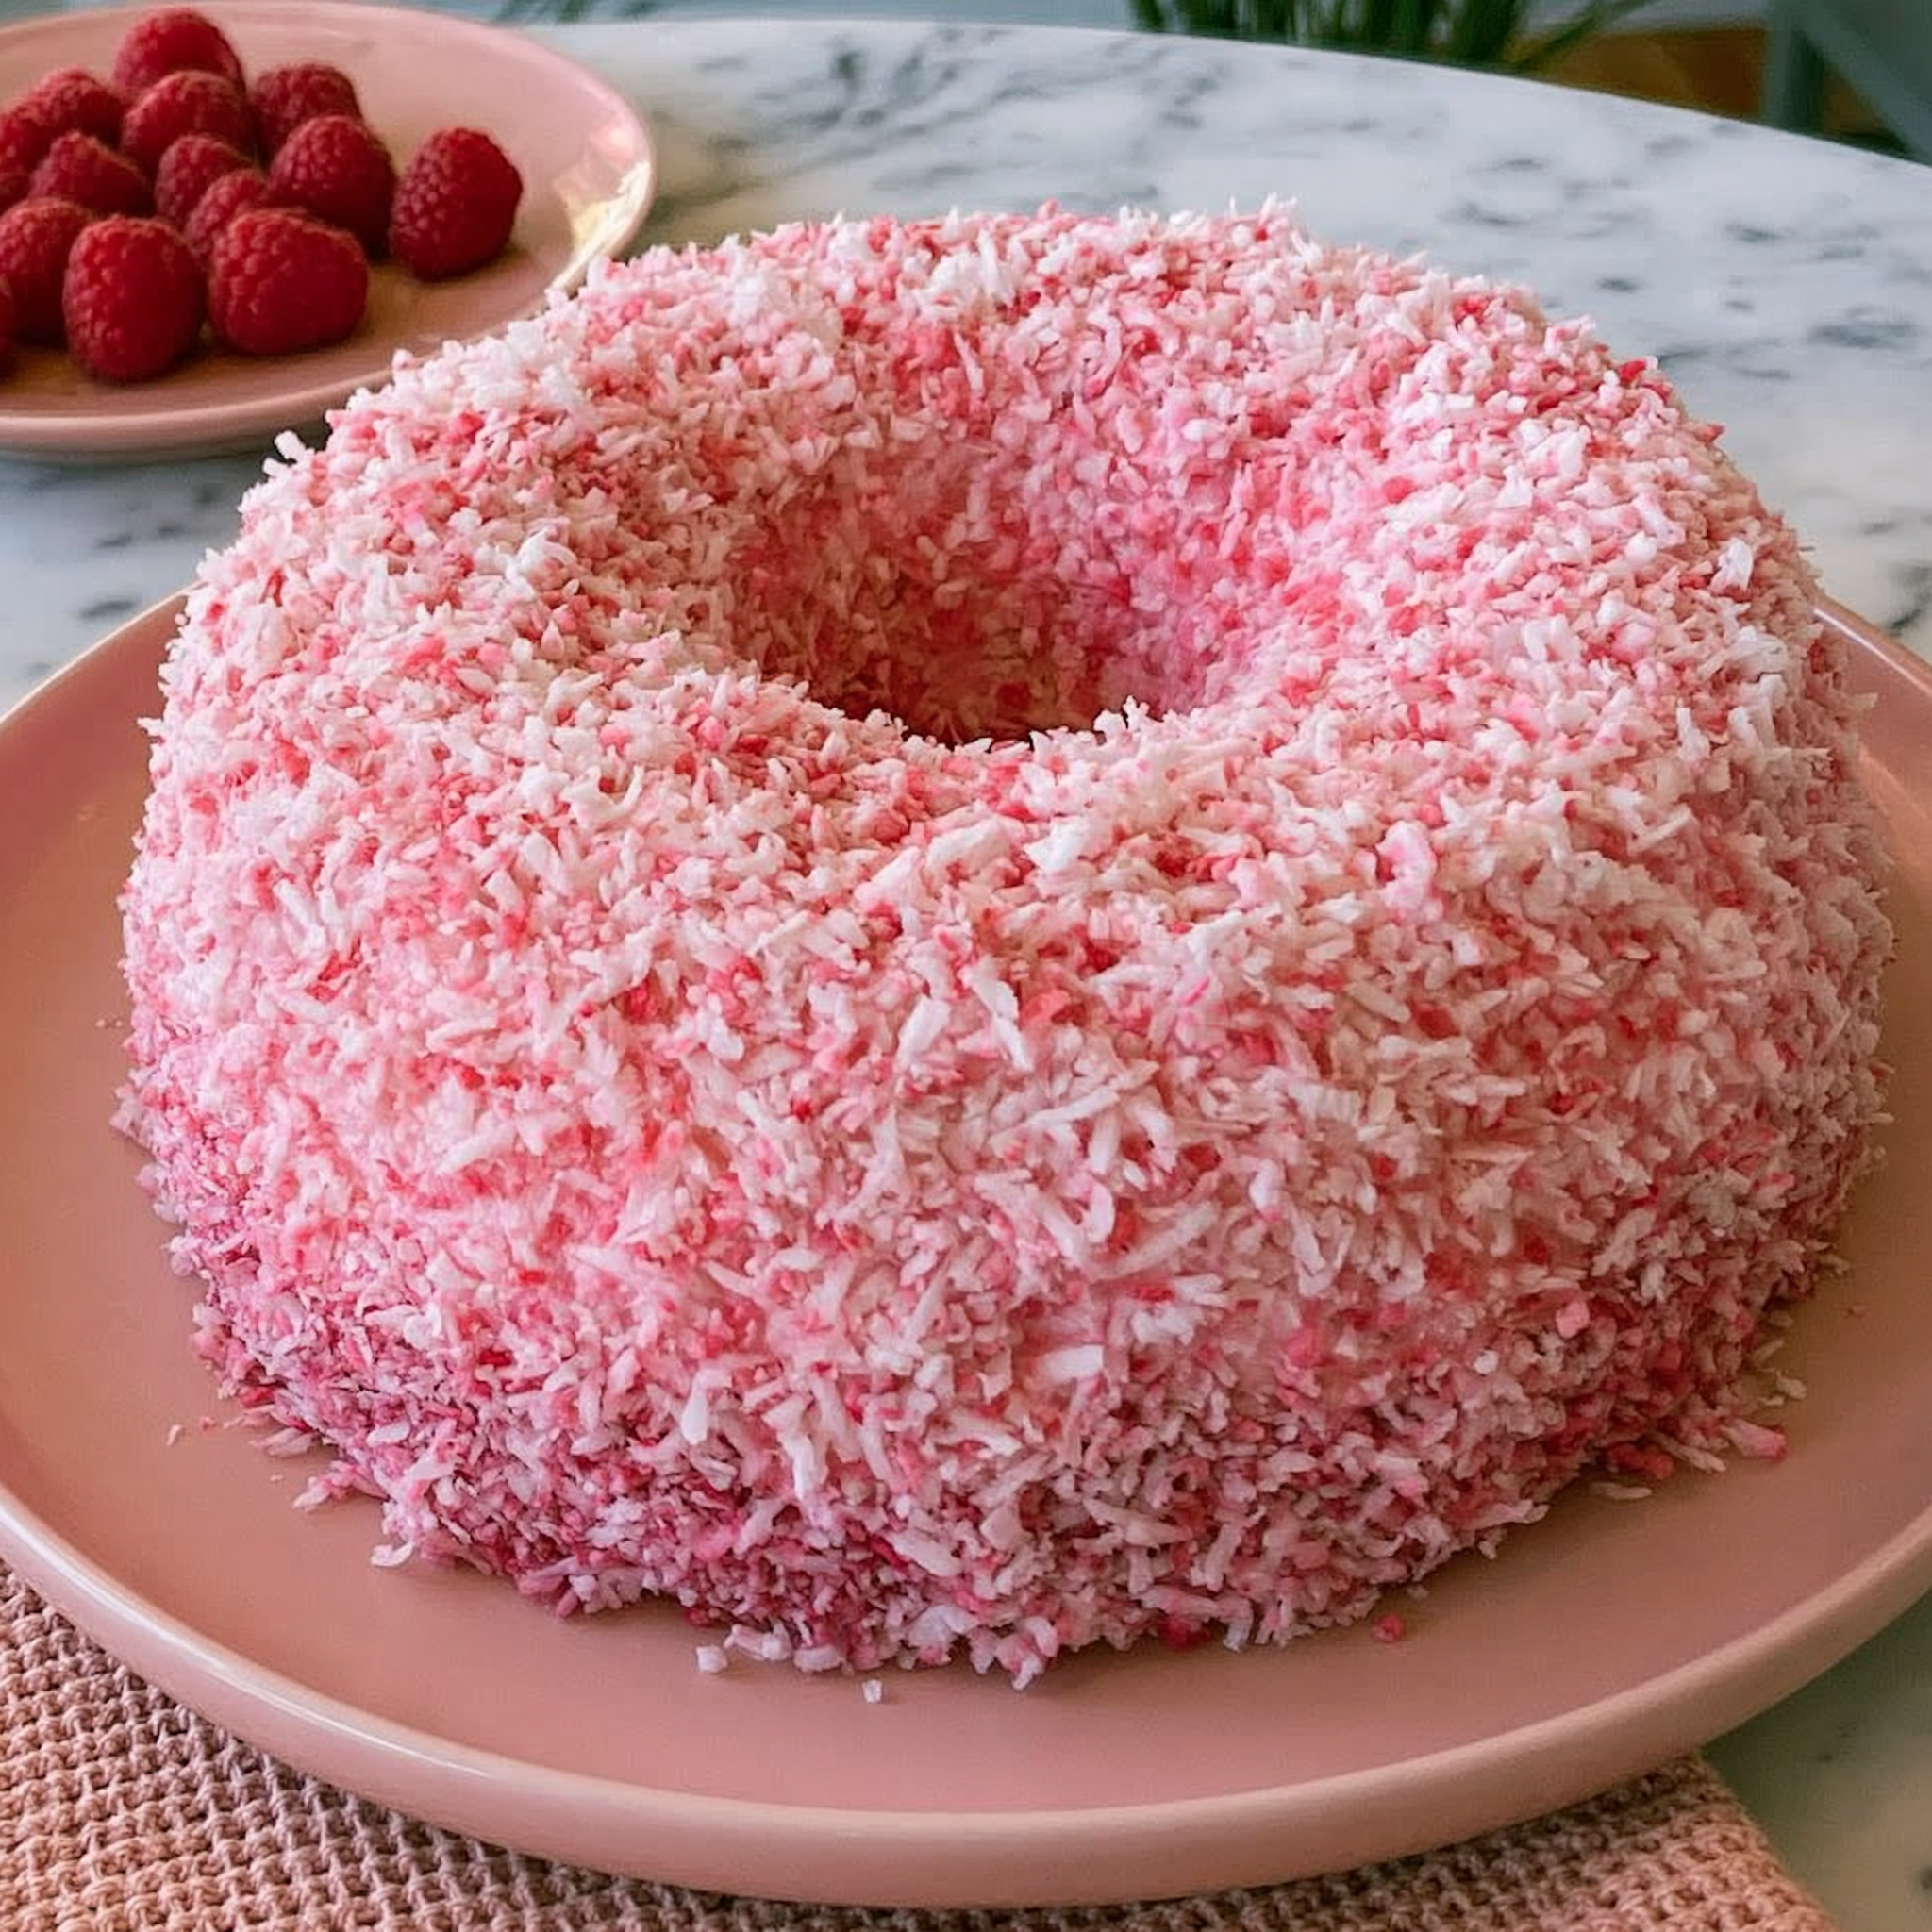
If you love the combination of sweet coconut, fluffy cake, and fruity raspberry filling, this Raspberry Coconut Snowball Cake is a dessert you will want to make again and again. Beautiful, soft, and covered in a snowy layer of shredded coconut, this homemade cake brings together everything that makes a dessert memorable: delicate cake layers, creamy frosting, and a bright raspberry center.
Inspired by classic snowball-style desserts, this cake gets its name from its beautiful white coconut coating. Every slice reveals a lovely contrast between the snowy exterior and the vibrant raspberry filling inside. The coconut adds a gentle sweetness and a little texture, while the raspberries bring a refreshing fruity flavor that balances the richness of the frosting.
This cake is perfect for Christmas celebrations, Easter gatherings, birthdays, baby showers, summer parties, or Sunday family dinners. Its pretty appearance makes it look like something from a bakery, but the recipe uses simple ingredients that are easy to find at most grocery stores.
Whether you are an experienced baker or making a layered cake for the first time, this Raspberry Coconut Snowball Cake is a wonderful homemade dessert to share. Prepare it ahead of time, let the flavors come together in the refrigerator, and enjoy a slice of soft, creamy, coconut-covered goodness.
Ingredients
For the cake
- 2 ½ cups all-purpose flour
- 2 teaspoons baking powder
- ½ teaspoon baking soda
- ½ teaspoon salt
- ¾ cup unsalted butter, softened
- 1 ½ cups granulated sugar
- 3 large eggs, room temperature
- 2 teaspoons vanilla extract
- 1 cup buttermilk, room temperature
- ¼ cup sour cream
For the raspberry filling
- 2 cups fresh or frozen raspberries
- ½ cup granulated sugar
- 1 tablespoon lemon juice
- 1 tablespoon cornstarch
- 2 tablespoons cold water
For the coconut cream frosting
- 1 cup unsalted butter, softened
- 4 cups powdered sugar
- ½ cup cream cheese, softened
- 2–3 tablespoons coconut milk or heavy cream
- 1 teaspoon vanilla extract
- ½ teaspoon coconut extract (optional)
- 2 cups sweetened shredded coconut, for coating
Preparation
Step 1: Prepare the oven and cake pans
Preheat your oven to 350°F (175°C). Grease two 8-inch round cake pans with butter or nonstick baking spray. Line the bottoms with parchment paper to help the cakes release easily after baking.
Lightly dust the sides with flour if needed. Preparing the pans before mixing the batter makes the baking process smoother and helps prevent the cake layers from sticking.
Step 2: Mix the dry ingredients
In a medium mixing bowl, whisk together the all-purpose flour, baking powder, baking soda, and salt.
Whisking these ingredients together helps distribute the leavening agents evenly throughout the flour. This is important for creating cake layers that rise evenly and have a soft, tender texture.
Set the bowl aside while you prepare the wet ingredients.
Step 3: Cream the butter and sugar
In a large mixing bowl, beat the softened butter and granulated sugar with an electric mixer for approximately 3–4 minutes.
Continue mixing until the mixture becomes pale, fluffy, and creamy. This step incorporates air into the batter, helping create a lighter cake.
Add the eggs one at a time, beating well after each addition. Mix in the vanilla extract until everything is combined.
Step 4: Combine the wet and dry ingredients
Add the dry ingredients to the butter mixture in three additions, alternating with the buttermilk. Begin and finish with the dry ingredients.
Mix on low speed just until combined. Avoid overmixing because too much mixing can make the cake dense.
Gently fold in the sour cream using a spatula. The sour cream adds moisture and gives the cake a soft, tender crumb.
Step 5: Bake the cake layers
Divide the batter evenly between the prepared cake pans. Smooth the tops with a spatula so the layers bake evenly.
Bake for approximately 25–30 minutes, or until a toothpick inserted into the center comes out clean or with a few moist crumbs.
Remove the pans from the oven and let the cakes cool for about 10 minutes. Carefully turn the cakes onto wire racks and remove the parchment paper.
Allow the cake layers to cool completely before adding the raspberry filling or frosting. Warm cake can melt the frosting and make the layers difficult to assemble.
Step 6: Make the raspberry filling
Place the raspberries, sugar, and lemon juice in a small saucepan over medium heat.
Stir gently as the berries soften and release their juices. Cook for approximately 5–7 minutes until the mixture becomes juicy and begins to thicken.
In a small bowl, mix the cornstarch with cold water until smooth. Slowly pour this mixture into the saucepan while stirring.
Continue cooking for another 1–2 minutes until the raspberry filling becomes thick and glossy.
Remove from the heat and allow it to cool completely. Refrigerate it if necessary to speed up the cooling process.
The filling should be thick enough to stay between the cake layers without running down the sides.
Step 7: Prepare the coconut cream frosting
In a large bowl, beat the softened butter and cream cheese until smooth and creamy.
Gradually add the powdered sugar, one cup at a time, mixing on low speed at first to prevent it from spilling.
Add the vanilla extract and optional coconut extract. Pour in the coconut milk or heavy cream one tablespoon at a time until the frosting reaches a smooth, spreadable consistency.
Beat for another 1–2 minutes until fluffy.
If the frosting feels too soft, refrigerate it for 10–15 minutes before assembling the cake.
Step 8: Assemble the cake layers
Place the first completely cooled cake layer on a serving plate or cake stand.
Spread a thin layer of coconut frosting over the top. Create a small frosting border around the outside edge to help hold the raspberry filling in place.
Spoon the cooled raspberry filling into the center and gently spread it into an even layer, keeping it inside the frosting border.
Place the second cake layer on top, positioning it carefully so the cake remains level.
Press gently to secure the layers without squeezing out the filling.
Step 9: Frost the entire cake
Use the remaining coconut frosting to cover the top and sides of the cake.
Start with a thin crumb coat to catch loose crumbs. Refrigerate the cake for approximately 15–20 minutes, then apply the remaining frosting in an even layer.
The frosting does not need to be perfectly smooth because the shredded coconut will cover most of the surface.
Step 10: Add the snowy coconut coating
Place the shredded coconut in a shallow bowl or on a large plate.
Gently press coconut onto the sides of the cake using clean hands. Sprinkle additional coconut over the top until the entire cake is covered.
Rotate the cake as you work to make sure every side receives an even coating.
For the prettiest snowball appearance, use plenty of coconut and gently pat it into the frosting so it stays in place.
Step 11: Chill and serve
Refrigerate the finished Raspberry Coconut Snowball Cake for at least 1 hour before slicing.
Chilling helps the frosting set, keeps the raspberry filling in place, and makes the cake easier to cut into neat slices.
Before serving, allow the cake to sit at room temperature for approximately 15–20 minutes so the frosting softens slightly.
Slice with a sharp knife, wiping the blade between cuts for beautiful layers.
Variations
1. White Chocolate Raspberry Coconut Cake
Add ½ cup of melted and cooled white chocolate to the frosting. The white chocolate creates a richer, sweeter flavor that pairs beautifully with the tart raspberry filling.
2. Fresh Raspberry Snowball Cake
Use fresh raspberries between the cake layers along with a thinner layer of raspberry filling. This creates a fresh, fruity texture in every slice.
3. Lemon Raspberry Coconut Cake
Add 1 tablespoon of fresh lemon zest to the cake batter and a little lemon juice to the frosting. The citrus flavor brightens the coconut and raspberry combination.
4. Almond Coconut Snowball Cake
Replace the vanilla extract in the cake with almond extract, using only about ½ teaspoon because almond extract is strong. Add sliced almonds between the layers for extra crunch.
5. Mini Raspberry Coconut Snowball Cakes
Bake the batter in cupcake pans and fill the cooled cupcakes with raspberry filling. Frost each one and roll or sprinkle with shredded coconut for individual snowball treats.
6. Toasted Coconut Version
For a deeper coconut flavor, lightly toast some of the shredded coconut before decorating. Allow it to cool completely, then mix it with regular shredded coconut for a beautiful texture.
7. Raspberry Jam Shortcut
If you are short on time, use a thick raspberry preserves or seedless raspberry jam instead of preparing the filling from scratch. Spread a thin layer between the cake layers.
Cooking Note
The most important secret to a successful Raspberry Coconut Snowball Cake is making sure every component has cooled completely before assembly.
The raspberry filling should be thick and cold, while the cake layers should be completely at room temperature. If either is warm, the frosting may soften and the layers may slide.
Use sweetened shredded coconut for a classic dessert-style finish. If you prefer a less sweet cake, unsweetened coconut is also a good option.
For a neat presentation, avoid adding too much raspberry filling. A thick, controlled layer gives you a beautiful raspberry stripe without making the cake unstable.
Serving Suggestions
- Serve each slice with fresh raspberries and a little extra shredded coconut.
- Pair the cake with hot coffee, cappuccino, or tea for an afternoon dessert.
- Add a few white chocolate curls on top for an elegant celebration cake.
- Serve with vanilla ice cream for a richer dessert.
- Decorate the top with fresh raspberries and mint leaves for a festive presentation.
- Include it on a holiday dessert table alongside cookies, brownies, and other homemade sweets.
This cake is especially lovely for Christmas parties because its snowy coconut exterior gives it a winter-inspired appearance. It is equally beautiful for spring celebrations and summer gatherings.
Tips for the Best Raspberry Coconut Snowball Cake
- Use room-temperature ingredients: Butter, eggs, buttermilk, and cream cheese combine more smoothly when they are not cold.
- Measure the flour correctly: Spoon flour into your measuring cup and level it off rather than packing it down. Too much flour can make the cake dry.
- Do not overmix the batter: Mix only until the ingredients are incorporated to keep the cake tender.
- Cool the cake completely: Never frost warm cake layers. Cooling prevents melting and sliding.
- Make thick raspberry filling: A runny filling can escape from the sides. Cook it until thick and allow it to cool before assembling.
- Create a frosting border: A small ring of frosting around the edge of the bottom layer helps keep the raspberry filling in place.
- Use fresh shredded coconut: Fresh, soft coconut gives the cake its beautiful snowball texture.
- Chill before slicing: Refrigeration helps the cake hold its shape and creates cleaner slices.
- Use a serrated knife: A gentle sawing motion helps cut through the coconut coating without crushing the cake.
- Prepare ahead: Bake the cake layers and prepare the raspberry filling a day in advance. Store them covered in the refrigerator and assemble when ready.
Prep Time
Approximately 35 minutes.
Cooking Time
Approximately 30 minutes.
Chilling Time
Approximately 1 hour and 20 minutes.
Total Time
Approximately 2 hours and 25 minutes, including cooling and chilling time.
Nutritional Information
Approximate nutritional values per serving, based on 12 slices:
- Calories: 590
- Protein: 6 g
- Sodium: 310 mg
- Carbohydrates: 78 g
- Fat: 29 g
- Sugar: 58 g
Actual nutritional values may vary depending on the brands of ingredients, frosting quantity, and serving size.
FAQs
1. Can I make Raspberry Coconut Snowball Cake ahead of time?
Yes! You can prepare the cake layers and raspberry filling one day ahead. Wrap the cooled cake layers tightly and refrigerate them. Keep the filling in an airtight container. Assemble and decorate the cake when you are ready.
2. Can I use frozen raspberries?
Absolutely. Frozen raspberries work very well in the filling. There is no need to thaw them first, although they may need an extra minute or two of cooking time to release their juices and thicken.
3. Can I use raspberry jam instead of homemade filling?
Yes. Thick raspberry jam or preserves make a convenient substitute. Choose a good-quality jam and avoid using a runny variety that could leak between the layers.
4. How do I keep the raspberry filling from leaking?
Make sure the filling is completely cold and thick before assembling. Pipe or spread a border of frosting around the edge of the first cake layer, then place the filling inside that border.
5. Should I use sweetened or unsweetened coconut?
Sweetened shredded coconut gives the cake a traditional sweet snowball finish. Unsweetened coconut works if you prefer a less sugary dessert or want the raspberry flavor to stand out more.
6. How should I store Raspberry Coconut Snowball Cake?
Because the frosting contains cream cheese, keep the cake covered in an airtight cake container in the refrigerator. It is best enjoyed within 3–4 days.
7. Can I freeze this cake?
Yes. For best results, freeze individual slices or the fully assembled cake without any fresh raspberry decorations. Wrap tightly in plastic wrap and place in a freezer-safe container. Freeze for up to 2 months for best quality.
Thaw overnight in the refrigerator before serving.
8. Why is my cake dense instead of fluffy?
A dense cake can result from overmixing, measuring too much flour, or using cold ingredients. Measure carefully and mix only until the batter is combined.
9. Can I make this cake without coconut extract?
Yes. Coconut extract is optional. Vanilla extract provides a delicious flavor on its own, while the shredded coconut still gives the cake its signature coconut taste.
10. Can I make this recipe in a 9-by-13-inch pan?
Yes, you can bake the batter in a greased 9-by-13-inch pan. Baking time will vary, so begin checking around 30 minutes. You can spread the raspberry filling and frosting over the cooled cake and finish with shredded coconut.
Conclusion
This Raspberry Coconut Snowball Cake is a beautiful homemade dessert that combines fluffy vanilla cake, sweet-tart raspberry filling, creamy frosting, and a generous coating of shredded coconut. Every slice looks like a little snowy celebration, while the raspberry center adds a colorful surprise and refreshing fruity flavor.
Whether you are baking for Christmas, a birthday, a family gathering, or simply because you are craving something sweet, this coconut raspberry cake is sure to make an impression. Prepare it ahead, chill until beautifully set, and serve generous slices to everyone around the table.
If you love coconut desserts and raspberry-filled cakes, this Raspberry Coconut Snowball Cake deserves a place in your recipe collection!
Print
Raspberry Coconut Snowball Cake – Easy, Fluffy & Delicious Homemade Dessert
- Total Time: 2 hours and 25 minutes
Description
this Raspberry Coconut Snowball Cake is a dessert you will want to make again and again. Beautiful, soft, and covered in a snowy layer of shredded coconut, this homemade cake brings together everything that makes a dessert memorable: delicate cake layers, creamy frosting, and a bright raspberry center.
Ingredients
For the cake
- 2 ½ cups all-purpose flour
- 2 teaspoons baking powder
- ½ teaspoon baking soda
- ½ teaspoon salt
- ¾ cup unsalted butter, softened
- 1 ½ cups granulated sugar
- 3 large eggs, room temperature
- 2 teaspoons vanilla extract
- 1 cup buttermilk, room temperature
- ¼ cup sour cream
For the raspberry filling
- 2 cups fresh or frozen raspberries
- ½ cup granulated sugar
- 1 tablespoon lemon juice
- 1 tablespoon cornstarch
- 2 tablespoons cold water
For the coconut cream frosting
- 1 cup unsalted butter, softened
- 4 cups powdered sugar
- ½ cup cream cheese, softened
- 2–3 tablespoons coconut milk or heavy cream
- 1 teaspoon vanilla extract
- ½ teaspoon coconut extract (optional)
- 2 cups sweetened shredded coconut, for coating
Instructions
Preheat your oven to 350°F (175°C). Grease two 8-inch round cake pans with butter or nonstick baking spray. Line the bottoms with parchment paper to help the cakes release easily after baking.
Lightly dust the sides with flour if needed. Preparing the pans before mixing the batter makes the baking process smoother and helps prevent the cake layers from sticking.
Step 2: Mix the dry ingredients
In a medium mixing bowl, whisk together the all-purpose flour, baking powder, baking soda, and salt.
Whisking these ingredients together helps distribute the leavening agents evenly throughout the flour. This is important for creating cake layers that rise evenly and have a soft, tender texture.
Set the bowl aside while you prepare the wet ingredients.
Step 3: Cream the butter and sugar
In a large mixing bowl, beat the softened butter and granulated sugar with an electric mixer for approximately 3–4 minutes.
Continue mixing until the mixture becomes pale, fluffy, and creamy. This step incorporates air into the batter, helping create a lighter cake.
Add the eggs one at a time, beating well after each addition. Mix in the vanilla extract until everything is combined.
Step 4: Combine the wet and dry ingredients
Add the dry ingredients to the butter mixture in three additions, alternating with the buttermilk. Begin and finish with the dry ingredients.
Mix on low speed just until combined. Avoid overmixing because too much mixing can make the cake dense.
Gently fold in the sour cream using a spatula. The sour cream adds moisture and gives the cake a soft, tender crumb.
Step 5: Bake the cake layers
Divide the batter evenly between the prepared cake pans. Smooth the tops with a spatula so the layers bake evenly.
Bake for approximately 25–30 minutes, or until a toothpick inserted into the center comes out clean or with a few moist crumbs.
Remove the pans from the oven and let the cakes cool for about 10 minutes. Carefully turn the cakes onto wire racks and remove the parchment paper.
Allow the cake layers to cool completely before adding the raspberry filling or frosting. Warm cake can melt the frosting and make the layers difficult to assemble.
Step 6: Make the raspberry filling
Place the raspberries, sugar, and lemon juice in a small saucepan over medium heat.
Stir gently as the berries soften and release their juices. Cook for approximately 5–7 minutes until the mixture becomes juicy and begins to thicken.
In a small bowl, mix the cornstarch with cold water until smooth. Slowly pour this mixture into the saucepan while stirring.
Continue cooking for another 1–2 minutes until the raspberry filling becomes thick and glossy.
Remove from the heat and allow it to cool completely. Refrigerate it if necessary to speed up the cooling process.
The filling should be thick enough to stay between the cake layers without running down the sides.
Step 7: Prepare the coconut cream frosting
In a large bowl, beat the softened butter and cream cheese until smooth and creamy.
Gradually add the powdered sugar, one cup at a time, mixing on low speed at first to prevent it from spilling.
Add the vanilla extract and optional coconut extract. Pour in the coconut milk or heavy cream one tablespoon at a time until the frosting reaches a smooth, spreadable consistency.
Beat for another 1–2 minutes until fluffy.
If the frosting feels too soft, refrigerate it for 10–15 minutes before assembling the cake.
Step 8: Assemble the cake layers
Place the first completely cooled cake layer on a serving plate or cake stand.
Spread a thin layer of coconut frosting over the top. Create a small frosting border around the outside edge to help hold the raspberry filling in place.
Spoon the cooled raspberry filling into the center and gently spread it into an even layer, keeping it inside the frosting border.
Place the second cake layer on top, positioning it carefully so the cake remains level.
Press gently to secure the layers without squeezing out the filling.
Step 9: Frost the entire cake
Use the remaining coconut frosting to cover the top and sides of the cake.
Start with a thin crumb coat to catch loose crumbs. Refrigerate the cake for approximately 15–20 minutes, then apply the remaining frosting in an even layer.
The frosting does not need to be perfectly smooth because the shredded coconut will cover most of the surface.
Step 10: Add the snowy coconut coating
Place the shredded coconut in a shallow bowl or on a large plate.
Gently press coconut onto the sides of the cake using clean hands. Sprinkle additional coconut over the top until the entire cake is covered.
Rotate the cake as you work to make sure every side receives an even coating.
For the prettiest snowball appearance, use plenty of coconut and gently pat it into the frosting so it stays in place.
Step 11: Chill and serve
Refrigerate the finished Raspberry Coconut Snowball Cake for at least 1 hour before slicing.
Chilling helps the frosting set, keeps the raspberry filling in place, and makes the cake easier to cut into neat slices.
Before serving, allow the cake to sit at room temperature for approximately 15–20 minutes so the frosting softens slightly.
Slice with a sharp knife, wiping the blade between cuts for beautiful layers.
Notes
The most important secret to a successful Raspberry Coconut Snowball Cake is making sure every component has cooled completely before assembly.
The raspberry filling should be thick and cold, while the cake layers should be completely at room temperature. If either is warm, the frosting may soften and the layers may slide.
Use sweetened shredded coconut for a classic dessert-style finish. If you prefer a less sweet cake, unsweetened coconut is also a good option.
For a neat presentation, avoid adding too much raspberry filling. A thick, controlled layer gives you a beautiful raspberry stripe without making the cake unstable.
- Prep Time: Approximately 35 minutes.
- Chilling Time: Approximately 1 hour and 20 minutes.
- Cook Time: Approximately 30 minutes.
Nutrition
- Calories: 590
- Sugar: 58 g
- Sodium: 310 mg
- Fat: 29 g
- Carbohydrates: 78 g
- Protein: 6 g
