Description
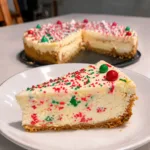
this Little Debbie Christmas Tree Cheesecake is the perfect holiday dessert to add to your Christmas baking list! Combining the nostalgic taste of the famous seasonal snack cakes with a rich, smooth cheesecake filling and a delicious buttery crust, this festive dessert is guaranteed to bring smiles to your holiday table.
Ingredients
For the graham cracker crust
- 2 cups graham cracker crumbs: Create a buttery, slightly crunchy foundation for the cheesecake.
- 1/2 cup unsalted butter, melted: Holds the crumbs together and adds richness.
- 2 tablespoons granulated sugar: Adds a little sweetness and helps balance the crust.
- 1 pinch of salt: Enhances the buttery flavor.
For the cheesecake filling
- 24 ounces cream cheese, softened: The main ingredient that creates a rich, creamy cheesecake texture.
- 1 cup powdered sugar: Sweetens the filling while keeping it smooth.
- 1 teaspoon vanilla extract: Adds classic cheesecake flavor.
- 1 1/2 cups heavy whipping cream, cold: Creates a light, fluffy texture when whipped.
- 6 Little Debbie Christmas Tree Cakes, chopped: Provide the signature festive cake flavor and sweet creamy filling.
- 1/2 cup sour cream: Adds a subtle tang and makes the cheesecake filling taste richer.
- 1 tablespoon lemon juice, optional: Balances the sweetness and enhances the cream cheese flavor.
For the topping and decoration
- 1 cup white chocolate chips: Creates a smooth, sweet topping.
- 2–3 tablespoons heavy cream: Helps melt the white chocolate into a drizzleable consistency.
- 2 Little Debbie Christmas Tree Cakes: For festive decoration.
- 1 cup whipped cream: Creates decorative swirls around the cheesecake.
- Red and green sprinkles: Add a colorful Christmas finish.
- Mini red candy pieces: Optional decorations inspired by the original snack cakes.
Instructions
Begin by preparing a 9-inch springform pan. Lightly grease the sides and line the bottom with parchment paper if desired. This will make removing the cheesecake much easier once it has chilled.
Place the graham crackers in a food processor and pulse until they become fine crumbs. If you do not have a food processor, place the crackers in a sealed plastic bag and crush them with a rolling pin.
Transfer the crumbs to a medium mixing bowl. Add the melted butter, granulated sugar, and a pinch of salt.
Stir until the mixture resembles wet sand. Every crumb should be lightly coated with butter so that the crust holds together when pressed.
Pour the mixture into the prepared springform pan. Use the bottom of a measuring cup or a flat glass to press the crumbs firmly across the bottom.
Make sure the crust is evenly distributed, especially around the edges. A firm crust will make slicing and serving much easier.
Place the pan in the refrigerator for approximately 20–30 minutes while you prepare the cheesecake filling.
For an extra-firm crust, you can bake it at 350°F (175°C) for approximately 8–10 minutes. Allow it to cool completely before adding the filling.
Step 2: Prepare the Little Debbie Christmas Tree Cakes
Unwrap the Little Debbie Christmas Tree Cakes and place them on a cutting board.
Chop six cakes into small bite-sized pieces. You want the pieces to be large enough to provide recognizable cake texture but small enough to distribute evenly throughout the cheesecake.
Reserve two additional cakes for decorating the top.
Avoid chopping the cakes into extremely fine crumbs. Small chunks create delicious layers of soft cake and creamy filling throughout the cheesecake.
If the cakes are very soft or sticky, place them in the refrigerator for a few minutes before cutting. This can make them easier to handle.
Set the chopped cakes aside while preparing the cream cheese mixture.
Step 3: Beat the cream cheese until smooth
Place the softened cream cheese in a large mixing bowl.
Using an electric mixer, beat the cream cheese on medium speed for approximately 2–3 minutes until smooth and creamy.
Scrape down the sides and bottom of the bowl to remove any lumps.
Add the powdered sugar gradually, mixing until completely incorporated.
Pour in the vanilla extract and add the sour cream and optional lemon juice.
Continue mixing until the filling is smooth, fluffy, and creamy.
Make sure the cream cheese is at room temperature before mixing. Cold cream cheese can create lumps that are difficult to remove, even with an electric mixer.
Do not overbeat the mixture. Once everything is combined, stop mixing.
Step 4: Whip the heavy cream
In a separate chilled mixing bowl, pour the cold heavy whipping cream.
Using a clean electric mixer with a whisk attachment, beat the cream on medium-high speed until stiff peaks form.
This usually takes approximately 3–5 minutes, depending on the temperature of the cream and the strength of your mixer.
Stiff peaks mean that when you lift the beaters, the whipped cream holds its shape without immediately falling over.
Be careful not to overwhip the cream, as it can become grainy and begin turning into butter.
Properly whipped cream is important because it gives the no-bake Christmas cheesecake a light, airy texture while helping it hold its shape.
Step 5: Combine the cheesecake filling
Add approximately one-third of the whipped cream to the cream cheese mixture.
Gently fold it in with a spatula to loosen the mixture.
Add the remaining whipped cream in two additions, folding gently after each addition.
Use a slow folding motion, moving the spatula from the bottom of the bowl toward the top.
Avoid stirring aggressively because this can deflate the whipped cream and make the cheesecake filling dense.
Once the mixture is smooth, light, and fluffy, add the chopped Little Debbie Christmas Tree Cakes.
Gently fold the cake pieces into the filling until they are evenly distributed.
Try to keep some visible pieces throughout the mixture so that every slice has plenty of festive cake flavor.
Step 6: Assemble the cheesecake
Remove the chilled graham cracker crust from the refrigerator.
Spoon the cheesecake filling over the crust and spread it evenly with a spatula.
Work carefully around the edges to make sure there are no large air pockets.
Smooth the top of the cheesecake using an offset spatula or the back of a spoon.
Tap the pan gently against the countertop a couple of times to help release any trapped air bubbles.
If you want an extra-decorative cheesecake, reserve a few small pieces of Christmas Tree Cake and gently press them into the top of the filling.
Cover the pan carefully with plastic wrap without allowing it to touch the surface.
Step 7: Chill until completely set
Place the cheesecake in the refrigerator for at least 6–8 hours.
For the best texture, allow it to chill overnight.
During this time, the cream cheese filling will firm up, the whipped cream will help stabilize the structure, and the graham cracker crust will become easier to slice.
Do not rush this step. A cheesecake that has not chilled long enough may be too soft and difficult to remove from the pan.
If you want particularly neat slices, you can place the cheesecake in the freezer for approximately 20–30 minutes before serving, but do not freeze it completely.
Step 8: Prepare the white chocolate topping
Place the white chocolate chips in a microwave-safe bowl.
Add the heavy cream and microwave in 15–20-second intervals, stirring between each interval.
Continue until the chocolate is melted and smooth.
Do not overheat white chocolate because it can become thick or grainy.
If the mixture seems too thick, add a small amount of warm heavy cream until it reaches a smooth drizzling consistency.
Allow the white chocolate mixture to cool slightly before decorating the cheesecake.
Step 9: Decorate the Christmas Tree Cheesecake
Carefully remove the sides of the springform pan.
Transfer the cheesecake to a serving plate or cake stand.
Drizzle the melted white chocolate over the top, allowing some of it to fall naturally down the sides.
Arrange the reserved Little Debbie Christmas Tree Cakes on top of the cheesecake.
Add decorative whipped cream swirls around the edges using a piping bag fitted with your favorite decorating tip.
Finish with red and green sprinkles for a festive holiday appearance.
For an extra-special Christmas presentation, add small red candy decorations and a few additional white chocolate drizzles.
Keep the decoration balanced so the cheesecake remains the star of the dessert table.
Step 10: Slice and serve
For clean slices, dip a sharp knife into warm water and wipe it dry before cutting.
Repeat this process between slices.
The cheesecake should be creamy but firm enough to hold its shape.
Serve chilled and enjoy the combination of buttery graham cracker crust, creamy cheesecake filling, soft cake pieces, and sweet white chocolate.
This Little Debbie Christmas Tree Cheesecake is especially delicious when served with coffee, hot chocolate, or a cold glass of milk.
Notes
For the best Little Debbie Christmas Tree Cheesecake, pay attention to the temperature of your ingredients and the chilling process.
Use softened cream cheese. Room-temperature cream cheese blends more smoothly and prevents lumps in the cheesecake filling.
Keep the heavy cream cold. Cold cream whips more easily and creates better volume.
Fold gently. When combining whipped cream with the cream cheese mixture, use a spatula and gentle movements to preserve the airy texture.
Do not overmix. Excessive mixing can deflate the whipped cream and make the filling less stable.
Chop the Christmas Tree Cakes carefully. Small chunks distribute evenly and create delicious pieces throughout the cheesecake.
Allow enough chilling time. A no-bake cheesecake needs sufficient refrigeration to become firm. Overnight chilling is ideal.
Use a springform pan. This makes removing the cheesecake easier and helps preserve its beautiful shape.
Decorate just before serving when possible. Whipped cream decorations and some toppings look freshest when added shortly before presentation.
Keep refrigerated. Since this dessert contains cream cheese and whipped cream, it should be stored in the refrigerator and not left at room temperature for extended periods.
- Prep Time: 40 minutes
- Refrigeration: 6–8 hours
- Cook Time: 0 minutes
Nutrition
- Calories: 550–650
- Sodium: 300–450 mg
- Protein: 6–8 g