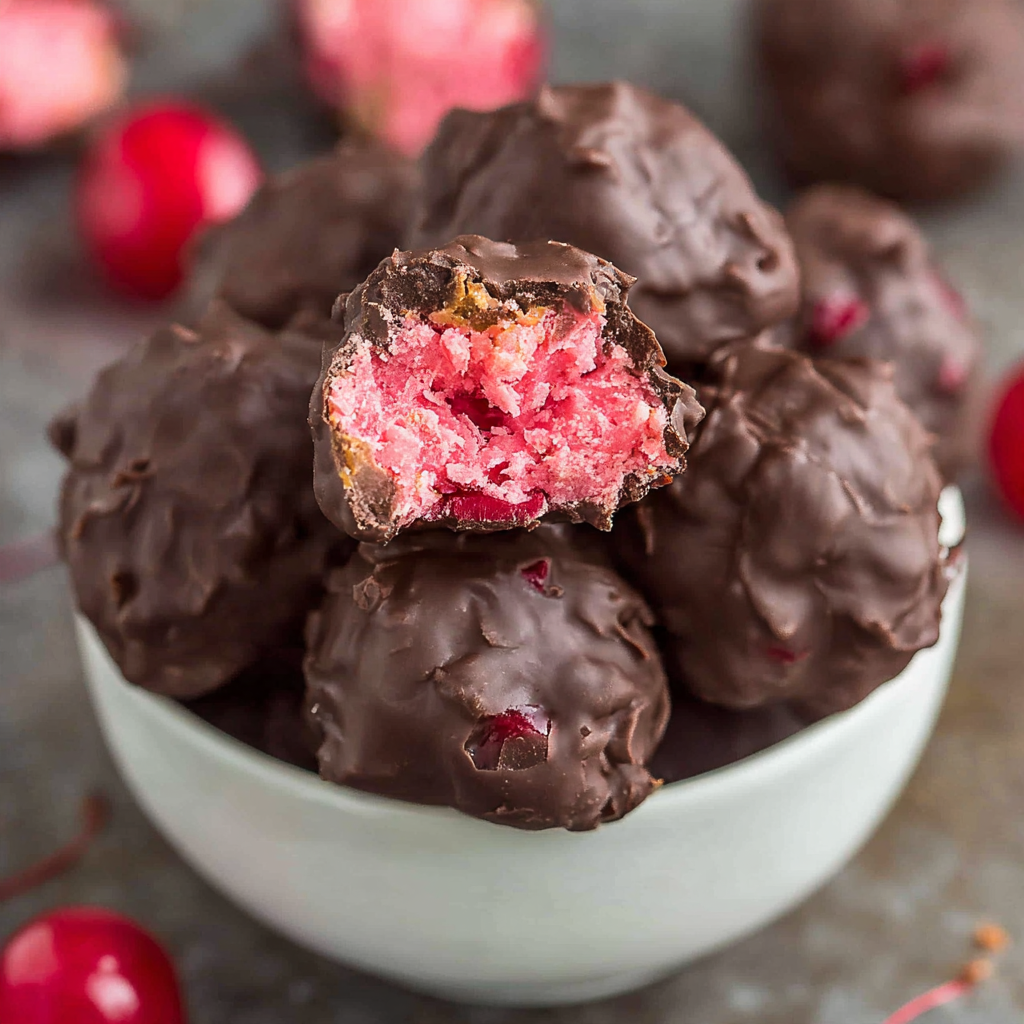
Cherry Mash Truffles are a delicious homemade candy inspired by the classic combination of sweet cherry flavor, rich chocolate, and crunchy peanuts. With a smooth pink cherry-flavored center surrounded by a chocolate coating and finished with chopped peanuts, these little treats bring together several wonderful flavors and textures in every bite.
This recipe combines softened unsalted butter, powdered sugar, cherry bakery emulsion, milk, and red food coloring to create a sweet cherry filling. The centers are then coated with melted semi-sweet chocolate mixed with coconut oil, while chopped peanuts provide a crunchy finishing touch.
One of the best things about making homemade truffles is that they can look beautiful without requiring complicated decorating techniques. Once the cherry mixture is prepared and shaped, the chocolate coating gives each piece a polished candy-shop appearance. The peanuts add an appealing finishing detail and a little crunch to contrast with the smooth filling.
These Cherry Mash Truffles are a lovely option for Christmas candy trays, holiday dessert tables, homemade gift boxes, Valentine’s Day treats, and special celebrations. Their combination of fruity cherry flavor and chocolate makes them a fun alternative to traditional chocolate truffles.
The recipe uses a relatively short ingredient list and does not require an oven. Instead, the preparation focuses on mixing the cherry filling, shaping the centers, preparing the chocolate coating, and allowing the finished candies to set.
If you enjoy chocolate-covered candies with a sweet fruit-flavored center, these Cherry Mash Truffles are a recipe worth adding to your homemade candy collection.
Why You’ll Love These Cherry Mash Truffles
Rich chocolate coating: Semi-sweet chocolate provides a deep cocoa flavor that balances the sweetness of the cherry filling.
Sweet cherry center: Cherry bakery emulsion gives the filling its distinctive cherry flavor and makes these candies different from ordinary chocolate truffles.
Beautiful pink filling: A little red food coloring creates a festive pink or red appearance inside the chocolate shell.
Crunchy peanut topping: Chopped peanuts add texture and a pleasant contrast to the smooth cherry center and chocolate exterior.
No oven required: These candies are prepared without baking, making them convenient when you want a homemade dessert without heating up the kitchen.
Great for gifting: Their chocolate coating and decorative peanut topping make them attractive additions to homemade candy boxes and holiday gift assortments.
Easy to customize: The basic cherry and chocolate combination can be presented in different ways for Christmas, Valentine’s Day, parties, and other special occasions.
Ingredients You’ll Need
This recipe uses eight ingredients. Each one contributes to the flavor, texture, or appearance of the finished Cherry Mash Truffles.
Unsalted Butter – 1/4 Cup, Softened
Butter creates the creamy foundation of the cherry filling. It helps bring the powdered sugar and other ingredients together into a smooth mixture.
Use softened butter rather than melted butter. Softened butter is easier to combine evenly and helps create a workable filling.
Unsalted butter is recommended because it allows better control over the overall flavor.
Powdered Sugar – 3 Cups
Powdered sugar provides sweetness and structure to the cherry filling. Its fine texture helps create a smooth mixture without the graininess that can occur when using regular granulated sugar.
Add it gradually if necessary to make mixing easier and reduce the amount of loose sugar around the bowl.
Because powdered sugar is the main dry ingredient in the filling, measuring it accurately is important for achieving the intended consistency.
LorAnn Cherry Bakery Emulsion – 3 Teaspoons
Cherry bakery emulsion provides the signature cherry flavor in these truffles.
Unlike ordinary vanilla flavoring, cherry emulsion gives the filling its distinctive fruity character. It is an important ingredient for achieving the intended cherry candy flavor.
The specified amount is three teaspoons. Use the product according to its labeling and avoid substituting another flavor without adjusting your expectations for the final result.
Milk – 2 Tablespoons
Milk helps bring the powdered sugar and butter together into a smoother filling.
It contributes moisture and makes the mixture easier to combine. Add the specified amount gradually if the mixture needs more help coming together.
Red Food Coloring – 1/4 Teaspoon
Red food coloring gives the cherry filling its recognizable pink or red appearance.
The exact shade will depend on the type and concentration of food coloring used. Gel and liquid food coloring can produce different results, so use the specified quantity as the starting point for this recipe.
Semi-Sweet Chocolate – 12 Ounces
Semi-sweet chocolate forms the outer coating of the truffles.
Its slightly bittersweet flavor complements the sweet cherry filling and prevents the finished candy from tasting overwhelmingly sweet.
Use chocolate suitable for melting and coating. Chop larger pieces into smaller, similar-sized portions to encourage even melting.
Coconut Oil – 2 Teaspoons
Coconut oil is combined with the semi-sweet chocolate to help create a smoother coating.
It can make the melted chocolate easier to work with when dipping the cherry centers.
Use the specified amount rather than adding extra oil, since too much can change the consistency of the chocolate coating.
Chopped Peanuts – 1/4 Cup
Chopped peanuts provide the crunchy finishing touch.
They add a nutty flavor that complements the chocolate and cherry combination. Their texture also contrasts nicely with the soft center.
Chop the peanuts into small pieces so they can be distributed easily over the coated truffles.
How to Make Cherry Mash Truffles
These homemade cherry candies are prepared in five main steps. The important parts are creating a smooth filling, allowing the centers to become firm enough to handle, and coating them carefully with melted chocolate.
Step 1: Prepare the Cherry Filling
Place the softened unsalted butter in a large mixing bowl.
Beat the butter until smooth and creamy. Gradually add the powdered sugar, mixing until the ingredients begin to form a thick filling.
Add the cherry bakery emulsion, milk, and red food coloring.
Continue mixing until the cherry flavoring and color are evenly incorporated throughout the mixture.
Scrape down the sides of the bowl as needed to make sure the ingredients are combined.
The filling should be thick enough to shape. If it feels too soft to handle, refrigerate it until it becomes firmer rather than adding unlisted ingredients.
Step 2: Shape and Chill the Cherry Centers
Once the cherry mixture is evenly combined, prepare a baking sheet or tray lined with parchment paper.
Portion the filling into small, similarly sized pieces and roll each portion gently between your hands to create smooth balls.
Place the shaped centers on the prepared tray, leaving a little space between them.
Transfer the tray to the refrigerator until the centers are firm enough to dip into melted chocolate.
Chilling is important because a firm filling is easier to handle and less likely to lose its shape during the coating process.
The exact chilling time will depend on the size of the centers and the temperature of the mixture.
Step 3: Melt the Chocolate and Coconut Oil
Place the semi-sweet chocolate and coconut oil in a microwave-safe bowl.
Heat in short intervals, stirring between each interval, until the chocolate is melted and smooth.
Avoid overheating the chocolate. Excessive heat can cause the coating to become thick or develop an undesirable texture.
Alternatively, use a double boiler by placing the chocolate and coconut oil in a heat-safe bowl over a saucepan of gently simmering water. Make sure the bottom of the bowl does not touch the water.
Stir until the chocolate is smooth and fully melted.
Keep water away from the chocolate, as even a small amount can cause melted chocolate to seize and become difficult to use.
Step 4: Coat the Cherry Centers in Chocolate
Remove the chilled cherry centers from the refrigerator.
Using a dipping fork or small fork, lower each center into the melted chocolate until it is completely coated.
Lift the truffle carefully and allow excess chocolate to drip back into the bowl.
Place each coated truffle on the parchment-lined tray.
Work with a few centers at a time so the remaining filling stays chilled and firm.
If the chocolate begins to thicken while dipping, gently warm it again in short intervals, stirring carefully.
Step 5: Add the Peanuts and Let the Truffles Set
While the chocolate coating is still wet, sprinkle the chopped peanuts over the tops of the truffles.
The peanuts should adhere to the chocolate before the coating begins to set.
Continue until all the truffles have been coated and decorated.
Place the tray in a cool area or refrigerator until the chocolate coating is firm.
Once set, transfer the Cherry Mash Truffles to an airtight food-safe container and store them according to the storage recommendations below.
Tips for the Best Cherry Mash Truffles
A few simple preparation details can make the process easier and help create attractive homemade candies.
Use softened butter: Softened butter combines more easily with powdered sugar and helps create a smooth cherry filling. Avoid using melted butter because it can make the mixture too loose.
Add powdered sugar gradually: Adding the sugar in portions makes mixing easier and helps prevent clouds of powdered sugar from escaping the bowl.
Measure the cherry emulsion carefully: Cherry bakery emulsion is responsible for the main fruit flavor. Use the specified three teaspoons for the intended flavor profile.
Check the filling consistency: The cherry mixture should be firm enough to shape into balls. If it is too soft, chilling can help it become easier to handle.
Make evenly sized centers: Similar-sized portions create a more consistent presentation and help the truffles receive an even chocolate coating.
Chill before dipping: Cold, firm centers are generally easier to dip than soft filling. This also helps reduce handling problems during coating.
Melt chocolate gently: Use short microwave intervals or a double boiler. Stir frequently and avoid overheating.
Keep water away from the chocolate: Water can cause melted chocolate to seize, making it thick and difficult to work with.
Add peanuts before the chocolate sets: Sprinkle the chopped peanuts over the truffles immediately after dipping so they stick properly.
Allow enough time for setting: Do not stack or package the candies until the chocolate coating has become firm.
Variations and Substitutions
Although the original recipe uses cherry emulsion, semi-sweet chocolate, and peanuts, there are several ways to change the presentation or flavor combination.
White Chocolate Cherry Truffles
For a sweeter appearance, use a suitable white chocolate coating instead of semi-sweet chocolate.
White chocolate creates a lighter exterior that contrasts beautifully with the pink cherry center.
Because white chocolate melts differently from semi-sweet chocolate, use appropriate melting temperatures and check its consistency carefully.
Dark Chocolate Cherry Truffles
Dark chocolate can provide a deeper cocoa flavor and a more pronounced contrast with the sweet cherry filling.
This variation is suitable for anyone who prefers a less sweet chocolate coating.
Almond Cherry Truffles
Cherry and almond are a familiar flavor combination. You can explore a small amount of almond flavoring as an alternative to part of the cherry flavoring, although this would change the original recipe.
Use a suitable food-grade extract and adjust only after testing the flavor.
Extra Peanut Crunch
For a more noticeable crunchy topping, use slightly larger chopped peanut pieces.
Keep the pieces small enough to adhere to the chocolate coating and make the truffles comfortable to eat.
Festive Christmas Cherry Truffles
For Christmas, arrange the finished candies in decorative mini paper cups and place them on a holiday serving tray.
The pink cherry center, chocolate exterior, and peanut topping create an attractive combination for seasonal dessert tables.
Valentine’s Day Cherry Truffles
These truffles can also be presented for Valentine’s Day. Arrange them in small decorative candy cups and use a red or pink gift box for a festive presentation.
Cooking Notes
Cherry Mash Truffles are a no-bake candy recipe, so the main preparation challenge is managing the consistency of the filling and chocolate coating.
The butter should be softened before mixing, while the powdered sugar should be incorporated until the filling is smooth and thick enough to shape.
The milk helps bring the filling together, but the mixture should not become overly soft. Refrigeration can help firm the centers before dipping.
The chocolate and coconut oil should be melted gently. Avoid exposing the chocolate to excessive heat or moisture.
The chopped peanuts should be added while the chocolate is still wet. Waiting too long can prevent them from sticking properly.
The final appearance will depend on the size of the centers, the thickness of the chocolate coating, and the amount of peanuts used on each truffle.
Because this recipe has not been tested, the exact shaping time, chilling duration, final yield, and setting time should be confirmed during preparation.
Serving Suggestions
Cherry Mash Truffles are small, rich treats that work well for many celebrations and dessert occasions.
Christmas Candy Platters: Arrange them alongside chocolate fudge, coconut candies, peppermint treats, and other homemade holiday sweets.
Holiday Dessert Tables: Place the truffles in mini paper candy cups and arrange them on a decorative serving tray. Their chocolate exterior makes them look especially attractive among homemade candies.
Homemade Gift Boxes: Package completely set truffles in food-safe candy boxes. Use parchment or mini paper cups to separate the pieces and help protect their chocolate coating.
Valentine’s Day Treats: Their cherry flavor and colorful centers make them a natural addition to Valentine’s Day dessert assortments.
After-Dinner Sweets: Serve one or two truffles after dinner as a small chocolate dessert.
Coffee and Tea Pairings: The semi-sweet chocolate and cherry filling pair nicely with coffee or unsweetened tea.
Party Dessert Stations: Include them in a selection of bite-sized candies so guests can enjoy different flavors without needing a large dessert portion.
Storage and Make-Ahead Instructions
How to Store Cherry Mash Truffles
Because the filling contains butter and milk, refrigeration is a sensible storage choice.
Place the finished truffles in an airtight food-safe container and refrigerate them at 40°F or below.
Separate layers with parchment paper or mini candy cups to help prevent the chocolate coatings from sticking together.
For food safety, follow standard guidance for perishable dairy-containing foods and avoid leaving the truffles at room temperature for extended periods.
Can You Make Cherry Mash Truffles Ahead?
Yes, the preparation can be organized ahead of serving.
The cherry centers can be shaped and chilled before dipping. Once coated and fully set, the finished truffles can be placed in a covered container and refrigerated until needed.
This can make holiday preparation easier when several different candies and desserts are being prepared.
Can You Freeze Cherry Mash Truffles?
Freezing has not been tested for this particular recipe, so the final texture after thawing cannot be guaranteed.
Butter-based fillings and chocolate coatings may change texture when frozen and thawed.
If you choose to freeze a small test batch, use a freezer-safe airtight container and protect the candies from moisture and odors. Thaw them while still covered to reduce condensation on the chocolate surface.
Recipe Information
- Prep Time: Approximately 30 minutes (estimated)
- Chilling Time: Additional time required until the centers are firm enough to dip
- Cook Time: 0 minutes
- Setting Time: Additional time required until the chocolate coating is firm
- Total Time: Preparation time plus chilling and setting; exact total requires testing
- Yield: To be confirmed after portioning
- Category: Dessert, Candy, Truffles
- Cuisine: American-inspired homemade candy
- Method: No-Bake
- Difficulty: Easy to Moderate
- Season: Christmas, Valentine’s Day, Holidays
Nutritional Information
The following nutrition values have not been calculated because the final number of truffles and the specific product nutrition labels have not been supplied.
The nutritional content will depend on the portion size, the chocolate brand, the powdered sugar brand, the cherry bakery emulsion, and the quantity of peanuts used per piece.
Estimated Nutrition Per Truffle:
- Calories: To be calculated
- Protein: To be calculated
- Sodium: To be calculated
For accurate per-piece values, calculate the nutrition for the complete ingredient list and divide the total by the actual number of finished truffles.
Frequently Asked Questions
What are Cherry Mash Truffles made of?
These homemade truffles use softened butter, powdered sugar, cherry bakery emulsion, milk, and red food coloring for the cherry center. The filling is coated in semi-sweet chocolate mixed with coconut oil and finished with chopped peanuts.
Do Cherry Mash Truffles need to be baked?
No. This is a no-bake candy recipe. The cherry filling is mixed, shaped, chilled, dipped in melted chocolate, and allowed to set.
Can I use cherry extract instead of cherry bakery emulsion?
A suitable cherry extract may provide a similar flavor direction, but different products have different strengths and concentrations. The three-teaspoon quantity in this recipe is specifically for the listed cherry bakery emulsion and should not automatically be transferred to another product.
Why does the cherry filling need to be chilled?
Chilling helps the shaped centers become firm enough to handle and dip into melted chocolate. A soft filling may lose its shape during the coating process.
What does coconut oil do in the chocolate coating?
Coconut oil helps make the melted chocolate smoother and easier to work with during dipping.
Can I use milk chocolate instead of semi-sweet chocolate?
Yes, milk chocolate can be used as a variation. However, it will produce a sweeter coating and change the balance between the chocolate and cherry filling.
How do I keep the chocolate coating smooth?
Melt the chocolate gently, stir regularly, and keep moisture away from the bowl. Avoid overheating, since excessive heat can affect the texture of the chocolate.
When should I add the chopped peanuts?
Add the chopped peanuts immediately after coating each truffle, while the chocolate is still wet. This helps the pieces stick to the exterior.
Can I make the cherry centers ahead of time?
The centers can be shaped and refrigerated before dipping. Keep them covered and chilled until you are ready to prepare the chocolate coating.
Why is my cherry filling too soft?
The filling may be too soft if the butter is overly warm or the mixture has not had enough time to firm up. Refrigerating the mixture before shaping or dipping can help.
How should I store Cherry Mash Truffles?
Store them in an airtight food-safe container in the refrigerator. Separate layers with parchment paper to protect the chocolate coating and keep the candies from sticking together.
Can I make Cherry Mash Truffles for Christmas gifts?
Absolutely. Once the chocolate coating has fully set, place the truffles in mini candy cups inside a food-safe gift box. Keep them refrigerated as appropriate because the filling contains dairy ingredients.
Conclusion
Cherry Mash Truffles are a delicious-looking homemade candy that combines sweet cherry flavor, smooth chocolate, and crunchy peanuts in one small treat.
The creamy cherry filling provides a colorful center, while the semi-sweet chocolate coating adds richness and the chopped peanuts create a satisfying finishing touch. With no oven required, these candies are a convenient addition to Christmas dessert tables, holiday gift boxes, and special celebrations.
The most important preparation details are getting the filling firm enough to shape, melting the chocolate gently, and adding the peanuts before the coating sets.
Whether you are preparing homemade holiday candies or looking for a different chocolate dessert to share, Cherry Mash Truffles bring a festive combination of flavors and textures to your candy collection.
Print
Cherry Mash Truffles – Easy Chocolate Cherry Peanut Butter-Free Candy
Ingredients
- 1/4 cup unsalted butter, softened
- 3 cups powdered sugar
- 3 teaspoons LorAnn Cherry Bakery Emulsion
- 2 tablespoons milk
- 1/4 teaspoon red food coloring
- 12 ounces semi sweet chocolate
- 2 teaspoons coconut oil
- 1/4 cup chopped peanuts
Instructions
Place the softened unsalted butter in a large mixing bowl.
Beat the butter until smooth and creamy. Gradually add the powdered sugar, mixing until the ingredients begin to form a thick filling.
Add the cherry bakery emulsion, milk, and red food coloring.
Continue mixing until the cherry flavoring and color are evenly incorporated throughout the mixture.
Scrape down the sides of the bowl as needed to make sure the ingredients are combined.
The filling should be thick enough to shape. If it feels too soft to handle, refrigerate it until it becomes firmer rather than adding unlisted ingredients.
Step 2: Shape and Chill the Cherry Centers
Once the cherry mixture is evenly combined, prepare a baking sheet or tray lined with parchment paper.
Portion the filling into small, similarly sized pieces and roll each portion gently between your hands to create smooth balls.
Place the shaped centers on the prepared tray, leaving a little space between them.
Transfer the tray to the refrigerator until the centers are firm enough to dip into melted chocolate.
Chilling is important because a firm filling is easier to handle and less likely to lose its shape during the coating process.
The exact chilling time will depend on the size of the centers and the temperature of the mixture.
Step 3: Melt the Chocolate and Coconut Oil
Place the semi-sweet chocolate and coconut oil in a microwave-safe bowl.
Heat in short intervals, stirring between each interval, until the chocolate is melted and smooth.
Avoid overheating the chocolate. Excessive heat can cause the coating to become thick or develop an undesirable texture.
Alternatively, use a double boiler by placing the chocolate and coconut oil in a heat-safe bowl over a saucepan of gently simmering water. Make sure the bottom of the bowl does not touch the water.
Stir until the chocolate is smooth and fully melted.
Keep water away from the chocolate, as even a small amount can cause melted chocolate to seize and become difficult to use.
Step 4: Coat the Cherry Centers in Chocolate
Remove the chilled cherry centers from the refrigerator.
Using a dipping fork or small fork, lower each center into the melted chocolate until it is completely coated.
Lift the truffle carefully and allow excess chocolate to drip back into the bowl.
Place each coated truffle on the parchment-lined tray.
Work with a few centers at a time so the remaining filling stays chilled and firm.
If the chocolate begins to thicken while dipping, gently warm it again in short intervals, stirring carefully.
Step 5: Add the Peanuts and Let the Truffles Set
While the chocolate coating is still wet, sprinkle the chopped peanuts over the tops of the truffles.
The peanuts should adhere to the chocolate before the coating begins to set.
Continue until all the truffles have been coated and decorated.
Place the tray in a cool area or refrigerator until the chocolate coating is firm.
Once set, transfer the Cherry Mash Truffles to an airtight food-safe container and store them according to the storage recommendations below.
Notes
Cherry Mash Truffles are a no-bake candy recipe, so the main preparation challenge is managing the consistency of the filling and chocolate coating.
The butter should be softened before mixing, while the powdered sugar should be incorporated until the filling is smooth and thick enough to shape.
The milk helps bring the filling together, but the mixture should not become overly soft. Refrigeration can help firm the centers before dipping.
The chocolate and coconut oil should be melted gently. Avoid exposing the chocolate to excessive heat or moisture.
The chopped peanuts should be added while the chocolate is still wet. Waiting too long can prevent them from sticking properly.
The final appearance will depend on the size of the centers, the thickness of the chocolate coating, and the amount of peanuts used on each truffle.
Because this recipe has not been tested, the exact shaping time, chilling duration, final yield, and setting time should be confirmed during preparation.
