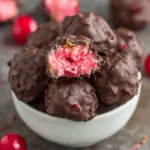
Ingredients
- 1/4 cup unsalted butter, softened
- 3 cups powdered sugar
- 3 teaspoons LorAnn Cherry Bakery Emulsion
- 2 tablespoons milk
- 1/4 teaspoon red food coloring
- 12 ounces semi sweet chocolate
- 2 teaspoons coconut oil
- 1/4 cup chopped peanuts
Instructions
Place the softened unsalted butter in a large mixing bowl.
Beat the butter until smooth and creamy. Gradually add the powdered sugar, mixing until the ingredients begin to form a thick filling.
Add the cherry bakery emulsion, milk, and red food coloring.
Continue mixing until the cherry flavoring and color are evenly incorporated throughout the mixture.
Scrape down the sides of the bowl as needed to make sure the ingredients are combined.
The filling should be thick enough to shape. If it feels too soft to handle, refrigerate it until it becomes firmer rather than adding unlisted ingredients.
Step 2: Shape and Chill the Cherry Centers
Once the cherry mixture is evenly combined, prepare a baking sheet or tray lined with parchment paper.
Portion the filling into small, similarly sized pieces and roll each portion gently between your hands to create smooth balls.
Place the shaped centers on the prepared tray, leaving a little space between them.
Transfer the tray to the refrigerator until the centers are firm enough to dip into melted chocolate.
Chilling is important because a firm filling is easier to handle and less likely to lose its shape during the coating process.
The exact chilling time will depend on the size of the centers and the temperature of the mixture.
Step 3: Melt the Chocolate and Coconut Oil
Place the semi-sweet chocolate and coconut oil in a microwave-safe bowl.
Heat in short intervals, stirring between each interval, until the chocolate is melted and smooth.
Avoid overheating the chocolate. Excessive heat can cause the coating to become thick or develop an undesirable texture.
Alternatively, use a double boiler by placing the chocolate and coconut oil in a heat-safe bowl over a saucepan of gently simmering water. Make sure the bottom of the bowl does not touch the water.
Stir until the chocolate is smooth and fully melted.
Keep water away from the chocolate, as even a small amount can cause melted chocolate to seize and become difficult to use.
Step 4: Coat the Cherry Centers in Chocolate
Remove the chilled cherry centers from the refrigerator.
Using a dipping fork or small fork, lower each center into the melted chocolate until it is completely coated.
Lift the truffle carefully and allow excess chocolate to drip back into the bowl.
Place each coated truffle on the parchment-lined tray.
Work with a few centers at a time so the remaining filling stays chilled and firm.
If the chocolate begins to thicken while dipping, gently warm it again in short intervals, stirring carefully.
Step 5: Add the Peanuts and Let the Truffles Set
While the chocolate coating is still wet, sprinkle the chopped peanuts over the tops of the truffles.
The peanuts should adhere to the chocolate before the coating begins to set.
Continue until all the truffles have been coated and decorated.
Place the tray in a cool area or refrigerator until the chocolate coating is firm.
Once set, transfer the Cherry Mash Truffles to an airtight food-safe container and store them according to the storage recommendations below.
Notes
Cherry Mash Truffles are a no-bake candy recipe, so the main preparation challenge is managing the consistency of the filling and chocolate coating.
The butter should be softened before mixing, while the powdered sugar should be incorporated until the filling is smooth and thick enough to shape.
The milk helps bring the filling together, but the mixture should not become overly soft. Refrigeration can help firm the centers before dipping.
The chocolate and coconut oil should be melted gently. Avoid exposing the chocolate to excessive heat or moisture.
The chopped peanuts should be added while the chocolate is still wet. Waiting too long can prevent them from sticking properly.
The final appearance will depend on the size of the centers, the thickness of the chocolate coating, and the amount of peanuts used on each truffle.
Because this recipe has not been tested, the exact shaping time, chilling duration, final yield, and setting time should be confirmed during preparation.