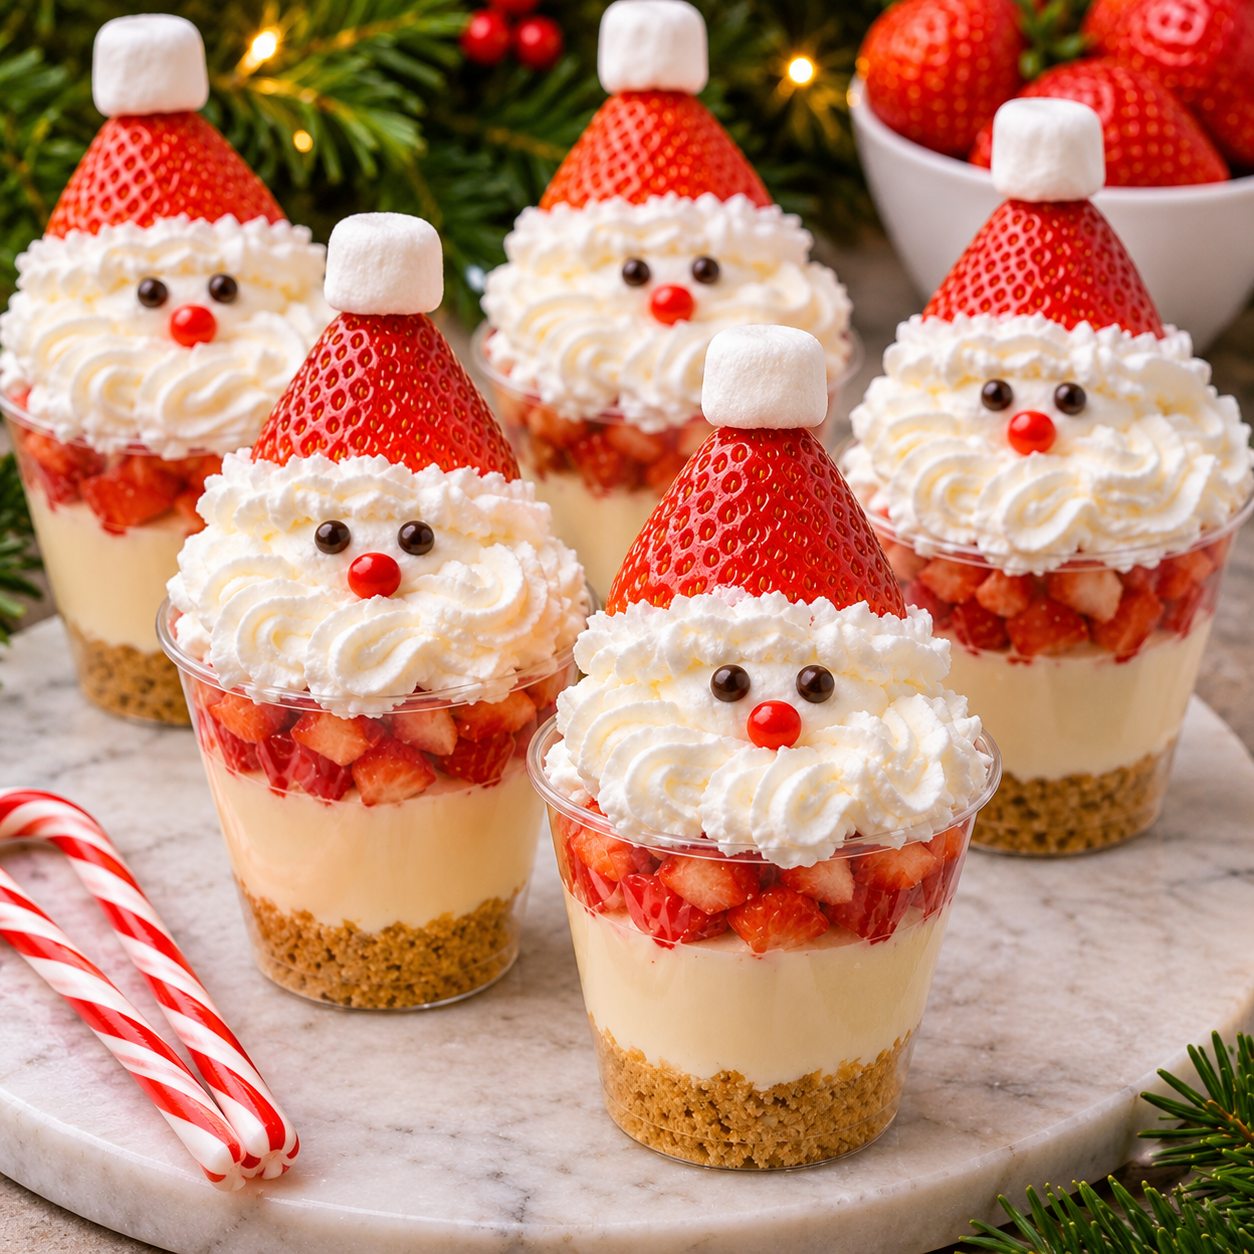
These Strawberry Santa Cheesecake Cups are a festive little dessert that looks almost too cute to eat! Each individual cup features a buttery cookie crust, a smooth and creamy cheesecake filling, and fresh strawberries decorated to look like tiny Santa hats. They’re sweet, refreshing, and perfect for adding a little Christmas magic to your holiday dessert table.
The best part is that this recipe requires no oven and no complicated baking techniques. The cheesecake filling comes together with cream cheese, powdered sugar, vanilla, and whipped cream, creating a light and fluffy texture that pairs beautifully with the fresh strawberries. A simple cookie crust gives every spoonful a delicious buttery crunch.
Whether you’re hosting a Christmas party, preparing treats for a family gathering, or looking for an adorable dessert to share on social media, these mini cheesecake cups are sure to attract attention. They’re easy to portion, beautiful to display, and can be prepared ahead of time.
Why You’ll Love These Strawberry Santa Cheesecake Cups
- No-bake dessert: No oven is needed, making this recipe convenient during the busy holiday season.
- Festive presentation: Fresh strawberries become adorable Santa hats with a little whipped cream.
- Creamy cheesecake filling: The combination of cream cheese and whipped cream creates a smooth, fluffy texture.
- Individual servings: Small dessert cups make serving easy and mess-free.
- Perfect for Christmas: Their red-and-white colors look beautiful on holiday dessert tables.
- Make-ahead friendly: Prepare the crust and cheesecake filling in advance, then decorate shortly before serving.
Ingredients You’ll Need
For the Cookie Crust
- 1 ½ cups graham cracker crumbs: These create a buttery, slightly crunchy base.
- 4 tablespoons unsalted butter, melted: Helps bind the crumbs together.
- 2 tablespoons granulated sugar: Adds a little sweetness to the crust.
For the Cheesecake Filling
- 8 ounces cream cheese, softened: Use full-fat cream cheese for the richest and creamiest filling.
- ½ cup powdered sugar: Sweetens the cheesecake while keeping the texture smooth.
- 1 teaspoon vanilla extract: Adds warm, classic cheesecake flavor.
- 1 tablespoon fresh lemon juice: Adds a subtle tang that balances the sweetness.
- 1 cup cold heavy whipping cream: Whipped into soft peaks to give the filling a light texture.
For the Strawberry Santa Topping
- 12–15 medium fresh strawberries: Choose firm, ripe strawberries with attractive pointed tops.
- ½ cup heavy whipping cream: For decorating the Santa hats.
- 2 tablespoons powdered sugar: Sweetens the whipped cream.
- ½ teaspoon vanilla extract: Adds flavor to the decorative cream.
Optional Decorations
- Mini white chocolate chips for small decorative details.
- Extra whipped cream for serving.
- Festive red and green sprinkles for the dessert cups.
Ingredient Notes and Substitutions
Cream cheese: Full-fat block cream cheese is recommended because it produces a thicker, more stable cheesecake filling. Let it soften at room temperature before mixing so you don’t end up with lumps.
Graham cracker crumbs: You can substitute digestive biscuits, vanilla wafer cookies, or shortbread cookies. Each option gives the crust a slightly different flavor.
Heavy whipping cream: Use cold heavy cream with enough fat to whip into stable peaks. Do not substitute regular milk because it will not create the same fluffy texture.
Fresh strawberries: Choose firm, evenly sized berries. Avoid strawberries that are bruised, overly soft, or leaking juice. Dry them thoroughly after washing.
Powdered sugar: This dissolves easily into the cheesecake filling and whipped cream, helping create a smooth consistency.
How to Make Strawberry Santa Cheesecake Cups
Step 1: Prepare the Cookie Crust
Place the graham cracker crumbs in a medium mixing bowl.
Add the melted butter and granulated sugar. Stir until all the crumbs are evenly moistened and resemble damp sand.
Divide the mixture between 12 small dessert cups, approximately 3–4 ounces each.
Press the crumbs gently into the bottom of each cup using the back of a spoon. You want a compact base without pressing it too firmly.
Place the cups in the refrigerator while you prepare the cheesecake filling.
Step 2: Make the Cheesecake Filling
In a large mixing bowl, beat the softened cream cheese with an electric mixer until smooth and creamy.
Add the powdered sugar, vanilla extract, and lemon juice. Beat again until everything is fully combined and no lumps remain.
In a separate chilled bowl, whip the cold heavy cream until soft-to-medium peaks form.
Gently fold the whipped cream into the cream cheese mixture using a spatula. Work slowly to keep the filling light and airy.
Continue folding until the mixture is smooth, fluffy, and evenly combined.
Step 3: Fill the Dessert Cups
Transfer the cheesecake mixture into a piping bag fitted with a large round or star-shaped tip.
Pipe the filling evenly over the chilled cookie crusts, filling each cup almost to the top.
You can also spoon the filling into the cups and smooth the surface with the back of a spoon.
Refrigerate the cups for at least 3 hours, or until the cheesecake filling is properly chilled and firm enough to hold the strawberry decorations.
Step 4: Prepare the Santa Strawberries
Wash the strawberries carefully and remove any damaged leaves.
Pat each strawberry completely dry with paper towels. This step is important because excess moisture can make the whipped cream slide off the fruit.
Keep the pointed strawberry tops intact. If necessary, trim a tiny amount from the bottom of each strawberry so it can sit upright.
For the Santa hats, the pointed end of each strawberry should face upward.
Step 5: Make the Decorative Whipped Cream
Place the cold heavy whipping cream in a chilled mixing bowl.
Add the powdered sugar and vanilla extract.
Beat with an electric mixer until stiff peaks form. The cream should be firm enough to hold its shape when piped.
Transfer the whipped cream into a piping bag fitted with a small round or star tip.
Avoid overwhipping, as the cream can become grainy and lose its smooth texture.
Step 6: Decorate the Strawberry Santa Hats
Remove the chilled cheesecake cups from the refrigerator.
Place one dry strawberry upright in the center of each cup, with its pointed end facing upward.
Pipe a small ring or generous dollop of whipped cream around the bottom of each strawberry to create the white fur trim of Santa’s hat.
Add a tiny dot of whipped cream to the strawberry tip to create the pom-pom.
If desired, use mini white chocolate chips or tiny edible decorations to create additional details.
For the prettiest result, pipe the whipped cream carefully and keep the decorations consistent across all the cups.
Step 7: Chill and Serve
Return the decorated cheesecake cups to the refrigerator for approximately 15–20 minutes before serving.
Keep them refrigerated until ready to enjoy. For the freshest appearance and best texture, serve them shortly after decorating.
Helpful Cooking Notes
- Soften the cream cheese: Cold cream cheese can create lumps, so allow it to soften before mixing.
- Use cold whipping cream: Cold cream whips more easily and holds its shape better.
- Fold gently: Folding the whipped cream into the cheesecake mixture helps preserve its light texture.
- Dry strawberries completely: Water on the berries can cause the whipped cream to slip and affect the appearance.
- Chill before decorating: The cheesecake filling should be firm enough to support the strawberries.
- Use a piping bag: Piping makes the Santa hats look neat and gives the dessert cups a professional finish.
- Decorate close to serving time: Fresh strawberries release moisture as they sit, so adding them shortly before serving gives the best results.
Delicious Variations
Chocolate Strawberry Santa Cups: Replace the graham cracker crust with chocolate cookie crumbs for a richer chocolate-and-strawberry combination.
Oreo Santa Cheesecake Cups: Use crushed chocolate sandwich cookies mixed with melted butter to create a delicious Oreo-style base.
White Chocolate Cheesecake Cups: Melt 2–3 ounces of white chocolate, allow it to cool slightly, and beat it into the cream cheese mixture before folding in the whipped cream. Chill thoroughly so the filling sets properly.
Vanilla Wafer Cheesecake Cups: Replace the graham crackers with crushed vanilla wafers for a sweeter, softer cookie crust.
Mini Santa Cheesecake Jars: Layer the crust and filling in small glass jars for an elegant holiday dessert presentation.
Chocolate Drizzle Strawberry Cups: Add a little melted and cooled dark chocolate drizzle around the strawberry topping just before serving.
Serving Suggestions
These Strawberry Santa Cheesecake Cups are perfect for Christmas parties, holiday dinners, and festive family gatherings.
- Arrange them on a Christmas dessert table with fudge, cookies, and chocolate truffles.
- Serve them after a holiday dinner as individual mini cheesecakes.
- Pair them with hot chocolate, coffee, or a warm holiday drink.
- Display them in small clear dessert cups so everyone can see the cookie crust and creamy filling.
- Add a few fresh mint leaves around the serving platter for a festive red-and-green presentation.
- Serve them alongside other strawberry desserts for a colorful holiday dessert spread.
For a beautiful presentation, use transparent cups and pipe the filling in even layers so the crust and cheesecake are clearly visible.
Tips for Perfect Strawberry Santa Cheesecake Cups
- Use block cream cheese: It gives the filling a thicker consistency than cream cheese spread.
- Beat the cream cheese first: Make sure it is completely smooth before adding the other ingredients.
- Do not overmix the whipped cream: Stop once stiff peaks form.
- Choose similar-sized strawberries: This makes the Santa decorations look consistent.
- Keep the strawberries dry: Excess moisture can affect the whipped cream.
- Do not skip chilling: The filling needs time to firm up before decorating.
- Use a small piping tip: It gives you better control over the Santa hat details.
- Decorate shortly before serving: This keeps the strawberries looking fresh and attractive.
Storage Instructions
Store the cheesecake cups in an airtight container in the refrigerator.
Because this recipe contains cream cheese, whipped cream, and fresh strawberries, it must remain refrigerated. For the best flavor and appearance, enjoy the cheesecake cups within 1–2 days.
The strawberries may release moisture over time, and the whipped cream can gradually lose its shape. If preparing ahead, keep the cheesecake cups and decorations separate, then add the strawberries and whipped cream shortly before serving.
Do not leave the finished dessert cups at room temperature for more than 2 hours, or more than 1 hour when temperatures are above 90°F.
Can You Freeze Strawberry Santa Cheesecake Cups?
Freezing the fully decorated cheesecake cups is not recommended. Fresh strawberries can become soft and watery after thawing, while the whipped cream may lose its shape.
You can prepare and freeze the undecorated cheesecake filling in suitable freezer-safe containers, but the texture may change slightly after thawing.
For the best results, prepare the crust and filling ahead, refrigerate them, and add the fresh strawberry Santa decorations on the day you plan to serve them.
Make-Ahead Instructions
These cheesecake cups are easy to prepare in advance, which makes them especially convenient during the busy Christmas season.
Up to 1 day ahead: Prepare the graham cracker crust and cheesecake filling. Divide the filling between the cups, cover, and refrigerate.
A few hours before serving: Wash and dry the strawberries. Keep them refrigerated in a single layer on paper towels.
Shortly before serving: Whip the cream, decorate the strawberries to look like Santa hats, and place them on top of the chilled cheesecake cups.
This approach helps keep the strawberries fresh and the whipped cream decorations beautiful.
Recipe Details
- Prep Time: 30 minutes
- Cook Time: 0 minutes
- Chilling Time: 3 hours 20 minutes
- Total Time: 3 hours 50 minutes
- Yield: 12 cheesecake cups
- Serving Size: 1 cheesecake cup
Nutritional Information
Estimated nutrition per serving:
- Calories: 310
- Protein: 4 g
- Carbohydrates: 25 g
- Fat: 22 g
- Saturated Fat: 13 g
- Sugar: 18 g
- Sodium: 190 mg
Nutrition values are estimates and may vary depending on the cookie brand, cream cheese, whipping cream, strawberries, and dessert cup size.
Frequently Asked Questions
Can I make Strawberry Santa Cheesecake Cups without baking?
Yes! This is a completely no-bake dessert. The graham cracker crust is made with melted butter and chilled until firm, while the cheesecake filling sets in the refrigerator.
Can I use frozen strawberries?
Fresh strawberries are strongly recommended. Frozen strawberries release a lot of moisture when thawed and will not hold the same shape as fresh berries. They can also make the whipped cream decorations slide.
How do I keep the cheesecake filling from becoming runny?
Use full-fat block cream cheese, cold heavy whipping cream, and the correct ingredient measurements. Whip the cream to stiff peaks and fold it gently into the cream cheese mixture. Allow enough chilling time before decorating.
Can I make these cheesecake cups the night before?
Yes. Prepare the crust and cheesecake filling the night before and refrigerate the cups. For the best appearance, add the fresh strawberries and whipped cream Santa decorations shortly before serving.
What can I use instead of graham crackers?
You can use crushed vanilla wafers, digestive biscuits, shortbread cookies, or chocolate sandwich cookies. Mix the crumbs with melted butter until they hold together when pressed.
How do I make the Santa hat decorations stay in place?
Make sure the strawberries are completely dry and the cheesecake filling is well chilled. Pipe a small amount of firm whipped cream around the bottom of each strawberry and add a little cream to the tip.
Can I use store-bought whipped topping?
Yes. You can use thawed whipped topping for the cheesecake filling, following the package directions. For the Santa hat decorations, use a product that holds its shape when piped. Freshly whipped heavy cream is a good option.
Can I make these in larger dessert cups?
Absolutely! You can use larger cups or small glass jars. Simply divide the crust and filling between fewer containers and adjust the number of servings.
How long do Strawberry Santa Cheesecake Cups last?
For the best quality, enjoy them within 1–2 days when stored continuously in the refrigerator. The fresh strawberries and whipped cream are most attractive when added shortly before serving.
Are these cheesecake cups good for Christmas parties?
Yes! Their individual portions and adorable Santa decorations make them a wonderful choice for Christmas parties, family gatherings, school celebrations, and holiday dessert tables.
Conclusion
These Strawberry Santa Cheesecake Cups are a delightful combination of buttery cookie crust, fluffy cheesecake filling, and fresh strawberries decorated like little Santa hats. They’re easy to prepare, require no baking, and bring a festive touch to any Christmas celebration.
Whether you’re making them for a holiday party, a family dessert, or a special Christmas treat, these adorable cheesecake cups are sure to impress. Prepare the creamy filling ahead, add the fresh strawberry decorations before serving, and enjoy a sweet little dessert that captures the magic of the holiday season!
Print
Strawberry Santa Cheesecake Cups – Easy No-Bake Christmas Dessert
Ingredients
For the Cookie Crust
- 1 ½ cups graham cracker crumbs: These create a buttery, slightly crunchy base.
- 4 tablespoons unsalted butter, melted: Helps bind the crumbs together.
- 2 tablespoons granulated sugar: Adds a little sweetness to the crust.
For the Cheesecake Filling
- 8 ounces cream cheese, softened: Use full-fat cream cheese for the richest and creamiest filling.
- ½ cup powdered sugar: Sweetens the cheesecake while keeping the texture smooth.
- 1 teaspoon vanilla extract: Adds warm, classic cheesecake flavor.
- 1 tablespoon fresh lemon juice: Adds a subtle tang that balances the sweetness.
- 1 cup cold heavy whipping cream: Whipped into soft peaks to give the filling a light texture.
For the Strawberry Santa Topping
- 12–15 medium fresh strawberries: Choose firm, ripe strawberries with attractive pointed tops.
- ½ cup heavy whipping cream: For decorating the Santa hats.
- 2 tablespoons powdered sugar: Sweetens the whipped cream.
- ½ teaspoon vanilla extract: Adds flavor to the decorative cream.
Instructions
Place the graham cracker crumbs in a medium mixing bowl.
Add the melted butter and granulated sugar. Stir until all the crumbs are evenly moistened and resemble damp sand.
Divide the mixture between 12 small dessert cups, approximately 3–4 ounces each.
Press the crumbs gently into the bottom of each cup using the back of a spoon. You want a compact base without pressing it too firmly.
Place the cups in the refrigerator while you prepare the cheesecake filling.
Step 2: Make the Cheesecake Filling
In a large mixing bowl, beat the softened cream cheese with an electric mixer until smooth and creamy.
Add the powdered sugar, vanilla extract, and lemon juice. Beat again until everything is fully combined and no lumps remain.
In a separate chilled bowl, whip the cold heavy cream until soft-to-medium peaks form.
Gently fold the whipped cream into the cream cheese mixture using a spatula. Work slowly to keep the filling light and airy.
Continue folding until the mixture is smooth, fluffy, and evenly combined.
Step 3: Fill the Dessert Cups
Transfer the cheesecake mixture into a piping bag fitted with a large round or star-shaped tip.
Pipe the filling evenly over the chilled cookie crusts, filling each cup almost to the top.
You can also spoon the filling into the cups and smooth the surface with the back of a spoon.
Refrigerate the cups for at least 3 hours, or until the cheesecake filling is properly chilled and firm enough to hold the strawberry decorations.
Step 4: Prepare the Santa Strawberries
Wash the strawberries carefully and remove any damaged leaves.
Pat each strawberry completely dry with paper towels. This step is important because excess moisture can make the whipped cream slide off the fruit.
Keep the pointed strawberry tops intact. If necessary, trim a tiny amount from the bottom of each strawberry so it can sit upright.
For the Santa hats, the pointed end of each strawberry should face upward.
Step 5: Make the Decorative Whipped Cream
Place the cold heavy whipping cream in a chilled mixing bowl.
Add the powdered sugar and vanilla extract.
Beat with an electric mixer until stiff peaks form. The cream should be firm enough to hold its shape when piped.
Transfer the whipped cream into a piping bag fitted with a small round or star tip.
Avoid overwhipping, as the cream can become grainy and lose its smooth texture.
Step 6: Decorate the Strawberry Santa Hats
Remove the chilled cheesecake cups from the refrigerator.
Place one dry strawberry upright in the center of each cup, with its pointed end facing upward.
Pipe a small ring or generous dollop of whipped cream around the bottom of each strawberry to create the white fur trim of Santa’s hat.
Add a tiny dot of whipped cream to the strawberry tip to create the pom-pom.
If desired, use mini white chocolate chips or tiny edible decorations to create additional details.
For the prettiest result, pipe the whipped cream carefully and keep the decorations consistent across all the cups.
Step 7: Chill and Serve
Return the decorated cheesecake cups to the refrigerator for approximately 15–20 minutes before serving.
Keep them refrigerated until ready to enjoy. For the freshest appearance and best texture, serve them shortly after decorating.
Notes
- Soften the cream cheese: Cold cream cheese can create lumps, so allow it to soften before mixing.
- Use cold whipping cream: Cold cream whips more easily and holds its shape better.
- Fold gently: Folding the whipped cream into the cheesecake mixture helps preserve its light texture.
- Dry strawberries completely: Water on the berries can cause the whipped cream to slip and affect the appearance.
- Chill before decorating: The cheesecake filling should be firm enough to support the strawberries.
- Use a piping bag: Piping makes the Santa hats look neat and gives the dessert cups a professional finish.
- Decorate close to serving time: Fresh strawberries release moisture as they sit, so adding them shortly before serving gives the best results.
