Ingredients
For the Cookie Crust
- 1 ½ cups graham cracker crumbs: These create a buttery, slightly crunchy base.
- 4 tablespoons unsalted butter, melted: Helps bind the crumbs together.
- 2 tablespoons granulated sugar: Adds a little sweetness to the crust.
For the Cheesecake Filling
- 8 ounces cream cheese, softened: Use full-fat cream cheese for the richest and creamiest filling.
- ½ cup powdered sugar: Sweetens the cheesecake while keeping the texture smooth.
- 1 teaspoon vanilla extract: Adds warm, classic cheesecake flavor.
- 1 tablespoon fresh lemon juice: Adds a subtle tang that balances the sweetness.
- 1 cup cold heavy whipping cream: Whipped into soft peaks to give the filling a light texture.
For the Strawberry Santa Topping
- 12–15 medium fresh strawberries: Choose firm, ripe strawberries with attractive pointed tops.
- ½ cup heavy whipping cream: For decorating the Santa hats.
- 2 tablespoons powdered sugar: Sweetens the whipped cream.
- ½ teaspoon vanilla extract: Adds flavor to the decorative cream.
Instructions
Place the graham cracker crumbs in a medium mixing bowl.
Add the melted butter and granulated sugar. Stir until all the crumbs are evenly moistened and resemble damp sand.
Divide the mixture between 12 small dessert cups, approximately 3–4 ounces each.
Press the crumbs gently into the bottom of each cup using the back of a spoon. You want a compact base without pressing it too firmly.
Place the cups in the refrigerator while you prepare the cheesecake filling.
Step 2: Make the Cheesecake Filling
In a large mixing bowl, beat the softened cream cheese with an electric mixer until smooth and creamy.
Add the powdered sugar, vanilla extract, and lemon juice. Beat again until everything is fully combined and no lumps remain.
In a separate chilled bowl, whip the cold heavy cream until soft-to-medium peaks form.
Gently fold the whipped cream into the cream cheese mixture using a spatula. Work slowly to keep the filling light and airy.
Continue folding until the mixture is smooth, fluffy, and evenly combined.
Step 3: Fill the Dessert Cups
Transfer the cheesecake mixture into a piping bag fitted with a large round or star-shaped tip.
Pipe the filling evenly over the chilled cookie crusts, filling each cup almost to the top.
You can also spoon the filling into the cups and smooth the surface with the back of a spoon.
Refrigerate the cups for at least 3 hours, or until the cheesecake filling is properly chilled and firm enough to hold the strawberry decorations.
Step 4: Prepare the Santa Strawberries
Wash the strawberries carefully and remove any damaged leaves.
Pat each strawberry completely dry with paper towels. This step is important because excess moisture can make the whipped cream slide off the fruit.
Keep the pointed strawberry tops intact. If necessary, trim a tiny amount from the bottom of each strawberry so it can sit upright.
For the Santa hats, the pointed end of each strawberry should face upward.
Step 5: Make the Decorative Whipped Cream
Place the cold heavy whipping cream in a chilled mixing bowl.
Add the powdered sugar and vanilla extract.
Beat with an electric mixer until stiff peaks form. The cream should be firm enough to hold its shape when piped.
Transfer the whipped cream into a piping bag fitted with a small round or star tip.
Avoid overwhipping, as the cream can become grainy and lose its smooth texture.
Step 6: Decorate the Strawberry Santa Hats
Remove the chilled cheesecake cups from the refrigerator.
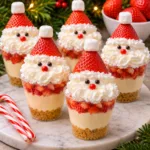
Place one dry strawberry upright in the center of each cup, with its pointed end facing upward.
Pipe a small ring or generous dollop of whipped cream around the bottom of each strawberry to create the white fur trim of Santa’s hat.
Add a tiny dot of whipped cream to the strawberry tip to create the pom-pom.
If desired, use mini white chocolate chips or tiny edible decorations to create additional details.
For the prettiest result, pipe the whipped cream carefully and keep the decorations consistent across all the cups.
Step 7: Chill and Serve
Return the decorated cheesecake cups to the refrigerator for approximately 15–20 minutes before serving.
Keep them refrigerated until ready to enjoy. For the freshest appearance and best texture, serve them shortly after decorating.
Notes
- Soften the cream cheese: Cold cream cheese can create lumps, so allow it to soften before mixing.
- Use cold whipping cream: Cold cream whips more easily and holds its shape better.
- Fold gently: Folding the whipped cream into the cheesecake mixture helps preserve its light texture.
- Dry strawberries completely: Water on the berries can cause the whipped cream to slip and affect the appearance.
- Chill before decorating: The cheesecake filling should be firm enough to support the strawberries.
- Use a piping bag: Piping makes the Santa hats look neat and gives the dessert cups a professional finish.
- Decorate close to serving time: Fresh strawberries release moisture as they sit, so adding them shortly before serving gives the best results.