Introduction
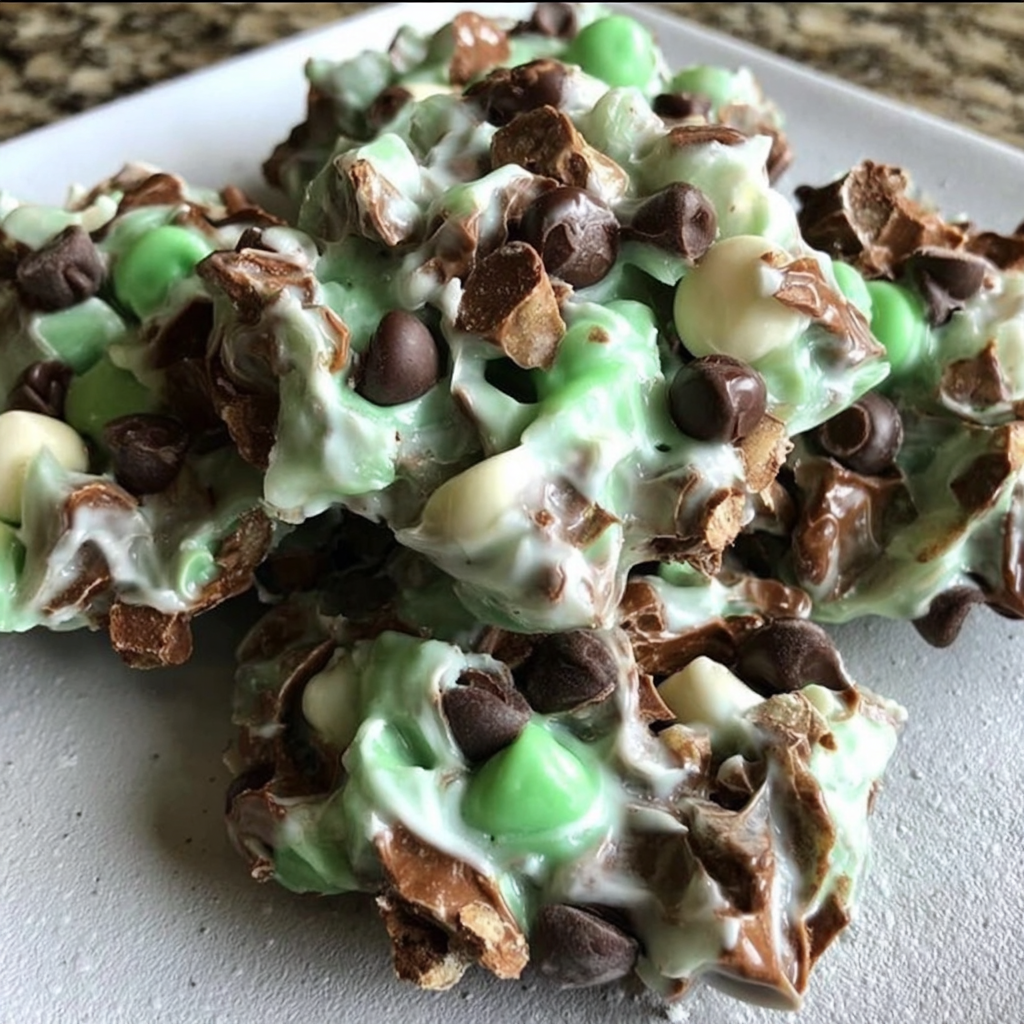
If you love the refreshing flavor of mint paired with rich chocolate, these No-Bake Mint Chocolate Chip Clusters are about to become one of your favorite easy treats. They combine creamy chocolate, cool mint flavor, and a satisfying crunch in bite-sized clusters that look beautiful on dessert trays and taste just as good as they look.
The best part? There’s no oven, no complicated baking technique, and no lengthy preparation. Simply melt the chocolate, mix in a few ingredients, spoon the mixture into clusters, and let everything set. It’s a wonderfully simple recipe for busy afternoons, holiday gatherings, homemade gifts, or whenever you’re craving something sweet.
These mint chocolate clusters are especially appealing during Christmas, St. Patrick’s Day, and winter celebrations, but they’re delicious enough to enjoy all year. The combination of smooth chocolate and refreshing mint creates a familiar candy-shop flavor, while crisp cereal or crunchy chocolate pieces give each bite extra texture.
Whether you’re preparing a dessert platter, filling holiday treat boxes, or adding a quick recipe to your collection of favorite no-bake desserts, these clusters are an excellent choice. You only need a few basic ingredients and simple kitchen tools to create a treat that feels special without requiring hours in the kitchen.
Ingredients
For the Mint Chocolate Clusters
- 12 ounces white chocolate chips or white melting wafers
- 1 cup semi-sweet chocolate chips
- ½ teaspoon peppermint extract
- 2 cups crispy rice cereal
- ¼ cup mini chocolate chips, optional
- A few drops of green food coloring, optional
Optional Toppings
- Crushed chocolate sandwich cookies
- Chocolate sprinkles
- Crushed peppermint candies
- Extra mini chocolate chips
- Melted dark chocolate for drizzling
Preparation
Step 1: Prepare the Baking Sheet
Line a large baking sheet or tray with parchment paper or a silicone baking mat.
Make sure the tray fits inside your refrigerator so the clusters can chill without being disturbed. If you want evenly sized treats, prepare a small cookie scoop or two spoons for portioning the mixture.
Measure all your ingredients before melting the chocolate. Since melted chocolate begins to cool and thicken relatively quickly, having everything ready makes the process easier.
Step 2: Melt the Chocolate
Place the white chocolate chips or melting wafers in a microwave-safe bowl.
Microwave in 20- to 30-second intervals, stirring thoroughly after each interval until the chocolate is mostly melted and smooth. Avoid overheating it, as white chocolate can become thick or grainy if exposed to too much heat.
In a separate bowl, melt the semi-sweet chocolate chips using the same method.
Allow both chocolates to cool slightly before combining them with the other ingredients.
For a more distinct chocolate appearance, you can keep the white and semi-sweet chocolate separate and swirl them together later.
Step 3: Add the Mint Flavor
Stir the peppermint extract into the melted white chocolate.
Start with ½ teaspoon, then taste a tiny amount once the mixture is cool enough to sample safely. Peppermint extract can be quite strong, so avoid adding too much.
If you want a festive green color, add just one or two drops of green food coloring and mix well. Use a coloring compatible with chocolate, preferably an oil-based or powdered product, because water-based coloring can cause melted chocolate to seize.
For a classic mint chocolate chip appearance, leave the white chocolate pale green and keep the semi-sweet chocolate separate.
Step 4: Fold in the Crunchy Ingredients
Add the crispy rice cereal to the mint chocolate mixture and gently fold until the cereal is evenly coated.
Stir in the mini chocolate chips, if using. Allow the chocolate mixture to cool slightly before adding the mini chips so they retain their shape instead of melting completely.
If you’re creating a marbled effect, drizzle some of the semi-sweet chocolate into the mint mixture and fold only a few times.
The mixture should be thick enough to hold together when scooped. If it feels too loose, allow it to sit for a few minutes while the chocolate begins to cool.
Step 5: Shape and Chill the Clusters
Use a tablespoon or small cookie scoop to drop portions of the mixture onto the prepared baking sheet.
Shape each portion into a rough cluster. These treats don’t need to look perfectly uniform; their irregular shapes give them a homemade candy-shop appearance.
Drizzle the remaining semi-sweet chocolate over the tops, then add extra mini chocolate chips or sprinkles if desired.
Place the tray in the refrigerator for approximately 30 to 45 minutes, or until the chocolate has completely set.
Once firm, transfer the clusters to an airtight container and keep them chilled until you’re ready to serve.
Variations
Dark Chocolate Mint Clusters
Replace the white chocolate with dark chocolate melting wafers and add peppermint extract to taste. This version has a deeper chocolate flavor and is less sweet.
Mint Oreo Clusters
Fold in 1 cup of roughly crushed chocolate sandwich cookies instead of some of the crispy rice cereal. The cookies add a creamy, crunchy texture that pairs beautifully with mint.
Andes-Inspired Mint Chocolate Clusters
Combine melted semi-sweet chocolate with a small amount of white chocolate and peppermint extract. Finish with a thin chocolate drizzle for a candy-inspired flavor.
Mint Pretzel Clusters
Replace half the crispy rice cereal with crushed pretzels. The salty crunch balances the sweetness of the chocolate.
Holiday Mint Clusters
Add crushed peppermint candies or red-and-green sprinkles to create a festive Christmas version. For St. Patrick’s Day, use green-colored mint chocolate and white chocolate drizzle.
Peanut Butter Mint Clusters
Add 2 tablespoons of smooth peanut butter to the melted semi-sweet chocolate for a nutty twist. Make sure the mixture remains thick enough to form stable clusters.
Sugar-Free-Inspired Version
Use suitable sugar-free melting chocolate and unsweetened crispy cereal. Check the labels carefully, as peppermint extracts, cereals, and chocolate products can vary in their carbohydrate and sugar content.
Cooking Notes
Choose chocolate that melts smoothly. White melting wafers are often easier to work with than standard white chocolate chips because they’re designed to melt and set consistently.
Be careful with peppermint extract. A small amount gives the clusters a refreshing flavor, while too much can make them taste medicinal.
Keep water away from the chocolate. Even a small amount of water can cause melted chocolate to seize and become grainy.
Use suitable food coloring. Water-based coloring may cause chocolate to thicken unexpectedly. Oil-based coloring is generally a better option for chocolate mixtures.
Allow the mixture to cool slightly before adding chocolate chips. This helps the mini chips keep their shape.
Choose the right kitchenware. A heatproof mixing bowl, silicone spatula, microwave-safe bowl, and parchment-lined baking tray are useful cooking tools for no-bake desserts.
Keep the clusters cool. Chocolate can soften at warm room temperatures, especially if your kitchen is hot.
Serving Suggestions
Arrange these No-Bake Mint Chocolate Chip Clusters on a dessert platter alongside chocolate truffles, brownies, fudge, and holiday cookies.
They also make lovely additions to homemade treat boxes. Place each cluster in a mini paper candy cup, then arrange them in a decorative tin for gifting.
For an after-dinner treat, serve a couple of clusters with coffee, hot chocolate, or a glass of cold milk. Their refreshing mint flavor also pairs nicely with vanilla ice cream.
If you’re making treats for a Christmas party, alternate green mint clusters with plain chocolate clusters for a festive color combination.
These clusters are also convenient for meal planning around celebrations because they can be prepared ahead of time and stored in the refrigerator until needed.
When shopping for ingredients, look for grocery deals on chocolate chips, cereal, and holiday sprinkles. Buying baking supplies in advance can make homemade desserts more affordable during busy holiday seasons.
Tips for the Best No-Bake Mint Chocolate Chip Clusters
- Melt chocolate slowly: Short microwave intervals help prevent scorching.
- Stir frequently: Chocolate can continue melting from its residual heat after each interval.
- Measure the peppermint extract: Mint flavor becomes overpowering very quickly.
- Use dry utensils: Water can cause melted chocolate to seize.
- Fold gently: Stir just enough to coat the cereal without crushing it.
- Make uniform portions: A cookie scoop helps create clusters of similar size.
- Add toppings before chilling: Sprinkles and extra chocolate chips adhere better while the chocolate is still soft.
- Allow enough chilling time: The centers should be firm before you transfer the clusters.
- Store in an airtight container: This helps protect the flavor and texture.
- Avoid warm storage: Chocolate clusters can soften or lose their shape in a hot kitchen.
Prep Time, Cooking Time, and Total Time
Prep Time: 15 minutes
Cooking Time: 0 minutes
Chilling Time: 30–45 minutes
Total Time: Approximately 45–60 minutes
Servings: 20–24 clusters
Nutritional Information
Estimated per cluster, based on 24 clusters:
Calories: 135
Protein: 1g
Sodium: 45mg
Nutritional values are estimates and depend on the type of chocolate, cereal, toppings, and cluster size used.
FAQs
Do No-Bake Mint Chocolate Chip Clusters need to be refrigerated?
Refrigeration is recommended because it helps the chocolate remain firm, especially in a warm kitchen. Store the clusters in an airtight container to protect them from moisture and odors.
Can I use regular chocolate chips?
Yes. Regular chocolate chips work well, although white chocolate chips can be more sensitive to overheating. Melt them slowly and stir frequently for the smoothest texture.
How do I make the clusters greener?
Add a small amount of chocolate-compatible green food coloring to the melted white chocolate. Add it gradually until you reach your preferred shade.
Can I make these clusters without cereal?
Yes. Replace the crispy rice cereal with crushed pretzels, chopped nuts, crushed chocolate cookies, or another crunchy ingredient.
Why did my melted chocolate become thick and grainy?
Chocolate may become grainy if it overheats or comes into contact with water. Melt it slowly in short intervals, stir frequently, and make sure your bowls and utensils are completely dry.
Can I freeze mint chocolate clusters?
Yes. Place the fully set clusters in a freezer-safe airtight container, separating layers with parchment paper. Freeze for up to about 2 months for the best quality. Let them thaw while still in their container to help minimize condensation.
How long do these clusters last?
Stored in an airtight container in the refrigerator, the clusters generally keep well for about 1 to 2 weeks, depending on the ingredients used. Follow the storage guidance on your chocolate and cereal packaging.
Can I make them ahead for Christmas?
Absolutely. Prepare them several days before your gathering and store them in the refrigerator. Keep them away from strong-smelling foods to preserve their mint and chocolate flavor.
Can I use peppermint oil instead of peppermint extract?
Yes, but peppermint oil is usually much more concentrated. Use a product intended for food and follow its dosage guidance carefully. Do not substitute it in equal amounts without checking the product instructions.
Are these clusters suitable for gifting?
Yes. Once completely set, place them in mini paper candy cups and arrange them in a sturdy airtight container. Keep them cool during transport so the chocolate doesn’t soften.
Conclusion
These No-Bake Mint Chocolate Chip Clusters are proof that a delicious homemade treat doesn’t need a long ingredient list or an oven. Creamy chocolate, refreshing peppermint, and crunchy cereal come together in easy bite-sized clusters that are perfect for holidays, parties, dessert trays, and homemade gifts.
With minimal preparation and a short chilling time, this recipe is ideal for busy bakers who want something sweet without the extra work. You can customize the colors, toppings, and crunchy ingredients to match any occasion.
Keep a batch chilled for an easy chocolate-mint treat whenever the craving strikes, or prepare several batches for your next holiday gathering. These simple clusters are a fun, reliable addition to any collection of no-bake dessert recipes.
Print
No-Bake Mint Chocolate Chip Clusters – Easy 4-Ingredient Treat
Ingredients
For the Mint Chocolate Clusters
- 12 ounces white chocolate chips or white melting wafers
- 1 cup semi-sweet chocolate chips
- ½ teaspoon peppermint extract
- 2 cups crispy rice cereal
- ¼ cup mini chocolate chips, optional
- A few drops of green food coloring, optional
Optional Toppings
- Crushed chocolate sandwich cookies
- Chocolate sprinkles
- Crushed peppermint candies
- Extra mini chocolate chips
- Melted dark chocolate for drizzling
Instructions
Line a large baking sheet or tray with parchment paper or a silicone baking mat.
Make sure the tray fits inside your refrigerator so the clusters can chill without being disturbed. If you want evenly sized treats, prepare a small cookie scoop or two spoons for portioning the mixture.
Measure all your ingredients before melting the chocolate. Since melted chocolate begins to cool and thicken relatively quickly, having everything ready makes the process easier.
Step 2: Melt the Chocolate
Place the white chocolate chips or melting wafers in a microwave-safe bowl.
Microwave in 20- to 30-second intervals, stirring thoroughly after each interval until the chocolate is mostly melted and smooth. Avoid overheating it, as white chocolate can become thick or grainy if exposed to too much heat.
In a separate bowl, melt the semi-sweet chocolate chips using the same method.
Allow both chocolates to cool slightly before combining them with the other ingredients.
For a more distinct chocolate appearance, you can keep the white and semi-sweet chocolate separate and swirl them together later.
Step 3: Add the Mint Flavor
Stir the peppermint extract into the melted white chocolate.
Start with ½ teaspoon, then taste a tiny amount once the mixture is cool enough to sample safely. Peppermint extract can be quite strong, so avoid adding too much.
If you want a festive green color, add just one or two drops of green food coloring and mix well. Use a coloring compatible with chocolate, preferably an oil-based or powdered product, because water-based coloring can cause melted chocolate to seize.
For a classic mint chocolate chip appearance, leave the white chocolate pale green and keep the semi-sweet chocolate separate.
Step 4: Fold in the Crunchy Ingredients
Add the crispy rice cereal to the mint chocolate mixture and gently fold until the cereal is evenly coated.
Stir in the mini chocolate chips, if using. Allow the chocolate mixture to cool slightly before adding the mini chips so they retain their shape instead of melting completely.
If you’re creating a marbled effect, drizzle some of the semi-sweet chocolate into the mint mixture and fold only a few times.
The mixture should be thick enough to hold together when scooped. If it feels too loose, allow it to sit for a few minutes while the chocolate begins to cool.
Step 5: Shape and Chill the Clusters
Use a tablespoon or small cookie scoop to drop portions of the mixture onto the prepared baking sheet.
Shape each portion into a rough cluster. These treats don’t need to look perfectly uniform; their irregular shapes give them a homemade candy-shop appearance.
Drizzle the remaining semi-sweet chocolate over the tops, then add extra mini chocolate chips or sprinkles if desired.
Place the tray in the refrigerator for approximately 30 to 45 minutes, or until the chocolate has completely set.
Once firm, transfer the clusters to an airtight container and keep them chilled until you’re ready to serve.
Notes
Choose chocolate that melts smoothly. White melting wafers are often easier to work with than standard white chocolate chips because they’re designed to melt and set consistently.
Be careful with peppermint extract. A small amount gives the clusters a refreshing flavor, while too much can make them taste medicinal.
Keep water away from the chocolate. Even a small amount of water can cause melted chocolate to seize and become grainy.
Use suitable food coloring. Water-based coloring may cause chocolate to thicken unexpectedly. Oil-based coloring is generally a better option for chocolate mixtures.
Allow the mixture to cool slightly before adding chocolate chips. This helps the mini chips keep their shape.
Choose the right kitchenware. A heatproof mixing bowl, silicone spatula, microwave-safe bowl, and parchment-lined baking tray are useful cooking tools for no-bake desserts.
Keep the clusters cool. Chocolate can soften at warm room temperatures, especially if your kitchen is hot.
