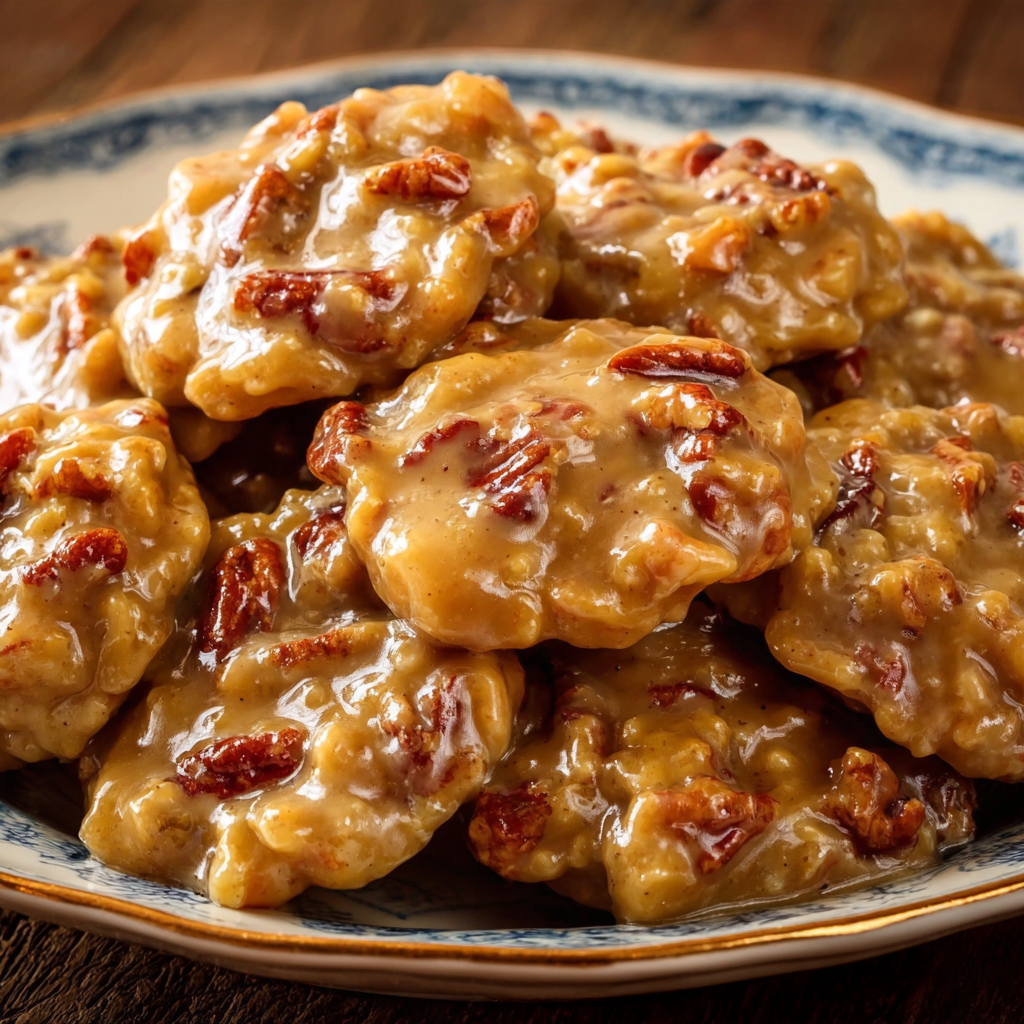
Creole Creamy Pralines are a classic Southern candy inspired by the rich culinary traditions of Louisiana and New Orleans. Made with pecans, sugar, butter, cream, and vanilla, these homemade pralines have a deliciously sweet, buttery flavor and a creamy, melt-in-your-mouth texture. They are perfect for holidays, family gatherings, homemade gifts, dessert platters, and anyone who loves traditional Southern sweets.
Unlike hard candies, creamy pecan pralines are meant to develop a soft, slightly crumbly texture that melts beautifully on the tongue. The combination of brown sugar and granulated sugar creates a deep caramel-like sweetness, while butter and cream add richness. Toasted pecans provide a satisfying crunch and a wonderful nutty flavor that balances the sweetness.
This Creole Creamy Pralines recipe brings the charm of old-fashioned Southern candy-making into your home kitchen. You do not need special candy molds or complicated equipment. A heavy-bottomed saucepan, a candy thermometer if available, a wooden spoon, and parchment paper are enough to get started.
The secret to making delicious creamy pralines is controlling the cooking temperature and allowing the candy mixture to cool slightly before beating it. This process helps the sugar mixture thicken and develop the characteristic creamy texture. With careful timing and a little patience, you can make homemade pecan pralines that look beautiful and taste like a treasured family recipe.
Whether you are preparing a batch for Christmas, Thanksgiving, a bake sale, or simply a sweet afternoon treat, these Creole Creamy Pralines are an irresistible addition to your dessert collection.
Ingredients
This recipe makes approximately 18–24 pralines, depending on the size of each portion.
Main Ingredients
- 2 cups granulated sugar – Provides sweetness and helps the pralines set.
- 1 cup packed light brown sugar – Adds a rich molasses flavor and a deeper caramel taste.
- ¾ cup heavy cream – Creates a creamy texture and gives the candy its rich flavor.
- 4 tablespoons unsalted butter – Adds smoothness, richness, and a classic buttery taste.
- 2 cups pecan halves or roughly chopped pecans – The star ingredient, providing nutty flavor and crunch.
- 1 teaspoon pure vanilla extract – Enhances the caramel and pecan flavors.
- ¼ teaspoon salt – Balances the sweetness and brings out the flavor of the pecans.
- 2 tablespoons water, if needed – Helps the sugars dissolve evenly at the beginning of cooking.
Optional Ingredients
- ¼ teaspoon ground cinnamon – Adds a subtle warm spice.
- ½ teaspoon maple extract – Gives the pralines a gentle maple-inspired flavor.
- ½ cup additional chopped pecans – Useful if you prefer extra nutty pralines.
- A tiny pinch of flaky sea salt – Creates a sweet-and-salty finish.
For the most traditional flavor, use pecans, butter, cream, sugar, vanilla, and a small amount of salt. The optional ingredients are not necessary for a delicious result.
Preparation: How to Make Creole Creamy Pralines
Step 1: Prepare Your Workstation
Before cooking the sugar mixture, prepare everything you need. Line two baking sheets with parchment paper or lightly grease them with butter. Make sure the baking sheets are completely dry and placed on a stable, heat-resistant surface.
Measure all the ingredients in advance. Candy-making requires attention because the mixture can change consistency quickly once it reaches the correct temperature.
Place a wooden spoon or heat-resistant spatula nearby. If you have a candy thermometer, attach it to the side of a heavy-bottomed saucepan, making sure the tip does not touch the bottom of the pan.
Keep children and pets away from the cooking area because hot sugar can cause serious burns.
Step 2: Prepare the Pecans
Inspect the pecans and remove any small pieces of shell. You can use whole pecan halves for a more traditional appearance or roughly chopped pecans for pralines that are easier to portion.
For extra flavor, lightly toast the pecans before adding them to the candy mixture. Spread them on a baking sheet and toast at 325°F for approximately 5–8 minutes, checking frequently to prevent burning.
Allow the toasted pecans to cool slightly before using them. Toasting is optional, but it helps deepen their natural nutty flavor and makes the finished pralines taste even richer.
Step 3: Combine the Sugars, Cream, and Butter
Place the granulated sugar, brown sugar, heavy cream, butter, salt, and optional water in a heavy-bottomed saucepan.
Set the pan over medium-low heat. Stir gently until the butter melts and the sugars begin dissolving into the cream.
Avoid rushing this step by turning the heat too high. Gradual heating helps the sugar dissolve more evenly and reduces the risk of scorching the mixture.
If sugar crystals stick to the sides of the saucepan, carefully brush them down with a clean pastry brush dipped in water. Avoid splashing water into the hot mixture.
Step 4: Bring the Mixture to a Gentle Boil
Once the sugar has dissolved and the mixture looks smooth, increase the heat to medium. Allow it to come to a steady boil.
After the mixture begins boiling, avoid constant stirring. Excessive stirring during the boiling stage can encourage unwanted sugar crystallization.
Watch the mixture carefully as it bubbles and thickens. The color will gradually deepen, and the aroma will become richer and more caramel-like.
If using a candy thermometer, keep an eye on the temperature throughout the cooking process.
Step 5: Cook to the Soft-Ball Stage
Continue cooking until the candy mixture reaches approximately 234–240°F (112–116°C), generally associated with the soft-ball stage. The exact temperature needed for the desired texture can vary with the recipe, humidity, altitude, and ingredients.
For a creamy praline, many cooks aim near the lower end of this range. A mixture cooked too cool may remain overly soft, while one cooked too hot may produce dry, crumbly candy.
If you do not have a candy thermometer, you can carefully test a small drop of the mixture in cold water. If it forms a soft ball that holds together but flattens easily when removed, it is approaching the soft-ball stage.
Use caution when performing this test. Never touch the hot sugar directly.
Step 6: Remove the Pan from the Heat
Once the mixture reaches the target temperature, immediately remove the saucepan from the heat.
Allow it to rest briefly, usually for about 3–5 minutes. This short cooling period helps prepare the mixture for the beating stage.
Do not add the pecans and vanilla too early if the mixture is still boiling vigorously. A brief rest helps prevent excessive cooking and gives you better control over the final texture.
Step 7: Add the Vanilla and Pecans
Stir in the vanilla extract and prepared pecans. Mix carefully until the pecans are evenly distributed throughout the thick sugar mixture.
The vanilla may release a little steam when it meets the hot candy, so add it cautiously.
Make sure the pecans are coated well. Every portion should contain enough nuts to provide a satisfying balance between the creamy candy and the crunchy pecans.
If you enjoy a stronger pecan flavor, you can use a combination of halves and chopped pecans.
Step 8: Beat the Mixture Until Creamy
Allow the mixture to cool slightly, then beat it with a wooden spoon. As it cools, it should gradually become thicker, less glossy, and more opaque.
This is one of the most important steps in making Creole Creamy Pralines. Beating encourages the sugar mixture to crystallize in a controlled way, helping create the characteristic creamy texture rather than a hard, glassy candy.
Stop beating when the mixture thickens enough to hold its shape but remains soft enough to spoon onto the prepared baking sheets.
If you stop too early, the pralines may spread excessively. If you beat for too long, the mixture may become stiff before you finish portioning it.
Step 9: Spoon the Pralines onto the Baking Sheets
Working quickly, drop spoonfuls of the mixture onto the parchment-lined baking sheets. Leave a little space between each portion because the candy may spread slightly.
You can use a tablespoon or a small cookie scoop to make the pralines more uniform in size.
If the mixture becomes too firm to spoon, do not add large amounts of liquid. Instead, work quickly from the beginning and avoid allowing the mixture to cool completely before portioning.
For a decorative finish, gently press a pecan half onto the top of each praline before it sets.
Step 10: Allow the Pralines to Set
Leave the pralines at room temperature for approximately 30–60 minutes, or until they are firm enough to handle.
The exact setting time depends on the room temperature, humidity, and how thickly the pralines were portioned.
Do not move them while they are still very soft. Allowing them to set undisturbed helps preserve their shape and gives them a better texture.
Avoid placing hot pralines directly into the refrigerator, as condensation can affect their surface and texture.
Step 11: Check the Texture
Once the pralines have cooled, gently lift one from the parchment paper and examine its texture.
A successful creamy praline should be set enough to hold its shape while remaining tender, rich, and slightly crumbly when bitten. It should not be sticky like caramel or rock-hard like brittle.
If the pralines are slightly softer than expected, give them additional time at room temperature. Humidity and small differences in cooking temperature can influence the final result.
Step 12: Serve or Store
Arrange the finished Creole Creamy Pralines on a serving plate or place them in small candy cups.
They are delicious on their own, with coffee or tea, or as part of a holiday dessert tray. You can also package them in small gift boxes lined with parchment paper.
For the best texture, store the pralines in an airtight container in a cool, dry place. Separate layers with parchment paper to prevent sticking.
Variations
1. Classic New Orleans-Style Pecan Pralines
For a traditional Southern-inspired flavor, keep the recipe simple with pecans, butter, cream, sugar, vanilla, and salt. Use toasted pecan halves for a beautiful appearance and a rich nutty taste.
2. Brown Sugar Creamy Pralines
Replace a small portion of the granulated sugar with additional brown sugar for a deeper molasses flavor. This version has a warmer, more caramel-like taste and pairs wonderfully with coffee.
3. Vanilla Butter Pralines
Increase the vanilla extract slightly for a more pronounced vanilla aroma. Use real vanilla extract rather than imitation vanilla if you want a richer flavor.
4. Maple Pecan Pralines
Add a small amount of maple extract for a gentle maple flavor. Maple and pecans complement each other beautifully, making this variation especially suitable for autumn and winter celebrations.
5. Cinnamon Creole Pralines
Add a small pinch of ground cinnamon to the mixture after removing it from the heat. The cinnamon gives the candy a subtle warmth without overpowering the buttery pecan flavor.
6. Sweet-and-Salty Pecan Pralines
Sprinkle a tiny amount of flaky sea salt over the pralines just after spooning them onto the baking sheet. The salt balances the sweetness and makes the pecan flavor stand out.
7. Extra-Pecan Creamy Pralines
Use up to 2½ cups of pecans if you prefer a candy with more nuts and less creamy mixture between them. Keep in mind that adding extra pecans can make the mixture harder to portion, so work quickly.
8. Chocolate-Dipped Pecan Pralines
Once the pralines are completely cool, dip part of each piece into melted semisweet chocolate. Let the chocolate set on parchment paper before serving.
This variation is sweeter and richer than the traditional version, but it makes a beautiful homemade holiday gift.
9. Holiday Creamy Pralines
Prepare the classic recipe and package the pralines with festive parchment paper, decorative candy cups, or small gift boxes. A few pecan halves arranged on top make each piece look especially attractive.
10. Smaller Bite-Sized Pralines
Use a teaspoon instead of a tablespoon to make smaller candies. This is a convenient option for dessert trays, parties, cookie exchanges, and holiday gatherings.
COOKING Note:
The most important factor in making successful Creole Creamy Pralines is reaching the correct temperature and beating the mixture at the right stage.
Sugar candy can be sensitive to small temperature changes. A few degrees can affect whether the finished pralines remain creamy, become crumbly, or fail to set properly.
- Use a heavy-bottomed saucepan: This helps distribute heat more evenly and reduces the chance of burning the sugar mixture.
- Measure ingredients carefully: Too much cream or too little sugar can change the final consistency.
- Use a candy thermometer when possible: It offers more reliable results than judging the mixture by appearance alone.
- Avoid stirring constantly while boiling: Once the sugars dissolve, excessive stirring may encourage crystallization.
- Allow a short cooling period: Adding the pecans and beating the mixture at the appropriate time helps produce a creamy texture.
- Work quickly when portioning: The mixture can thicken rapidly as it cools.
- Consider the weather: Humidity can affect how candy sets, so allow extra cooling time on damp days.
- Do not handle hot sugar: Boiling sugar is extremely hot and can stick to the skin, causing serious burns.
If the pralines become grainy, the sugar may have crystallized too early or the mixture may have been beaten at the wrong stage. If they spread too much, the mixture may not have cooked long enough or may have needed more cooling before portioning. If they become too hard, the mixture may have been cooked to too high a temperature.
Candy-making can require practice, but careful temperature control and attention to texture will help you improve with every batch.
Serving Suggestions
1. Serve with Coffee
Creole Creamy Pralines pair beautifully with hot coffee, espresso, or a mild latte. The slightly bitter flavor of coffee balances the candy’s rich sweetness.
2. Add Them to a Southern Dessert Tray
Arrange the pralines alongside cookies, brownies, fudge, and other homemade candies. Their pecan-studded appearance adds variety to a dessert platter.
3. Make Homemade Holiday Gifts
Place cooled pralines in decorative candy boxes or food-safe bags. Add parchment paper between layers and store them in a cool location before gifting.
4. Serve After a Family Dinner
Offer one or two pralines after a meal as a small, satisfying dessert. Their rich flavor means a modest portion is often enough.
5. Pair with Vanilla Ice Cream
Serve a praline beside a scoop of vanilla ice cream. You can also crumble a small piece over the ice cream for extra sweetness and pecan flavor.
6. Include Them on a Christmas Candy Board
Combine pralines with chocolate truffles, peppermint candies, shortbread cookies, and roasted nuts for a festive holiday spread.
7. Enjoy with Tea
Black tea, chai, and lightly spiced teas complement the buttery, caramel-like flavor of pecan pralines.
8. Package for Bake Sales
Place each praline in an individual candy cup and arrange them in a clean, attractive container. Label the package clearly, especially because pecans are a tree nut allergen.
Tips for Perfect Creole Creamy Pralines
- Use fresh pecans: Fresh nuts have a sweeter, cleaner flavor. Pecans that have been stored too long may taste bitter or stale.
- Toast the pecans lightly: Toasting enhances their flavor, but avoid dark browning because it can introduce bitterness.
- Prepare the baking sheets first: Once the candy reaches the right consistency, there may be little time to prepare anything else.
- Measure the cream accurately: The liquid-to-sugar balance affects how the pralines set.
- Avoid overheating: Cooking beyond the target temperature can make the candy harder and drier than intended.
- Watch the cooling stage: The mixture needs to cool enough to thicken before you beat and portion it.
- Do not overbeat: Once the mixture begins to lose its glossy appearance and holds its shape, spoon it out promptly.
- Use parchment paper: This makes removing the finished candies easier and helps keep the pralines intact.
- Make evenly sized portions: A tablespoon or cookie scoop helps the pralines set at a similar rate.
- Keep the kitchen organized: Have the pecans, vanilla, spoon, and baking sheets ready before starting.
- Avoid unnecessary substitutions: Changes to the type of sugar, cream, or butter can affect the consistency.
- Store away from humidity: Moisture can make the surface sticky and reduce the quality of the candy.
- Let the pralines cool completely: Storing them while warm can create condensation inside the container.
- Separate layers with parchment: This helps prevent sticking and protects the surface of the candies.
- Label nut-containing gifts: Pecans are a tree nut allergen, so always identify them clearly when sharing homemade pralines.
Prep Time:
15 minutes
This includes measuring ingredients, preparing the baking sheets, and preparing the pecans. Toasting the pecans is optional and may add a few extra minutes.
Cooking Time:
15–20 minutes
The exact cooking time depends on the saucepan, stove, batch size, and starting temperature of the ingredients. Use the candy’s temperature and consistency rather than the clock alone.
Cooling and Setting Time:
30–60 minutes
The pralines need time to cool and firm up at room temperature. Additional time may be necessary in humid conditions.
Total Time:
Approximately 1 hour to 1 hour and 35 minutes
This includes preparation, cooking, and setting time. Actual timing varies with the cooking temperature and room conditions.
Nutritional Information
The following values are estimates for one praline, assuming the recipe produces 24 pieces. Actual nutrition will vary depending on portion size, the amount of pecans used, and the ingredients selected.
- Calories: Approximately 170–200
- Protein: Approximately 1–2 g
- Sodium: Approximately 20–45 mg
- Carbohydrates: Approximately 22–27 g
- Total Fat: Approximately 9–12 g
- Saturated Fat: Approximately 3–5 g
- Sugar: Approximately 20–25 g
- Fiber: Approximately 1 g
These homemade pralines are a rich candy intended to be enjoyed in moderate portions. Pecans contribute unsaturated fats and a small amount of fiber, while sugar and cream provide most of the sweetness and richness.
FAQs About Creole Creamy Pralines
1. What Are Creole Creamy Pralines?
Creole Creamy Pralines are Southern-style pecan candies made with sugar, butter, cream, vanilla, and pecans. They are known for their rich, buttery sweetness and a creamy, slightly crumbly texture.
2. Are Creole Pralines the Same as New Orleans Pralines?
The terms are often used for similar Louisiana-style pecan candies. Recipes vary by family and region, but many feature pecans, sugar, butter, and cream or milk. Some versions are softer and creamier, while others are firmer or more crumbly.
3. Why Did My Pralines Not Set?
Pralines may remain soft if the mixture did not reach a sufficiently high temperature or if the ingredient proportions were inaccurate. Humidity can also affect the setting process.
Allow them to cool completely before deciding they have failed. For the next batch, use a candy thermometer and follow the recipe’s temperature range carefully.
4. Why Did My Pralines Become Hard?
Hard pralines are often the result of cooking the sugar mixture to too high a temperature. Excessive cooking removes more moisture, producing a firmer candy.
Use a reliable thermometer and remove the pan from the heat once the mixture reaches the intended stage.
5. Why Are My Creamy Pralines Grainy?
A grainy texture can develop when sugar crystallizes too early or when the mixture is beaten at the wrong stage. Sugar crystals on the sides of the pan can also encourage crystallization.
Dissolve the sugar thoroughly before boiling, avoid unnecessary stirring during cooking, and follow the cooling and beating instructions carefully.
6. Can I Make Pralines Without a Candy Thermometer?
Yes, although a thermometer makes the process more reliable. You can test a small amount of the mixture in cold water to see whether it forms a soft ball that flattens easily.
Be cautious when testing hot sugar, and remember that the cold-water method can be less precise than using a thermometer.
7. Should I Use Pecan Halves or Chopped Pecans?
Both work well. Pecan halves create a traditional appearance and provide larger nutty bites. Chopped pecans distribute more evenly through the candy and make the pralines easier to portion.
A combination of both is an excellent choice.
8. Can I Toast the Pecans Before Making Pralines?
Yes. Lightly toasting pecans enhances their natural flavor and aroma. Allow them to cool slightly before adding them to the cooked sugar mixture.
Toasting is optional, so you can skip this step when you need a quicker recipe.
9. Can I Use Half-and-Half Instead of Heavy Cream?
Heavy cream is recommended because its higher fat content contributes to a richer texture. Half-and-half may change the consistency and cooking behavior of the candy.
For the most reliable result, use the heavy cream specified in the recipe.
10. Can I Use Salted Butter?
Yes, but reduce or omit the additional salt. Salted butter varies by brand, so adjusting the salt prevents the finished pralines from becoming too salty.
11. How Should I Store Creole Creamy Pralines?
Store completely cooled pralines in an airtight container in a cool, dry place. Place parchment paper between layers to help prevent sticking.
Avoid warm or humid storage conditions because moisture can affect the texture.
12. How Long Do Homemade Pralines Last?
For the best flavor and texture, enjoy the pralines within several days. Their keeping quality depends on the recipe, humidity, storage temperature, and cleanliness of the container.
Discard any candy that develops an unusual smell, visible mold, or other signs of spoilage.
13. Can I Freeze Creamy Pecan Pralines?
Freezing may change their texture, especially when condensation develops during thawing. If you choose to freeze them, use a well-sealed, freezer-safe container with parchment between the layers.
Thaw them while still covered to reduce condensation on the candy. For the best traditional texture, making a fresh batch is preferable.
14. Can I Make Creole Creamy Pralines Ahead of Time?
Yes. Prepare them a few days before a gathering and store them in an airtight container in a cool, dry place.
Make sure they are completely cool before packing, and separate the layers with parchment paper.
15. Are Creole Creamy Pralines Good for Christmas Gifts?
Absolutely. Their rich pecan flavor and traditional Southern character make them a popular homemade holiday treat.
Arrange them in small candy cups, place them in decorative boxes, and clearly label the package with the ingredients and tree nut allergen information.
16. Can I Double This Recipe?
It is usually better to make separate batches rather than doubling the recipe in one saucepan. A larger batch may heat unevenly, take longer to reach the correct temperature, and become difficult to beat and portion before it sets.
If you make a larger quantity, use a suitably sized heavy-bottomed pan and monitor the temperature carefully.
17. What Is the Best Way to Serve Creamy Pralines?
Serve them at room temperature for the best flavor and texture. They pair especially well with coffee, tea, vanilla ice cream, and other Southern-inspired desserts.
18. Can I Make Smaller Pralines?
Yes. Use a teaspoon to portion the candy into smaller pieces. Small pralines are convenient for parties, dessert trays, and edible gifts.
Because smaller pieces cool more quickly, work promptly once the mixture reaches the correct consistency.
Conclusion
Creole Creamy Pralines are a delicious way to enjoy the traditional flavors of Southern candy-making. With buttery richness, sweet caramel notes, fragrant vanilla, and crunchy pecans, these homemade treats are simple enough for a special weekend project and impressive enough for holiday celebrations.
The key to making excellent creamy pecan pralines is to prepare everything in advance, cook the sugar mixture carefully, monitor the temperature, and beat the mixture until it begins to thicken. Spoon the candy onto prepared baking sheets before it becomes too firm, then allow the pralines to cool completely.
Serve these Creole Creamy Pralines with coffee, add them to a holiday dessert platter, or package them as thoughtful homemade gifts. Once you master the technique, this classic Southern-inspired pecan candy can become a favorite recipe for family gatherings, Christmas celebrations, and sweet moments throughout the year.
Print
Creole Creamy Pralines – Easy Southern Pecan Candy Recipe
- Total Time: 1 hour and 35 minutes
Description
Creole Creamy Pralines are a classic Southern candy inspired by the rich culinary traditions of Louisiana and New Orleans. Made with pecans, sugar, butter, cream, and vanilla, these homemade pralines have a deliciously sweet, buttery flavor and a creamy, melt-in-your-mouth texture. They are perfect for holidays, family gatherings, homemade gifts, dessert platters, and anyone who loves traditional Southern sweets.
Ingredients
Main Ingredients
- 2 cups granulated sugar – Provides sweetness and helps the pralines set.
- 1 cup packed light brown sugar – Adds a rich molasses flavor and a deeper caramel taste.
- ¾ cup heavy cream – Creates a creamy texture and gives the candy its rich flavor.
- 4 tablespoons unsalted butter – Adds smoothness, richness, and a classic buttery taste.
- 2 cups pecan halves or roughly chopped pecans – The star ingredient, providing nutty flavor and crunch.
- 1 teaspoon pure vanilla extract – Enhances the caramel and pecan flavors.
- ¼ teaspoon salt – Balances the sweetness and brings out the flavor of the pecans.
- 2 tablespoons water, if needed – Helps the sugars dissolve evenly at the beginning of cooking.
Optional Ingredients
- ¼ teaspoon ground cinnamon – Adds a subtle warm spice.
- ½ teaspoon maple extract – Gives the pralines a gentle maple-inspired flavor.
- ½ cup additional chopped pecans – Useful if you prefer extra nutty pralines.
- A tiny pinch of flaky sea salt – Creates a sweet-and-salty finish.
For the most traditional flavor, use pecans, butter, cream, sugar, vanilla, and a small amount of salt. The optional ingredients are not necessary for a delicious result.
Instructions
Step 1: Prepare Your Workstation
Before cooking the sugar mixture, prepare everything you need. Line two baking sheets with parchment paper or lightly grease them with butter. Make sure the baking sheets are completely dry and placed on a stable, heat-resistant surface.
Measure all the ingredients in advance. Candy-making requires attention because the mixture can change consistency quickly once it reaches the correct temperature.
Place a wooden spoon or heat-resistant spatula nearby. If you have a candy thermometer, attach it to the side of a heavy-bottomed saucepan, making sure the tip does not touch the bottom of the pan.
Keep children and pets away from the cooking area because hot sugar can cause serious burns.
Step 2: Prepare the Pecans
Inspect the pecans and remove any small pieces of shell. You can use whole pecan halves for a more traditional appearance or roughly chopped pecans for pralines that are easier to portion.
For extra flavor, lightly toast the pecans before adding them to the candy mixture. Spread them on a baking sheet and toast at 325°F for approximately 5–8 minutes, checking frequently to prevent burning.
Allow the toasted pecans to cool slightly before using them. Toasting is optional, but it helps deepen their natural nutty flavor and makes the finished pralines taste even richer.
Step 3: Combine the Sugars, Cream, and Butter
Place the granulated sugar, brown sugar, heavy cream, butter, salt, and optional water in a heavy-bottomed saucepan.
Set the pan over medium-low heat. Stir gently until the butter melts and the sugars begin dissolving into the cream.
Avoid rushing this step by turning the heat too high. Gradual heating helps the sugar dissolve more evenly and reduces the risk of scorching the mixture.
If sugar crystals stick to the sides of the saucepan, carefully brush them down with a clean pastry brush dipped in water. Avoid splashing water into the hot mixture.
Step 4: Bring the Mixture to a Gentle Boil
Once the sugar has dissolved and the mixture looks smooth, increase the heat to medium. Allow it to come to a steady boil.
After the mixture begins boiling, avoid constant stirring. Excessive stirring during the boiling stage can encourage unwanted sugar crystallization.
Watch the mixture carefully as it bubbles and thickens. The color will gradually deepen, and the aroma will become richer and more caramel-like.
If using a candy thermometer, keep an eye on the temperature throughout the cooking process.
Step 5: Cook to the Soft-Ball Stage
Continue cooking until the candy mixture reaches approximately 234–240°F (112–116°C), generally associated with the soft-ball stage. The exact temperature needed for the desired texture can vary with the recipe, humidity, altitude, and ingredients.
For a creamy praline, many cooks aim near the lower end of this range. A mixture cooked too cool may remain overly soft, while one cooked too hot may produce dry, crumbly candy.
If you do not have a candy thermometer, you can carefully test a small drop of the mixture in cold water. If it forms a soft ball that holds together but flattens easily when removed, it is approaching the soft-ball stage.
Use caution when performing this test. Never touch the hot sugar directly.
Step 6: Remove the Pan from the Heat
Once the mixture reaches the target temperature, immediately remove the saucepan from the heat.
Allow it to rest briefly, usually for about 3–5 minutes. This short cooling period helps prepare the mixture for the beating stage.
Do not add the pecans and vanilla too early if the mixture is still boiling vigorously. A brief rest helps prevent excessive cooking and gives you better control over the final texture.
Step 7: Add the Vanilla and Pecans
Stir in the vanilla extract and prepared pecans. Mix carefully until the pecans are evenly distributed throughout the thick sugar mixture.
The vanilla may release a little steam when it meets the hot candy, so add it cautiously.
Make sure the pecans are coated well. Every portion should contain enough nuts to provide a satisfying balance between the creamy candy and the crunchy pecans.
If you enjoy a stronger pecan flavor, you can use a combination of halves and chopped pecans.
Step 8: Beat the Mixture Until Creamy
Allow the mixture to cool slightly, then beat it with a wooden spoon. As it cools, it should gradually become thicker, less glossy, and more opaque.
This is one of the most important steps in making Creole Creamy Pralines. Beating encourages the sugar mixture to crystallize in a controlled way, helping create the characteristic creamy texture rather than a hard, glassy candy.
Stop beating when the mixture thickens enough to hold its shape but remains soft enough to spoon onto the prepared baking sheets.
If you stop too early, the pralines may spread excessively. If you beat for too long, the mixture may become stiff before you finish portioning it.
Step 9: Spoon the Pralines onto the Baking Sheets
Working quickly, drop spoonfuls of the mixture onto the parchment-lined baking sheets. Leave a little space between each portion because the candy may spread slightly.
You can use a tablespoon or a small cookie scoop to make the pralines more uniform in size.
If the mixture becomes too firm to spoon, do not add large amounts of liquid. Instead, work quickly from the beginning and avoid allowing the mixture to cool completely before portioning.
For a decorative finish, gently press a pecan half onto the top of each praline before it sets.
Step 10: Allow the Pralines to Set
Leave the pralines at room temperature for approximately 30–60 minutes, or until they are firm enough to handle.
The exact setting time depends on the room temperature, humidity, and how thickly the pralines were portioned.
Do not move them while they are still very soft. Allowing them to set undisturbed helps preserve their shape and gives them a better texture.
Avoid placing hot pralines directly into the refrigerator, as condensation can affect their surface and texture.
Step 11: Check the Texture
Once the pralines have cooled, gently lift one from the parchment paper and examine its texture.
A successful creamy praline should be set enough to hold its shape while remaining tender, rich, and slightly crumbly when bitten. It should not be sticky like caramel or rock-hard like brittle.
If the pralines are slightly softer than expected, give them additional time at room temperature. Humidity and small differences in cooking temperature can influence the final result.
Step 12: Serve or Store
Arrange the finished Creole Creamy Pralines on a serving plate or place them in small candy cups.
They are delicious on their own, with coffee or tea, or as part of a holiday dessert tray. You can also package them in small gift boxes lined with parchment paper.
For the best texture, store the pralines in an airtight container in a cool, dry place. Separate layers with parchment paper to prevent sticking.
Notes
The most important factor in making successful Creole Creamy Pralines is reaching the correct temperature and beating the mixture at the right stage.
Sugar candy can be sensitive to small temperature changes. A few degrees can affect whether the finished pralines remain creamy, become crumbly, or fail to set properly.
- Use a heavy-bottomed saucepan: This helps distribute heat more evenly and reduces the chance of burning the sugar mixture.
- Measure ingredients carefully: Too much cream or too little sugar can change the final consistency.
- Use a candy thermometer when possible: It offers more reliable results than judging the mixture by appearance alone.
- Avoid stirring constantly while boiling: Once the sugars dissolve, excessive stirring may encourage crystallization.
- Allow a short cooling period: Adding the pecans and beating the mixture at the appropriate time helps produce a creamy texture.
- Work quickly when portioning: The mixture can thicken rapidly as it cools.
- Consider the weather: Humidity can affect how candy sets, so allow extra cooling time on damp days.
- Do not handle hot sugar: Boiling sugar is extremely hot and can stick to the skin, causing serious burns.
If the pralines become grainy, the sugar may have crystallized too early or the mixture may have been beaten at the wrong stage. If they spread too much, the mixture may not have cooked long enough or may have needed more cooling before portioning. If they become too hard, the mixture may have been cooked to too high a temperature.
Candy-making can require practice, but careful temperature control and attention to texture will help you improve with every batch.
- Prep Time: 15 minutes
- Cooling Time: 30–60 minutes
- Cook Time: 15–20 minutes
Nutrition
- Calories: 170–200
- Sugar: 20–25 g
- Sodium: 20–45 mg
- Fat: 9–12 g
- Saturated Fat: 3–5 g
- Carbohydrates: 22–27 g
- Fiber: 1 g
- Protein: 1–2 g
