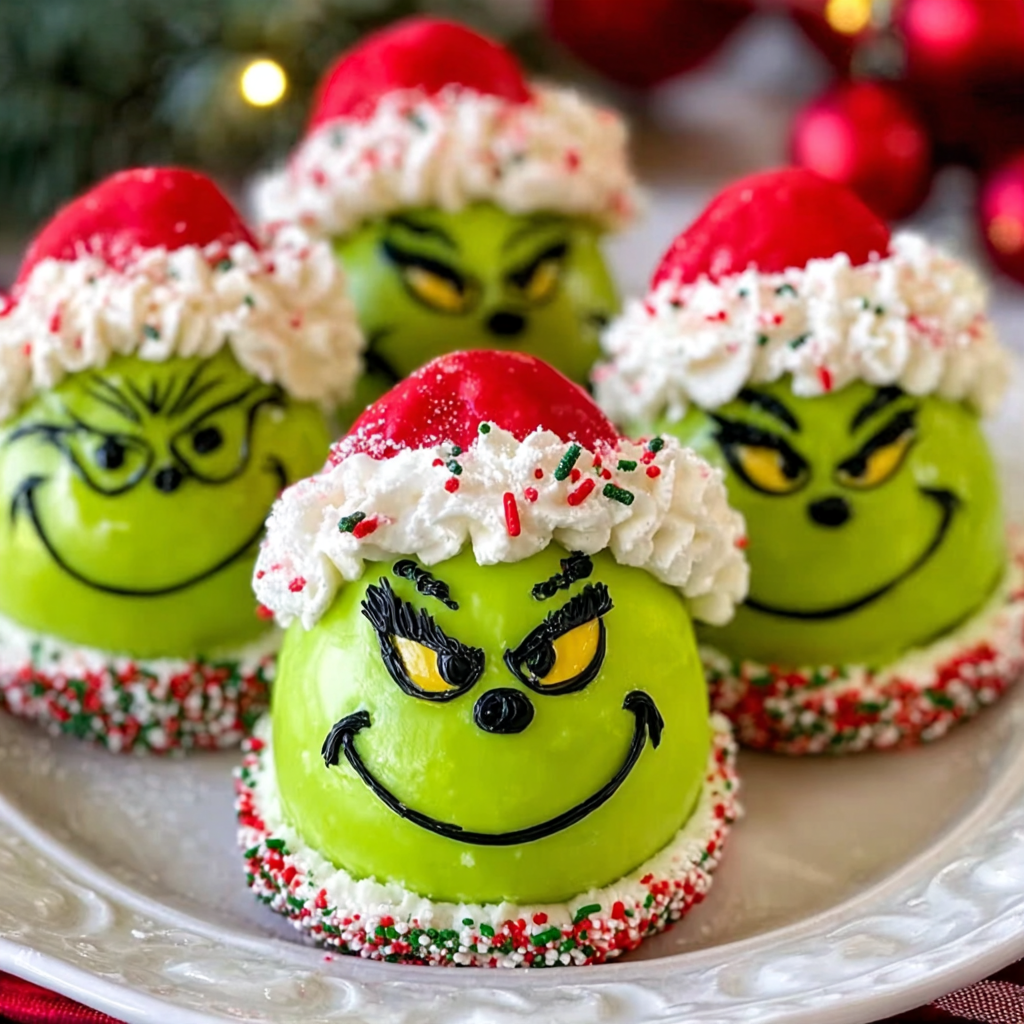
These adorable Grinch Christmas Balls are a fun, festive, and delicious no-bake treat that will bring a little holiday mischief to your Christmas dessert table! Made with a creamy vanilla cheesecake-style filling, crushed Golden Oreos, and a sweet green candy coating, these bite-sized treats are inspired by everyone’s favorite Christmas character.
Each little green ball is decorated with a tiny red heart, making them instantly recognizable and perfect for holiday parties, Christmas cookie exchanges, school celebrations, and homemade edible gifts.
The best part? You don’t need an oven, complicated equipment, or hours of preparation. Simply mix the ingredients, roll the filling into balls, chill until firm, dip in green candy coating, and add the finishing touches.
Whether you’re making them for the kids, preparing a festive dessert platter, or looking for an easy Christmas treat to share with friends, these Grinch Christmas Balls are guaranteed to steal the show!
Why You’ll Love These Grinch Christmas Balls
- No baking required: These festive treats come together without turning on the oven.
- Adorable Christmas appearance: Bright green coating and tiny red hearts create the perfect Grinch-inspired look.
- Simple ingredients: Golden sandwich cookies, cream cheese, and candy melts make the preparation easy.
- Perfect party treats: Their bite-sized shape makes them ideal for Christmas dessert platters and cookie exchanges.
- Make-ahead friendly: Prepare the centers in advance and dip them when you’re ready.
- Fun to decorate: Kids and adults can help add the little red hearts and festive finishing touches.
Ingredients
For the Grinch Balls
- 36 Golden sandwich cookies (about 14 ounces)
- 8 ounces cream cheese, softened
- 1 teaspoon vanilla extract
- ¼ teaspoon salt
For the Green Coating
- 16 ounces green candy melting wafers
- 1 teaspoon coconut oil, optional, if needed for thinning
For Decoration
- 24 to 36 small red heart-shaped sprinkles
- Extra green candy melts, optional, for decorative drizzle
Ingredient Notes and Substitutions
Golden Sandwich Cookies: These cookies create a sweet vanilla-flavored base that pairs beautifully with cream cheese. Use the entire cookie, including the filling, when crushing them.
Cream Cheese: Full-fat block cream cheese provides the best consistency and helps the cookie mixture hold together. Let it soften before mixing.
Vanilla Extract: A little vanilla enhances the cookie flavor and gives the filling a delicious cheesecake-like taste.
Salt: A small pinch balances the sweetness and makes the vanilla flavor more noticeable.
Green Candy Melting Wafers: Green melting wafers are ideal because they melt smoothly and are designed to set into a firm coating. Choose a bright or lime-green shade for the Grinch-inspired appearance.
Coconut Oil: A small amount can help thin candy melts if they are too thick. Add it gradually, following the melting wafer package directions.
Red Heart Sprinkles: These create the signature little red heart on each Grinch ball. Choose small heart-shaped decorations so they fit neatly on top.
How to Make Grinch Christmas Balls
Step 1: Crush the Golden Cookies
Place the Golden sandwich cookies in a food processor.
Pulse until they become very fine crumbs with no large cookie pieces remaining. If you don’t have a food processor, place the cookies in a large zip-top bag and crush them with a rolling pin.
Transfer the crumbs to a large mixing bowl.
Step 2: Prepare the Creamy Filling
Add the softened cream cheese, vanilla extract, and salt to the cookie crumbs.
Mix using a hand mixer on low speed or a sturdy spatula until everything is completely combined.
Continue mixing until the crumbs are evenly coated and the mixture becomes thick, soft, and dough-like.
Step 3: Shape the Balls
Scoop approximately 1 tablespoon of the mixture at a time.
Roll each portion between your palms to create a smooth, round ball. Try to keep them similar in size so they chill and coat evenly.
Place the balls on a parchment-lined baking sheet.
You should get approximately 24 to 30 balls, depending on their size.
Step 4: Chill Until Firm
Place the baking sheet in the refrigerator for at least 1 to 2 hours, or until the cookie balls are firm enough to dip.
If you’re short on time, you can place them in the freezer for approximately 20 to 30 minutes. Avoid freezing them until completely solid if you plan to dip them immediately, because extreme temperature differences can cause the candy coating to crack.
Step 5: Melt the Green Candy Coating
Place the green candy melting wafers in a microwave-safe bowl.
Microwave in 20- to 30-second intervals, stirring thoroughly after each interval.
Continue until the wafers are completely melted and smooth. Avoid overheating because candy melts can become thick or grainy if exposed to too much heat.
If the coating seems too thick, add a small amount of coconut oil and stir until smooth. Do not add water or liquid flavorings.
Step 6: Dip the Cookie Balls
Remove a few chilled balls from the refrigerator at a time, keeping the remaining ones cold.
Place one ball into the melted green coating. Use a fork or dipping tool to turn it gently until completely covered.
Lift the ball out and allow the excess coating to drip back into the bowl.
Gently tap the fork against the edge of the bowl to remove extra coating.
Step 7: Place on the Baking Sheet
Carefully transfer each coated ball onto the parchment-lined baking sheet.
Use a toothpick or another small tool to gently slide the ball off the fork if necessary.
Try to keep the tops smooth and avoid touching the coating while it is still wet.
Step 8: Add the Red Hearts
While the green coating is still wet, place one small red heart sprinkle near the top or upper center of each ball.
Press very gently so the heart sticks without sinking too far into the coating.
If the coating has already started to set, use a tiny dot of melted green candy coating as edible glue to attach the heart.
Step 9: Let the Coating Set
Allow the Grinch Christmas Balls to sit at room temperature in a cool, dry area until the candy coating is firm.
If your kitchen is warm, place the tray in the refrigerator for approximately 10 to 15 minutes to help the coating set.
Once firm, transfer the treats to a serving platter or airtight container.
Your adorable Grinch Christmas Balls are ready to enjoy!
Helpful Cooking Notes
- Use finely crushed cookies: Fine crumbs create a smoother filling and help the balls hold their shape.
- Use softened cream cheese: This makes mixing easier and prevents lumps.
- Chill before dipping: Firm centers are much easier to handle and coat.
- Melt the candy slowly: Short microwave intervals help prevent overheating.
- Keep water away from the coating: Even a small amount of water can cause melted candy coating to seize.
- Dip a few balls at a time: This keeps the remaining centers cold and firm.
- Add hearts immediately: Place the red hearts while the green coating is still wet.
- Use a dipping fork: It helps create a more even coating and allows excess candy to drip away.
Delicious Variations
1. Chocolate Grinch Christmas Balls
Replace the Golden sandwich cookies with chocolate sandwich cookies. The chocolate filling creates a rich contrast with the bright green candy coating.
2. Mint Grinch Balls
Add ¼ teaspoon of peppermint extract to the cream cheese mixture. Start with a small amount because peppermint extract can be quite strong.
3. White Chocolate Grinch Balls
Use white candy melting wafers colored with an oil-based green candy color. Regular water-based food coloring can cause melted chocolate or candy coating to seize.
4. Grinch Cheesecake Balls
Add 2 tablespoons of finely crushed graham crackers to the cookie mixture for a subtle cheesecake-inspired flavor and a little extra texture.
5. Red and Green Christmas Truffles
Make half the batch with green coating and the other half with red coating. Decorate with contrasting festive sprinkles for a colorful Christmas dessert platter.
6. Mini Grinch Balls
Make smaller balls using approximately 2 teaspoons of filling per portion. These bite-sized treats are perfect for dessert boards and holiday party favors.
Serving Suggestions
These Grinch Christmas Balls look wonderful on a festive Christmas dessert table.
Serve them with:
- Christmas sugar cookies.
- Chocolate truffles.
- Peppermint bark.
- Mini brownies.
- Christmas fudge.
- White chocolate pretzels.
- Holiday cupcakes.
- Fresh strawberries and raspberries.
For a beautiful presentation, arrange the green balls on a white serving platter with red and white sprinkles scattered around them. Add a few small Christmas decorations outside the food area to create a festive display.
You can also place each ball in a mini paper candy cup for easy serving at Christmas parties.
Tips for the Best Grinch Christmas Balls
- Use room-temperature cream cheese: It blends more easily with the cookie crumbs.
- Make evenly sized balls: This helps create a uniform batch with a professional appearance.
- Chill thoroughly: Soft centers are difficult to dip and may fall apart in the coating.
- Avoid overheating candy melts: Stir frequently and melt slowly for the smoothest coating.
- Use a deep melting bowl: A deeper bowl makes dipping easier and provides better coverage.
- Remove excess coating: Let extra candy drip away to avoid thick puddles around the bottom.
- Add hearts before the coating sets: This helps the decorations stick securely.
- Keep the finished treats cool: The cream cheese filling needs refrigeration between servings.
Storage Instructions
Store Grinch Christmas Balls in a single layer in an airtight container in the refrigerator for up to 5 days.
If stacking is necessary, place parchment paper between the layers to protect the candy coating and decorations.
Keep them refrigerated because the filling contains cream cheese. Do not leave them at room temperature for more than 2 hours, or more than 1 hour when the temperature is above 90°F.
For the best texture, remove them from the refrigerator shortly before serving.
Can You Freeze Grinch Christmas Balls?
Yes! These no-bake treats freeze well when stored properly.
Place the fully coated and set balls on a parchment-lined baking sheet and freeze until firm. Transfer them to a freezer-safe airtight container, separating layers with parchment paper.
Freeze for up to 2 months for the best quality.
When ready to serve, transfer the container to the refrigerator and allow the balls to thaw overnight. Avoid opening the container while the treats are still very cold, as condensation can form on the candy coating.
Make-Ahead Instructions
These Grinch Christmas Balls are perfect for preparing ahead of a busy holiday celebration.
You can make the cookie and cream cheese mixture, shape the balls, and refrigerate them up to 2 days before dipping.
You can also freeze the shaped, undipped centers for up to 2 months. Thaw them in the refrigerator before coating.
For the freshest appearance, dip the balls in green candy coating and add the red heart decorations a day before your party.
Keep the finished treats refrigerated until serving.
Recipe Details
- Prep Time: 30 minutes
- Chilling Time: 1 hour 30 minutes
- Cook Time: 0 minutes
- Total Time: 2 hours
- Yield: 24 to 30 balls
- Servings: 24
Nutritional Information
Approximate nutritional information per ball, based on 24 pieces:
- Calories: 185
- Protein: 2g
- Carbohydrates: 24g
- Fat: 9g
- Saturated Fat: 5g
- Sodium: 120mg
- Fiber: 0.5g
- Sugar: 17g
Actual nutritional values will vary depending on the cookie brand, candy coating, cream cheese, and size of each ball.
Frequently Asked Questions
1. Can I make Grinch Christmas Balls without baking?
Absolutely! This is a no-bake dessert. The cookie crumbs and cream cheese create the filling, so there is no need to turn on the oven.
2. Can I use regular chocolate instead of candy melts?
Yes, but the result will be different. White chocolate or green-colored chocolate can be used, but it may require proper tempering to set with a firm, glossy finish. Green candy melting wafers are generally easier for beginners.
3. Why is my green candy coating too thick?
Candy melts can become thick if overheated or if the product is naturally dense. Warm them gently and stir well. If necessary, add a little coconut oil or a compatible candy-coating thinner, following the product instructions.
4. Why are my cookie balls falling apart when dipping?
They may not be chilled enough, or the cookie mixture may not have enough cream cheese to bind the crumbs. Refrigerate the balls until firm before dipping. If the mixture was dry before shaping, add a small amount of softened cream cheese and mix again.
5. Can I make Grinch Balls with chocolate sandwich cookies?
Yes! Chocolate sandwich cookies create a delicious chocolate version. The green candy coating still works beautifully and gives the treats their festive Grinch appearance.
6. How do I keep the red hearts attached?
Add the heart sprinkles while the green candy coating is still wet. If the coating has already hardened, attach them with a tiny dot of melted green candy coating.
7. Can I make these treats smaller?
Yes! Use a smaller scoop and roll the filling into bite-sized portions. Smaller balls are especially convenient for Christmas dessert boards and cookie exchanges.
8. Do Grinch Christmas Balls need refrigeration?
Yes. The filling contains cream cheese, so the finished treats should be refrigerated in an airtight container until serving.
9. Can I prepare Grinch Christmas Balls the day before?
Definitely! Prepare and dip the balls the day before your celebration, add the red hearts, and store them in the refrigerator until ready to serve.
10. Can I use food coloring to make the coating green?
If you’re using white chocolate or white candy melts, use an oil-based candy coloring specifically designed for chocolate. Water-based food coloring can cause the coating to seize or become grainy.
Conclusion
These Grinch Christmas Balls are a fun, festive, and delicious way to add a little holiday magic to your Christmas celebrations. With their creamy vanilla cookie filling, bright green candy coating, and adorable red heart decorations, they are almost too cute to eat!
They’re easy to prepare, require no baking, and can be made ahead of time for stress-free holiday entertaining. Arrange them on a Christmas dessert platter, share them with friends and family, or package them as sweet homemade gifts. These adorable green treats are sure to become a favorite Christmas tradition!
Print
GRINCH CHRISTMAS BALLS
Ingredients
For the Grinch Balls
- 36 Golden sandwich cookies (about 14 ounces)
- 8 ounces cream cheese, softened
- 1 teaspoon vanilla extract
- ¼ teaspoon salt
For the Green Coating
- 16 ounces green candy melting wafers
- 1 teaspoon coconut oil, optional, if needed for thinning
For Decoration
- 24 to 36 small red heart-shaped sprinkles
- Extra green candy melts, optional, for decorative drizzle
Instructions
Place the Golden sandwich cookies in a food processor.
Pulse until they become very fine crumbs with no large cookie pieces remaining. If you don’t have a food processor, place the cookies in a large zip-top bag and crush them with a rolling pin.
Transfer the crumbs to a large mixing bowl.
Step 2: Prepare the Creamy Filling
Add the softened cream cheese, vanilla extract, and salt to the cookie crumbs.
Mix using a hand mixer on low speed or a sturdy spatula until everything is completely combined.
Continue mixing until the crumbs are evenly coated and the mixture becomes thick, soft, and dough-like.
Step 3: Shape the Balls
Scoop approximately 1 tablespoon of the mixture at a time.
Roll each portion between your palms to create a smooth, round ball. Try to keep them similar in size so they chill and coat evenly.
Place the balls on a parchment-lined baking sheet.
You should get approximately 24 to 30 balls, depending on their size.
Step 4: Chill Until Firm
Place the baking sheet in the refrigerator for at least 1 to 2 hours, or until the cookie balls are firm enough to dip.
If you’re short on time, you can place them in the freezer for approximately 20 to 30 minutes. Avoid freezing them until completely solid if you plan to dip them immediately, because extreme temperature differences can cause the candy coating to crack.
Step 5: Melt the Green Candy Coating
Place the green candy melting wafers in a microwave-safe bowl.
Microwave in 20- to 30-second intervals, stirring thoroughly after each interval.
Continue until the wafers are completely melted and smooth. Avoid overheating because candy melts can become thick or grainy if exposed to too much heat.
If the coating seems too thick, add a small amount of coconut oil and stir until smooth. Do not add water or liquid flavorings.
Step 6: Dip the Cookie Balls
Remove a few chilled balls from the refrigerator at a time, keeping the remaining ones cold.
Place one ball into the melted green coating. Use a fork or dipping tool to turn it gently until completely covered.
Lift the ball out and allow the excess coating to drip back into the bowl.
Gently tap the fork against the edge of the bowl to remove extra coating.
Step 7: Place on the Baking Sheet
Carefully transfer each coated ball onto the parchment-lined baking sheet.
Use a toothpick or another small tool to gently slide the ball off the fork if necessary.
Try to keep the tops smooth and avoid touching the coating while it is still wet.
Step 8: Add the Red Hearts
While the green coating is still wet, place one small red heart sprinkle near the top or upper center of each ball.
Press very gently so the heart sticks without sinking too far into the coating.
If the coating has already started to set, use a tiny dot of melted green candy coating as edible glue to attach the heart.
Step 9: Let the Coating Set
Allow the Grinch Christmas Balls to sit at room temperature in a cool, dry area until the candy coating is firm.
If your kitchen is warm, place the tray in the refrigerator for approximately 10 to 15 minutes to help the coating set.
Once firm, transfer the treats to a serving platter or airtight container.
Your adorable Grinch Christmas Balls are ready to enjoy!
Notes
- Use finely crushed cookies: Fine crumbs create a smoother filling and help the balls hold their shape.
- Use softened cream cheese: This makes mixing easier and prevents lumps.
- Chill before dipping: Firm centers are much easier to handle and coat.
- Melt the candy slowly: Short microwave intervals help prevent overheating.
- Keep water away from the coating: Even a small amount of water can cause melted candy coating to seize.
- Dip a few balls at a time: This keeps the remaining centers cold and firm.
- Add hearts immediately: Place the red hearts while the green coating is still wet.
- Use a dipping fork: It helps create a more even coating and allows excess candy to drip away.
