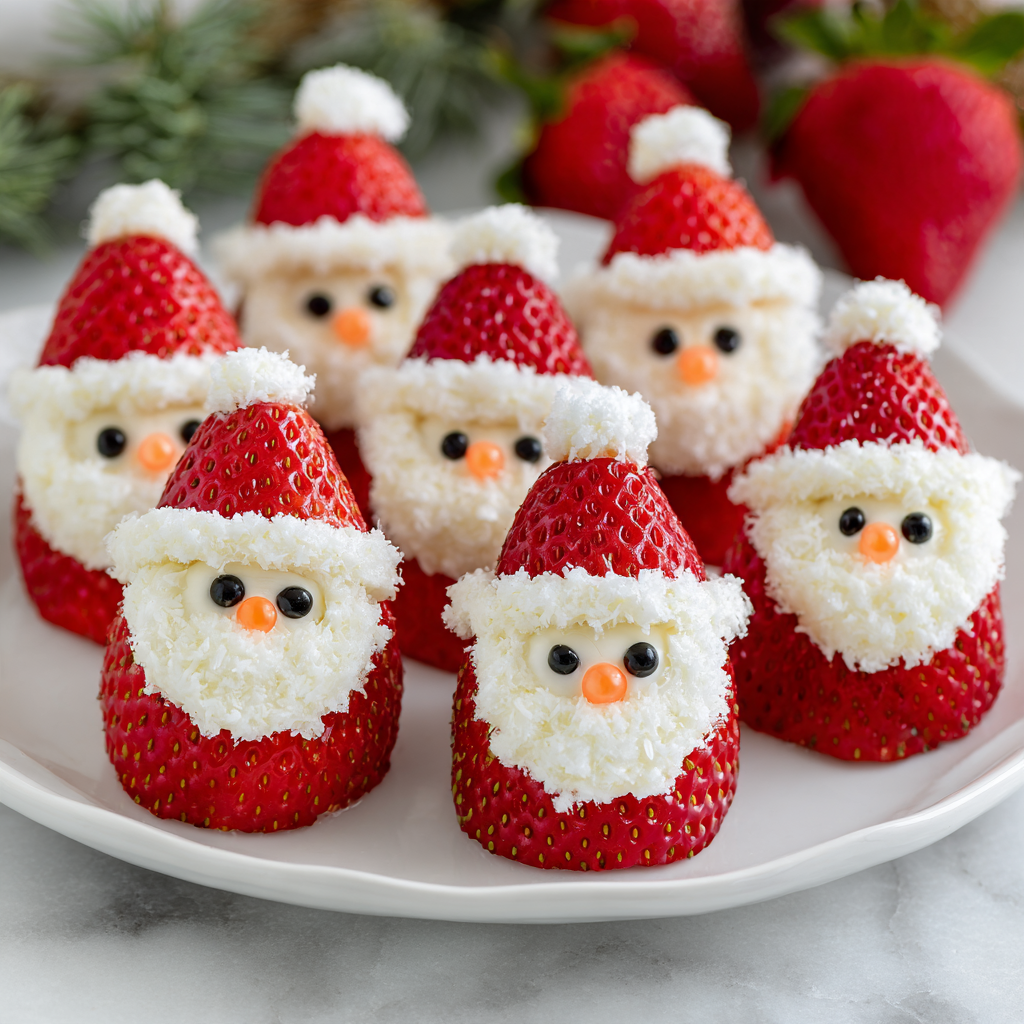
These adorable Strawberry Santas are the sweetest little treats to add to your Christmas dessert table! Made with fresh strawberries, fluffy whipped cream, and a few simple decorations, these bite-sized Santa treats are festive, delicious, and incredibly easy to prepare.
Each little Santa features a juicy strawberry body, a creamy white filling, and a strawberry hat topped with a tiny swirl of whipped cream. They look like miniature Christmas Santas and are perfect for holiday parties, Christmas brunch, school celebrations, and family gatherings.
The best part is that you don’t need to turn on the oven or spend hours preparing an elaborate dessert. With just a handful of ingredients and a little decorating, you can create a beautiful Christmas treat that both kids and adults will love!
Why You’ll Love These Strawberry Santas
- No baking required: These festive treats come together without an oven.
- Simple ingredients: Fresh strawberries, cream cheese, powdered sugar, and vanilla create a delicious little dessert.
- Adorable presentation: Their tiny Santa hats and creamy white beards make them perfect for Christmas celebrations.
- Quick to prepare: Once the strawberries are washed and dried, decorating is easy.
- Perfect party treats: Serve them on a Christmas dessert platter or as individual bite-sized sweets.
- Easy to customize: You can use different fillings and decorations to create your own festive Santa designs.
Ingredients
For the Strawberry Santas
- 24 medium-to-large fresh strawberries
- 4 ounces cream cheese, softened
- ½ cup heavy whipping cream, cold
- ½ cup powdered sugar
- 1 teaspoon vanilla extract
For Decorating
- 24 tiny pieces of mini chocolate chips, for the eyes
- 2 tablespoons powdered sugar, for optional dusting
- Extra whipped cream, if needed for decorating
Ingredient Notes and Substitutions
Fresh Strawberries: Choose medium-to-large strawberries that are firm, bright red, and similar in size. Strawberries with naturally pointed tips make especially cute Santa hats. Avoid overly ripe or bruised berries because they can release too much moisture.
Cream Cheese: Full-fat block cream cheese creates a stable, creamy filling with a slightly tangy flavor. Allow it to soften before mixing so there are no lumps.
Heavy Whipping Cream: Use cold heavy whipping cream to create a fluffy filling. It should contain enough milk fat to whip into soft or medium peaks.
Powdered Sugar: Powdered sugar sweetens the filling and gives it a smooth texture. It also helps the cream cheese mixture hold its shape.
Vanilla Extract: Vanilla adds a warm, sweet flavor that complements the fresh strawberries.
Mini Chocolate Chips: Tiny chocolate chips make simple Santa eyes. You can also use very small pieces of melted chocolate applied with a toothpick.
How to Make Strawberry Santas
Step 1: Wash and Dry the Strawberries
Rinse the strawberries gently under cool running water. Remove any dirt or debris, then pat them completely dry with paper towels.
This step is especially important because excess moisture can make the cream filling slide off the strawberries.
Remove the green leafy tops. Cut a small amount from the bottom of each strawberry if necessary so it can stand upright.
Step 2: Cut the Strawberry Hats
Place each strawberry upright with its pointed end facing up.
Using a sharp paring knife, cut approximately the top third from each strawberry. These small pointed pieces will become Santa’s hats.
Set the strawberry bottoms aside with the cut side facing upward. Keep the pointed tops separate for decorating.
Step 3: Prepare the Creamy Filling
Place the softened cream cheese in a mixing bowl and beat until smooth.
Add the powdered sugar and vanilla extract. Mix again until the ingredients are completely combined and creamy.
In a separate chilled bowl, whip the cold heavy cream until medium peaks form. The cream should hold its shape but remain smooth and soft.
Gently fold the whipped cream into the sweetened cream cheese mixture using a spatula. Continue folding until the filling is light, fluffy, and evenly combined.
Step 4: Transfer the Filling to a Piping Bag
Spoon the cream filling into a piping bag fitted with a small round or star-shaped piping tip.
If you don’t have a piping bag, use a sturdy food-safe plastic bag and cut a small corner.
Keep the filling refrigerated while preparing the strawberries so it stays firm and easy to pipe.
Step 5: Pipe Santa’s Body and Beard
Arrange the strawberry bottoms on a serving tray with the cut sides facing upward.
Pipe a generous swirl of cream filling onto each strawberry. Create a rounded shape that extends slightly over the edges to resemble Santa’s fluffy beard.
The filling should be thick enough to support the strawberry hat without sliding down.
Step 6: Add the Strawberry Hats
Take the pointed strawberry tops and place one gently on top of each cream-filled strawberry.
Position each tip upward to create Santa’s classic red hat.
Press very gently so the hat sits securely without squeezing out too much filling.
Step 7: Decorate Santa’s Face
Use two tiny mini chocolate chips for each Santa’s eyes. Place them carefully into the exposed cream filling just below the hat.
Add a tiny dot of cream at the tip of each strawberry hat to create the white pom-pom.
If desired, pipe a small additional amount of cream around the bottom of each Santa to create a fluffy white trim.
Step 8: Chill and Serve
Place the finished Strawberry Santas in the refrigerator for approximately 15 to 20 minutes before serving.
This helps the cream filling firm up slightly and makes the treats easier to handle.
Serve them chilled on a festive Christmas platter. Your adorable Strawberry Santas are ready to bring holiday cheer to the table!
Helpful Cooking Notes
- Dry the strawberries thoroughly: Water can prevent the filling from staying in place.
- Use cold whipping cream: Cold cream whips more easily and creates a fluffier filling.
- Choose firm berries: Overripe strawberries can become soft and difficult to decorate.
- Use a piping bag: It makes the filling look neat and gives every Santa a consistent appearance.
- Don’t overfill: Too much filling can make the strawberry hats slide off.
- Make the eyes tiny: Small chocolate pieces look more proportional and keep the Santas adorable.
- Keep them refrigerated: The cream filling needs to stay cold for food safety and a good texture.
- Decorate close to serving time: Fresh strawberries release moisture as they sit, so these treats look best when prepared shortly before serving.
Delicious Variations
1. Classic Whipped Cream Strawberry Santas
For a simpler version, use sweetened whipped cream instead of the cream cheese filling. Whip 1 cup of cold heavy cream with 2 tablespoons powdered sugar and ½ teaspoon vanilla until medium peaks form.
This creates a light, airy filling, although it is softer and best served immediately.
2. Mascarpone Strawberry Santas
Replace the cream cheese with 4 ounces of mascarpone cheese. Mix it with powdered sugar and vanilla, then gently fold in the whipped cream for a delicate, rich filling.
3. Chocolate Strawberry Santas
Add 1 tablespoon of unsweetened cocoa powder to the cream cheese mixture for a chocolate-flavored filling. Use mini chocolate chips for the eyes and a little extra chocolate for decoration.
4. Cheesecake Strawberry Santas
Add 2 tablespoons of finely crushed graham crackers to the cream cheese filling. This creates a cheesecake-inspired flavor that pairs beautifully with fresh strawberries.
5. Mini Strawberry Santa Bites
Choose smaller strawberries and use a smaller piping tip to create bite-sized Santa treats. These are especially cute for Christmas dessert platters.
6. Coconut Snowy Santas
Sprinkle a little finely shredded coconut around the base of each Santa for a snowy Christmas appearance. Use unsweetened coconut if you prefer to keep the sweetness balanced.
Serving Suggestions
Strawberry Santas are beautiful on their own, but you can make them part of a larger Christmas dessert spread.
Serve them with:
- Christmas sugar cookies.
- Chocolate-dipped strawberries.
- Mini brownies and brownie bites.
- Vanilla cupcakes.
- Chocolate truffles.
- Peppermint bark.
- Christmas cheesecake bites.
- Fresh raspberries and blueberries.
For a festive presentation, arrange the Strawberry Santas in rows on a white serving platter. Add a few mint leaves or small rosemary sprigs around the edges to create a Christmas-inspired look.
You can also place each Santa in a small paper cupcake liner to make serving easier at parties.
Tips for the Best Strawberry Santas
- Select strawberries of similar size: This creates a more consistent presentation.
- Choose pointed strawberries: Their natural shape makes perfect Santa hats.
- Dry the berries completely: Even a little water can make the filling slippery.
- Chill the filling if necessary: If it becomes too soft while decorating, refrigerate it briefly.
- Use a small piping tip: This gives you better control when creating the beard and hat pom-pom.
- Keep the hats in place: Gently position each strawberry top without pressing too hard.
- Add the eyes last: This makes it easier to adjust their position after the cream is piped.
- Prepare small batches: If making a large quantity, keep the undecorated strawberries and cream filling refrigerated until needed.
Storage Instructions
Store Strawberry Santas in a single layer inside an airtight container in the refrigerator.
For the best appearance and texture, enjoy them on the day they are prepared. They can generally be kept refrigerated for up to 24 hours, but the strawberries may release moisture and the cream decoration may soften over time.
Because these treats contain dairy and fresh cut fruit, do not leave them at room temperature for more than 2 hours, or more than 1 hour when the temperature is above 90°F.
Can You Freeze Strawberry Santas?
Freezing fully assembled Strawberry Santas is not recommended.
Fresh strawberries release moisture after thawing, which can make them mushy. The whipped cream and cream cheese filling may also lose their smooth texture.
For the best results, prepare the filling and wash the strawberries separately, then assemble the treats shortly before serving. Keep both components refrigerated until you are ready to decorate.
Make-Ahead Instructions
You can prepare some components ahead of time to make Christmas party preparation easier.
Wash and dry the strawberries a few hours in advance, then refrigerate them in a container lined with paper towels.
The cream cheese filling can also be prepared several hours ahead. Store it in an airtight container or piping bag in the refrigerator.
For the freshest results, cut the strawberries, pipe the filling, and assemble the Santa decorations shortly before serving. This helps prevent the strawberries from becoming watery and keeps the cream looking fluffy.
Recipe Details
- Prep Time: 25 minutes
- Cook Time: 0 minutes
- Chilling Time: 20 minutes
- Total Time: 45 minutes
- Yield: 24 Strawberry Santas
- Servings: 24 pieces
Nutritional Information
Approximate nutritional information per Strawberry Santa, based on 24 pieces:
- Calories: 45
- Protein: 0.5g
- Carbohydrates: 6g
- Fat: 2g
- Saturated Fat: 1g
- Sodium: 12mg
- Fiber: 0.5g
- Sugar: 5g
Actual nutritional values will vary depending on the size of the strawberries and the brands of cream cheese, whipping cream, and chocolate chips used.
Frequently Asked Questions
1. Can I make Strawberry Santas the day before Christmas?
You can prepare the cream filling and wash the strawberries ahead of time, but it is best to assemble the Santas on the day you plan to serve them. Fresh strawberries release moisture after being cut, which can make the filling and decorations less stable.
2. How do I keep the cream filling from sliding off the strawberries?
Make sure the strawberries are completely dry before decorating. Also, use a thick filling, avoid overfilling, and refrigerate the assembled treats before serving.
3. Can I use store-bought whipped cream?
You can, but aerosol whipped cream is usually too soft to hold its shape for long. A stabilized cream cheese filling or freshly whipped heavy cream is a better choice.
4. What is the best piping tip for Strawberry Santas?
A small round piping tip creates a smooth beard, while a small star tip gives the filling a decorative appearance. Both work beautifully.
5. Can I make Strawberry Santas without cream cheese?
Yes! Use sweetened whipped cream or mascarpone filling instead. Remember that plain whipped cream is softer, so the Santas should be assembled shortly before serving.
6. How do I make the Santa eyes?
Tiny mini chocolate chips are the easiest option. You can also use small dots of melted chocolate applied with a toothpick. Allow melted chocolate to set before serving.
7. Why are my strawberries leaking juice?
This can happen when strawberries are very ripe, have been washed too far in advance without drying, or have been cut and left sitting for too long. Choose firm berries, dry them thoroughly, and assemble the Santas shortly before serving.
8. Are Strawberry Santas suitable for a Christmas party?
Absolutely! Their small size makes them easy to serve, and their festive appearance makes them a fun addition to Christmas dessert tables, potlucks, and holiday brunches.
9. Can children help make these Strawberry Santas?
Yes! Children can help place the chocolate eyes and strawberry hats, or arrange the finished treats on a serving platter. An adult should handle the knife and supervise any piping work.
10. Can I use frozen strawberries?
Fresh strawberries are strongly recommended. Frozen strawberries become soft and watery after thawing, making them difficult to cut, fill, and decorate.
Conclusion
These Strawberry Santas are proof that Christmas desserts don’t need to be complicated to look adorable and taste delicious! With fresh strawberries, fluffy cream cheese filling, and tiny chocolate eyes, these little Santa treats are easy to make and perfect for sharing.
Whether you’re preparing a festive Christmas brunch, hosting a holiday party, or making a fun dessert with the family, these no-bake Strawberry Santas will add a beautiful touch of Christmas magic to your table. Prepare them fresh, serve them chilled, and enjoy every sweet little bite!
Print
STRAWBERRY SANTAS
Ingredients
For the Strawberry Santas
- 24 medium-to-large fresh strawberries
- 4 ounces cream cheese, softened
- ½ cup heavy whipping cream, cold
- ½ cup powdered sugar
- 1 teaspoon vanilla extract
For Decorating
- 24 tiny pieces of mini chocolate chips, for the eyes
- 2 tablespoons powdered sugar, for optional dusting
- Extra whipped cream, if needed for decorating
Instructions
Rinse the strawberries gently under cool running water. Remove any dirt or debris, then pat them completely dry with paper towels.
This step is especially important because excess moisture can make the cream filling slide off the strawberries.
Remove the green leafy tops. Cut a small amount from the bottom of each strawberry if necessary so it can stand upright.
Step 2: Cut the Strawberry Hats
Place each strawberry upright with its pointed end facing up.
Using a sharp paring knife, cut approximately the top third from each strawberry. These small pointed pieces will become Santa’s hats.
Set the strawberry bottoms aside with the cut side facing upward. Keep the pointed tops separate for decorating.
Step 3: Prepare the Creamy Filling
Place the softened cream cheese in a mixing bowl and beat until smooth.
Add the powdered sugar and vanilla extract. Mix again until the ingredients are completely combined and creamy.
In a separate chilled bowl, whip the cold heavy cream until medium peaks form. The cream should hold its shape but remain smooth and soft.
Gently fold the whipped cream into the sweetened cream cheese mixture using a spatula. Continue folding until the filling is light, fluffy, and evenly combined.
Step 4: Transfer the Filling to a Piping Bag
Spoon the cream filling into a piping bag fitted with a small round or star-shaped piping tip.
If you don’t have a piping bag, use a sturdy food-safe plastic bag and cut a small corner.
Keep the filling refrigerated while preparing the strawberries so it stays firm and easy to pipe.
Step 5: Pipe Santa’s Body and Beard
Arrange the strawberry bottoms on a serving tray with the cut sides facing upward.
Pipe a generous swirl of cream filling onto each strawberry. Create a rounded shape that extends slightly over the edges to resemble Santa’s fluffy beard.
The filling should be thick enough to support the strawberry hat without sliding down.
Step 6: Add the Strawberry Hats
Take the pointed strawberry tops and place one gently on top of each cream-filled strawberry.
Position each tip upward to create Santa’s classic red hat.
Press very gently so the hat sits securely without squeezing out too much filling.
Step 7: Decorate Santa’s Face
Use two tiny mini chocolate chips for each Santa’s eyes. Place them carefully into the exposed cream filling just below the hat.
Add a tiny dot of cream at the tip of each strawberry hat to create the white pom-pom.
If desired, pipe a small additional amount of cream around the bottom of each Santa to create a fluffy white trim.
Step 8: Chill and Serve
Place the finished Strawberry Santas in the refrigerator for approximately 15 to 20 minutes before serving.
This helps the cream filling firm up slightly and makes the treats easier to handle.
Serve them chilled on a festive Christmas platter. Your adorable Strawberry Santas are ready to bring holiday cheer to the table!
Notes
- Dry the strawberries thoroughly: Water can prevent the filling from staying in place.
- Use cold whipping cream: Cold cream whips more easily and creates a fluffier filling.
- Choose firm berries: Overripe strawberries can become soft and difficult to decorate.
- Use a piping bag: It makes the filling look neat and gives every Santa a consistent appearance.
- Don’t overfill: Too much filling can make the strawberry hats slide off.
- Make the eyes tiny: Small chocolate pieces look more proportional and keep the Santas adorable.
- Keep them refrigerated: The cream filling needs to stay cold for food safety and a good texture.
- Decorate close to serving time: Fresh strawberries release moisture as they sit, so these treats look best when prepared shortly before serving.
