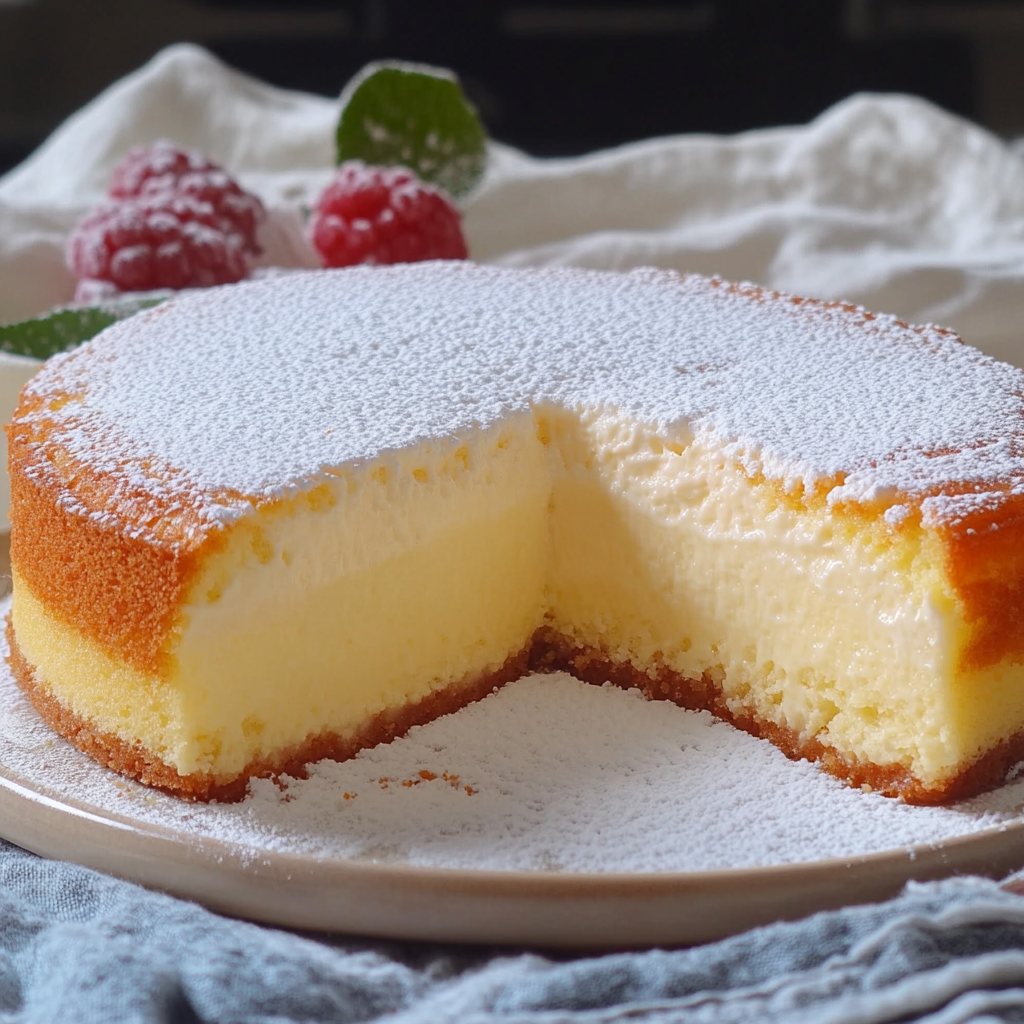
If you love creamy custard desserts and soft vanilla cake, this Vanilla Magic Custard Cake is one recipe you absolutely need to try.
What makes this cake so special is that one thin batter transforms into three distinct layers while it bakes. The top becomes light and delicate, the middle turns into a creamy vanilla custard, and the bottom develops into a soft, slightly denser cake layer.
It almost looks like you made three different desserts and stacked them together—but the magic happens right inside the oven.
The flavor is wonderfully simple. There’s plenty of vanilla, a delicate sweetness, and a rich custard texture that makes every bite melt in your mouth.
This is an old-fashioned style dessert that’s perfect when you want something elegant without spending hours decorating a cake.
Serve it chilled with a dusting of powdered sugar, fresh berries, whipped cream, or simply enjoy it as-is with a cup of coffee.
❤️ Why You’ll Love This Recipe
- ✨ Three layers from one batter
- 🍦 Rich vanilla flavor
- 🍮 Creamy custard center
- 🍰 Soft cake-like bottom
- ☕ Perfect with coffee or tea
- 🎉 Beautiful enough for entertaining
- 🧈 Made with simple ingredients
- ❄️ Delicious served chilled
- 👩🍳 No complicated decorating required
🛒 Ingredients
For the Cake
- 4 large eggs, separated
- ¾ cup granulated sugar
- ½ cup unsalted butter, melted and cooled
- 2 teaspoons pure vanilla extract
- ¾ cup all-purpose flour
- 2 cups whole milk, lukewarm
- ¼ teaspoon salt
- 1 tablespoon water
For Finishing
- Powdered sugar, for dusting
- Fresh berries, optional
- Whipped cream, optional
- Fresh mint, optional
👩🍳 How to Make Vanilla Magic Custard Cake
Step 1: Prepare the Oven and Pan
Preheat your oven to 325°F (165°C).
Grease an 8×8-inch square baking pan and line the bottom with parchment paper.
Leave a little parchment hanging over two sides of the pan. This will make it much easier to lift the finished cake out later.
A glass or light-colored metal pan works well for this recipe.
Step 2: Separate the Eggs
Carefully separate the egg yolks from the whites.
Place the yolks in a large mixing bowl.
Place the egg whites in a separate clean bowl.
Make sure the egg whites are free from any traces of yolk because even a small amount of yolk can prevent them from whipping properly.
Step 3: Beat the Egg Yolks
Add the granulated sugar to the egg yolks.
Beat for approximately 2–3 minutes, until the mixture becomes lighter in color and slightly thickened.
Add the melted butter, vanilla extract, and water.
Mix until smooth.
The butter should be cooled before adding it so it doesn’t cook the egg mixture.
Step 4: Add the Flour
Sift the flour and salt into the egg yolk mixture.
Whisk gently until the flour is incorporated.
Don’t worry if the batter seems unusually thin at this point.
That’s exactly what you want.
🥛 Step 5: Add the Milk
Gradually pour in the lukewarm milk while whisking continuously.
The finished batter will be very thin and liquid-like.
Don’t add extra flour.
The thin consistency is essential to the magic layering process.
☁️ Step 6: Whip the Egg Whites
Using a clean electric mixer, beat the egg whites until they form stiff peaks.
This usually takes approximately 3–5 minutes.
The whites should be fluffy and hold their shape when the beaters are lifted.
🍰 Step 7: Fold the Egg Whites Into the Batter
This is one of the most important steps.
Add the whipped egg whites to the thin batter in several additions.
Gently fold them in using a spatula.
Do not completely blend the egg whites into the batter.
Small floating pieces of egg white should remain visible.
Those pieces rise toward the top during baking and help create the delicate upper layer.
Step 8: Pour Into the Pan
Slowly pour the batter into the prepared baking pan.
Use a spatula to distribute the mixture evenly.
Because the batter is extremely thin, pour carefully to avoid splashing.
Step 9: Bake
Place the pan in the preheated oven.
Bake for approximately 50–60 minutes.
The top should be golden and firm, while the center should still have a slight jiggle when gently moved.
Don’t worry if the cake doesn’t look completely firm in the middle.
It will continue setting as it cools.
Step 10: Cool Completely
Remove the cake from the oven.
Allow it to cool completely in the pan.
Once it reaches room temperature, refrigerate it for at least 2 hours.
For the cleanest slices and best custard texture, chilling it overnight is even better.
Step 11: Dust With Powdered Sugar
Once chilled, carefully lift the cake from the pan using the parchment paper.
Place it on a cutting board.
Dust generously with powdered sugar.
Cut into squares using a sharp knife.
For cleaner cuts, wipe the knife between slices.
🍮 What Makes This Cake “Magic”?
The magic comes from the unusual batter and the way the ingredients behave during baking.
You start with one very thin mixture.
As it bakes:
The heavier ingredients settle toward the bottom → forming a soft cake layer.
The creamy middle remains custard-like → creating the smooth center.
The whipped egg whites rise toward the top → forming a light, delicate layer.
So instead of making separate cake, custard, and topping layers, the oven does the work for you.
🍦 Vanilla Flavor Tips
Because vanilla is the star of this recipe, using good-quality vanilla extract makes a noticeable difference.
For an even stronger vanilla flavor, add:
- 1 teaspoon vanilla bean paste
- The seeds from 1 vanilla bean
- An additional ½ teaspoon vanilla extract
A little lemon zest can also brighten the flavor without overpowering the vanilla.
🍓 How to Serve Vanilla Magic Custard Cake
This cake is delicious straight from the refrigerator, but you can dress it up in many ways.
Classic
Dust generously with powdered sugar.
With Fresh Berries
Serve with strawberries, raspberries, or blueberries.
With Whipped Cream
Add a spoonful of lightly sweetened whipped cream.
With Strawberry Sauce
Drizzle homemade strawberry sauce over each slice.
With Caramel
A small drizzle of caramel sauce adds a delicious buttery flavor.
With Chocolate
Add a light drizzle of melted chocolate for a richer dessert.
With Fresh Fruit
Peaches, blackberries, and raspberries all pair beautifully with vanilla custard.
🍓 Strawberry Vanilla Magic Cake
For a beautiful summer version, serve chilled slices with fresh strawberries and homemade strawberry sauce.
You can also add a small amount of finely grated lemon zest to the batter for a fresh citrus note.
🍋 Lemon Vanilla Magic Cake
Add:
- 1 tablespoon fresh lemon zest
- 1 tablespoon fresh lemon juice
The lemon cuts through the richness of the custard and gives the cake a bright, refreshing flavor.
🥥 Coconut Vanilla Magic Cake
Replace ½ cup of the whole milk with full-fat coconut milk.
Add ½ cup finely shredded sweetened coconut.
Sprinkle toasted coconut over the top before serving.
🍫 Chocolate Vanilla Magic Cake
For a chocolate version, replace approximately ¼ cup of the flour with unsweetened cocoa powder.
You can also add mini chocolate chips to the batter.
Serve with whipped cream and chocolate shavings.
🍁 Maple Vanilla Magic Cake
Replace 2 tablespoons of the granulated sugar with pure maple syrup.
Add ½ teaspoon maple extract.
Serve with toasted pecans and a light maple glaze.
🧈 Cooking Notes
The batter for magic custard cake is much thinner than a traditional cake batter.
Do not panic.
It should look almost like a thin pancake batter before baking.
Another important point is the temperature of the milk.
Use milk that is lukewarm rather than cold. Cold milk can make it more difficult to incorporate the butter and egg mixture smoothly.
The egg whites should also be folded gently.
If you completely mix the egg whites into the batter, you may lose the characteristic light top layer.
⭐ Tips for Perfect Magic Custard Cake
1. Separate the eggs carefully
Keep the yolks out of the egg whites.
2. Use room-temperature eggs
They separate and whip more easily.
3. Cool the melted butter
Hot butter can affect the egg mixture.
4. Use lukewarm milk
It combines more smoothly with the batter.
5. Don’t overmix
Especially when folding in the egg whites.
6. Keep some egg-white pieces
They help create the top layer.
7. Don’t add extra flour
The batter is supposed to be very thin.
8. Don’t overbake
The center should retain a gentle jiggle.
9. Chill before slicing
Cold custard cake cuts much more cleanly.
10. Use a sharp knife
For beautiful square portions.
🍰 Why Didn’t My Cake Form Three Layers?
Several factors can affect the layers.
The egg whites may have been folded too thoroughly.
The oven temperature may have been too high or too low.
The batter may have been overmixed.
The cake may have been removed from the oven too early.
The recipe also works best when baked in the recommended pan size because changing the pan dimensions changes the depth of the batter and therefore the baking time.
🍮 Why Is My Custard Cake Runny?
If the center is extremely liquid after cooling, it may simply need more baking time.
However, remember that the center should remain softer than the top and bottom layers.
Allow the cake to cool completely and refrigerate it before deciding whether the texture is correct.
❄️ How to Store Vanilla Magic Custard Cake
Because this dessert contains a custard layer, store it in the refrigerator.
Cover the cake tightly with plastic wrap or place it in an airtight container.
It will keep for approximately 3–4 days when properly refrigerated.
❄️ Can You Freeze Magic Custard Cake?
Yes, although the texture can change slightly after freezing and thawing because of the custard.
For best results, freeze individual portions tightly wrapped.
Thaw them overnight in the refrigerator.
Avoid repeatedly freezing and thawing the cake.
🍰 Can I Make This Cake Ahead?
Absolutely.
This is actually an excellent make-ahead dessert.
Prepare the cake the day before serving and refrigerate it overnight.
The flavors become more developed and the custard becomes firmer, making the slices easier to cut.
Add powdered sugar and fresh berries just before serving.
Frequently Asked Questions
Why is my batter so thin?
That’s normal. Magic custard cake batter is intentionally much thinner than traditional cake batter.
Can I use skim milk?
You can, but whole milk produces a richer and creamier custard.
Can I use almond milk?
Yes, although the flavor and texture may be slightly different.
Can I use salted butter?
Yes. If using salted butter, reduce the additional salt.
Can I make this in a 9×13 pan?
You can, but the cake will be much thinner and the baking time will change. For the classic three-layer result, an 8×8-inch pan is preferable.
Why is the top not fluffy?
The egg whites may have been overmixed into the batter or weren’t whipped enough.
Should the center jiggle?
Yes. A gentle jiggle is normal when the cake first comes out of the oven.
Can I serve it warm?
It’s possible, but the cake is best chilled. Cooling allows the custard layer to set properly.
Can I add fruit to the batter?
Fresh fruit can release additional moisture and interfere with the layers. It’s better to serve fruit on top.
Can I make it more vanilla-flavored?
Yes. Vanilla bean paste or vanilla bean seeds can provide an especially intense vanilla flavor.
🎉 Perfect for Every Occasion
Vanilla Magic Custard Cake is elegant enough for entertaining but simple enough for an everyday dessert.
Serve it for:
- ☕ Afternoon tea
- 🍓 Spring brunch
- 🌸 Mother’s Day
- 🎉 Birthday gatherings
- 🍽️ Sunday dinner
- 🦃 Thanksgiving
- 🎄 Christmas
- ☀️ Summer parties
- 👨👩👧👦 Family gatherings
- 🥳 Potlucks
The beautiful three-layer appearance makes it look much more complicated than it actually is.
⏱️ Recipe Information
Prep Time: 20 minutes
Cook Time: 50–60 minutes
Cooling Time: 2 hours
Total Time: Approximately 3 hours 20 minutes
Servings: 9–12 slices
🥄 Nutritional Information
Approximate per serving and will vary depending on portion size and ingredients.
- Calories: 285
- Protein: 7g
- Carbohydrates: 34g
- Sugar: 23g
- Fat: 14g
- Saturated Fat: 8g
- Sodium: 150mg
- Fiber: 0g
- Cholesterol: 125mg
❤️ Conclusion
This Vanilla Magic Custard Cake is proof that sometimes the simplest recipes create the most impressive desserts.
With just one thin batter, the oven creates a delicate cake layer, a rich creamy custard center, and a light vanilla top. There’s no complicated assembly and no frosting required.
Serve it chilled with powdered sugar and fresh berries, or add whipped cream and caramel for an extra-special dessert.
One batter, three beautiful layers, and absolutely magical results! 🍰🍮✨
Print
🍰 Vanilla Magic Custard Cake
- Total Time: Approximately 3 hours 20 minutes
Description
If you love creamy custard desserts and soft vanilla cake, this Vanilla Magic Custard Cake is one recipe you absolutely need to try.
What makes this cake so special is that one thin batter transforms into three distinct layers while it bakes. The top becomes light and delicate, the middle turns into a creamy vanilla custard, and the bottom develops into a soft, slightly denser cake layer.
Ingredients
For the Cake
- 4 large eggs, separated
- ¾ cup granulated sugar
- ½ cup unsalted butter, melted and cooled
- 2 teaspoons pure vanilla extract
- ¾ cup all-purpose flour
- 2 cups whole milk, lukewarm
- ¼ teaspoon salt
- 1 tablespoon water
For Finishing
- Powdered sugar, for dusting
- Fresh berries, optional
- Whipped cream, optional
- Fresh mint, optional
Instructions
Preheat your oven to 325°F (165°C).
Grease an 8×8-inch square baking pan and line the bottom with parchment paper.
Leave a little parchment hanging over two sides of the pan. This will make it much easier to lift the finished cake out later.
A glass or light-colored metal pan works well for this recipe.
Carefully separate the egg yolks from the whites.
Place the yolks in a large mixing bowl.
Place the egg whites in a separate clean bowl.
Make sure the egg whites are free from any traces of yolk because even a small amount of yolk can prevent them from whipping properly.
Add the granulated sugar to the egg yolks.
Beat for approximately 2–3 minutes, until the mixture becomes lighter in color and slightly thickened.
Add the melted butter, vanilla extract, and water.
Mix until smooth.
The butter should be cooled before adding it so it doesn’t cook the egg mixture.
Sift the flour and salt into the egg yolk mixture.
Whisk gently until the flour is incorporated.
Don’t worry if the batter seems unusually thin at this point.
That’s exactly what you want.
Gradually pour in the lukewarm milk while whisking continuously.
The finished batter will be very thin and liquid-like.
Don’t add extra flour.
The thin consistency is essential to the magic layering process.
Using a clean electric mixer, beat the egg whites until they form stiff peaks.
This usually takes approximately 3–5 minutes.
The whites should be fluffy and hold their shape when the beaters are lifted.
This is one of the most important steps.
Add the whipped egg whites to the thin batter in several additions.
Gently fold them in using a spatula.
Do not completely blend the egg whites into the batter.
Small floating pieces of egg white should remain visible.
Those pieces rise toward the top during baking and help create the delicate upper layer.
Slowly pour the batter into the prepared baking pan.
Use a spatula to distribute the mixture evenly.
Because the batter is extremely thin, pour carefully to avoid splashing.
Place the pan in the preheated oven.
Bake for approximately 50–60 minutes.
The top should be golden and firm, while the center should still have a slight jiggle when gently moved.
Don’t worry if the cake doesn’t look completely firm in the middle.
It will continue setting as it cools.
Remove the cake from the oven.
Allow it to cool completely in the pan.
Once it reaches room temperature, refrigerate it for at least 2 hours.
For the cleanest slices and best custard texture, chilling it overnight is even better.
Once chilled, carefully lift the cake from the pan using the parchment paper.
Place it on a cutting board.
Dust generously with powdered sugar.
Cut into squares using a sharp knife.
For cleaner cuts, wipe the knife between slices.
Notes
The batter for magic custard cake is much thinner than a traditional cake batter.
Do not panic.
It should look almost like a thin pancake batter before baking.
Another important point is the temperature of the milk.
Use milk that is lukewarm rather than cold. Cold milk can make it more difficult to incorporate the butter and egg mixture smoothly.
The egg whites should also be folded gently.
If you completely mix the egg whites into the batter, you may lose the characteristic light top layer.
- Prep Time: 20 minutes
- Cooling Time: 2 hours
- Cook Time: 50–60 minutes
Nutrition
- Calories: 285
- Sugar: 23g
- Fat: 14g
- Saturated Fat: 8g
- Carbohydrates: 34g
- Protein: 7g
