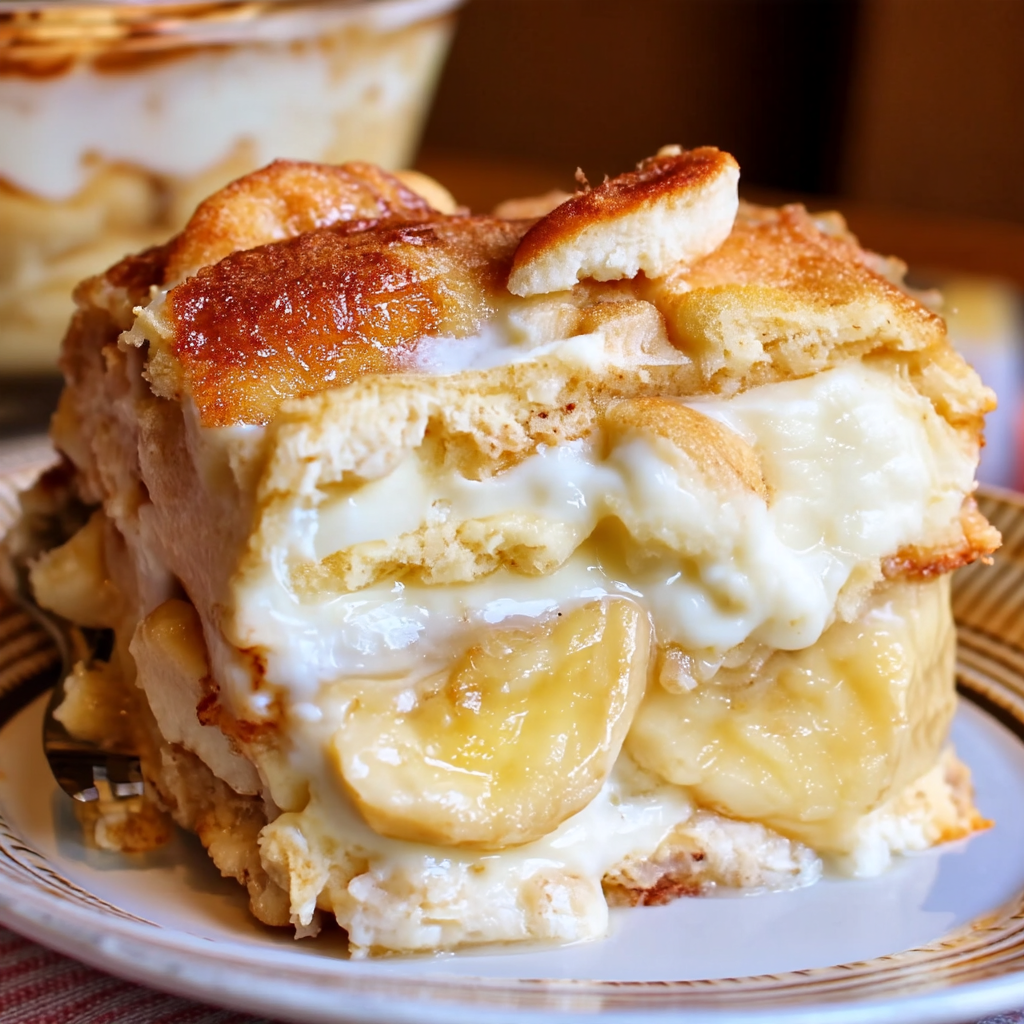
Few desserts are as comforting and nostalgic as a big dish of homemade Banana Pudding. Creamy vanilla pudding, sweet ripe bananas, and crisp vanilla wafers come together in layers to create a dessert that’s simple, old-fashioned, and incredibly satisfying.
This classic Southern-style dessert is especially popular at family gatherings, Sunday dinners, holidays, potlucks, cookouts, and celebrations. It’s easy enough for a weeknight treat but special enough to earn a place on a holiday dessert table.
The magic is in the layers. The vanilla wafers soften slightly as they sit beside the creamy pudding and juicy bananas, creating a texture that’s somewhere between cake and custard. Every spoonful gives you creamy pudding, tender banana, and a little bit of cookie.
For an extra special finish, the pudding can be topped with freshly whipped cream and additional vanilla wafers.
And although banana pudding is wonderfully delicious right after assembling, allowing it to chill for a few hours gives the flavors time to come together and the cookies time to soften into that classic texture everyone loves.
❤️ Why You’ll Love This Banana Pudding
- Creamy and rich: The vanilla pudding creates a smooth, luscious base.
- Classic Southern flavor: Bananas and vanilla wafers are a timeless combination.
- Easy to assemble: Most of the work is simply layering the ingredients.
- Perfect for gatherings: A large dish makes plenty for family and friends.
- Make-ahead friendly: It can be prepared several hours before serving.
- No complicated baking: There’s no cake batter or pie crust to prepare.
🛒 Ingredients
For the Pudding
- 1 package instant vanilla pudding mix, 5.1 ounces
- 3 cups cold whole milk
- 1 can sweetened condensed milk, 14 ounces
- 1 teaspoon vanilla extract
- 8 ounces cream cheese, softened
- 1 cup heavy whipping cream
- ¼ cup powdered sugar
For the Layers
- 5–6 ripe but firm bananas
- 1–2 packages vanilla wafer cookies, approximately 11 ounces each
- Additional whipped cream, optional
- Extra vanilla wafers for garnish
👩🍳 How to Make Banana Pudding
Step 1: Prepare the Vanilla Pudding
Pour the cold milk into a large mixing bowl.
Add the instant vanilla pudding mix.
Whisk vigorously for approximately 2 minutes, or until the mixture begins to thicken.
Allow it to sit for several minutes while you prepare the remaining ingredients.
Step 2: Prepare the Cream Cheese Mixture
In a separate bowl, beat the softened cream cheese until smooth and creamy.
Add the sweetened condensed milk gradually and continue beating until completely incorporated.
Add the vanilla extract.
The mixture should be smooth without visible lumps of cream cheese.
Step 3: Combine the Pudding
Add the prepared vanilla pudding to the cream cheese mixture.
Beat gently until everything is smooth and well combined.
The resulting mixture should be thick, creamy, and silky.
Step 4: Whip the Cream
Pour the heavy whipping cream into a clean bowl.
Add the powdered sugar.
Beat until stiff peaks form.
Be careful not to overbeat the cream, or it can become grainy.
Step 5: Fold in the Whipped Cream
Gently fold the whipped cream into the pudding mixture.
Use a spatula and fold rather than aggressively stirring.
This keeps the mixture light and fluffy.
🍌 Step 6: Slice the Bananas
Peel the bananas and slice them into approximately ¼-inch rounds.
Choose bananas that are ripe and sweet but still firm.
Avoid bananas that are extremely soft because they can become mushy in the pudding.
🍪 Step 7: Start the First Layer
Place a layer of vanilla wafers across the bottom of a large 9×13-inch baking dish or trifle bowl.
Try to cover most of the surface.
A few small gaps are perfectly fine.
🍌 Step 8: Add the Bananas
Arrange a layer of sliced bananas over the vanilla wafers.
Spread them evenly so every serving will contain banana.
🥄 Step 9: Add the Pudding
Spoon approximately half of the creamy pudding mixture over the bananas.
Spread it gently with a spatula.
Make sure the pudding reaches the edges of the dish.
🍪 Step 10: Repeat the Layers
Repeat the layers:
Vanilla wafers → bananas → pudding
Continue until all of the ingredients have been used.
Finish with a generous layer of pudding.
🍦 Step 11: Add the Topping
Top the pudding with additional whipped cream.
Arrange several vanilla wafers around the top.
You can also crumble a few wafers over the surface for extra texture.
For a beautiful presentation, arrange whole wafers around the edges of the dish.
❄️ Step 12: Chill
Cover the banana pudding tightly with plastic wrap.
Refrigerate for at least 4 hours.
For the best flavor and texture, chilling overnight is even better.
The vanilla wafers will soften slightly while still retaining enough texture to make the dessert interesting.
🍌 Choosing the Best Bananas
The bananas are one of the most important ingredients, so choosing the right ones makes a big difference.
Look for bananas that are:
- Bright yellow
- Sweet-smelling
- Mostly ripe
- Slightly firm
- Free from excessive bruising
Bananas with a few brown spots are perfectly fine and usually sweeter.
However, avoid bananas that are extremely soft or heavily browned because they can break down too quickly in the pudding.
🍪 Choosing the Best Vanilla Wafers
Classic vanilla wafer cookies work beautifully because they absorb some of the pudding without completely disappearing.
You can use traditional vanilla wafers or another crisp vanilla cookie.
For a slightly different flavor, try:
- Shortbread cookies
- Butter cookies
- Golden sandwich cookies
- Homemade vanilla cookies
🍨 How to Serve Banana Pudding
Banana pudding should be served chilled.
Spoon it into individual dessert bowls and garnish with:
- Whipped cream
- Vanilla wafers
- Banana slices
- Caramel sauce
- Toasted pecans
- A light dusting of cinnamon
For an especially indulgent version, drizzle a small amount of caramel sauce over each serving.
🍮 Banana Pudding in Individual Cups
Individual banana pudding cups are perfect for parties.
Use small clear dessert cups or jars.
Layer:
- Crushed vanilla wafers
- Banana slices
- Vanilla pudding
- Whipped cream
Repeat the layers and finish with a whole vanilla wafer.
These are easy to serve and look beautiful on a dessert table.
🍯 Caramel Banana Pudding
For a richer variation, drizzle a little caramel sauce between the layers.
Add caramel over the top just before serving.
The combination of banana, vanilla, caramel, and cream tastes almost like a banana cream pie with a caramel twist.
🍫 Chocolate Banana Pudding
For chocolate lovers, replace the vanilla pudding with chocolate pudding.
Layer with bananas and vanilla wafers.
You can also add mini chocolate chips between the layers.
Finish with chocolate shavings and whipped cream.
🥜 Peanut Butter Banana Pudding
Add small spoonfuls of creamy peanut butter between the pudding layers.
You can also stir ½ cup smooth peanut butter into the cream cheese mixture.
Top with crushed peanut butter cookies for an extra-special dessert.
🥥 Coconut Banana Pudding
Add 1 cup toasted shredded coconut to the layers.
For an even stronger coconut flavor, replace part of the milk with coconut milk.
Top with toasted coconut flakes before serving.
🍓 Strawberry Banana Pudding
Add thinly sliced strawberries alongside the bananas.
The fresh berries add a bright flavor and beautiful color.
This variation is especially good during spring and summer.
🍰 Banana Pudding Cake
Turn this dessert into a cake by layering banana pudding between vanilla cake layers.
Add sliced bananas and vanilla wafers between the layers.
Finish with whipped cream or cream cheese frosting.
This makes a wonderful birthday or celebration dessert.
🧈 Cooking Notes
One of the biggest secrets to great banana pudding is patience.
It can be tempting to serve it immediately, but chilling allows the flavors and textures to develop.
The vanilla wafers absorb some of the creamy pudding and become soft without completely falling apart.
For the best appearance, however, don’t slice all of the bananas hours before assembling. Bananas naturally darken when exposed to air.
Layering them directly into the pudding helps reduce browning.
⭐ Tips for the Best Banana Pudding
1. Use firm ripe bananas
They provide sweetness without becoming mushy.
2. Use cold milk
Cold milk helps instant pudding thicken properly.
3. Soften the cream cheese
Room-temperature cream cheese creates a smoother filling.
4. Don’t overbeat the whipped cream
Stop once stiff peaks form.
5. Fold gently
This keeps the pudding light and fluffy.
6. Chill thoroughly
Give the dessert at least 4 hours.
7. Add garnish before serving
Fresh banana slices look best when added close to serving time.
8. Don’t over-layer the bananas
A single even layer provides the perfect balance.
9. Use plenty of vanilla wafers
They provide the classic texture and flavor.
10. Serve cold
Banana pudding tastes best properly chilled.
🍌 How Do You Keep Bananas From Turning Brown?
The easiest method is to use ripe but firm bananas and assemble them directly into the pudding.
The creamy pudding helps limit their exposure to air.
If you need to slice the bananas ahead of time, you can lightly toss them with a small amount of lemon juice.
Don’t use too much lemon juice because it can change the flavor of the dessert.
🧊 How to Store Banana Pudding
Cover the dish tightly with plastic wrap or transfer individual servings to airtight containers.
Refrigerate for up to 3 days.
The cookies will continue becoming softer as the pudding sits.
For the freshest texture, banana pudding is best enjoyed within the first 24–48 hours.
❄️ Can You Freeze Banana Pudding?
Freezing is generally not recommended for the finished dessert.
The bananas can become watery and the pudding may separate after thawing.
The vanilla wafers can also develop an unpleasant texture.
For the best results, prepare the dessert fresh and refrigerate it until serving.
🍌 Can I Make Banana Pudding Ahead of Time?
Absolutely.
Banana pudding is actually an excellent make-ahead dessert.
Prepare it several hours before serving and refrigerate it.
For a party or holiday meal, you can assemble it earlier in the day and add the final whipped cream and banana garnish shortly before serving.
Frequently Asked Questions
Can I use homemade pudding?
Yes. Homemade vanilla custard can make an exceptionally rich banana pudding. Allow it to cool completely before assembling the layers.
Can I use whipped topping instead of whipped cream?
Yes. A prepared whipped topping can be substituted for homemade whipped cream.
Can I make banana pudding without cream cheese?
Absolutely. Simply omit the cream cheese and use a classic vanilla pudding and whipped cream combination.
How long should banana pudding chill?
At least 4 hours is recommended. Overnight chilling gives the best texture.
Can I use instant banana pudding?
Yes, but vanilla pudding provides a more traditional flavor and allows the fresh bananas to stand out.
Can I use homemade vanilla wafers?
Yes. Homemade cookies can make the dessert even more special.
Why is my banana pudding runny?
The pudding may not have thickened properly before layering, or too much liquid may have been added. Make sure you measure the milk accurately and allow the pudding to thicken before assembling.
Why did my bananas turn brown?
Bananas naturally oxidize when exposed to air. Use firm bananas and assemble them directly into the pudding to minimize browning.
Can I add caramel?
Yes. Caramel is one of the best additions to banana pudding.
Can I make individual servings?
Yes. Small dessert cups or jars are perfect for parties and gatherings.
🎉 Perfect for Family Gatherings
Classic Banana Pudding is one of those desserts that feels right at almost any gathering.
Bring it to:
- 🍽️ Sunday dinner
- 🦃 Thanksgiving
- 🎄 Christmas
- ☀️ Summer cookouts
- 🎉 Birthday parties
- 🏈 Game-day gatherings
- 👨👩👧👦 Family reunions
- 🥳 Potlucks
- ⛪ Church gatherings
- 🍎 School events
It’s easy to make in a large dish, easy to transport, and easy for guests to serve themselves.
⏱️ Recipe Information
Prep Time: 25 minutes
Chill Time: 4 hours
Total Time: 4 hours 25 minutes
Servings: 12–16
🥄 Nutritional Information
Approximate per serving and will vary depending on the cookies, pudding mix, and toppings used.
- Calories: 385
- Protein: 6g
- Carbohydrates: 52g
- Sugar: 34g
- Fat: 18g
- Saturated Fat: 9g
- Sodium: 300mg
- Fiber: 2g
- Cholesterol: 55mg
❤️ Conclusion
This Classic Banana Pudding is the kind of dessert that never goes out of style.
Creamy vanilla pudding, sweet ripe bananas, and soft vanilla wafers come together in simple layers to create a dessert that’s nostalgic, comforting, and incredibly delicious.
Whether you’re making it for a family dinner, a summer cookout, Thanksgiving, or a big holiday gathering, it’s an easy dessert that always feels homemade and special.
For the ultimate serving, add a generous spoonful of whipped cream, a few fresh banana slices, and a drizzle of caramel.
One creamy, banana-filled bite and you’ll understand why this classic Southern dessert has been loved for generations! 🍌🍪🍮❤️
Print
🍌 Classic Southern Banana Pudding
- Total Time: 4 hours 25 minutes
Description
This classic Southern-style dessert is especially popular at family gatherings, Sunday dinners, holidays, potlucks, cookouts, and celebrations. It’s easy enough for a weeknight treat but special enough to earn a place on a holiday dessert table.
Ingredients
For the Pudding
- 1 package instant vanilla pudding mix, 5.1 ounces
- 3 cups cold whole milk
- 1 can sweetened condensed milk, 14 ounces
- 1 teaspoon vanilla extract
- 8 ounces cream cheese, softened
- 1 cup heavy whipping cream
- ¼ cup powdered sugar
For the Layers
- 5–6 ripe but firm bananas
- 1–2 packages vanilla wafer cookies, approximately 11 ounces each
- Additional whipped cream, optional
- Extra vanilla wafers for garnish
Instructions
Pour the cold milk into a large mixing bowl.
Add the instant vanilla pudding mix.
Whisk vigorously for approximately 2 minutes, or until the mixture begins to thicken.
Allow it to sit for several minutes while you prepare the remaining ingredients.
In a separate bowl, beat the softened cream cheese until smooth and creamy.
Add the sweetened condensed milk gradually and continue beating until completely incorporated.
Add the vanilla extract.
The mixture should be smooth without visible lumps of cream cheese.
Add the prepared vanilla pudding to the cream cheese mixture.
Beat gently until everything is smooth and well combined.
The resulting mixture should be thick, creamy, and silky.
Pour the heavy whipping cream into a clean bowl.
Add the powdered sugar.
Beat until stiff peaks form.
Be careful not to overbeat the cream, or it can become grainy.
Gently fold the whipped cream into the pudding mixture.
Use a spatula and fold rather than aggressively stirring.
This keeps the mixture light and fluffy.
Peel the bananas and slice them into approximately ¼-inch rounds.
Choose bananas that are ripe and sweet but still firm.
Avoid bananas that are extremely soft because they can become mushy in the pudding.
Place a layer of vanilla wafers across the bottom of a large 9×13-inch baking dish or trifle bowl.
Try to cover most of the surface.
A few small gaps are perfectly fine.
Arrange a layer of sliced bananas over the vanilla wafers.
Spread them evenly so every serving will contain banana.
Spoon approximately half of the creamy pudding mixture over the bananas.
Spread it gently with a spatula.
Make sure the pudding reaches the edges of the dish.
Repeat the layers:
Vanilla wafers → bananas → pudding
Continue until all of the ingredients have been used.
Finish with a generous layer of pudding.
Top the pudding with additional whipped cream.
Arrange several vanilla wafers around the top.
You can also crumble a few wafers over the surface for extra texture.
For a beautiful presentation, arrange whole wafers around the edges of the dish.
Cover the banana pudding tightly with plastic wrap.
Refrigerate for at least 4 hours.
For the best flavor and texture, chilling overnight is even better.
The vanilla wafers will soften slightly while still retaining enough texture to make the dessert interesting.
Notes
One of the biggest secrets to great banana pudding is patience.
It can be tempting to serve it immediately, but chilling allows the flavors and textures to develop.
The vanilla wafers absorb some of the creamy pudding and become soft without completely falling apart.
For the best appearance, however, don’t slice all of the bananas hours before assembling. Bananas naturally darken when exposed to air.
Layering them directly into the pudding helps reduce browning.
- Prep Time: 25 minutes
- Chill Time: 4 hours
Nutrition
- Calories: 385
- Sugar: 34g
- Fat: 18g
- Carbohydrates: 52g
- Protein: 6g
