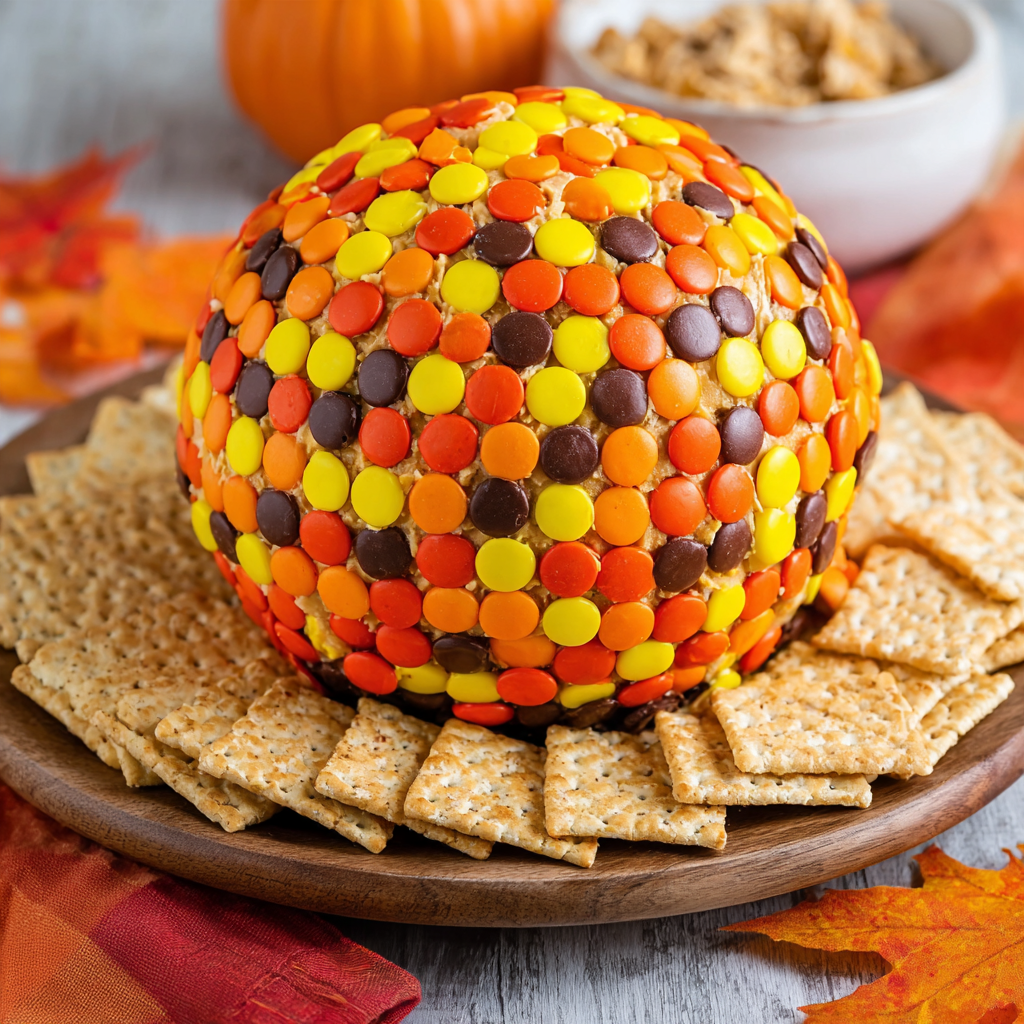
If you love the combination of creamy peanut butter and chocolate, this Reese’s Cheese Ball Peanut Butter Ball is about to become your new favorite party dessert! This easy no-bake treat combines smooth cream cheese, rich peanut butter, powdered sugar, and chocolate chips to create a sweet, creamy dessert cheese ball that tastes like a giant peanut butter cup.
Coated with mini chocolate chips and decorated with peanut butter cup pieces, this delicious dessert is perfect for Christmas parties, birthdays, potlucks, game days, and family gatherings. Serve it with graham crackers, pretzels, vanilla wafers, or fresh apple slices for a fun dessert dip everyone will love.
The best part? You don’t need an oven, complicated equipment, or hours in the kitchen. Simply mix, shape, chill, and decorate!
Why You’ll Love This Recipe
- No baking required: Everything comes together in one mixing bowl, making this an easy dessert for busy days.
- Peanut butter and chocolate: The classic combination creates a rich, sweet flavor that tastes like a giant peanut butter cup.
- Creamy and crunchy: The smooth filling is balanced by mini chocolate chips and chopped peanut butter cups.
- Perfect party dessert: Its round shape makes a beautiful centerpiece for a dessert board.
- Make-ahead friendly: Prepare the cheese ball in advance and decorate it shortly before serving.
- Easy to customize: Add crushed cookies, chopped peanuts, or extra chocolate for your own delicious version.
Ingredients
For the Peanut Butter Cheese Ball
- 8 ounces cream cheese, softened
- 1 cup creamy peanut butter
- ½ cup unsalted butter, softened
- 1 ½ cups powdered sugar
- 1 teaspoon vanilla extract
- ¼ teaspoon salt
- ½ cup mini semisweet chocolate chips
- ¼ cup finely chopped peanut butter cups
For the Chocolate Coating
- ¾ cup mini semisweet chocolate chips
- ¼ cup finely chopped peanut butter cups
- 2 tablespoons finely chopped roasted peanuts, optional
For Serving
- Graham crackers
- Vanilla wafers
- Chocolate sandwich cookies
- Pretzel twists
- Apple slices
- Strawberries
- Mini pretzels
Ingredient Notes and Substitutions
Cream Cheese: Use full-fat block cream cheese for the best consistency. It provides the creamy, slightly tangy base that makes this dessert cheese ball taste so delicious. Let it soften before mixing.
Creamy Peanut Butter: Regular creamy peanut butter works best because it creates a smooth, stable filling. Natural peanut butter that separates easily can make the mixture oily or too soft, so it is better to use a conventional no-stir variety.
Unsalted Butter: Butter adds richness and helps create a smooth, firm filling after chilling. Use softened butter rather than melted butter.
Powdered Sugar: This sweetens the mixture and gives the cheese ball enough structure to hold its shape. Add it gradually to prevent a cloud of sugar from forming while mixing.
Vanilla Extract: A little vanilla balances the peanut butter and chocolate flavors.
Mini Chocolate Chips: Mini chips distribute evenly throughout the filling and provide little bites of chocolate. Regular chocolate chips can also be used, but mini chips are easier to mix into the cheese ball.
Peanut Butter Cups: Chopped peanut butter cups add extra chocolate and peanut butter flavor. Use small pieces so they blend easily into the filling.
Roasted Peanuts: Optional chopped peanuts add a little crunch to the outside coating. Leave them out if you prefer a smoother finish.
How to Make Reese’s Cheese Ball Peanut Butter Ball
Step 1: Prepare the Creamy Base
Place the softened cream cheese and butter in a large mixing bowl.
Using a hand mixer on medium speed, beat them together until smooth, creamy, and free of large lumps. Scrape down the sides of the bowl as needed to ensure everything is evenly combined.
Step 2: Add the Peanut Butter
Add the creamy peanut butter and vanilla extract to the cream cheese mixture.
Continue mixing until the ingredients are completely incorporated. The mixture should look thick, smooth, and creamy, with a rich peanut butter color.
Step 3: Add the Powdered Sugar
Gradually add the powdered sugar, mixing on low speed after each addition.
Add the salt and continue mixing until the filling becomes thick enough to hold its shape. Avoid adding all the powdered sugar at once, as it may create a mess and make the mixture harder to combine.
Step 4: Fold in the Chocolate
Add the mini chocolate chips and finely chopped peanut butter cups.
Use a spatula to gently fold them into the peanut butter mixture. Distribute the chocolate pieces evenly without overmixing.
Step 5: Shape the Cheese Ball
Place a large sheet of plastic wrap on your work surface.
Transfer the peanut butter mixture onto the center of the plastic wrap. Gather the edges and use your hands to shape the mixture into a smooth, round ball.
Wrap it tightly and gently adjust the shape until it looks even.
Step 6: Chill Until Firm
Place the wrapped ball in the refrigerator for at least 3 hours, or until firm enough to handle.
For an especially neat shape, check the ball after about 90 minutes and gently reshape it through the plastic wrap if needed.
If the mixture still feels too soft after chilling, return it to the refrigerator for another 30 to 60 minutes.
Step 7: Prepare the Coating
Place the remaining mini chocolate chips, chopped peanut butter cups, and optional chopped peanuts in a shallow bowl.
Mix gently to combine.
For a more decorative appearance, reserve a few larger peanut butter cup pieces to arrange on top of the finished dessert.
Step 8: Coat the Peanut Butter Ball
Remove the chilled cheese ball from the refrigerator and unwrap it carefully.
Place it in the bowl of chocolate chips and chopped peanut butter cups. Gently roll and press the coating around the surface until the entire ball is covered.
Use your hands to press any loose chocolate pieces gently into the filling.
Step 9: Chill and Serve
Transfer the finished peanut butter ball to a serving plate.
Refrigerate it for another 20 to 30 minutes to help the coating settle and keep the ball firm.
When ready to serve, arrange graham crackers, vanilla wafers, pretzels, and apple slices around it.
Your Reese’s Cheese Ball Peanut Butter Ball is ready to enjoy!
Helpful Cooking Notes
- Use softened ingredients: Cream cheese and butter should be softened but not melted. This helps create a smooth filling without making it greasy.
- Choose regular creamy peanut butter: No-stir peanut butter usually provides a more reliable texture than natural varieties.
- Add powdered sugar gradually: The amount needed can vary slightly depending on the peanut butter and cream cheese brands.
- Chill thoroughly: Refrigeration is essential for a cheese ball that holds its shape.
- Use mini chocolate chips: They make the coating easier to apply and create a more even appearance.
- Keep the filling cold: If it becomes sticky while shaping, refrigerate it briefly before continuing.
- Decorate before serving: Add a few extra chopped peanut butter cups on top for a beautiful finishing touch.
Delicious Variations
1. Chocolate Peanut Butter Cheese Ball
For an even richer chocolate flavor, add 2 tablespoons of unsweetened cocoa powder to the filling. If the mixture becomes too firm or dry, add a small spoonful of peanut butter to adjust the consistency.
2. Crunchy Peanut Butter Ball
Replace creamy peanut butter with crunchy peanut butter for extra texture. You can also add 2 tablespoons of finely chopped roasted peanuts to the filling.
3. Oreo Peanut Butter Cheese Ball
Fold ½ cup of finely crushed chocolate sandwich cookies into the filling. Use additional cookie crumbs in the outside coating for a chocolate-cookie finish.
4. White Chocolate Peanut Butter Ball
Replace some of the semisweet chocolate chips with mini white chocolate chips. The white chocolate adds sweetness and creates a lovely contrast with the peanut butter.
5. Peanut Butter Pretzel Cheese Ball
Fold ¼ cup of finely crushed pretzels into the filling and use additional crushed pretzels in the coating. The salty crunch pairs beautifully with the sweet peanut butter mixture.
6. Mini Peanut Butter Dessert Balls
Instead of making one large ball, divide the mixture into 12 to 16 small portions. Roll each portion into a ball and coat with mini chocolate chips or chopped peanut butter cups. Chill until firm.
Serving Suggestions
This dessert is perfect for a sweet snack board or holiday dessert table.
Serve it with:
- Graham crackers for a classic pairing.
- Vanilla wafers for a buttery crunch.
- Chocolate sandwich cookies for extra chocolate flavor.
- Pretzel twists for a sweet-and-salty combination.
- Apple slices for a fresh, crisp contrast.
- Strawberries and banana slices for a fruity option.
- Mini pancakes or waffle pieces for a fun dessert platter.
For a beautiful party presentation, place the peanut butter ball in the center of a round wooden board. Arrange the dipping options around it in small groups, alternating crackers, fruit, and pretzels.
Tips for the Best Peanut Butter Cheese Ball
- Beat the cream cheese first: This helps remove lumps before adding the other ingredients.
- Don’t melt the butter: Melted butter can make the mixture greasy and difficult to shape.
- Measure powdered sugar accurately: Too little can make the filling too soft, while too much can make it overly sweet and dense.
- Use plastic wrap for shaping: It keeps the mixture from sticking to your hands and helps create a smooth round shape.
- Chill before coating: A firm ball is much easier to roll in chocolate chips and chopped peanut butter cups.
- Use a shallow coating bowl: This makes it easier to cover the entire surface evenly.
- Prepare the crackers separately: Keep the dipping items dry and add them to the serving board just before serving.
Storage Instructions
Store leftover Reese’s Cheese Ball Peanut Butter Ball in an airtight container in the refrigerator for up to 4 days.
Keep it refrigerated between servings because the recipe contains cream cheese and butter. If you are serving it at a party, put out a smaller portion and keep the remaining dessert chilled.
Do not leave it at room temperature for more than 2 hours, or more than 1 hour when the temperature is above 90°F.
For the best texture, remove it from the refrigerator about 10 minutes before serving so it softens slightly and becomes easier to scoop.
Can You Freeze Reese’s Cheese Ball Peanut Butter Ball?
Yes! This dessert can be frozen.
For the best results, freeze the shaped cheese ball before adding the outside coating. Wrap it tightly in plastic wrap, then place it inside a freezer-safe airtight container.
Freeze for up to 1 month for the best quality.
When ready to serve, thaw it overnight in the refrigerator. Once thawed and firm, add the chocolate chips and chopped peanut butter cups coating.
Avoid thawing it at room temperature, as this can make the cream cheese mixture too soft.
Make-Ahead Instructions
This recipe is ideal for preparing ahead of a party or holiday celebration.
You can make and shape the peanut butter filling up to 2 days in advance. Keep it tightly wrapped in the refrigerator until you are ready to decorate.
For the freshest presentation, add the chocolate chip and peanut butter cup coating on the day of serving.
If you are preparing the dessert board in advance, store the crackers, pretzels, and fruit separately so they stay fresh and crunchy.
Recipe Details
- Prep Time: 20 minutes
- Chilling Time: 3 hours 30 minutes
- Cook Time: 0 minutes
- Total Time: 3 hours 50 minutes
- Yield: 1 large dessert cheese ball
- Servings: 12
Nutritional Information
Approximate nutritional information per serving, based on 12 servings of the cheese ball and its coating, excluding crackers, fruit, and other dipping accompaniments:
- Calories: 390
- Protein: 8g
- Carbohydrates: 25g
- Fat: 29g
- Saturated Fat: 12g
- Sodium: 210mg
- Fiber: 2g
- Sugar: 20g
Values are estimates and will vary depending on the brands of peanut butter, cream cheese, chocolate chips, and peanut butter cups used.
Frequently Asked Questions
1. Is Reese’s Cheese Ball Peanut Butter Ball a no-bake dessert?
Yes! This is a completely no-bake dessert. Simply mix the ingredients, shape the filling, refrigerate until firm, and add the chocolate coating.
2. Can I make this peanut butter cheese ball the day before?
Absolutely. Prepare the filling, shape it into a ball, wrap it tightly, and refrigerate overnight. Add the chocolate coating shortly before serving for the freshest appearance.
3. Why is my peanut butter cheese ball too soft?
The mixture may be too warm, the cream cheese or butter may have been overly soft, or the peanut butter may contain excess oil. Refrigerate the mixture longer before shaping. If it remains too soft, gradually mix in a little extra powdered sugar.
4. Can I use crunchy peanut butter?
Yes! Crunchy peanut butter works well if you enjoy extra texture. However, creamy peanut butter creates a smoother filling that is easier to shape.
5. What can I use instead of peanut butter cups?
You can use chopped chocolate bars, peanut butter baking chips, or additional mini chocolate chips. The flavor will be slightly different, but the dessert will still be delicious.
6. Can I make this recipe without nuts?
Traditional peanut butter is made from peanuts, so this recipe is not suitable for people with peanut allergies. For a nut-free alternative, use a suitable seed butter, such as sunflower seed butter, and check that all other ingredients are labeled safe for your needs.
7. What are the best crackers to serve with this dessert?
Graham crackers and vanilla wafers are excellent choices. Pretzels are also wonderful because their salty flavor balances the sweetness of the peanut butter filling.
8. Can I make individual peanut butter balls?
Yes! Divide the chilled mixture into small portions and roll them into individual balls. Coat each one with mini chocolate chips, chopped peanut butter cups, or crushed cookies. Keep them refrigerated until serving.
9. Does this dessert need to stay refrigerated?
Yes. Since it contains cream cheese and butter, it should be stored in the refrigerator. Keep it chilled between servings and avoid leaving it out for extended periods.
10. Can I freeze the finished peanut butter cheese ball?
Yes, although the coating may lose some of its original texture after thawing. For the best result, freeze the undecorated cheese ball and add the chocolate coating after thawing overnight in the refrigerator.
Conclusion
This Reese’s Cheese Ball Peanut Butter Ball is everything you love about a classic peanut butter cup transformed into a creamy, shareable dessert. With its rich peanut butter filling, smooth cream cheese, mini chocolate chips, and chopped peanut butter cups, every bite is sweet, chocolatey, and delicious.
It’s easy to prepare, requires no baking, and can be made ahead for stress-free entertaining. Serve it with graham crackers, pretzels, vanilla wafers, or fresh fruit, and watch it disappear from your dessert table!
Print
REESE’S CHEESE BALL PEANUT BUTTER BALL
Ingredients
For the Peanut Butter Cheese Ball
- 8 ounces cream cheese, softened
- 1 cup creamy peanut butter
- ½ cup unsalted butter, softened
- 1 ½ cups powdered sugar
- 1 teaspoon vanilla extract
- ¼ teaspoon salt
- ½ cup mini semisweet chocolate chips
- ¼ cup finely chopped peanut butter cups
For the Chocolate Coating
- ¾ cup mini semisweet chocolate chips
- ¼ cup finely chopped peanut butter cups
- 2 tablespoons finely chopped roasted peanuts, optional
Instructions
Place the softened cream cheese and butter in a large mixing bowl.
Using a hand mixer on medium speed, beat them together until smooth, creamy, and free of large lumps. Scrape down the sides of the bowl as needed to ensure everything is evenly combined.
Step 2: Add the Peanut Butter
Add the creamy peanut butter and vanilla extract to the cream cheese mixture.
Continue mixing until the ingredients are completely incorporated. The mixture should look thick, smooth, and creamy, with a rich peanut butter color.
Step 3: Add the Powdered Sugar
Gradually add the powdered sugar, mixing on low speed after each addition.
Add the salt and continue mixing until the filling becomes thick enough to hold its shape. Avoid adding all the powdered sugar at once, as it may create a mess and make the mixture harder to combine.
Step 4: Fold in the Chocolate
Add the mini chocolate chips and finely chopped peanut butter cups.
Use a spatula to gently fold them into the peanut butter mixture. Distribute the chocolate pieces evenly without overmixing.
Step 5: Shape the Cheese Ball
Place a large sheet of plastic wrap on your work surface.
Transfer the peanut butter mixture onto the center of the plastic wrap. Gather the edges and use your hands to shape the mixture into a smooth, round ball.
Wrap it tightly and gently adjust the shape until it looks even.
Step 6: Chill Until Firm
Place the wrapped ball in the refrigerator for at least 3 hours, or until firm enough to handle.
For an especially neat shape, check the ball after about 90 minutes and gently reshape it through the plastic wrap if needed.
If the mixture still feels too soft after chilling, return it to the refrigerator for another 30 to 60 minutes.
Step 7: Prepare the Coating
Place the remaining mini chocolate chips, chopped peanut butter cups, and optional chopped peanuts in a shallow bowl.
Mix gently to combine.
For a more decorative appearance, reserve a few larger peanut butter cup pieces to arrange on top of the finished dessert.
Step 8: Coat the Peanut Butter Ball
Remove the chilled cheese ball from the refrigerator and unwrap it carefully.
Place it in the bowl of chocolate chips and chopped peanut butter cups. Gently roll and press the coating around the surface until the entire ball is covered.
Use your hands to press any loose chocolate pieces gently into the filling.
Step 9: Chill and Serve
Transfer the finished peanut butter ball to a serving plate.
Refrigerate it for another 20 to 30 minutes to help the coating settle and keep the ball firm.
When ready to serve, arrange graham crackers, vanilla wafers, pretzels, and apple slices around it.
Your Reese’s Cheese Ball Peanut Butter Ball is ready to enjoy!
Notes
- Use softened ingredients: Cream cheese and butter should be softened but not melted. This helps create a smooth filling without making it greasy.
- Choose regular creamy peanut butter: No-stir peanut butter usually provides a more reliable texture than natural varieties.
- Add powdered sugar gradually: The amount needed can vary slightly depending on the peanut butter and cream cheese brands.
- Chill thoroughly: Refrigeration is essential for a cheese ball that holds its shape.
- Use mini chocolate chips: They make the coating easier to apply and create a more even appearance.
- Keep the filling cold: If it becomes sticky while shaping, refrigerate it briefly before continuing.
- Decorate before serving: Add a few extra chopped peanut butter cups on top for a beautiful finishing touch.
