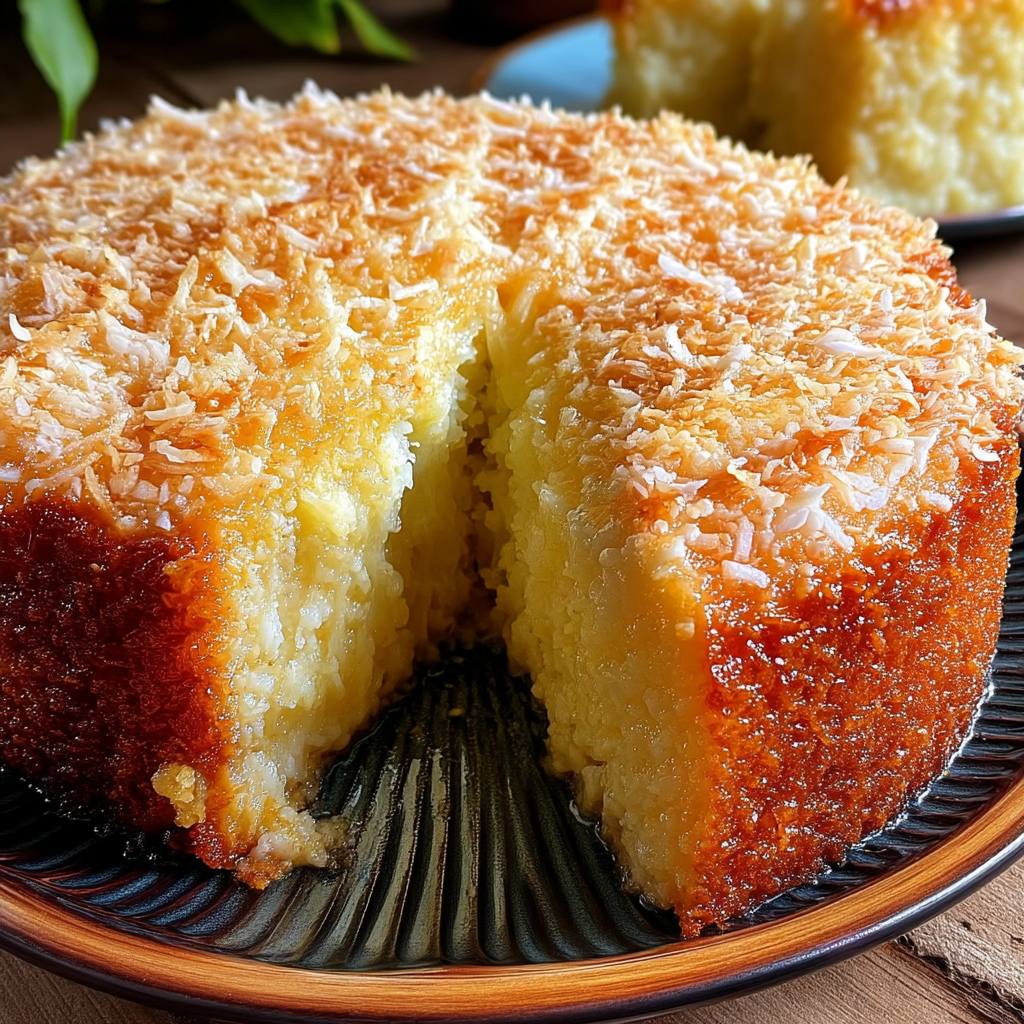
Sticky Coconut Milk Cake is a rich, moist, and wonderfully chewy coconut dessert made with creamy coconut milk and simple pantry ingredients. It has everything coconut lovers look for in a homemade cake: a soft and tender center, a slightly sticky texture, a golden top, and plenty of delicious coconut flavor in every bite.
Unlike a traditional fluffy coconut cake, this coconut milk cake has a denser and more satisfying texture. Coconut milk gives the cake a rich, creamy flavor while helping keep the inside moist. The result is a dessert that feels both comforting and special without requiring complicated baking techniques.
This easy Sticky Coconut Milk Cake is perfect for family gatherings, holiday dessert tables, potlucks, afternoon coffee, weekend baking, or whenever you want an easy homemade coconut dessert. It can be served warm, at room temperature, or chilled, and it tastes especially delicious with toasted coconut sprinkled over the top.
The best part is how easy this recipe is to prepare. There is no need for complicated decorating or multiple cake layers. Simply mix the batter, bake until beautifully golden, and finish it with a sweet coconut topping that soaks slightly into the warm cake.
If you love moist coconut desserts, coconut cream pie, coconut pound cake, or tropical-inspired sweets, this Sticky Coconut Milk Cake is definitely one to add to your recipe collection.
Ingredients
For the Coconut Milk Cake
- 2 cups all-purpose flour
- 1 ½ cups granulated sugar
- 2 teaspoons baking powder
- ½ teaspoon baking soda
- ¼ teaspoon salt
- 3 large eggs, room temperature
- 1 cup full-fat coconut milk
- ½ cup unsalted butter, melted and slightly cooled
- 1 teaspoon vanilla extract
- 1 teaspoon coconut extract, optional
- 1 cup sweetened shredded coconut
For the Sticky Coconut Topping
- ¾ cup full-fat coconut milk
- ½ cup sweetened condensed milk
- ¼ cup granulated sugar
- 2 tablespoons unsalted butter
- 1 teaspoon vanilla extract
- ½ cup sweetened shredded coconut
Optional Garnish
- ½ cup toasted shredded coconut
- Extra coconut flakes
- A light dusting of powdered sugar
- Whipped cream
- Fresh berries for serving
Preparation
Step 1: Prepare the Oven and Baking Pan
Preheat your oven to 350°F (175°C). Grease a 9×13-inch baking dish with butter or nonstick cooking spray.
For easier removal, you can also line the bottom of the pan with parchment paper, leaving a little overhang on the sides.
Make sure all refrigerated ingredients, especially the eggs and coconut milk, are close to room temperature before mixing. Room-temperature ingredients generally combine more smoothly and help create a more evenly textured cake.
Step 2: Combine the Dry Ingredients
In a medium mixing bowl, whisk together the all-purpose flour, baking powder, baking soda, and salt.
Mix thoroughly so the leavening agents are evenly distributed throughout the flour.
Set the dry ingredients aside while you prepare the wet ingredients.
Step 3: Mix the Eggs and Sugar
In a large bowl, add the eggs and granulated sugar.
Beat them together for about 2–3 minutes until the mixture becomes lighter in color and slightly thickened.
This step helps create a smooth cake batter and prevents the finished cake from becoming unnecessarily heavy.
Step 4: Add the Coconut Milk
Slowly pour the full-fat coconut milk into the egg mixture while whisking gently.
Add the melted butter, vanilla extract, and coconut extract if using.
Mix until everything is smooth and well combined.
The coconut milk and melted butter give this cake its rich texture and intense coconut flavor.
Step 5: Add the Dry Ingredients
Gradually add the dry ingredients to the wet mixture.
Use a spatula or whisk to gently combine everything until just incorporated.
Do not overmix the batter. A few tiny streaks of flour can be mixed away with gentle folding.
Overmixing can develop too much gluten and make the finished cake tougher instead of soft and tender.
Step 6: Fold in the Coconut
Add the shredded coconut to the batter.
Fold gently with a spatula until the coconut is evenly distributed.
The shredded coconut adds texture and gives the cake an extra layer of coconut flavor.
Step 7: Transfer the Batter to the Pan
Pour the coconut cake batter into the prepared baking dish.
Use a spatula to spread the batter evenly from corner to corner.
Gently tap the pan against the counter once or twice to remove any large air bubbles.
Step 8: Bake the Cake
Place the cake in the preheated oven and bake for approximately 35–45 minutes.
The exact baking time can vary depending on your oven and the depth of your baking dish.
The cake is ready when the top is golden brown and a toothpick inserted near the center comes out with a few moist crumbs.
Avoid overbaking the cake because the goal is a moist, soft, slightly sticky texture.
Step 9: Prepare the Sticky Coconut Topping
While the cake is baking, prepare the coconut topping.
Add the coconut milk, sweetened condensed milk, sugar, and butter to a small saucepan.
Heat over medium-low heat, stirring frequently.
Cook until the butter melts and the mixture becomes smooth and slightly thickened.
Do not bring it to a vigorous boil. The goal is to create a warm, creamy coconut mixture that can soak into the cake.
Remove from the heat and stir in the vanilla extract.
Step 10: Add the Coconut Topping
When the cake comes out of the oven, let it cool for approximately 5–10 minutes.
Using a toothpick or wooden skewer, poke small holes across the surface of the warm cake.
Slowly drizzle the warm coconut topping over the entire cake.
Allow the topping to soak into the holes and the surface of the cake.
For an especially sticky and moist cake, pour the topping gradually rather than all at once.
Step 11: Add Shredded Coconut
Sprinkle the remaining shredded coconut over the warm topping.
For even more flavor, you can use lightly toasted coconut.
The warm cake will absorb some of the coconut mixture while the shredded coconut adds a delicious chewy texture to the top.
Step 12: Allow the Cake to Rest
Let the cake rest for at least 30 minutes before slicing.
This resting time allows the coconut topping to absorb into the cake and creates the signature sticky texture.
For an even richer texture, refrigerate the cake for several hours before serving.
Step 13: Toast the Coconut for Garnish
If you want an extra-special presentation, place shredded coconut in a dry skillet over medium-low heat.
Stir constantly until the coconut becomes lightly golden and fragrant.
Remove it immediately from the pan because coconut can burn quickly.
Sprinkle the toasted coconut over individual pieces before serving.
Step 14: Slice and Serve
Cut the Sticky Coconut Milk Cake into squares or rectangles.
Serve it as-is, or add whipped cream, vanilla ice cream, toasted coconut, or fresh berries.
The cake can be served slightly warm, at room temperature, or chilled.
Variation
Toasted Coconut Sticky Cake
Toast the shredded coconut before adding it to the batter. Toasted coconut gives the cake a deeper, nuttier flavor.
Coconut Lime Cake
Add 1–2 teaspoons of fresh lime zest to the batter and a tablespoon of fresh lime juice to the coconut topping for a bright tropical flavor.
Pineapple Coconut Cake
Add ½ cup of well-drained crushed pineapple to the batter. Pineapple pairs beautifully with coconut and gives the cake a tropical twist.
Coconut Cream Cake
Replace part of the coconut milk in the topping with coconut cream for an even richer and creamier finish.
Chocolate Coconut Cake
Add 2–3 tablespoons of unsweetened cocoa powder to the dry ingredients and slightly reduce the flour. Add mini chocolate chips for extra chocolate flavor.
Almond Coconut Cake
Add ½ teaspoon almond extract along with the vanilla. The combination of almond and coconut creates a bakery-style flavor.
Coconut Pecan Cake
Fold ½ cup of finely chopped toasted pecans into the batter for added crunch.
Extra Sticky Coconut Cake
For a very moist and sticky texture, poke additional holes in the cake after baking and slowly pour the coconut topping over the surface while the cake is still warm.
COOKING Note :
Use full-fat coconut milk for the best flavor and texture. Light coconut milk contains less fat and may produce a less rich cake.
Shake the can of coconut milk very well before opening, especially if the coconut cream has separated from the liquid.
Do not overmix the batter after adding the flour. Mix just until the ingredients are incorporated.
The cake should remain moist in the center. Do not wait for a completely dry toothpick before removing it from the oven.
Adding the sticky coconut topping while the cake is still warm helps the coconut mixture absorb into the cake.
If you want a stronger coconut flavor, use coconut extract in addition to vanilla extract.
Allowing the cake to rest before slicing is important because the topping continues to soak into the cake as it cools.
For the best texture, prepare the cake several hours ahead of serving. The coconut flavor becomes even more noticeable after the cake has had time to rest.
Serving Suggestions :
Serve Sticky Coconut Milk Cake slightly warm with a scoop of vanilla ice cream.
For a simple presentation, sprinkle toasted coconut over each piece before serving.
Add a spoonful of whipped cream for an extra creamy dessert.
Fresh strawberries, raspberries, blueberries, or pineapple make excellent accompaniments.
For a tropical dessert platter, serve the cake with fresh pineapple and mango.
A cup of hot coffee pairs beautifully with the rich coconut flavor.
For holidays and gatherings, cut the cake into small squares and arrange them on a dessert tray with toasted coconut sprinkled over the top.
You can also drizzle individual pieces with a little extra coconut milk glaze before serving.
Tips :
- Use full-fat coconut milk: It provides the richest flavor and softest texture.
- Use room-temperature eggs: They blend more easily into the batter.
- Do not overmix: Mix the batter only until the flour disappears.
- Do not overbake: Overbaking can make the cake dry and reduce its sticky texture.
- Poke the cake while warm: This allows the coconut topping to penetrate deeper.
- Pour the topping slowly: Give the cake time to absorb the coconut mixture.
- Toast the coconut carefully: It can go from golden to burned very quickly.
- Let the cake rest: The texture becomes richer and stickier as it sits.
- Chill for a firmer texture: Refrigerating the cake makes it easier to slice neatly.
- Use a sharp knife: Wipe the knife clean between cuts for attractive cake squares.
- Add coconut extract: If you want a stronger coconut flavor, coconut extract is an easy way to intensify it.
- Drain pineapple completely: If making the pineapple variation, excess liquid can make the cake too wet.
- Store covered: Keep leftover cake tightly covered so it stays moist.
- Make it ahead: This cake is excellent when prepared a day in advance.
Prep Time:
20 minutes
Cooking Time:
40 minutes
Total Time:
1 hour
Nutritional Information :
Approximate per serving, depending on serving size and toppings
- Calories: 390 kcal
- Protein: 5 g
- Sodium: 230 mg
FAQs
What is Sticky Coconut Milk Cake?
Sticky Coconut Milk Cake is a moist coconut dessert made with coconut milk, butter, eggs, flour, sugar, and shredded coconut. A sweet coconut topping is poured over the warm cake, creating its signature rich and sticky texture.
Can I use canned coconut milk?
Yes. Canned full-fat coconut milk is highly recommended because it provides a richer coconut flavor and more moisture than many refrigerated coconut milk beverages.
Can I use coconut cream instead of coconut milk?
Yes. Coconut cream can be used for a richer version, although it is thicker and higher in fat. You may need to slightly adjust the amount depending on the consistency.
Why is my coconut cake dry?
The most common reason is overbaking. Coconut cake should be removed from the oven when the center is set but still moist. Using full-fat coconut milk and adding the topping while the cake is warm also helps maintain moisture.
How do I make the cake extra sticky?
Poke plenty of small holes in the warm cake and slowly pour the coconut topping over the surface. Allow the cake to rest so the topping can soak into the crumb.
Can I make Sticky Coconut Milk Cake ahead of time?
Yes. In fact, making it several hours ahead can improve the texture because the coconut topping has more time to soak into the cake.
How should I store Sticky Coconut Milk Cake?
Cover the cake tightly and refrigerate it because of the moist coconut topping. It should keep well for several days when properly covered and refrigerated.
Can I freeze coconut milk cake?
Yes. Cut the cake into individual portions and wrap them tightly before placing them in a freezer-safe container. Thaw in the refrigerator before serving.
Can I use unsweetened shredded coconut?
Yes. Unsweetened coconut can be used if you prefer less sweetness. The overall flavor will be slightly less sweet and more naturally coconut-forward.
Can I add nuts?
Absolutely. Chopped pecans, walnuts, or almonds work well with coconut. Toasting the nuts first gives them even more flavor.
Can I make this cake without coconut extract?
Yes. Coconut extract is optional. The coconut milk and shredded coconut already provide plenty of coconut flavor.
What can I serve with Sticky Coconut Milk Cake?
Vanilla ice cream, whipped cream, fresh berries, pineapple, mango, toasted coconut, or a cup of coffee all pair wonderfully with this cake.
Can I make this cake in a Bundt pan?
Yes, but the baking time may change because the batter will be deeper. Grease and flour the Bundt pan very thoroughly and begin checking the cake before the expected baking time is complete.
Why should I let the cake cool before slicing?
Allowing the cake to rest gives the coconut topping time to absorb and settle. Slicing immediately can make the pieces softer and more difficult to remove cleanly.
Is Sticky Coconut Milk Cake good served cold?
Yes. Chilled Sticky Coconut Milk Cake becomes slightly firmer and wonderfully rich. It is especially refreshing when served cold with whipped cream or fresh fruit.
Conclusion
Sticky Coconut Milk Cake is the perfect dessert for anyone who loves rich, moist, and flavorful coconut desserts. The combination of tender coconut cake, creamy coconut milk, sweet condensed milk, butter, and shredded coconut creates an irresistible texture that is soft, chewy, moist, and wonderfully sticky.
This easy coconut cake requires simple ingredients and does not need complicated decoration or frosting. The warm coconut topping does most of the work, soaking into the cake and creating layers of creamy coconut flavor throughout every bite.
Whether you are preparing dessert for a family dinner, holiday gathering, potluck, birthday celebration, or simply want something delicious with your afternoon coffee, this Sticky Coconut Milk Cake is an easy homemade treat that is sure to disappear quickly. For the ultimate coconut experience, finish it with toasted coconut and serve it with a scoop of vanilla ice cream.
Print
Sticky Coconut Milk Cake Recipe
- Total Time: 1 hour
Description
Sticky Coconut Milk Cake is a rich, moist, and wonderfully chewy coconut dessert made with creamy coconut milk and simple pantry ingredients. It has everything coconut lovers look for in a homemade cake: a soft and tender center, a slightly sticky texture, a golden top, and plenty of delicious coconut flavor in every bite.
Ingredients
For the Coconut Milk Cake
- 2 cups all-purpose flour
- 1 ½ cups granulated sugar
- 2 teaspoons baking powder
- ½ teaspoon baking soda
- ¼ teaspoon salt
- 3 large eggs, room temperature
- 1 cup full-fat coconut milk
- ½ cup unsalted butter, melted and slightly cooled
- 1 teaspoon vanilla extract
- 1 teaspoon coconut extract, optional
- 1 cup sweetened shredded coconut
For the Sticky Coconut Topping
- ¾ cup full-fat coconut milk
- ½ cup sweetened condensed milk
- ¼ cup granulated sugar
- 2 tablespoons unsalted butter
- 1 teaspoon vanilla extract
- ½ cup sweetened shredded coconut
Optional Garnish
- ½ cup toasted shredded coconut
- Extra coconut flakes
- A light dusting of powdered sugar
- Whipped cream
- Fresh berries for serving
Instructions
Preheat your oven to 350°F (175°C). Grease a 9×13-inch baking dish with butter or nonstick cooking spray.
For easier removal, you can also line the bottom of the pan with parchment paper, leaving a little overhang on the sides.
Make sure all refrigerated ingredients, especially the eggs and coconut milk, are close to room temperature before mixing. Room-temperature ingredients generally combine more smoothly and help create a more evenly textured cake.
In a medium mixing bowl, whisk together the all-purpose flour, baking powder, baking soda, and salt.
Mix thoroughly so the leavening agents are evenly distributed throughout the flour.
Set the dry ingredients aside while you prepare the wet ingredients.
In a large bowl, add the eggs and granulated sugar.
Beat them together for about 2–3 minutes until the mixture becomes lighter in color and slightly thickened.
This step helps create a smooth cake batter and prevents the finished cake from becoming unnecessarily heavy.
Slowly pour the full-fat coconut milk into the egg mixture while whisking gently.
Add the melted butter, vanilla extract, and coconut extract if using.
Mix until everything is smooth and well combined.
The coconut milk and melted butter give this cake its rich texture and intense coconut flavor.
Gradually add the dry ingredients to the wet mixture.
Use a spatula or whisk to gently combine everything until just incorporated.
Do not overmix the batter. A few tiny streaks of flour can be mixed away with gentle folding.
Overmixing can develop too much gluten and make the finished cake tougher instead of soft and tender.
Add the shredded coconut to the batter.
Fold gently with a spatula until the coconut is evenly distributed.
The shredded coconut adds texture and gives the cake an extra layer of coconut flavor.
Pour the coconut cake batter into the prepared baking dish.
Use a spatula to spread the batter evenly from corner to corner.
Gently tap the pan against the counter once or twice to remove any large air bubbles.
Place the cake in the preheated oven and bake for approximately 35–45 minutes.
The exact baking time can vary depending on your oven and the depth of your baking dish.
The cake is ready when the top is golden brown and a toothpick inserted near the center comes out with a few moist crumbs.
Avoid overbaking the cake because the goal is a moist, soft, slightly sticky texture.
While the cake is baking, prepare the coconut topping.
Add the coconut milk, sweetened condensed milk, sugar, and butter to a small saucepan.
Heat over medium-low heat, stirring frequently.
Cook until the butter melts and the mixture becomes smooth and slightly thickened.
Do not bring it to a vigorous boil. The goal is to create a warm, creamy coconut mixture that can soak into the cake.
Remove from the heat and stir in the vanilla extract.
When the cake comes out of the oven, let it cool for approximately 5–10 minutes.
Using a toothpick or wooden skewer, poke small holes across the surface of the warm cake.
Slowly drizzle the warm coconut topping over the entire cake.
Allow the topping to soak into the holes and the surface of the cake.
For an especially sticky and moist cake, pour the topping gradually rather than all at once.
Sprinkle the remaining shredded coconut over the warm topping.
For even more flavor, you can use lightly toasted coconut.
The warm cake will absorb some of the coconut mixture while the shredded coconut adds a delicious chewy texture to the top.
Let the cake rest for at least 30 minutes before slicing.
This resting time allows the coconut topping to absorb into the cake and creates the signature sticky texture.
For an even richer texture, refrigerate the cake for several hours before serving.
If you want an extra-special presentation, place shredded coconut in a dry skillet over medium-low heat.
Stir constantly until the coconut becomes lightly golden and fragrant.
Remove it immediately from the pan because coconut can burn quickly.
Sprinkle the toasted coconut over individual pieces before serving.
Cut the Sticky Coconut Milk Cake into squares or rectangles.
Serve it as-is, or add whipped cream, vanilla ice cream, toasted coconut, or fresh berries.
The cake can be served slightly warm, at room temperature, or chilled.
Notes
Use full-fat coconut milk for the best flavor and texture. Light coconut milk contains less fat and may produce a less rich cake.
Shake the can of coconut milk very well before opening, especially if the coconut cream has separated from the liquid.
Do not overmix the batter after adding the flour. Mix just until the ingredients are incorporated.
The cake should remain moist in the center. Do not wait for a completely dry toothpick before removing it from the oven.
Adding the sticky coconut topping while the cake is still warm helps the coconut mixture absorb into the cake.
If you want a stronger coconut flavor, use coconut extract in addition to vanilla extract.
Allowing the cake to rest before slicing is important because the topping continues to soak into the cake as it cools.
For the best texture, prepare the cake several hours ahead of serving. The coconut flavor becomes even more noticeable after the cake has had time to rest.
- Prep Time: 20 minutes
- Cook Time: 40 minutes
Nutrition
- Calories: 390 kcal
- Sodium: 230 mg
- Protein: 5 g
