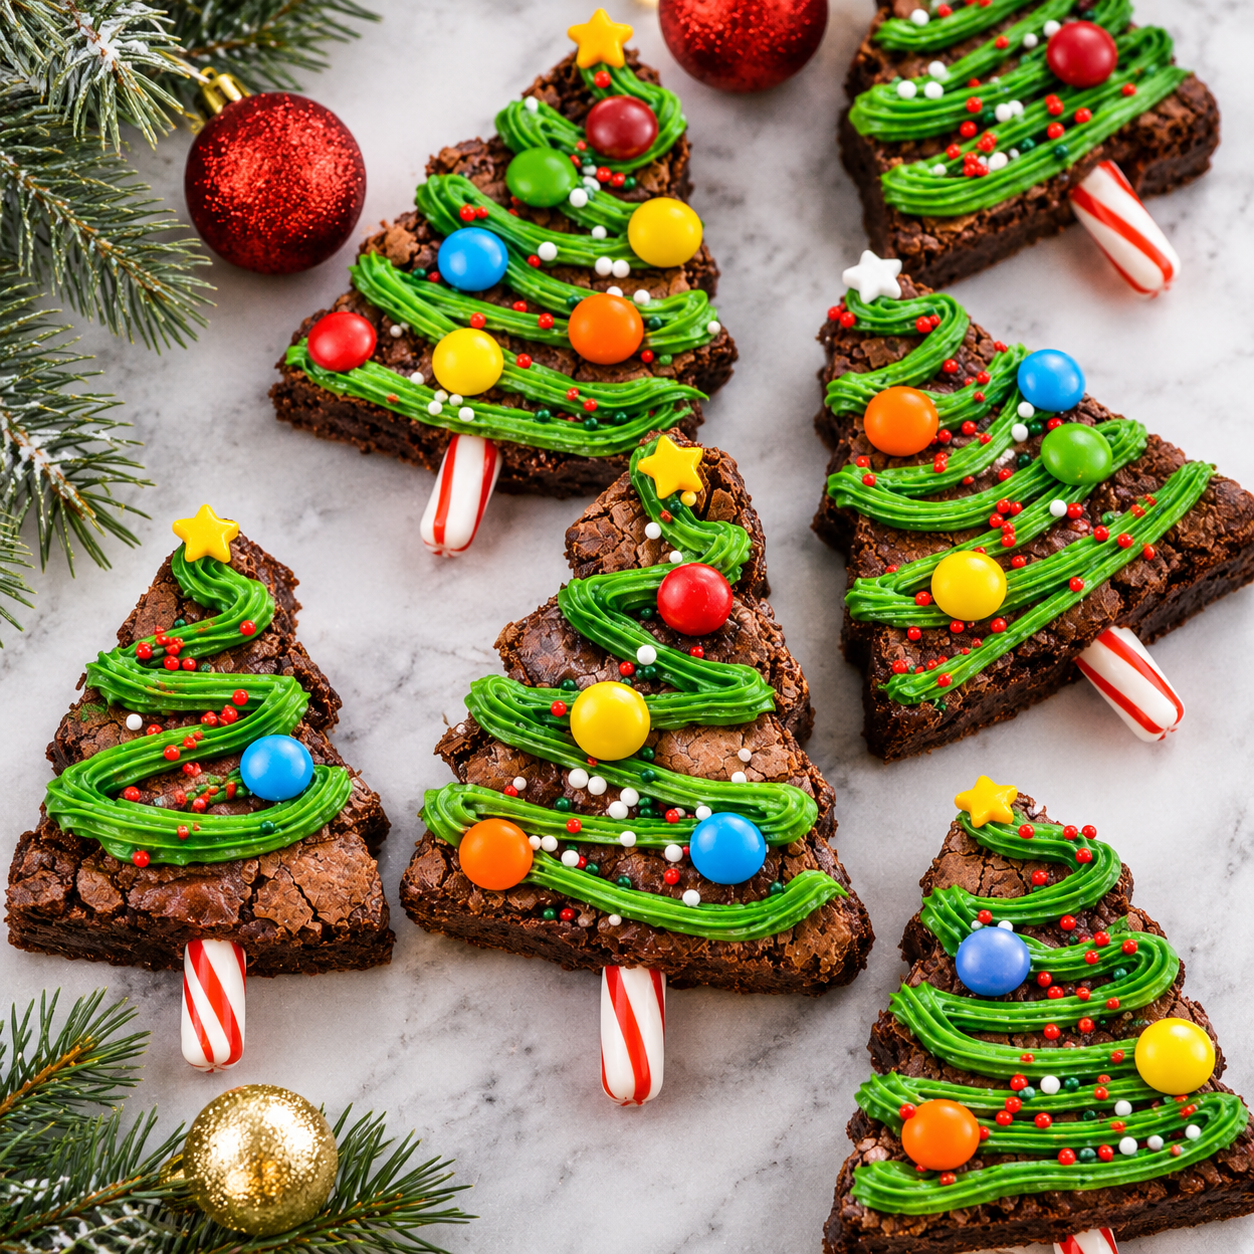
Make your holiday dessert table extra special with these adorable Brownie Christmas Trees! Made with rich, fudgy chocolate brownies and decorated with creamy green frosting, colorful sprinkles, and little candy ornaments, these festive treats look just like miniature Christmas trees. They are delicious, easy to make, and guaranteed to bring a little Christmas magic to every celebration.
The best part about this recipe is that you don’t need complicated decorating skills or special baking equipment. Simply bake a batch of brownies, cut them into triangles, add a pretzel stick for the tree trunk, and decorate with green frosting. Each brownie becomes a cute edible Christmas tree that looks beautiful on dessert platters, holiday cookie trays, and Christmas party tables.
These Brownie Christmas Trees are perfect for school celebrations, family gatherings, Christmas parties, cookie exchanges, and holiday baking with kids. You can prepare the brownies ahead of time and let everyone decorate their own tree with different colors of frosting and candy decorations.
If you love chocolate desserts, this easy Christmas brownie recipe is one you will want to make every December!
Why You’ll Love These Brownie Christmas Trees
- Rich and fudgy: The brownies have a deep chocolate flavor with a soft, moist center.
- Festive and adorable: Green frosting and colorful decorations transform ordinary brownies into Christmas trees.
- Easy to customize: Use your favorite sprinkles, candies, and frosting colors.
- Great for holiday parties: Individual brownie trees are easy to serve and look beautiful on a dessert table.
- Fun family activity: Kids can help decorate their own edible Christmas trees.
- Make-ahead friendly: Bake the brownies in advance and decorate them closer to serving time.
Ingredients
For the Brownies
- ½ cup (1 stick) unsalted butter
- 1 cup granulated sugar
- 2 large eggs, room temperature
- 1 teaspoon vanilla extract
- ½ cup unsweetened cocoa powder
- ¾ cup all-purpose flour
- ¼ teaspoon salt
- ¼ teaspoon baking powder
- ½ cup semi-sweet chocolate chips
For the Green Frosting
- ½ cup unsalted butter, softened
- 2 cups powdered sugar
- 1–2 tablespoons milk or heavy cream
- 1 teaspoon vanilla extract
- Green gel food coloring, as needed
For Decorating
- 12–16 small pretzel sticks, for tree trunks
- Christmas sprinkles
- Mini colorful candy pieces or small round candies
- Star-shaped sprinkles or yellow candies, optional
- Extra powdered sugar, optional
Ingredient Notes and Substitutions
Butter: Unsalted butter gives the brownies a rich flavor and lets you control the salt. If using salted butter, reduce the added salt slightly.
Cocoa powder: Unsweetened natural cocoa powder creates a classic chocolate brownie flavor. Dutch-process cocoa can also work, although the flavor and color may be slightly different.
Chocolate chips: Semi-sweet chocolate chips add little pockets of melted chocolate throughout the brownies. Milk chocolate chips can be used for a sweeter result.
Green gel food coloring: Gel coloring gives the frosting a strong green shade without adding too much liquid. Start with a small amount and gradually add more.
Powdered sugar: This creates a smooth, pipeable frosting. Add it gradually to avoid lumps.
Pretzel sticks: These create the Christmas tree trunks. Mini pretzel sticks work best because they are easy to insert into the bottom of each brownie.
Candy decorations: Use mini M&M-style candies, Christmas sprinkles, sugar pearls, or other small decorations. Choose colors that make your trees look festive.
How to Make Brownie Christmas Trees
Step 1: Prepare the Brownie Pan
Preheat your oven to 350°F (175°C).
Line an 8-inch square baking pan with parchment paper, leaving a little overhang on the sides. This makes it easier to lift the brownies out after baking.
Lightly grease the parchment paper with butter or nonstick cooking spray.
Step 2: Make the Brownie Batter
In a medium microwave-safe bowl, melt the butter. Let it cool slightly, then whisk in the granulated sugar.
Add the eggs and vanilla extract. Whisk until the mixture is smooth and glossy.
Sift in the cocoa powder, flour, salt, and baking powder. Gently fold the dry ingredients into the wet mixture until just combined.
Stir in the semi-sweet chocolate chips. Avoid overmixing because this can make the brownies less tender.
Step 3: Bake the Brownies
Pour the batter into the prepared baking pan and spread it evenly with a spatula.
Bake for approximately 22–28 minutes, or until the edges are set and a toothpick inserted near the center comes out with a few moist crumbs. Avoid waiting until the toothpick is completely clean, as that can mean the brownies are overbaked.
Remove the pan from the oven and let the brownies cool completely in the pan.
For cleaner cuts, refrigerate the cooled brownies for about 20–30 minutes before slicing.
Step 4: Cut the Brownies Into Christmas Trees
Use the parchment paper to lift the brownies out of the pan.
Place the brownie slab on a cutting board. Cut it into 3–4 long strips, depending on the desired size of your trees.
Cut each strip into triangles by making alternating diagonal cuts. You should get approximately 12–16 brownie triangles.
If some edges are uneven, gently trim them with a sharp knife.
Insert a pretzel stick into the bottom center of each triangle to create the tree trunk. If the brownies are very fudgy, make a small opening with a skewer first to prevent cracking.
Step 5: Prepare the Green Frosting
In a mixing bowl, beat the softened butter until creamy and smooth.
Gradually add the powdered sugar, beating on low speed until combined.
Add the vanilla extract and one tablespoon of milk or cream. Beat until the frosting becomes fluffy and spreadable.
Add green gel food coloring a little at a time until you reach your preferred Christmas tree shade.
If the frosting is too thick, add a few drops of milk. If it is too thin, add a little more powdered sugar.
Step 6: Decorate the Brownie Christmas Trees
Transfer the green frosting to a piping bag fitted with a small star or round piping tip.
Starting at the bottom of each brownie triangle, pipe small zigzags or wavy lines toward the top to create the appearance of Christmas tree branches.
You can also spread the frosting with a small spatula if you prefer a simpler decoration.
While the frosting is still soft, add colorful candy pieces and Christmas sprinkles to look like ornaments. Finish each tree with a small star-shaped sprinkle or yellow candy at the top.
Allow the frosting to set slightly before arranging the brownie trees on a serving platter.
Your festive Brownie Christmas Trees are ready to enjoy!
Helpful Cooking Notes
Cool brownies completely: Warm brownies are difficult to cut and can cause the frosting to melt. Make sure they are completely cool before decorating.
Chill before cutting: A short time in the refrigerator helps create neat triangle shapes, especially when the brownies are very fudgy.
Use a sharp knife: Wipe the knife clean between cuts to keep the edges smooth.
Do not overbake: The best brownie trees have a soft, fudgy center. Remove the brownies when a toothpick shows a few moist crumbs.
Choose thick frosting: The frosting should hold its shape when piped. Add milk gradually so it does not become too runny.
Decorate immediately: Add the candy decorations while the frosting is still soft so they stick properly.
Insert pretzel trunks carefully: Make a small opening first if necessary. This helps prevent the brownie triangles from splitting.
Variations
Chocolate Christmas Tree Brownies
For an even richer chocolate flavor, add ¼ cup extra chocolate chips to the brownie batter. You can also drizzle melted chocolate over the finished trees.
White Chocolate Snowy Trees
Use white frosting instead of green frosting and decorate with white sugar pearls and silver sprinkles. Add a light dusting of powdered sugar to create a snowy effect.
Peppermint Brownie Christmas Trees
Add ¼ teaspoon peppermint extract to the frosting and sprinkle crushed peppermint candies over the trees. Start with a small amount of extract because peppermint can quickly become overpowering.
Mini Brownie Christmas Trees
Cut the brownies into smaller triangles to make bite-sized holiday treats. Use shorter pretzel pieces for the trunks and small sprinkles for decoration.
Gluten-Free Brownie Christmas Trees
Replace the all-purpose flour with a suitable gluten-free baking flour blend designed for a 1:1 substitution. Check that the chocolate chips, pretzels, and decorations are also gluten-free.
Different Frosting Colors
Create a whole Christmas forest by making several colors of frosting. Use dark green, light green, white, and even a little red for a colorful holiday dessert platter.
Serving Suggestions
These Brownie Christmas Trees are delicious on their own, but they also look wonderful alongside other holiday desserts.
- Christmas cookie platter: Arrange them with sugar cookies, gingerbread cookies, and shortbread.
- Hot chocolate: Serve with mugs of warm hot chocolate topped with whipped cream.
- Vanilla ice cream: Add a scoop of ice cream for a simple holiday dessert.
- Christmas dessert table: Place the trees on a white serving platter with extra sprinkles around them.
- Holiday party favors: Package individual brownie trees in clear treat bags tied with festive ribbons.
- Family dessert night: Let everyone choose their favorite decorations and create their own brownie tree.
For a beautiful presentation, arrange the brownie trees in rows on a large platter. Add a few extra Christmas sprinkles around the base and place them beside other holiday treats.
Tips for the Best Brownie Christmas Trees
- Use room-temperature eggs: They mix more easily into the butter and sugar mixture.
- Measure flour correctly: Spoon flour into the measuring cup and level it off instead of packing it tightly.
- Avoid overmixing: Fold the dry ingredients into the wet mixture just until combined.
- Use parchment paper: The overhang makes removing the brownies from the pan much easier.
- Chill before slicing: This helps the triangles keep their shape.
- Choose gel food coloring: It provides a vibrant green color without making the frosting watery.
- Use a piping bag: A small piping tip makes it easy to create realistic tree branches.
- Keep decorations small: Tiny candies and sprinkles look more like Christmas ornaments.
- Make them your own: Every tree can have a different combination of ornaments and frosting patterns.
Storage Instructions
Store decorated Brownie Christmas Trees in a single layer in an airtight container.
Because the buttercream contains dairy, refrigerate the decorated brownies and do not leave them at room temperature for more than 2 hours, or 1 hour if the temperature is above 90°F.
They will keep in the refrigerator for approximately 4–5 days. For the best brownie texture, allow them to sit at room temperature briefly before serving, while keeping within safe food-handling limits.
If stacking is necessary, place parchment paper between layers and make sure the frosting has firmed up first.
Freezing Instructions
Brownie Christmas Trees can be frozen, but they are easiest to store before decorating.
Allow the brownies to cool completely, then cut them into triangles. Wrap each brownie individually in plastic wrap and place them in a freezer-safe airtight container.
Freeze for up to 2 months for best quality.
When ready to serve, thaw the brownies in the refrigerator while still wrapped. Once thawed, prepare fresh green frosting, add the pretzel trunks, and decorate with sprinkles and candies.
Decorated brownies can also be frozen, but the frosting and candy decorations may change texture or appearance after thawing.
Make-Ahead Instructions
These Christmas brownies are perfect for preparing ahead of a busy holiday celebration.
One day ahead: Bake the brownies, allow them to cool completely, and store them covered in the refrigerator or in a cool place if they are still undecorated and your ingredients allow it. Cut them into triangles when ready to decorate.
A few hours ahead: Prepare the green frosting and keep it covered in the refrigerator. Let it soften slightly and beat it briefly before piping.
Before serving: Add the pretzel trunks, pipe the frosting, and decorate with candies and sprinkles. Keep the finished treats refrigerated until serving time.
Recipe Details
- Prep Time: 30 minutes
- Cook Time: 25 minutes
- Cooling Time: 1 hour
- Decorating Time: 20 minutes
- Total Time: 2 hours 15 minutes
- Yield: 12–16 brownie trees
- Servings: 12–16, depending on the size of the triangles
Nutritional Information
Estimated nutrition per brownie tree, based on 16 trees:
- Calories: 285
- Protein: 3g
- Carbohydrates: 42g
- Fat: 13g
- Saturated Fat: 8g
- Cholesterol: 45mg
- Sodium: 115mg
- Fiber: 2g
- Sugar: 32g
Nutritional values are estimates and will vary depending on the frosting amount, chocolate chips, candy decorations, and serving size.
Frequently Asked Questions
Can I use a boxed brownie mix?
Absolutely! A boxed brownie mix is a convenient shortcut. Prepare it according to the package directions, bake it in an 8-inch square pan if the quantity is suitable, and allow it to cool completely before cutting and decorating.
How do I cut brownies into Christmas tree shapes?
Cut the brownie slab into long strips, then make alternating diagonal cuts to create triangles. A sharp knife and slightly chilled brownies will help you achieve cleaner edges.
How do I keep the brownie trees from breaking?
Let the brownies cool completely and chill them briefly before cutting. Use a sharp knife and avoid making the triangles too narrow. Make a small opening with a skewer before inserting the pretzel trunks.
Can I use store-bought frosting?
Yes! Store-bought vanilla frosting works well. Add green gel food coloring, mix until evenly colored, and transfer it to a piping bag for decorating.
What can I use instead of pretzel sticks?
You can use small pieces of chocolate-covered biscuit sticks, candy sticks, or omit the trunks entirely. Pretzel sticks are especially useful because they provide a crunchy contrast to the soft brownies.
Can children help decorate these brownies?
Yes! Children can add sprinkles, candy ornaments, and star decorations after an adult prepares the brownies and frosting. Keep small candies away from very young children who may be at risk of choking.
Can I make Brownie Christmas Trees ahead of time?
Yes. Bake and cut the brownies a day ahead, then store them covered. Decorate them closer to serving time for the freshest appearance.
Why are my brownies too soft to cut?
They may still be warm or slightly underbaked. Let them cool completely and refrigerate them for 20–30 minutes before slicing. If they are extremely soft, return them to the refrigerator for a little longer.
Can I make these brownies without frosting?
Yes! Melted white chocolate or green candy melts can be drizzled over the brownie triangles. Add the sprinkles while the coating is still wet so they stick.
How many Christmas tree brownies does this recipe make?
An 8-inch square pan generally makes about 12–16 trees, depending on how wide you cut the triangles and how large you want each serving to be.
Conclusion
These Brownie Christmas Trees are the perfect combination of rich chocolate flavor and festive holiday fun. With fudgy homemade brownies, fluffy green frosting, crunchy pretzel trunks, and colorful candy ornaments, each little tree becomes a delicious Christmas treat.
Whether you’re making them for a Christmas party, a family baking afternoon, or a festive dessert table, this easy recipe is sure to be a holiday favorite. Grab your favorite sprinkles, decorate a whole forest of chocolate brownie trees, and make this Christmas a little sweeter!
Print
Brownie Christmas Tree – Easy Festive Christmas Brownie Dessert
Ingredients
For the Brownies
- ½ cup (1 stick) unsalted butter
- 1 cup granulated sugar
- 2 large eggs, room temperature
- 1 teaspoon vanilla extract
- ½ cup unsweetened cocoa powder
- ¾ cup all-purpose flour
- ¼ teaspoon salt
- ¼ teaspoon baking powder
- ½ cup semi-sweet chocolate chips
For the Green Frosting
- ½ cup unsalted butter, softened
- 2 cups powdered sugar
- 1–2 tablespoons milk or heavy cream
- 1 teaspoon vanilla extract
- Green gel food coloring, as needed
For Decorating
- 12–16 small pretzel sticks, for tree trunks
- Christmas sprinkles
- Mini colorful candy pieces or small round candies
- Star-shaped sprinkles or yellow candies, optional
- Extra powdered sugar, optional
Instructions
Preheat your oven to 350°F (175°C).
Line an 8-inch square baking pan with parchment paper, leaving a little overhang on the sides. This makes it easier to lift the brownies out after baking.
Lightly grease the parchment paper with butter or nonstick cooking spray.
Step 2: Make the Brownie Batter
In a medium microwave-safe bowl, melt the butter. Let it cool slightly, then whisk in the granulated sugar.
Add the eggs and vanilla extract. Whisk until the mixture is smooth and glossy.
Sift in the cocoa powder, flour, salt, and baking powder. Gently fold the dry ingredients into the wet mixture until just combined.
Stir in the semi-sweet chocolate chips. Avoid overmixing because this can make the brownies less tender.
Step 3: Bake the Brownies
Pour the batter into the prepared baking pan and spread it evenly with a spatula.
Bake for approximately 22–28 minutes, or until the edges are set and a toothpick inserted near the center comes out with a few moist crumbs. Avoid waiting until the toothpick is completely clean, as that can mean the brownies are overbaked.
Remove the pan from the oven and let the brownies cool completely in the pan.
For cleaner cuts, refrigerate the cooled brownies for about 20–30 minutes before slicing.
Step 4: Cut the Brownies Into Christmas Trees
Use the parchment paper to lift the brownies out of the pan.
Place the brownie slab on a cutting board. Cut it into 3–4 long strips, depending on the desired size of your trees.
Cut each strip into triangles by making alternating diagonal cuts. You should get approximately 12–16 brownie triangles.
If some edges are uneven, gently trim them with a sharp knife.
Insert a pretzel stick into the bottom center of each triangle to create the tree trunk. If the brownies are very fudgy, make a small opening with a skewer first to prevent cracking.
Step 5: Prepare the Green Frosting
In a mixing bowl, beat the softened butter until creamy and smooth.
Gradually add the powdered sugar, beating on low speed until combined.
Add the vanilla extract and one tablespoon of milk or cream. Beat until the frosting becomes fluffy and spreadable.
Add green gel food coloring a little at a time until you reach your preferred Christmas tree shade.
If the frosting is too thick, add a few drops of milk. If it is too thin, add a little more powdered sugar.
Step 6: Decorate the Brownie Christmas Trees
Transfer the green frosting to a piping bag fitted with a small star or round piping tip.
Starting at the bottom of each brownie triangle, pipe small zigzags or wavy lines toward the top to create the appearance of Christmas tree branches.
You can also spread the frosting with a small spatula if you prefer a simpler decoration.
While the frosting is still soft, add colorful candy pieces and Christmas sprinkles to look like ornaments. Finish each tree with a small star-shaped sprinkle or yellow candy at the top.
Allow the frosting to set slightly before arranging the brownie trees on a serving platter.
Your festive Brownie Christmas Trees are ready to enjoy!
Notes
Cool brownies completely: Warm brownies are difficult to cut and can cause the frosting to melt. Make sure they are completely cool before decorating.
Chill before cutting: A short time in the refrigerator helps create neat triangle shapes, especially when the brownies are very fudgy.
Use a sharp knife: Wipe the knife clean between cuts to keep the edges smooth.
Do not overbake: The best brownie trees have a soft, fudgy center. Remove the brownies when a toothpick shows a few moist crumbs.
Choose thick frosting: The frosting should hold its shape when piped. Add milk gradually so it does not become too runny.
Decorate immediately: Add the candy decorations while the frosting is still soft so they stick properly.
Insert pretzel trunks carefully: Make a small opening first if necessary. This helps prevent the brownie triangles from splitting.
