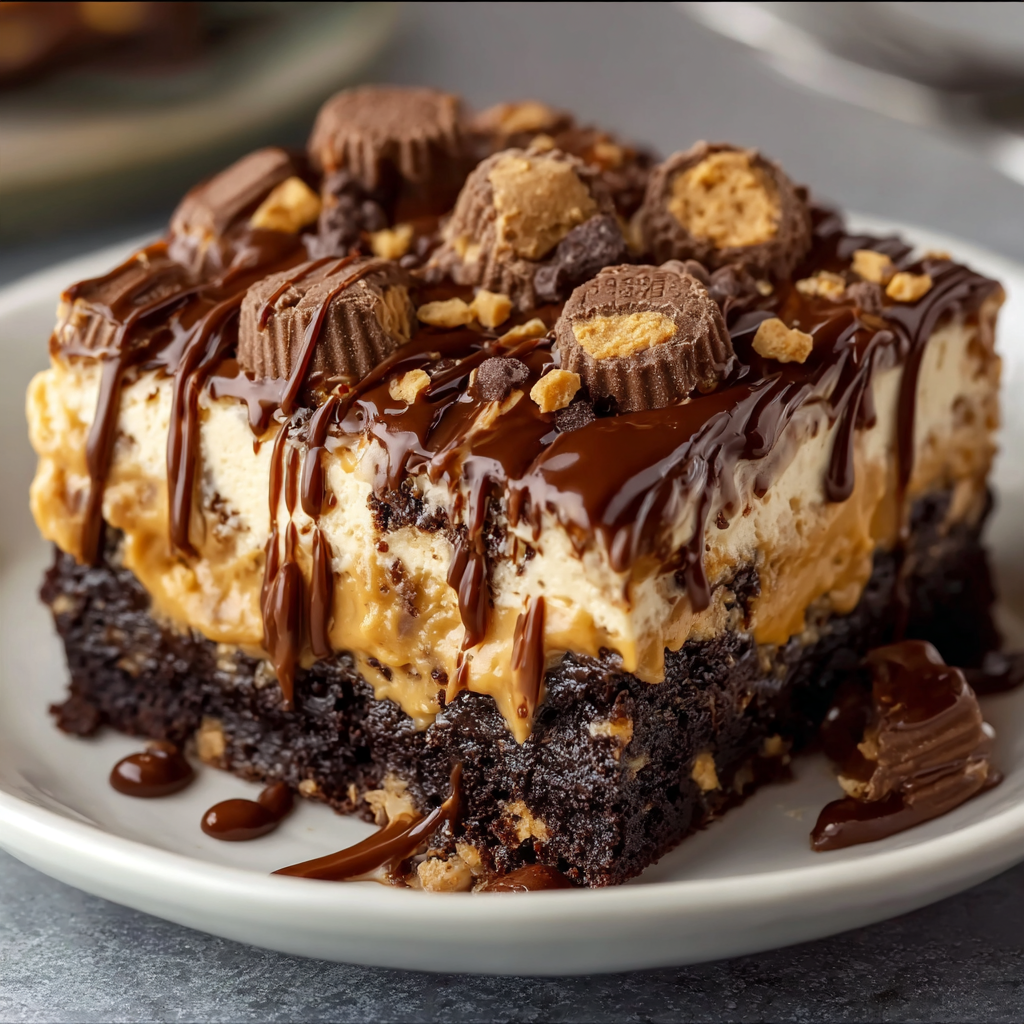
If you love the irresistible combination of chocolate and peanut butter, this Reese’s Chocolate Peanut Butter Earthquake Cake is the ultimate dessert to add to your baking collection. Made with rich chocolate cake, a creamy peanut butter and cream cheese filling, chunks of Reese’s peanut butter cups, and a deliciously sweet topping, this dessert delivers layers of flavor in every bite. It is soft, gooey, creamy, chocolatey, and packed with the classic candy-inspired flavor that chocolate and peanut butter lovers cannot resist.
An earthquake cake is a fun and indulgent dessert known for its cracked, uneven surface and rich pockets of filling. Unlike a traditional layered cake that requires careful frosting and decorating, an earthquake cake develops its signature appearance naturally as the cake bakes. The cream cheese mixture sinks into the chocolate cake in places, creating creamy ribbons, soft pockets, and a beautiful cracked top.
This Reese’s-inspired version takes the classic earthquake cake to another level by combining chocolate cake with peanut butter, cream cheese, and chopped peanut butter cups. The chocolate cake provides a rich foundation, while the peanut butter filling adds a creamy, slightly salty contrast. Reese’s pieces scattered throughout the cake create extra bursts of chocolate and peanut butter flavor.
One of the best things about this easy Reese’s Chocolate Peanut Butter Earthquake Cake recipe is that it does not require professional baking skills. You can prepare it using a boxed chocolate cake mix, a simple homemade peanut butter cream cheese filling, and a handful of familiar ingredients. The result looks impressive enough for birthdays, holidays, potlucks, family gatherings, and special celebrations.
The texture is what makes this dessert especially memorable. The edges become tender and cake-like, while the center remains rich and moist with creamy pockets of peanut butter filling. The chopped peanut butter cups soften during baking, adding a candy-inspired richness that makes every serving feel extra special.
This chocolate peanut butter earthquake cake is also a wonderful choice when you want a dessert that can be prepared ahead of time. Once baked and cooled, it can be chilled for easier slicing or served slightly warm for a softer, gooier texture. Add a scoop of vanilla ice cream, drizzle melted chocolate over the top, or sprinkle extra Reese’s pieces over each serving for an even more indulgent dessert.
Whether you are searching for a Reese’s peanut butter cake recipe, an easy chocolate cream cheese dessert, or a crowd-pleasing earthquake cake with a delicious twist, this recipe is worth trying. Its rich chocolate base, creamy peanut butter filling, and generous candy topping make it a dessert that is hard to forget.
Ingredients
This recipe uses simple ingredients to create a rich chocolate cake with a creamy peanut butter filling and Reese’s candy pieces. The quantities below are designed for a 9-by-13-inch baking dish.
For the chocolate cake
- 1 box chocolate cake mix, approximately 15–16 ounces: Use your favorite chocolate, devil’s food, or chocolate fudge cake mix.
- Ingredients listed on the cake mix package: Usually eggs, vegetable oil, and water. Use the exact quantities specified on your package.
- 1 cup chopped Reese’s Peanut Butter Cups: Adds classic chocolate and peanut butter flavor throughout the cake.
- 1/2 cup chocolate chips, optional: Semisweet or milk chocolate chips create additional pockets of melted chocolate.
- 1/2 cup chopped Reese’s Pieces, optional: Adds extra peanut butter candy flavor and color.
For the peanut butter cream cheese filling
- 8 ounces (226 g) cream cheese, softened: Creates a smooth, creamy filling with a slight tang that balances the sweetness.
- 1/2 cup (125 g) creamy peanut butter: Provides the signature peanut butter flavor.
- 1/2 cup (60 g) powdered sugar: Sweetens the filling and helps create a smooth consistency.
- 1 teaspoon vanilla extract: Enhances the flavor of the cream cheese and peanut butter.
- 1/4 cup (57 g) unsalted butter, softened: Adds richness and helps the filling become smooth and creamy.
For the topping
- 1/2 cup chopped Reese’s Peanut Butter Cups: Adds extra candy pieces across the top of the cake.
- 1/4 cup chocolate chips: Provides additional chocolate flavor.
- 2–3 tablespoons peanut butter, optional: Can be melted and drizzled over the cake after baking.
- 2 tablespoons chocolate sauce, optional: Creates an attractive finishing drizzle.
You can adjust the amount of Reese’s candy according to your preference. If you love a dessert loaded with peanut butter cups, reserve additional chopped candy for the top after baking.
Preparation: How to Make Reese’s Chocolate Peanut Butter Earthquake Cake
Step 1: Prepare the oven and baking dish
Preheat your oven to 350°F (175°C). Grease a 9-by-13-inch baking dish with butter or nonstick cooking spray.
For easier cleanup and serving, you can lightly grease the bottom and sides of the dish before adding the batter. A glass or metal baking dish can work, but baking times may vary depending on the material.
Chop the Reese’s Peanut Butter Cups into small pieces. Keep the pieces relatively uniform so that they distribute evenly throughout the cake.
Set aside the candy pieces intended for the filling and topping. Preparing these ingredients before mixing the batter makes the recipe easier to assemble.
Step 2: Prepare the chocolate cake batter
In a large mixing bowl, prepare the chocolate cake mix according to the package directions. Add the required eggs, oil, and water, then mix until the batter is smooth and evenly combined.
Avoid overmixing the batter. Excessive mixing can affect the texture of the finished cake.
If you prefer a richer chocolate flavor, choose a devil’s food or chocolate fudge cake mix. These varieties pair particularly well with the sweet peanut butter cream cheese filling.
Fold in approximately 1 cup of chopped Reese’s Peanut Butter Cups if you want candy pieces throughout the cake. You can also reserve all the candy for the filling and topping if you prefer more distinct layers.
Pour the chocolate batter into the prepared baking dish. Spread it evenly with a spatula, making sure the batter reaches the corners.
Step 3: Make the peanut butter cream cheese filling
Place the softened cream cheese and softened butter in a medium mixing bowl. Beat them together until smooth and creamy.
Add the peanut butter and continue mixing until the ingredients are fully combined. Scrape down the sides of the bowl as needed to ensure that no lumps remain.
Gradually add the powdered sugar, mixing until the filling becomes thick, smooth, and spreadable. Stir in the vanilla extract.
The filling should be creamy enough to spoon over the chocolate cake batter but thick enough to hold its shape in small pockets.
If the filling seems too thick, mix it briefly until it becomes easier to spread. If it seems unusually soft, refrigerate it for a few minutes before assembling the cake.
Avoid adding too much extra liquid, because a thinner filling may blend excessively into the cake batter rather than forming distinct creamy pockets.
Step 4: Add the peanut butter filling to the cake
Spoon generous dollops of the peanut butter cream cheese mixture over the chocolate cake batter.
Distribute the filling across the surface rather than placing it all in the center. This helps create the characteristic earthquake cake appearance, with creamy pockets throughout the finished dessert.
Use a butter knife or the tip of a spatula to gently swirl some of the filling into the chocolate batter.
Do not stir the entire mixture together. The goal is to create separate ribbons and pockets of peanut butter cream cheese, not a completely uniform chocolate-peanut butter batter.
Sprinkle the remaining chopped Reese’s Peanut Butter Cups over the surface. Add the optional chocolate chips or Reese’s Pieces if desired.
The uneven distribution of filling and candy helps create the cake’s signature cracked appearance as it bakes.
Step 5: Bake the earthquake cake
Place the baking dish in the preheated oven and bake for approximately 35–45 minutes.
Begin checking the cake around the 35-minute mark. The edges should look set, and the surface should develop cracks. The chocolate cake portion should be cooked through, while the cream cheese filling may remain visibly soft and creamy.
Insert a toothpick into a section containing mostly chocolate cake rather than directly into the cream cheese filling. The toothpick should come out without wet cake batter. A little moisture from melted chocolate is normal.
Because this recipe contains a rich cream cheese filling, the center may look softer than a conventional chocolate cake. Avoid assuming that every creamy area means the cake is underbaked.
If the chocolate cake batter is still visibly raw, continue baking in short intervals and check again.
Remove the dish from the oven when the cake is cooked through but still moist. Overbaking can make the chocolate cake dry and cause the filling to lose its creamy texture.
Step 6: Allow the cake to cool
Place the baking dish on a heatproof surface and allow the cake to cool for at least 20–30 minutes before serving.
During cooling, the chocolate cake becomes more stable and the peanut butter cream cheese filling thickens slightly. This makes the cake easier to portion.
For a gooier dessert, serve it warm after a short cooling period. For cleaner slices, allow it to cool further and refrigerate it once it is no longer steaming.
Because the filling contains cream cheese, do not leave the finished cake at room temperature for extended periods. Refrigerate it within two hours of baking, or within one hour if the surrounding temperature is above 90°F (32°C).
Step 7: Add the finishing toppings
For an extra indulgent finish, melt 2–3 tablespoons of peanut butter in a microwave-safe bowl using short intervals, stirring between each interval.
Drizzle the melted peanut butter over the cooled cake. Add chocolate sauce if desired.
Sprinkle additional chopped Reese’s Peanut Butter Cups over the top for a more dramatic presentation. You can also add a few chocolate chips or Reese’s Pieces.
If you prefer a less sweet dessert, keep the topping simple and let the chocolate cake and peanut butter cream cheese filling provide most of the flavor.
Allow the drizzle to settle before cutting the cake into squares.
Step 8: Slice and serve
Cut the cake into squares using a sharp knife. For the cleanest cuts, wipe the knife between slices.
Serve each portion on a dessert plate and add a scoop of vanilla ice cream if desired. The contrast between cold ice cream and the rich chocolate cake is especially delicious.
If you prefer the cake warm, heat an individual portion briefly in the microwave, using short intervals and checking the temperature before serving. Avoid overheating because the cream cheese filling and melted candy can become very hot.
Enjoy the soft chocolate cake, creamy peanut butter filling, and irresistible pieces of Reese’s candy in every bite.
Variations
One of the best things about Reese’s Chocolate Peanut Butter Earthquake Cake is how easy it is to customize. You can change the chocolate flavor, add extra toppings, or adjust the filling to suit different preferences.
1. Double Chocolate Reese’s Earthquake Cake
For a stronger chocolate flavor, use chocolate fudge cake mix and add 1/2 cup of semisweet chocolate chips to the batter.
You can also drizzle melted chocolate over the cooled cake. The extra chocolate creates a richer dessert that is perfect for anyone who loves chocolate-heavy treats.
2. Extra Peanut Butter Earthquake Cake
If you want a more pronounced peanut butter flavor, increase the peanut butter filling slightly and add a light drizzle of melted peanut butter over the finished cake.
Be careful not to add so much filling that it overwhelms the cake batter or prevents the center from cooking properly.
3. Reese’s Pieces Earthquake Cake
Replace some of the chopped peanut butter cups with Reese’s Pieces. Their colorful candy shells create a different texture and add visual interest.
For the best appearance, add some of the Reese’s Pieces after baking rather than relying entirely on the pieces baked into the cake.
4. Chocolate Fudge Peanut Butter Cake
Add a small amount of chocolate fudge sauce to the chocolate batter or drizzle it over the finished cake.
This variation creates an even richer dessert, especially when served warm with vanilla ice cream.
5. Homemade Chocolate Earthquake Cake
Instead of boxed cake mix, use your favorite homemade chocolate cake batter. Prepare enough batter for a 9-by-13-inch pan and follow the recipe’s baking guidance, adjusting the timing as necessary.
A homemade chocolate cake can provide a deeper cocoa flavor and allow you to control the ingredients more precisely.
6. Peanut Butter Swirl Earthquake Cake
For a more defined peanut butter pattern, reserve a small portion of the filling and swirl it gently into the surface with a knife.
Avoid overmixing. The distinctive pockets of cream cheese filling are what make an earthquake cake visually appealing.
7. Mini Reese’s Earthquake Cakes
Prepare the batter and filling in individual oven-safe ramekins or appropriately sized baking dishes. Divide the mixture evenly and adjust the baking time according to the size of each portion.
Mini desserts are convenient for dinner parties and special occasions. Use oven-safe dishes and check that the centers are cooked through before serving.
8. Chocolate Peanut Butter Oreo Earthquake Cake
Add chopped chocolate sandwich cookies to the cake batter or sprinkle them over the top before baking.
The cookie pieces add crunch and create another chocolate flavor layer. You can also use a few crushed cookies as a finishing garnish after baking.
9. Salted Peanut Butter Chocolate Cake
Finish the cake with a very small pinch of flaky sea salt. Salt balances the sweetness and enhances the chocolate and peanut butter flavors.
Add it sparingly, especially if the candy and cake mix are already quite sweet.
10. Holiday Reese’s Earthquake Cake
For a festive dessert, decorate the cooled cake with seasonal candy pieces, chocolate drizzle, and additional chopped peanut butter cups.
Serve it on a holiday platter for birthdays, Christmas celebrations, family dinners, or other special gatherings.
Cooking Note
For the best results, use softened cream cheese and butter when preparing the peanut butter filling. Cold ingredients can create lumps and make the filling difficult to spread.
Do not overmix the chocolate cake batter. Follow the cake mix package directions, then gently add any optional candy pieces.
Distribute the cream cheese filling across the surface in dollops rather than stirring it completely into the batter. This creates the signature uneven texture and creamy pockets associated with earthquake cake.
Baking time depends on your oven, the type of baking dish, and the cake mix used. Check the chocolate cake portions for doneness rather than relying on the appearance of the cream cheese filling alone.
Allow the cake to cool before slicing. If you prefer clean, neat squares, refrigerate the cake after it has cooled sufficiently.
Because the filling contains cream cheese, store the cake in the refrigerator and follow safe food-handling guidance. Do not leave it out for long periods, especially in warm weather.
Serving Suggestions
Reese’s Chocolate Peanut Butter Earthquake Cake is rich enough to enjoy on its own, but the right accompaniments can make it even more delicious.
Serve with vanilla ice cream
Vanilla ice cream is one of the best pairings for this chocolate peanut butter dessert. Its cool, creamy texture balances the rich cake and sweet filling.
For an especially indulgent serving, place a scoop beside a slightly warm piece of cake and drizzle with chocolate sauce.
Add whipped cream
Freshly whipped cream provides a light contrast to the dense chocolate cake. A small dollop is enough to complement the dessert without overpowering it.
Pair with cold milk
A glass of cold milk is a classic choice for chocolate and peanut butter desserts. It complements the richness of the cake and makes the treat especially satisfying.
Serve with coffee
Coffee pairs beautifully with the chocolate flavor and helps balance the sweetness of the candy and cream cheese filling.
Serve small portions with espresso, cappuccino, or freshly brewed coffee after dinner.
Make it a party dessert
Cut the cake into small squares and arrange them on a platter. Add a light drizzle of chocolate sauce and a few chopped peanut butter cups to each piece for an attractive dessert table.
Serve for holidays and celebrations
This cake is perfect for birthdays, potlucks, family reunions, Christmas gatherings, and weekend celebrations. Its rich flavor and easy preparation make it an excellent choice when you need a dessert that serves several people.
Tips for the Best Reese’s Chocolate Peanut Butter Earthquake Cake
- Use softened cream cheese. This helps create a smooth filling without lumps.
- Choose a good chocolate cake mix. Devil’s food and chocolate fudge varieties work particularly well.
- Do not overmix the batter. Mix only until the ingredients are combined.
- Spread the filling evenly. Distribute the cream cheese mixture in multiple dollops to create creamy pockets throughout the cake.
- Reserve some Reese’s candy for the top. This makes the finished dessert more attractive and highlights its main ingredient.
- Watch the baking time. The cake should be cooked through without becoming dry.
- Use a toothpick in the cake portion. Avoid judging doneness by inserting it directly into the cream cheese filling.
- Allow time to cool. Cooling helps the filling set and makes serving easier.
- Add toppings after baking when appropriate. Extra peanut butter cups and chocolate drizzle create a beautiful finish without becoming overly melted.
- Refrigerate leftovers. The cream cheese filling requires appropriate refrigeration.
- Use a sharp knife for slicing. Wipe the blade between cuts for cleaner squares.
- Adjust the candy quantity to taste. Add more Reese’s cups if you love a candy-loaded cake, or reduce them for a less sweet version.
- Avoid adding too much liquid peanut butter. A thick filling holds its shape better during baking.
- Use a baking dish of the correct size. A 9-by-13-inch dish gives the batter enough room to bake evenly.
- Check the cake near the end of baking. Ovens vary, so begin checking before the maximum suggested time.
Prep Time, Cooking Time, and Total Time
- Prep Time: 20 minutes
- Cooking Time: 35–45 minutes
- Cooling Time: 20–30 minutes
- Total Time: Approximately 1 hour and 30 minutes
These times are estimates. Actual preparation and baking time can vary depending on your ingredients, oven, and cooling preferences.
Nutritional Information
The following values are approximate estimates per serving, assuming the cake is divided into 15 portions. Actual nutrition varies with the cake mix, peanut butter, cream cheese, candy, and toppings used.
- Calories: Approximately 400–550
- Protein: Approximately 6–9 g
- Sodium: Approximately 300–500 mg
Calories
Most calories come from the chocolate cake, peanut butter, cream cheese, butter, sugar, and Reese’s candy. Adding extra chocolate sauce or peanut butter drizzle will increase the calories per serving.
Protein
Peanut butter, cream cheese, eggs, and the cake mix contribute some protein. The exact amount depends on the brands and quantities used.
Sodium
Sodium comes from the cake mix, peanut butter, cream cheese, and candy. The amount varies between products, so check the labels if you need a more precise estimate.
These figures are general estimates rather than laboratory-tested nutrition values.
FAQs About Reese’s Chocolate Peanut Butter Earthquake Cake
1. What is Reese’s Chocolate Peanut Butter Earthquake Cake?
It is a chocolate cake filled with a creamy peanut butter and cream cheese mixture, often topped with chopped Reese’s Peanut Butter Cups and chocolate. As it bakes, the filling creates cracks and creamy pockets, giving the cake its characteristic earthquake appearance.
2. Why is it called an earthquake cake?
The name comes from the uneven surface that develops during baking. The cake batter rises around the cream cheese filling, producing cracks, swirls, and pockets that resemble a disrupted surface.
3. Can I use a boxed chocolate cake mix?
Yes. A boxed chocolate cake mix makes the recipe quick and convenient. Follow the package directions for the batter and then add the peanut butter cream cheese filling and candy pieces.
4. Can I make this cake from scratch?
Absolutely. Use a homemade chocolate cake recipe designed for a 9-by-13-inch pan. Follow the same assembly method, but adjust the baking time to suit the batter.
5. Can I use crunchy peanut butter?
Yes. Crunchy peanut butter adds texture to the filling. The mixture may be slightly less smooth, but it will still provide the characteristic peanut butter flavor.
6. Can I use Reese’s Pieces instead of peanut butter cups?
Yes. Reese’s Pieces can replace some or all of the chopped peanut butter cups. The texture will be slightly different because the candy shells remain more noticeable.
7. How do I know when the cake is done?
The edges should be set, and the chocolate cake portions should be cooked through. Insert a toothpick into an area containing cake rather than cream cheese filling. It should not come out with wet cake batter.
8. Should the center remain gooey?
The cream cheese filling naturally remains softer than the chocolate cake. However, the cake batter itself should be cooked through. Avoid serving undercooked cake batter simply because you want a gooey texture.
9. Can I make the cake ahead of time?
Yes. Bake the cake ahead, allow it to cool, and refrigerate it in a covered container. You can serve it chilled or allow individual portions to soften slightly before serving.
10. How should I store leftovers?
Because the recipe contains cream cheese, store leftovers in an airtight container in the refrigerator. For best quality, enjoy within approximately 3–4 days.
11. Can I freeze Reese’s Earthquake Cake?
Yes. Cool the cake completely, cut it into portions, and wrap them securely before placing them in a freezer-safe container. Freeze for approximately 2–3 months for best quality.
Thaw the portions in the refrigerator before serving. The texture of the cream cheese filling may change slightly after freezing.
12. Can I add extra Reese’s Peanut Butter Cups?
Yes. You can add more chopped cups to the batter, filling area, or top. However, too much candy may make the cake excessively sweet and can affect the texture.
13. Why is my filling lumpy?
The cream cheese may have been too cold, or the ingredients may not have been mixed thoroughly. Let the cream cheese soften at room temperature before beating it with the butter and peanut butter.
14. Can I make this recipe without cream cheese?
The cream cheese filling is an important part of the classic earthquake cake texture. You could experiment with a peanut butter filling made from peanut butter, powdered sugar, and butter, but the result will be different and may not create the same creamy pockets.
15. Can I serve this cake warm?
Yes. Allow it to cool for at least 20–30 minutes before serving. Individual portions can be warmed briefly, but avoid overheating the cake because the filling can become very hot.
16. What toppings go best with this cake?
Chopped Reese’s Peanut Butter Cups, melted peanut butter, chocolate sauce, chocolate chips, and vanilla ice cream are all excellent choices.
17. Is this cake suitable for potlucks?
Yes. It is easy to transport in its baking dish and can be cut into multiple portions. Keep it refrigerated when not being served because the filling contains cream cheese.
18. Can I make this cake less sweet?
Use semisweet chocolate chips, reduce optional candy toppings, and avoid adding extra chocolate sauce. Keep in mind that the cake mix and cream cheese filling will still contribute sweetness.
19. Can I make mini earthquake cakes?
Yes. Divide the batter and filling among individual oven-safe dishes. Adjust the baking time according to their size and make sure each portion is cooked through.
20. What makes this Reese’s dessert so popular?
The combination of chocolate and peanut butter is familiar and satisfying, while the cream cheese filling adds a rich texture. The uneven, cracked surface also makes the cake look impressive without requiring complicated decoration.
Conclusion
This Reese’s Chocolate Peanut Butter Earthquake Cake is a dream dessert for anyone who loves rich chocolate cake, creamy peanut butter, and Reese’s Peanut Butter Cups. Its soft chocolate base, sweet cream cheese filling, and candy-loaded topping create a delicious combination of flavors and textures in every slice.
The recipe is easy enough for everyday baking but special enough for birthdays, holiday gatherings, potlucks, and celebrations. Using a boxed cake mix keeps preparation simple, while the homemade peanut butter filling gives the dessert its signature creamy texture.
For the best results, distribute the filling in generous dollops, avoid overbaking the cake, and allow it to cool before slicing. Finish with chopped Reese’s cups or a drizzle of melted peanut butter for an attractive presentation.
Serve it with vanilla ice cream, cold milk, or coffee, and enjoy a dessert that brings together two classic favorites in one irresistible treat.
Whether you are a longtime Reese’s fan or simply looking for a new chocolate peanut butter dessert, this earthquake cake is a delicious addition to your recipe collection. One bite delivers rich chocolate, creamy peanut butter, and sweet candy flavor in a dessert that is wonderfully simple to make and even more enjoyable to share.
Print
Reese’s Chocolate Peanut Butter Earthquake Cake – A Gooey Chocolate Dessert Loaded with Reese’s
- Total Time: 1 hour and 30 minutes
Description
If you love the irresistible combination of chocolate and peanut butter, this Reese’s Chocolate Peanut Butter Earthquake Cake is the ultimate dessert to add to your baking collection. Made with rich chocolate cake, a creamy peanut butter and cream cheese filling, chunks of Reese’s peanut butter cups, and a deliciously sweet topping, this dessert delivers layers of flavor in every bite.
Ingredients
For the chocolate cake
- 1 box chocolate cake mix, approximately 15–16 ounces: Use your favorite chocolate, devil’s food, or chocolate fudge cake mix.
- Ingredients listed on the cake mix package: Usually eggs, vegetable oil, and water. Use the exact quantities specified on your package.
- 1 cup chopped Reese’s Peanut Butter Cups: Adds classic chocolate and peanut butter flavor throughout the cake.
- 1/2 cup chocolate chips, optional: Semisweet or milk chocolate chips create additional pockets of melted chocolate.
- 1/2 cup chopped Reese’s Pieces, optional: Adds extra peanut butter candy flavor and color.
For the peanut butter cream cheese filling
- 8 ounces (226 g) cream cheese, softened: Creates a smooth, creamy filling with a slight tang that balances the sweetness.
- 1/2 cup (125 g) creamy peanut butter: Provides the signature peanut butter flavor.
- 1/2 cup (60 g) powdered sugar: Sweetens the filling and helps create a smooth consistency.
- 1 teaspoon vanilla extract: Enhances the flavor of the cream cheese and peanut butter.
- 1/4 cup (57 g) unsalted butter, softened: Adds richness and helps the filling become smooth and creamy.
For the topping
- 1/2 cup chopped Reese’s Peanut Butter Cups: Adds extra candy pieces across the top of the cake.
- 1/4 cup chocolate chips: Provides additional chocolate flavor.
- 2–3 tablespoons peanut butter, optional: Can be melted and drizzled over the cake after baking.
- 2 tablespoons chocolate sauce, optional: Creates an attractive finishing drizzle.
Instructions
Preheat your oven to 350°F (175°C). Grease a 9-by-13-inch baking dish with butter or nonstick cooking spray.
For easier cleanup and serving, you can lightly grease the bottom and sides of the dish before adding the batter. A glass or metal baking dish can work, but baking times may vary depending on the material.
Chop the Reese’s Peanut Butter Cups into small pieces. Keep the pieces relatively uniform so that they distribute evenly throughout the cake.
Set aside the candy pieces intended for the filling and topping. Preparing these ingredients before mixing the batter makes the recipe easier to assemble.
Step 2: Prepare the chocolate cake batter
In a large mixing bowl, prepare the chocolate cake mix according to the package directions. Add the required eggs, oil, and water, then mix until the batter is smooth and evenly combined.
Avoid overmixing the batter. Excessive mixing can affect the texture of the finished cake.
If you prefer a richer chocolate flavor, choose a devil’s food or chocolate fudge cake mix. These varieties pair particularly well with the sweet peanut butter cream cheese filling.
Fold in approximately 1 cup of chopped Reese’s Peanut Butter Cups if you want candy pieces throughout the cake. You can also reserve all the candy for the filling and topping if you prefer more distinct layers.
Pour the chocolate batter into the prepared baking dish. Spread it evenly with a spatula, making sure the batter reaches the corners.
Step 3: Make the peanut butter cream cheese filling
Place the softened cream cheese and softened butter in a medium mixing bowl. Beat them together until smooth and creamy.
Add the peanut butter and continue mixing until the ingredients are fully combined. Scrape down the sides of the bowl as needed to ensure that no lumps remain.
Gradually add the powdered sugar, mixing until the filling becomes thick, smooth, and spreadable. Stir in the vanilla extract.
The filling should be creamy enough to spoon over the chocolate cake batter but thick enough to hold its shape in small pockets.
If the filling seems too thick, mix it briefly until it becomes easier to spread. If it seems unusually soft, refrigerate it for a few minutes before assembling the cake.
Avoid adding too much extra liquid, because a thinner filling may blend excessively into the cake batter rather than forming distinct creamy pockets.
Step 4: Add the peanut butter filling to the cake
Spoon generous dollops of the peanut butter cream cheese mixture over the chocolate cake batter.
Distribute the filling across the surface rather than placing it all in the center. This helps create the characteristic earthquake cake appearance, with creamy pockets throughout the finished dessert.
Use a butter knife or the tip of a spatula to gently swirl some of the filling into the chocolate batter.
Do not stir the entire mixture together. The goal is to create separate ribbons and pockets of peanut butter cream cheese, not a completely uniform chocolate-peanut butter batter.
Sprinkle the remaining chopped Reese’s Peanut Butter Cups over the surface. Add the optional chocolate chips or Reese’s Pieces if desired.
The uneven distribution of filling and candy helps create the cake’s signature cracked appearance as it bakes.
Step 5: Bake the earthquake cake
Place the baking dish in the preheated oven and bake for approximately 35–45 minutes.
Begin checking the cake around the 35-minute mark. The edges should look set, and the surface should develop cracks. The chocolate cake portion should be cooked through, while the cream cheese filling may remain visibly soft and creamy.
Insert a toothpick into a section containing mostly chocolate cake rather than directly into the cream cheese filling. The toothpick should come out without wet cake batter. A little moisture from melted chocolate is normal.
Because this recipe contains a rich cream cheese filling, the center may look softer than a conventional chocolate cake. Avoid assuming that every creamy area means the cake is underbaked.
If the chocolate cake batter is still visibly raw, continue baking in short intervals and check again.
Remove the dish from the oven when the cake is cooked through but still moist. Overbaking can make the chocolate cake dry and cause the filling to lose its creamy texture.
Step 6: Allow the cake to cool
Place the baking dish on a heatproof surface and allow the cake to cool for at least 20–30 minutes before serving.
During cooling, the chocolate cake becomes more stable and the peanut butter cream cheese filling thickens slightly. This makes the cake easier to portion.
For a gooier dessert, serve it warm after a short cooling period. For cleaner slices, allow it to cool further and refrigerate it once it is no longer steaming.
Because the filling contains cream cheese, do not leave the finished cake at room temperature for extended periods. Refrigerate it within two hours of baking, or within one hour if the surrounding temperature is above 90°F (32°C).
Step 7: Add the finishing toppings
For an extra indulgent finish, melt 2–3 tablespoons of peanut butter in a microwave-safe bowl using short intervals, stirring between each interval.
Drizzle the melted peanut butter over the cooled cake. Add chocolate sauce if desired.
Sprinkle additional chopped Reese’s Peanut Butter Cups over the top for a more dramatic presentation. You can also add a few chocolate chips or Reese’s Pieces.
If you prefer a less sweet dessert, keep the topping simple and let the chocolate cake and peanut butter cream cheese filling provide most of the flavor.
Allow the drizzle to settle before cutting the cake into squares.
Step 8: Slice and serve
Cut the cake into squares using a sharp knife. For the cleanest cuts, wipe the knife between slices.
Serve each portion on a dessert plate and add a scoop of vanilla ice cream if desired. The contrast between cold ice cream and the rich chocolate cake is especially delicious.
If you prefer the cake warm, heat an individual portion briefly in the microwave, using short intervals and checking the temperature before serving. Avoid overheating because the cream cheese filling and melted candy can become very hot.
Enjoy the soft chocolate cake, creamy peanut butter filling, and irresistible pieces of Reese’s candy in every bite.
Notes
For the best results, use softened cream cheese and butter when preparing the peanut butter filling. Cold ingredients can create lumps and make the filling difficult to spread.
Do not overmix the chocolate cake batter. Follow the cake mix package directions, then gently add any optional candy pieces.
Distribute the cream cheese filling across the surface in dollops rather than stirring it completely into the batter. This creates the signature uneven texture and creamy pockets associated with earthquake cake.
Baking time depends on your oven, the type of baking dish, and the cake mix used. Check the chocolate cake portions for doneness rather than relying on the appearance of the cream cheese filling alone.
Allow the cake to cool before slicing. If you prefer clean, neat squares, refrigerate the cake after it has cooled sufficiently.
Because the filling contains cream cheese, store the cake in the refrigerator and follow safe food-handling guidance. Do not leave it out for long periods, especially in warm weather.
- Prep Time: 20 minutes
- Cooling Time: 20–30 minutes
- Cook Time: 35–45 minutes
Nutrition
- Calories: 400–550
- Sodium: 300–500 mg
- Protein: 6–9 g
