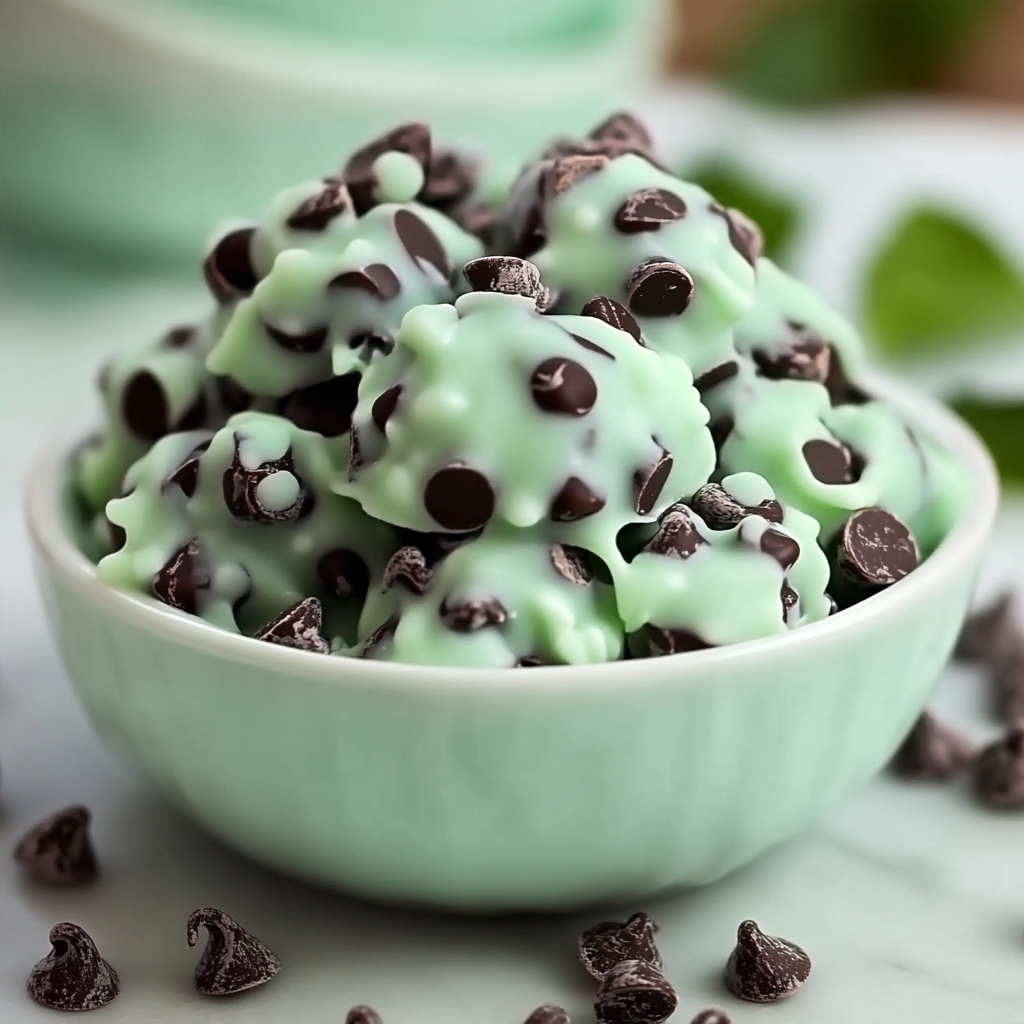
If you love the refreshing flavor of mint combined with rich, creamy chocolate, these No-Bake Mint Chocolate Chip Clusters are a dessert you absolutely need to try. They are sweet, chocolatey, refreshing, and incredibly easy to prepare. With their beautiful chocolate coating, creamy mint flavor, and little bursts of chocolate chips in every bite, these homemade candy clusters are perfect for holidays, parties, afternoon treats, or whenever you are craving something sweet.
The best part about this easy no-bake mint chocolate chip clusters recipe is that you do not need to turn on your oven. There is no complicated baking process, no special equipment, and no long preparation time. Simply melt the chocolate, prepare the mint-flavored mixture, combine the ingredients, shape the clusters, and let them chill until firm.
These delicious chocolate mint clusters bring together two classic dessert flavors that have been loved for generations. Chocolate provides a rich, smooth sweetness, while peppermint adds a cool and refreshing taste that makes each bite feel special. The chocolate chips provide an extra chocolatey texture, making these little treats even more satisfying.
Another wonderful thing about this recipe is how easy it is to customize. You can use dark chocolate, milk chocolate, or white chocolate, add extra mini chocolate chips, or finish the clusters with crushed peppermint candies for a festive appearance. They are especially popular during Christmas and winter celebrations, but their refreshing flavor makes them enjoyable throughout the year.
If you are looking for easy no-bake Christmas candy, homemade chocolate mint candies, or simple desserts that require only a few ingredients, these No-Bake Mint Chocolate Chip Clusters are a fantastic choice.
Make a batch for your family, package them in small gift boxes, or arrange them on a holiday dessert platter. Once you taste the combination of smooth chocolate and refreshing mint, you will understand why these little treats are so irresistible.
Ingredients
One of the reasons these no-bake chocolate mint clusters are so popular is that they require simple ingredients that are easy to find at most grocery stores.
Main Ingredients
- 2 cups semi-sweet chocolate chips: These provide the rich chocolate flavor and create the base for the clusters. Semi-sweet chocolate balances the sweetness of the mint mixture.
- 1 cup white chocolate chips: White chocolate adds sweetness and a creamy texture that complements the refreshing mint flavor.
- 1/2 teaspoon peppermint extract: Gives the clusters their signature cool mint flavor. Use peppermint extract rather than mint-flavored vanilla.
- 1/2 cup mini chocolate chips: Adds little chocolate pieces throughout the clusters and creates a delicious texture.
Optional Ingredients
- 2 tablespoons crushed peppermint candies for a festive topping.
- 1 teaspoon coconut oil to help thin the melted chocolate if needed.
- 1–2 drops green food coloring for a traditional mint-chocolate appearance.
- A pinch of sea salt to balance the sweetness.
- Extra melted chocolate for decorating.
Important ingredient note: Use food-grade peppermint extract and add it gradually. Peppermint extract is concentrated, so too much can overpower the chocolate flavor. Also, use properly formulated melting chocolate or chocolate chips for the coating. Avoid adding water to melted chocolate, as it can cause the chocolate to seize.
Preparation: How to Make No-Bake Mint Chocolate Chip Clusters
Follow these simple steps to prepare delicious homemade mint chocolate clusters without baking.
Step 1: Prepare Your Baking Sheet
Start by preparing a large baking sheet or flat tray. Line it with parchment paper or a silicone baking mat.
This prevents the chocolate clusters from sticking and makes them easy to remove once they have hardened.
Make sure the tray fits comfortably inside your refrigerator. Having everything ready before melting the chocolate will make the process easier.
Measure all your ingredients and place them near your workspace. This is especially important because melted chocolate begins to thicken as it cools.
Step 2: Melt the Semi-Sweet Chocolate
Place the semi-sweet chocolate chips in a microwave-safe bowl.
Microwave in 20–30-second intervals, stirring thoroughly after each interval. Continue until the chocolate is almost completely melted.
Stir until the remaining chocolate pieces dissolve and the mixture becomes smooth and glossy.
You can also melt the chocolate using a double boiler. Place a heatproof bowl over a saucepan containing gently simmering water. Make sure the bottom of the bowl does not touch the water.
Stir slowly until the chocolate melts completely.
Avoid overheating the chocolate because excessive heat can make it thick, grainy, or difficult to work with.
Step 3: Melt the White Chocolate
In a separate microwave-safe bowl, add the white chocolate chips.
Microwave in short intervals, stirring between each one until smooth.
White chocolate can burn more easily than regular chocolate, so use gentle heat and be patient.
Once melted, allow it to cool slightly before combining it with the other ingredients.
If you want a traditional mint-green appearance, add one or two drops of green food coloring to the melted white chocolate and stir until evenly colored.
Use oil-based or chocolate-compatible coloring when possible. Water-based coloring can cause melted chocolate to seize.
Step 4: Add the Peppermint Flavor
Add the peppermint extract gradually to the melted white chocolate.
Stir gently until the flavor is evenly distributed.
Start with 1/2 teaspoon and taste a small amount once it has cooled slightly. If you prefer a stronger mint flavor, you can add a little more, but avoid adding too much.
The goal is to create a refreshing mint flavor that complements the chocolate rather than overpowering it.
If the mixture becomes unusually thick, avoid adding water. Use a suitable small amount of melted chocolate or compatible cocoa butter to adjust the consistency if necessary.
Step 5: Combine the Chocolate and Mint Mixtures
Pour the melted mint-flavored white chocolate into the melted semi-sweet chocolate.
Stir gently until the two chocolates are combined into a smooth mixture.
You can create a fully blended chocolate mint flavor or leave a few visible swirls for a beautiful marbled appearance.
Add the mini chocolate chips and stir until they are evenly distributed throughout the mixture.
The mini chocolate chips provide extra texture and make every cluster taste like a little piece of mint chocolate chip candy.
If the mixture is too warm, allow it to cool briefly before adding the mini chocolate chips to prevent them from melting.
Step 6: Form the Chocolate Clusters
Using a small cookie scoop or two teaspoons, drop spoonfuls of the mixture onto the prepared parchment-lined baking sheet.
Leave a little space between each cluster so they do not touch.
You can make them small for bite-sized treats or slightly larger for a more generous dessert.
Use the back of a spoon to gently shape each cluster if necessary.
For an attractive finish, sprinkle crushed peppermint candies, extra mini chocolate chips, or a few chocolate shavings over the tops while the chocolate is still soft.
Try to keep the clusters relatively similar in size so they chill evenly and look beautiful when served.
Step 7: Refrigerate Until Firm
Place the baking sheet in the refrigerator for approximately 30–45 minutes, or until the clusters are completely firm.
The chilling time may vary depending on the size of the clusters and the type of chocolate used.
Avoid moving them too much while they are setting. Once the chocolate has hardened, gently lift each cluster from the parchment paper.
If they are still soft, return the tray to the refrigerator for another 10–15 minutes.
Step 8: Serve and Enjoy
Arrange the finished No-Bake Mint Chocolate Chip Clusters on a serving platter or place them in small candy liners.
For a beautiful presentation, drizzle a little melted chocolate over the tops and add a small sprinkle of crushed peppermint.
Serve chilled or slightly softened, depending on your preferred texture.
These homemade chocolate mint treats are perfect with coffee, hot chocolate, or a cold glass of milk.
Store any remaining clusters in an airtight container to keep them fresh and prevent them from absorbing other refrigerator odors.
Variations
One of the best things about this easy no-bake mint chocolate candy recipe is how many delicious variations you can create.
1. Dark Chocolate Mint Clusters
Replace the semi-sweet chocolate with dark chocolate chips or chopped dark chocolate.
Dark chocolate provides a deeper cocoa flavor and balances the sweetness of the white chocolate and peppermint.
This version is ideal for anyone who enjoys less-sweet chocolate desserts.
2. White Chocolate Mint Clusters
For a sweeter variation, use white chocolate as the primary chocolate ingredient.
Add peppermint extract and mini chocolate chips to create a creamy white chocolate mint candy with a beautiful appearance.
You can add a small amount of green food coloring for a festive look.
3. Christmas Mint Chocolate Clusters
Make these clusters especially festive by adding crushed candy canes.
Sprinkle the crushed peppermint over the tops before refrigerating.
You can also package the finished candies in red and green holiday candy wrappers for homemade Christmas gifts.
4. Mint Oreo Chocolate Clusters
Crush several mint chocolate sandwich cookies and fold the cookie pieces into the melted chocolate mixture.
The cookie pieces add a crunchy texture and extra chocolate flavor.
This variation tastes similar to a combination of mint chocolate cookies and homemade candy.
5. Mint Chocolate Peanut Butter Clusters
Add a small amount of smooth peanut butter to the melted chocolate mixture.
The peanut butter creates a richer, creamier flavor that pairs surprisingly well with peppermint.
Use a moderate amount so the clusters still become firm after chilling.
6. Extra Chocolate Chip Clusters
If you love chocolate, add another 1/4 cup of mini chocolate chips.
You can use a mixture of dark, milk, and white chocolate chips for extra flavor and a beautiful appearance.
7. Mint Coconut Chocolate Clusters
Add 1/3 cup of finely shredded coconut to the chocolate mixture.
The coconut provides a slightly chewy texture and a delicious flavor combination.
This variation is especially good with dark chocolate.
8. Peppermint Crunch Clusters
Add crushed peppermint candies directly to the chocolate mixture and sprinkle a little more on top.
The candy pieces create a refreshing crunch that makes the clusters especially enjoyable during the holiday season.
Cooking Note
Although this is a no-bake recipe, a few important details will help you achieve smooth, beautiful chocolate clusters.
Use dry equipment: Even a small amount of water can cause melted chocolate to seize. Make sure your bowls, spoons, and utensils are completely dry.
Melt chocolate slowly: Chocolate should be heated gently. Short microwave intervals and frequent stirring prevent overheating.
Choose good-quality chocolate: The quality of the chocolate makes a significant difference in flavor and texture.
Measure peppermint extract carefully: Peppermint is powerful, and too much can make the clusters taste overly strong.
Allow the chocolate to cool slightly: If the chocolate is too hot, the mini chocolate chips may melt when added.
Use parchment paper: This makes removing the finished clusters much easier.
Chill thoroughly: Allow enough time for the chocolate to become completely firm before transferring the clusters into storage containers.
Avoid excessive food coloring: A small amount is enough to create a lovely mint-green color. Use chocolate-compatible coloring to prevent the chocolate from becoming thick or grainy.
Serving Suggestions
These No-Bake Mint Chocolate Chip Clusters are delicious on their own, but there are several ways to serve them.
- With coffee: Serve a few chocolate mint clusters alongside hot coffee or espresso for a simple afternoon treat.
- With hot chocolate: Their refreshing mint flavor makes them a wonderful addition to a cup of homemade hot chocolate.
- On a Christmas dessert platter: Arrange them with cookies, brownies, fudge, and peppermint bark for a festive holiday display.
- As homemade gifts: Place the clusters in decorative candy boxes or small treat bags tied with ribbons.
- With ice cream: Chop a few clusters and sprinkle them over vanilla or chocolate ice cream.
- For birthday parties: Serve them in mini candy cups as bite-sized chocolate desserts.
- As an after-dinner treat: Offer one or two clusters after a meal for a small, satisfying dessert.
- With milk: A cold glass of milk pairs beautifully with the rich chocolate flavor.
Tips for the Best No-Bake Mint Chocolate Chip Clusters
- Use high-quality chocolate for the smoothest texture and best flavor.
- Melt the chocolate slowly to avoid burning it.
- Stir the chocolate frequently while melting.
- Use peppermint extract rather than ordinary mint-flavored syrup.
- Add the peppermint extract gradually to control the flavor.
- Make sure all utensils and bowls are completely dry.
- Use mini chocolate chips so they distribute evenly throughout the mixture.
- Allow the melted chocolate to cool slightly before adding the chocolate chips.
- Use a cookie scoop to create evenly sized clusters.
- Line your tray with parchment paper for easy removal.
- Add toppings before the chocolate hardens.
- Refrigerate the clusters until completely firm.
- Store them in an airtight container to maintain freshness.
- Keep the clusters away from direct sunlight and heat.
- For a more intense chocolate flavor, use a combination of semi-sweet and dark chocolate.
- For a festive presentation, sprinkle crushed candy canes over the tops.
- Avoid adding too much peppermint extract because it can overpower the chocolate.
- If the chocolate becomes too thick, gently rewarm it rather than adding water.
- Make the clusters smaller when serving them on a holiday dessert platter.
- Prepare an extra batch because these little chocolate mint treats are easy to share and enjoy!
Prep Time
- Preparation Time: 15 minutes
- Chilling Time: 30–45 minutes
- Cooking Time: 0 minutes
- Total Time: Approximately 45–60 minutes
- Servings: Approximately 20–24 clusters, depending on size.
Nutritional Information
The following nutritional values are approximate estimates based on 24 clusters and the ingredients listed above. Actual values depend on the brands of chocolate and the size of each cluster.
- Calories: Approximately 130–160 per cluster
- Protein: Approximately 1–2 g
- Sodium: Approximately 15–35 mg
Nutritional Notes
Calories: Most calories come from the chocolate and chocolate chips. Smaller clusters can help control portion sizes.
Protein: Chocolate contributes a small amount of protein, but these treats are primarily intended as a sweet dessert.
Sodium: Sodium levels vary depending on the chocolate brand and optional toppings.
These clusters are best enjoyed as an occasional homemade treat.
FAQs
1. Do No-Bake Mint Chocolate Chip Clusters need to be baked?
No! That is one of the best things about this recipe. The chocolate is melted, combined with the mint ingredients, shaped into clusters, and refrigerated until firm. There is no oven required.
2. Can I make these mint chocolate clusters ahead of time?
Absolutely! These clusters are perfect for preparing ahead of parties and holidays. Make them a few days in advance and store them in an airtight container in the refrigerator.
3. How long do No-Bake Mint Chocolate Chip Clusters last?
When stored properly in an airtight container in the refrigerator, they can generally maintain good quality for approximately 1–2 weeks. Always check for changes in appearance, smell, or texture before serving.
4. Can I freeze mint chocolate clusters?
Yes. Place the completely set clusters in a freezer-safe airtight container, separating layers with parchment paper.
Freeze for approximately 2–3 months for best quality. Thaw them in the refrigerator before serving to minimize condensation.
5. Can I use milk chocolate instead of semi-sweet chocolate?
Yes! Milk chocolate creates a sweeter and creamier candy. If you prefer a less-sweet dessert, use semi-sweet or dark chocolate.
6. What is the best mint extract for this recipe?
Peppermint extract is the best choice for a classic mint chocolate flavor. It provides the familiar cool taste associated with mint chocolate chip desserts.
Add it gradually because a little goes a long way.
7. Why did my melted chocolate become thick and grainy?
Chocolate can become thick and grainy when it overheats or comes into contact with water. Always use dry utensils and melt the chocolate in short intervals.
If the chocolate seizes, it may not return to a suitable consistency for making firm candy clusters.
8. Can I make these clusters green?
Yes! Add a tiny amount of chocolate-compatible green food coloring to the white chocolate.
Start with one drop and add more only if necessary. A soft mint-green shade looks especially attractive for Christmas, St. Patrick’s Day, or spring celebrations.
9. Can I use peppermint candies instead of peppermint extract?
Crushed peppermint candies can add mint flavor and crunch, but they will not provide the same smooth, evenly distributed flavor as peppermint extract.
For the best result, use a small amount of extract and add crushed candies as a topping.
10. Are these clusters good for Christmas?
Yes! They make wonderful homemade Christmas candies. Their chocolate and peppermint combination is perfect for holiday dessert tables, cookie exchanges, and edible gifts.
Package them in decorative boxes for a thoughtful homemade present.
11. Can I use white chocolate chips only?
Yes. You can make an all-white-chocolate version by using white chocolate as the main ingredient. Add peppermint extract and mini chocolate chips for the classic mint chocolate chip flavor.
12. How do I prevent the clusters from sticking together?
Allow them to harden completely before transferring them to a storage container. Separate layers with parchment paper and keep the container in a cool place.
13. Can I make these clusters without food coloring?
Of course! Food coloring is completely optional. The clusters will taste just as delicious without it.
14. What can I add for extra crunch?
Crushed peppermint candies, chopped chocolate cookies, toasted coconut, or finely chopped nuts can add extra texture.
Add these ingredients in moderate amounts so the clusters still hold together.
15. Why are my clusters not getting firm?
The chocolate may not have set properly, or the mixture may contain too much added liquid. Make sure you use suitable chocolate, avoid water, and refrigerate the clusters long enough.
If they remain soft, return them to the refrigerator until firm.
Conclusion
These No-Bake Mint Chocolate Chip Clusters are the perfect combination of rich chocolate and refreshing peppermint in one easy homemade treat. They are simple to prepare, require no oven, and use ingredients that are easy to find.
Whether you are making them for Christmas, a family gathering, a birthday party, or simply because you are craving something sweet, these chocolate mint clusters are sure to be a favorite.
Their creamy chocolate texture, refreshing mint flavor, and delicious chocolate chip pieces make every bite special. You can customize them with dark chocolate, crushed peppermint candies, chocolate cookies, or extra chocolate chips to create your own favorite version.
The best part is that you can prepare a batch ahead of time, refrigerate them, and have a delicious dessert ready whenever you need it.
If you love easy homemade candy recipes, chocolate mint desserts, and no-bake treats, add this recipe to your collection. Make a batch, share them with family and friends, and enjoy these irresistible little bites of chocolate mint goodness!
Print
No-Bake Mint Chocolate Chip Clusters – Easy, Creamy, and Delicious Chocolate Mint Treats
- Total Time: 45–60 minutes
Description
these No-Bake Mint Chocolate Chip Clusters are a dessert you absolutely need to try. They are sweet, chocolatey, refreshing, and incredibly easy to prepare. With their beautiful chocolate coating, creamy mint flavor, and little bursts of chocolate chips in every bite, these homemade candy clusters are perfect for holidays, parties, afternoon treats, or whenever you are craving something sweet.
Ingredients
- 2 cups semi-sweet chocolate chips: These provide the rich chocolate flavor and create the base for the clusters. Semi-sweet chocolate balances the sweetness of the mint mixture.
- 1 cup white chocolate chips: White chocolate adds sweetness and a creamy texture that complements the refreshing mint flavor.
- 1/2 teaspoon peppermint extract: Gives the clusters their signature cool mint flavor. Use peppermint extract rather than mint-flavored vanilla.
- 1/2 cup mini chocolate chips: Adds little chocolate pieces throughout the clusters and creates a delicious texture.
Optional Ingredients
- 2 tablespoons crushed peppermint candies for a festive topping.
- 1 teaspoon coconut oil to help thin the melted chocolate if needed.
- 1–2 drops green food coloring for a traditional mint-chocolate appearance.
- A pinch of sea salt to balance the sweetness.
- Extra melted chocolate for decorating.
Instructions
Start by preparing a large baking sheet or flat tray. Line it with parchment paper or a silicone baking mat.
This prevents the chocolate clusters from sticking and makes them easy to remove once they have hardened.
Make sure the tray fits comfortably inside your refrigerator. Having everything ready before melting the chocolate will make the process easier.
Measure all your ingredients and place them near your workspace. This is especially important because melted chocolate begins to thicken as it cools.
Step 2: Melt the Semi-Sweet Chocolate
Place the semi-sweet chocolate chips in a microwave-safe bowl.
Microwave in 20–30-second intervals, stirring thoroughly after each interval. Continue until the chocolate is almost completely melted.
Stir until the remaining chocolate pieces dissolve and the mixture becomes smooth and glossy.
You can also melt the chocolate using a double boiler. Place a heatproof bowl over a saucepan containing gently simmering water. Make sure the bottom of the bowl does not touch the water.
Stir slowly until the chocolate melts completely.
Avoid overheating the chocolate because excessive heat can make it thick, grainy, or difficult to work with.
Step 3: Melt the White Chocolate
In a separate microwave-safe bowl, add the white chocolate chips.
Microwave in short intervals, stirring between each one until smooth.
White chocolate can burn more easily than regular chocolate, so use gentle heat and be patient.
Once melted, allow it to cool slightly before combining it with the other ingredients.
If you want a traditional mint-green appearance, add one or two drops of green food coloring to the melted white chocolate and stir until evenly colored.
Use oil-based or chocolate-compatible coloring when possible. Water-based coloring can cause melted chocolate to seize.
Step 4: Add the Peppermint Flavor
Add the peppermint extract gradually to the melted white chocolate.
Stir gently until the flavor is evenly distributed.
Start with 1/2 teaspoon and taste a small amount once it has cooled slightly. If you prefer a stronger mint flavor, you can add a little more, but avoid adding too much.
The goal is to create a refreshing mint flavor that complements the chocolate rather than overpowering it.
If the mixture becomes unusually thick, avoid adding water. Use a suitable small amount of melted chocolate or compatible cocoa butter to adjust the consistency if necessary.
Step 5: Combine the Chocolate and Mint Mixtures
Pour the melted mint-flavored white chocolate into the melted semi-sweet chocolate.
Stir gently until the two chocolates are combined into a smooth mixture.
You can create a fully blended chocolate mint flavor or leave a few visible swirls for a beautiful marbled appearance.
Add the mini chocolate chips and stir until they are evenly distributed throughout the mixture.
The mini chocolate chips provide extra texture and make every cluster taste like a little piece of mint chocolate chip candy.
If the mixture is too warm, allow it to cool briefly before adding the mini chocolate chips to prevent them from melting.
Step 6: Form the Chocolate Clusters
Using a small cookie scoop or two teaspoons, drop spoonfuls of the mixture onto the prepared parchment-lined baking sheet.
Leave a little space between each cluster so they do not touch.
You can make them small for bite-sized treats or slightly larger for a more generous dessert.
Use the back of a spoon to gently shape each cluster if necessary.
For an attractive finish, sprinkle crushed peppermint candies, extra mini chocolate chips, or a few chocolate shavings over the tops while the chocolate is still soft.
Try to keep the clusters relatively similar in size so they chill evenly and look beautiful when served.
Step 7: Refrigerate Until Firm
Place the baking sheet in the refrigerator for approximately 30–45 minutes, or until the clusters are completely firm.
The chilling time may vary depending on the size of the clusters and the type of chocolate used.
Avoid moving them too much while they are setting. Once the chocolate has hardened, gently lift each cluster from the parchment paper.
If they are still soft, return the tray to the refrigerator for another 10–15 minutes.
Step 8: Serve and Enjoy
Arrange the finished No-Bake Mint Chocolate Chip Clusters on a serving platter or place them in small candy liners.
For a beautiful presentation, drizzle a little melted chocolate over the tops and add a small sprinkle of crushed peppermint.
Serve chilled or slightly softened, depending on your preferred texture.
These homemade chocolate mint treats are perfect with coffee, hot chocolate, or a cold glass of milk.
Store any remaining clusters in an airtight container to keep them fresh and prevent them from absorbing other refrigerator odors.
Notes
Although this is a no-bake recipe, a few important details will help you achieve smooth, beautiful chocolate clusters.
Use dry equipment: Even a small amount of water can cause melted chocolate to seize. Make sure your bowls, spoons, and utensils are completely dry.
Melt chocolate slowly: Chocolate should be heated gently. Short microwave intervals and frequent stirring prevent overheating.
Choose good-quality chocolate: The quality of the chocolate makes a significant difference in flavor and texture.
Measure peppermint extract carefully: Peppermint is powerful, and too much can make the clusters taste overly strong.
Allow the chocolate to cool slightly: If the chocolate is too hot, the mini chocolate chips may melt when added.
Use parchment paper: This makes removing the finished clusters much easier.
Chill thoroughly: Allow enough time for the chocolate to become completely firm before transferring the clusters into storage containers.
Avoid excessive food coloring: A small amount is enough to create a lovely mint-green color. Use chocolate-compatible coloring to prevent the chocolate from becoming thick or grainy.
- Prep Time: 15 minutes
- Chilling Time: 30–45 minutes
- Cook Time: 0 minutes
Nutrition
- Calories: 130–160 per cluster
- Sodium: 15–35 mg
- Protein: 1–2 g
