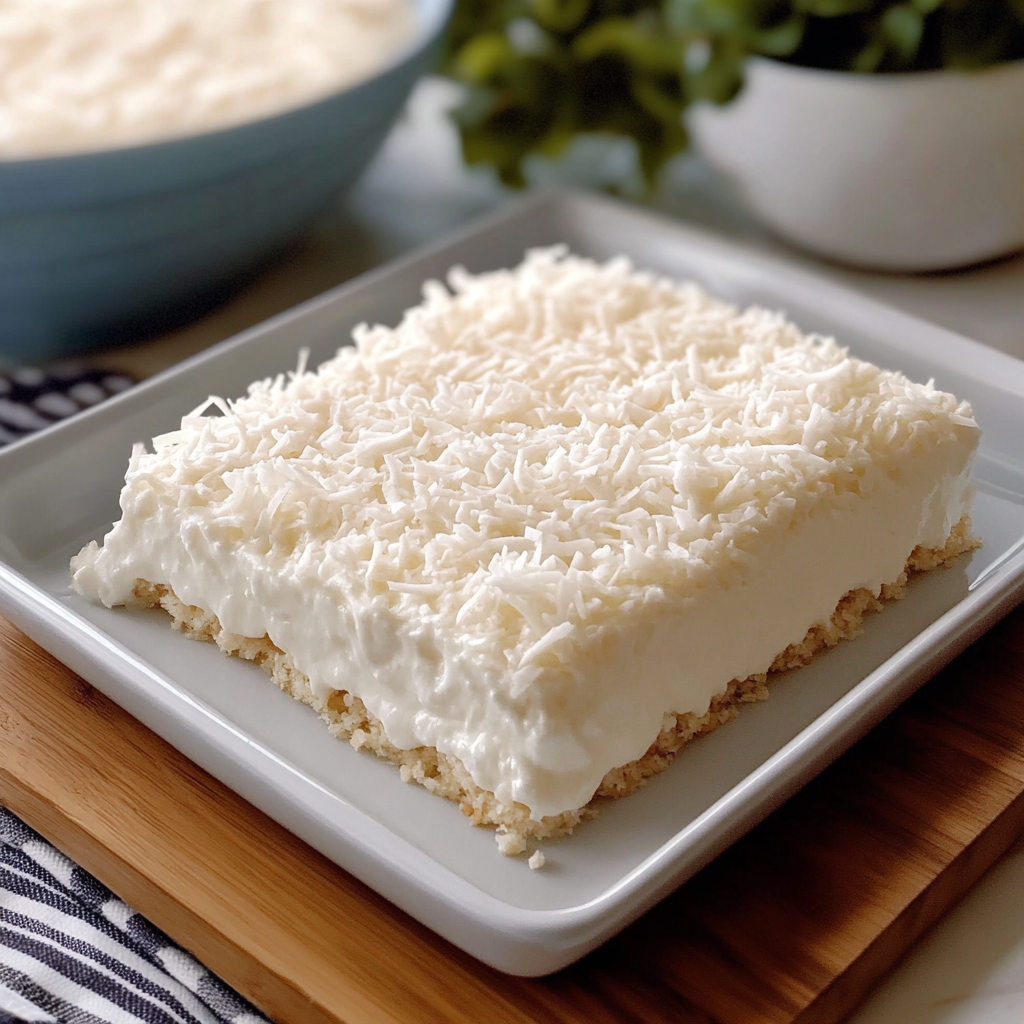
If you’re looking for an easy dessert that tastes like a little slice of tropical heaven, this No-Bake Coconut Cream Dream Dessert is the one to make.
This dreamy layered dessert combines a buttery cookie crust, creamy coconut pudding, sweetened coconut, and a light whipped topping into one incredibly delicious treat. Every spoonful is soft, creamy, fluffy, and packed with that sweet coconut flavor that makes coconut desserts so irresistible.
The best part is that there’s no oven required.
Instead of spending time preparing a complicated cake or pie, you simply prepare the crust, mix the creamy layers, assemble everything in a dish, and let it chill until perfectly set.
The result is a cool, refreshing dessert that’s especially wonderful during warm weather, but it’s delicious enough to serve all year long.
The buttery crust provides a little crunch underneath the silky coconut filling. Toasted coconut adds extra texture and flavor, while the whipped topping creates an airy finish that keeps the dessert from feeling too heavy.
It’s the perfect recipe for summer gatherings, potlucks, Sunday dinners, birthdays, Easter, Mother’s Day, Christmas, family reunions, and holiday dessert tables.
And if you’re a coconut lover, don’t be surprised if everyone asks for the recipe.
❤️ Why You’ll Love This Coconut Cream Dream Dessert
🥥 Incredible coconut flavor
Coconut pudding, shredded coconut, and toasted coconut work together to create layers of tropical flavor.
❄️ Completely no-bake
No need to heat up your kitchen.
🍰 Creamy and fluffy
The combination of pudding and whipped topping creates a wonderfully light texture.
🧈 Buttery crust
A simple cookie crust gives the creamy filling a delicious contrast.
🎉 Perfect for sharing
It’s made in a large dish, making it ideal for family gatherings and parties.
⏰ Easy to prepare
Most of the work is simply mixing and layering.
🛒 Ingredients
For the Crust
- 2½ cups crushed vanilla wafer cookies or shortbread cookies
- ½ cup unsalted butter, melted
- 2 tablespoons granulated sugar
- Pinch of salt
For the Coconut Cream Layer
- 2 packages instant coconut cream pudding mix, 3.4 ounces each
- 3 cups cold whole milk
- 1 teaspoon vanilla extract
- 1 cup sweetened shredded coconut
- 1 cup whipped topping
For the Cream Cheese Layer
- 8 ounces cream cheese, softened
- ½ cup powdered sugar
- 1 teaspoon vanilla extract
- 1 cup whipped topping
For the Top
- 2 cups whipped topping
- 1 cup sweetened shredded coconut
- ½ cup chopped pecans or almonds, optional
- Toasted coconut flakes, optional
👩🍳 How to Make No-Bake Coconut Cream Dream Dessert
Step 1: Prepare the Cookie Crust
Place the vanilla wafers or shortbread cookies into a food processor.
Pulse until they become fine crumbs.
You can also place the cookies inside a sealed bag and crush them with a rolling pin.
Transfer the crumbs to a bowl.
Add the melted butter, sugar, and a small pinch of salt.
Stir until all the crumbs are evenly coated with butter.
The mixture should resemble wet sand.
Step 2: Press the Crust Into the Dish
Lightly grease a 9×13-inch baking dish.
Pour the cookie crumb mixture into the bottom.
Press it firmly into an even layer using the bottom of a measuring cup or glass.
Make sure the crust reaches all the corners.
Place the dish in the refrigerator while you prepare the filling.
Chilling the crust helps it firm up and makes the dessert easier to cut later.
🥥 Step 3: Toast the Coconut
Place the shredded coconut in a dry skillet over medium-low heat.
Stir frequently.
Toast for approximately 3–5 minutes, or until lightly golden and fragrant.
Remove it from the heat immediately.
Allow it to cool completely.
Be careful because coconut can burn quickly.
Toasted coconut adds a much deeper flavor than untoasted coconut.
Step 4: Prepare the Coconut Pudding
Pour the cold milk into a large mixing bowl.
Add the instant coconut cream pudding mix.
Whisk for approximately 2 minutes, or according to the pudding package directions.
The mixture should become thick and creamy.
Add the vanilla extract.
Fold in 1 cup of shredded coconut and 1 cup whipped topping.
Mix gently until everything is evenly combined.
Step 5: Prepare the Cream Cheese Layer
Place the softened cream cheese into a clean mixing bowl.
Beat until smooth.
Add the powdered sugar and vanilla extract.
Continue beating until creamy and free of lumps.
Fold in 1 cup whipped topping.
Mix gently until light and fluffy.
The cream cheese layer adds a slight tanginess that balances the sweetness of the coconut pudding.
Step 6: Add the Cream Cheese Layer
Remove the chilled crust from the refrigerator.
Spread the cream cheese mixture evenly over the crust.
Use a spatula to smooth the surface.
Take your time with this layer because a smooth surface will make the finished dessert look beautiful.
Step 7: Add the Coconut Cream Layer
Spoon the coconut pudding mixture over the cream cheese layer.
Spread gently into an even layer.
Try not to press too hard because you don’t want to disturb the cream cheese layer underneath.
Step 8: Add the Whipped Topping
Spread the remaining whipped topping evenly over the coconut pudding.
Use an offset spatula or the back of a spoon to create a smooth surface.
Step 9: Add the Coconut Topping
Sprinkle the toasted coconut evenly over the top.
For extra texture, add chopped pecans or almonds.
You can also add a few larger toasted coconut flakes for a beautiful presentation.
Step 10: Chill
Cover the baking dish tightly with plastic wrap.
Refrigerate for at least 4 hours.
For the best texture, chill it overnight.
The longer chilling time allows the layers to firm up and makes the dessert easier to slice.
Step 11: Slice and Serve
Once thoroughly chilled, cut the dessert into squares.
Use a sharp knife and wipe it clean between cuts for neat layers.
Serve cold.
For an extra-special presentation, garnish each serving with a little toasted coconut and a small spoonful of whipped cream.
🥥 How to Toast Coconut in the Oven
If you’d rather use the oven, spread the coconut evenly on a baking sheet.
Bake at 325°F (165°C) for approximately 5–8 minutes.
Stir once or twice during baking.
Watch it carefully because coconut can go from golden to burnt very quickly.
Allow it to cool before using.
🍨 How to Serve
This dessert is delicious straight from the refrigerator.
For a more indulgent presentation, add:
- Toasted coconut
- Whipped cream
- Chopped pecans
- White chocolate curls
- Caramel drizzle
- A small scoop of vanilla ice cream
For summer parties, serve small squares chilled with fresh pineapple or strawberries on the side.
🌴 Variations
Coconut Pecan Dream Dessert
Add chopped pecans between the layers and sprinkle toasted pecans over the top.
The combination of coconut and pecans gives this dessert a wonderful Southern-inspired flavor.
Chocolate Coconut Dream Dessert
Use chocolate cookie crumbs for the crust.
Add a thin layer of chocolate pudding between the coconut cream and cream cheese layers.
Top with toasted coconut and chocolate shavings.
Pineapple Coconut Dream Dessert
Add 1 cup crushed pineapple that has been thoroughly drained to the coconut pudding layer.
Pineapple gives the dessert a bright tropical flavor.
Almond Joy Version
Add sliced almonds and chocolate chips to the layers.
Finish with chocolate shavings and toasted coconut.
Lemon Coconut Dream Dessert
Add 1 tablespoon fresh lemon zest and 1 tablespoon lemon juice to the cream cheese layer.
The citrus flavor gives the dessert a refreshing twist.
Coconut Banana Dream Dessert
Add thinly sliced bananas between the cream cheese and coconut pudding layers.
For best results, serve within 24 hours because bananas can darken over time.
🧈 Cooking Notes
The most important step is allowing the dessert to chill completely.
Because this is a layered no-bake dessert, the refrigerator does most of the work.
If you try to slice it too soon, the layers may be loose and difficult to serve neatly.
For the best results, chill for at least four hours, although overnight is even better.
Another important detail is draining any fruit completely if you add pineapple or another juicy ingredient. Excess liquid can prevent the layers from setting properly.
⭐ Tips for the Best Coconut Cream Dream Dessert
1. Use cold milk
Cold milk helps instant pudding thicken properly.
2. Soften the cream cheese
Room-temperature cream cheese creates a smoother filling.
3. Don’t skip toasting the coconut
Toasting adds a wonderful nutty flavor.
4. Crush the cookies finely
Fine crumbs create a more stable crust.
5. Press the crust firmly
A compact crust is easier to slice.
6. Fold whipped topping gently
Overmixing can reduce its airy texture.
7. Chill overnight if possible
This produces the cleanest layers.
8. Drain fruit thoroughly
Extra moisture can make the dessert watery.
9. Use a sharp knife
It helps create clean slices.
10. Keep refrigerated
This dessert should remain chilled until ready to serve.
🥥 Can I Use Coconut Milk?
You can use coconut milk in some versions, but be careful when substituting it for regular milk in instant pudding.
Some coconut milks have different water and fat levels and may not allow the pudding to set as firmly.
For the most reliable texture, use cold whole milk for the pudding and add coconut flavor through shredded coconut and coconut cream pudding mix.
🧊 How to Store Coconut Cream Dream Dessert
Cover the baking dish tightly with plastic wrap or aluminum foil.
Keep refrigerated for up to 4 days.
Because the dessert contains cream cheese, milk, and whipped topping, it should not be left at room temperature for extended periods.
Return leftovers to the refrigerator as soon as possible.
❄️ Can You Freeze Coconut Cream Dream Dessert?
Yes, but freezing can slightly change the texture of the cream cheese and whipped topping.
For the best results, freeze individual portions in airtight freezer-safe containers.
Freeze for up to 1 month.
Thaw overnight in the refrigerator.
The crust may become slightly softer after freezing, but the dessert will still be delicious.
🍰 Make-Ahead Instructions
This dessert is actually ideal for making ahead.
Prepare the entire dessert the day before serving.
Cover tightly and refrigerate overnight.
Add a fresh sprinkle of toasted coconut immediately before serving if desired.
Making it ahead also gives the layers plenty of time to set.
This makes it especially convenient for Thanksgiving, Christmas, Easter, Mother’s Day, and summer parties.
Frequently Asked Questions
Is this dessert really no-bake?
Yes. The entire dessert is assembled without baking. Toasting the coconut is optional and can also be done on the stovetop.
Can I use Cool Whip?
Yes. Whipped topping works very well in this recipe.
Can I use homemade whipped cream?
Yes, although homemade whipped cream may not remain as stable for as long as commercial whipped topping.
If using homemade whipped cream, keep the dessert refrigerated and serve within a shorter period.
Can I use graham crackers for the crust?
Absolutely. Graham cracker crumbs make a delicious alternative to vanilla wafers.
Can I use coconut cookies?
Yes. Coconut-flavored cookies can intensify the coconut flavor.
Can I make this without cream cheese?
Yes, but the cream cheese layer adds a pleasant tangy contrast to the sweet coconut pudding.
Can I add pineapple?
Yes. Make sure the pineapple is very well drained before adding it.
How long should it chill?
At least 4 hours, but overnight is recommended.
Why is my dessert runny?
The pudding may not have thickened enough, the milk measurement may have been too high, or the dessert may not have chilled long enough.
Can I make it in a different pan?
Yes. You can use a slightly smaller or larger dish, but the thickness of the layers will change.
Can I use coconut cream instead of coconut cream pudding?
Coconut cream and coconut cream pudding are not interchangeable in equal amounts. The pudding mix is specifically designed to thicken with milk.
🥥 Perfect for Summer Gatherings
Because it’s served cold and requires no oven, this dessert is especially wonderful during warmer months.
Bring it to:
- 🌴 Summer cookouts
- 🥥 Pool parties
- 🎉 Birthday parties
- 🍽️ Potlucks
- 👨👩👧👦 Family reunions
- 🌞 Memorial Day gatherings
- 🇺🇸 Fourth of July parties
- 🏖️ Beach-themed parties
- ☀️ Weekend barbecues
It’s also a fantastic dessert when you want something refreshing after a heavy meal.
⏱️ Recipe Information
Prep Time: 25 minutes
Chill Time: 4 hours
Total Time: About 4 hours 25 minutes
Servings: 12–16 squares
🥄 Nutritional Information
Approximate per serving and will vary depending on the cookies, pudding, whipped topping, and toppings used.
- Calories: 385
- Protein: 5g
- Carbohydrates: 45g
- Sugar: 31g
- Fat: 21g
- Saturated Fat: 12g
- Sodium: 290mg
- Fiber: 2g
- Cholesterol: 45mg
❤️ Conclusion
This No-Bake Coconut Cream Dream Dessert is creamy, fluffy, buttery, and packed with delicious coconut flavor from the first bite to the last.
The crisp cookie crust, tangy cream cheese layer, silky coconut pudding, fluffy whipped topping, and golden toasted coconut create a dessert with irresistible layers of flavor and texture.
It’s incredibly easy to prepare, requires no traditional baking, and can be made ahead of time—making it a perfect choice for busy holidays, summer gatherings, family dinners, and potlucks.
Serve it cold, garnish it with extra toasted coconut, and watch everyone come back for another square.
Creamy, coconutty, dreamy, and completely irresistible—this dessert truly lives up to its name! 🥥🍰✨
Print
🥥 No-Bake Coconut Cream Dream Dessert
- Total Time: About 4 hours 25 minutes
Description
This dreamy layered dessert combines a buttery cookie crust, creamy coconut pudding, sweetened coconut, and a light whipped topping into one incredibly delicious treat. Every spoonful is soft, creamy, fluffy, and packed with that sweet coconut flavor that makes coconut desserts so irresistible.
Ingredients
For the Crust
- 2½ cups crushed vanilla wafer cookies or shortbread cookies
- ½ cup unsalted butter, melted
- 2 tablespoons granulated sugar
- Pinch of salt
For the Coconut Cream Layer
- 2 packages instant coconut cream pudding mix, 3.4 ounces each
- 3 cups cold whole milk
- 1 teaspoon vanilla extract
- 1 cup sweetened shredded coconut
- 1 cup whipped topping
For the Cream Cheese Layer
- 8 ounces cream cheese, softened
- ½ cup powdered sugar
- 1 teaspoon vanilla extract
- 1 cup whipped topping
For the Top
- 2 cups whipped topping
- 1 cup sweetened shredded coconut
- ½ cup chopped pecans or almonds, optional
- Toasted coconut flakes, optional
Instructions
Place the vanilla wafers or shortbread cookies into a food processor.
Pulse until they become fine crumbs.
You can also place the cookies inside a sealed bag and crush them with a rolling pin.
Transfer the crumbs to a bowl.
Add the melted butter, sugar, and a small pinch of salt.
Stir until all the crumbs are evenly coated with butter.
The mixture should resemble wet sand.
Lightly grease a 9×13-inch baking dish.
Pour the cookie crumb mixture into the bottom.
Press it firmly into an even layer using the bottom of a measuring cup or glass.
Make sure the crust reaches all the corners.
Place the dish in the refrigerator while you prepare the filling.
Chilling the crust helps it firm up and makes the dessert easier to cut later.
Place the shredded coconut in a dry skillet over medium-low heat.
Stir frequently.
Toast for approximately 3–5 minutes, or until lightly golden and fragrant.
Remove it from the heat immediately.
Allow it to cool completely.
Be careful because coconut can burn quickly.
Toasted coconut adds a much deeper flavor than untoasted coconut.
Pour the cold milk into a large mixing bowl.
Add the instant coconut cream pudding mix.
Whisk for approximately 2 minutes, or according to the pudding package directions.
The mixture should become thick and creamy.
Add the vanilla extract.
Fold in 1 cup of shredded coconut and 1 cup whipped topping.
Mix gently until everything is evenly combined.
Place the softened cream cheese into a clean mixing bowl.
Beat until smooth.
Add the powdered sugar and vanilla extract.
Continue beating until creamy and free of lumps.
Fold in 1 cup whipped topping.
Mix gently until light and fluffy.
The cream cheese layer adds a slight tanginess that balances the sweetness of the coconut pudding.
Remove the chilled crust from the refrigerator.
Spread the cream cheese mixture evenly over the crust.
Use a spatula to smooth the surface.
Take your time with this layer because a smooth surface will make the finished dessert look beautiful.
Spoon the coconut pudding mixture over the cream cheese layer.
Spread gently into an even layer.
Try not to press too hard because you don’t want to disturb the cream cheese layer underneath.
Spread the remaining whipped topping evenly over the coconut pudding.
Use an offset spatula or the back of a spoon to create a smooth surface.
Sprinkle the toasted coconut evenly over the top.
For extra texture, add chopped pecans or almonds.
You can also add a few larger toasted coconut flakes for a beautiful presentation.
Cover the baking dish tightly with plastic wrap.
Refrigerate for at least 4 hours.
For the best texture, chill it overnight.
The longer chilling time allows the layers to firm up and makes the dessert easier to slice.
Once thoroughly chilled, cut the dessert into squares.
Use a sharp knife and wipe it clean between cuts for neat layers.
Serve cold.
For an extra-special presentation, garnish each serving with a little toasted coconut and a small spoonful of whipped cream.
Notes
The most important step is allowing the dessert to chill completely.
Because this is a layered no-bake dessert, the refrigerator does most of the work.
If you try to slice it too soon, the layers may be loose and difficult to serve neatly.
For the best results, chill for at least four hours, although overnight is even better.
Another important detail is draining any fruit completely if you add pineapple or another juicy ingredient. Excess liquid can prevent the layers from setting properly.
- Prep Time: 25 minutes
- Chill Time: 4 hours
Nutrition
- Serving Size: 12–16 squares
- Calories: 385
- Sugar: 31g
- Carbohydrates: 45g
- Protein: 5g
