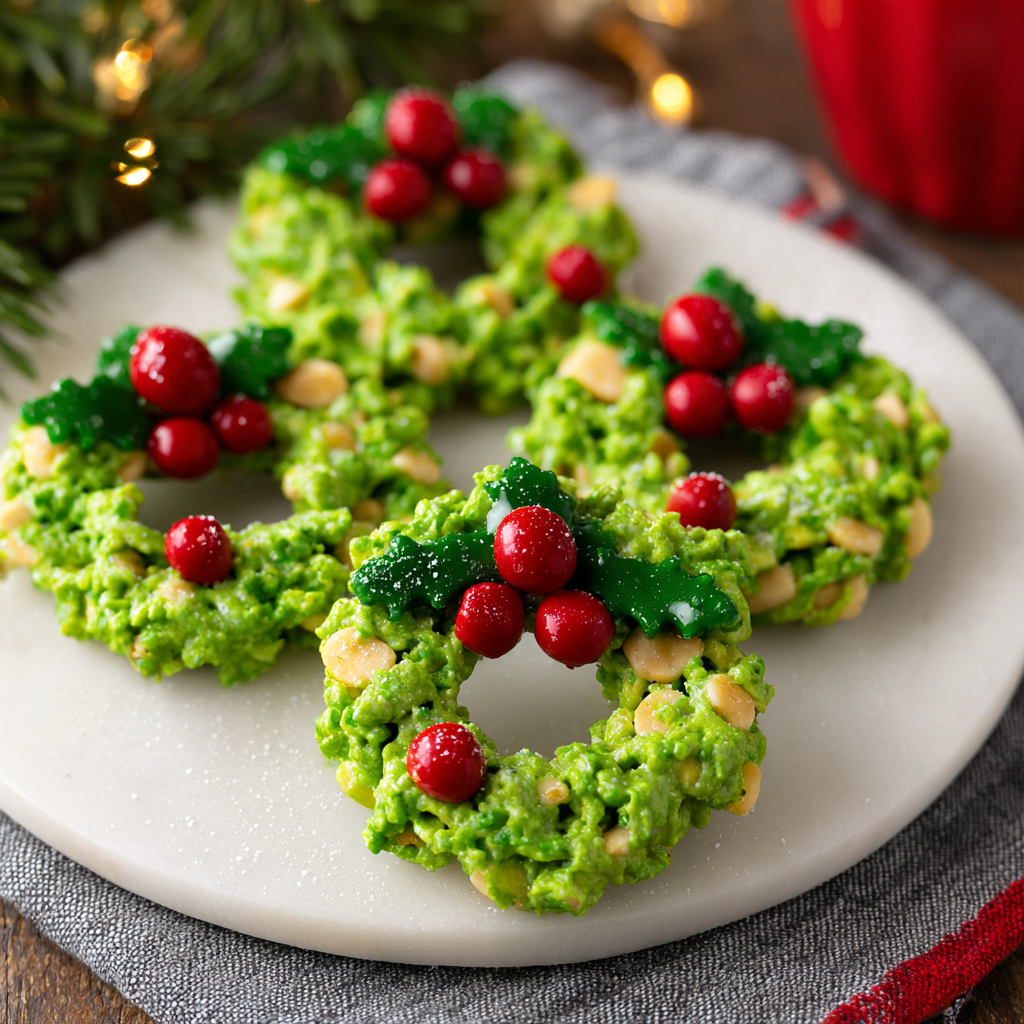
Bring a little extra Christmas magic to your holiday dessert table with these beautiful No-Bake Christmas Wreath Cookies! Made with crispy cornflakes, melted marshmallows, butter, and a touch of green food coloring, these festive treats look just like tiny Christmas wreaths. Finished with cheerful red candy decorations, they are almost too pretty to eat!
The best part? You don’t need an oven, complicated baking equipment, or hours in the kitchen. These cookies come together with a handful of simple ingredients and are perfect for holiday cookie exchanges, Christmas parties, school celebrations, and homemade edible gifts.
Their sweet, buttery marshmallow coating gives every bite a delicious chewy crunch, while the cornflakes create the perfect wreath-like texture. Whether you’re making Christmas treats with your children or preparing a festive dessert platter for guests, this easy no-bake recipe is sure to become a holiday favorite.
Why You’ll Love These Christmas Wreath Cookies
- No oven required: A wonderful option when your oven is already busy with holiday baking.
- Quick and easy: The mixture takes only a few minutes to prepare.
- Festive appearance: Green wreath shapes and bright red decorations make them perfect for Christmas.
- Simple ingredients: You only need a few affordable pantry staples.
- Fun family activity: Kids can help shape the wreaths and decorate them with candy.
- Perfect for gifting: Arrange them in holiday treat boxes or clear bags tied with festive ribbon.
Ingredients
This recipe makes approximately 16 Christmas wreath cookies.
- 4 cups crispy cornflakes cereal
- 4 tablespoons unsalted butter
- 10 ounces mini marshmallows (about 5½ cups)
- ½ teaspoon vanilla extract
- ½ teaspoon green gel food coloring, or as needed
- ⅛ teaspoon salt
- ¼ cup small red cinnamon candies or red candy-coated chocolates
- Nonstick cooking spray or butter, for greasing your hands and work surface
Optional decorations:
- Small white sugar pearls
- Edible Christmas sprinkles
- A light dusting of powdered sugar for a snowy presentation
Ingredient Notes and Substitutions
Cornflakes: Regular crispy cornflakes provide the classic wreath texture. Choose a fresh, crunchy cereal so the finished cookies have a pleasant crisp bite. Avoid crushing the flakes before adding them to the marshmallow mixture.
Mini marshmallows: These melt quickly and create the sticky coating that holds the wreaths together. Large marshmallows can also work, but they may take slightly longer to melt.
Butter: Unsalted butter adds richness and helps prevent the marshmallow mixture from becoming too sticky. If using salted butter, reduce or omit the additional salt.
Green food coloring: Gel food coloring is recommended because it produces a vibrant green shade without adding much liquid. Start with a small amount and add more until you reach your preferred Christmas green.
Vanilla extract: A little vanilla balances the sweetness and gives the cookies a classic homemade flavor.
Red candies: Small red cinnamon candies create the traditional holly-berry appearance. Red candy-coated chocolates are another attractive option.
How to Make No-Bake Christmas Wreath Cookies
Step 1: Prepare Your Work Surface
Line two large baking sheets with parchment paper or silicone baking mats. Lightly grease a large mixing bowl, a heatproof spatula, and your hands with nonstick cooking spray or a little butter.
Have the cornflakes and red decorations ready before melting the marshmallows. The mixture becomes harder to shape as it cools, so working efficiently is important.
Step 2: Melt the Butter and Marshmallows
Place the butter in a large saucepan over low heat. Allow it to melt completely, then add the mini marshmallows.
Stir continuously with a heatproof spatula until the marshmallows are melted and the mixture is smooth. Keep the heat low to prevent scorching or making the marshmallow mixture too firm.
Remove the saucepan from the heat.
Step 3: Add Vanilla and Green Coloring
Stir the vanilla extract and salt into the melted marshmallow mixture.
Add the green gel food coloring a little at a time, mixing thoroughly after each addition. Continue until the mixture reaches a bright, festive green color.
Remember that the cornflakes will lighten the overall appearance slightly, so a fairly vibrant marshmallow mixture works well.
Step 4: Fold in the Cornflakes
Add the cornflakes to the saucepan gradually, folding gently with a greased spatula.
Continue mixing until the cereal is evenly coated with the green marshmallow mixture. Try not to crush the cornflakes because their crisp shape gives the cookies their beautiful wreath texture.
Work carefully while the mixture is still warm and pliable.
Step 5: Shape the Christmas Wreaths
Scoop approximately ¼ cup of the mixture for each cookie and place it on the prepared baking sheets.
With lightly greased fingers, gently shape each mound into a small circle. Press a hole into the center using your finger or the rounded end of a greased wooden spoon.
Adjust the edges gently to create a wreath shape. Don’t worry if every wreath looks slightly different; their homemade appearance is part of their charm.
Step 6: Add the Christmas Decorations
While the marshmallow mixture is still soft, gently press three small red candies onto each wreath to resemble holly berries.
You can also add a few white sugar pearls or festive sprinkles for extra decoration.
Make sure the candies are lightly pressed into the surface so they stay in place once the cookies set.
Step 7: Let the Cookies Set
Allow the wreath cookies to cool at room temperature for approximately 30–45 minutes, or until they are firm enough to handle.
Once set, carefully lift them from the parchment paper and transfer them to a serving platter or an airtight storage container.
Your beautiful No-Bake Christmas Wreath Cookies are ready to enjoy!
Helpful Cooking Notes
Work quickly: Melted marshmallow becomes firmer as it cools. Prepare your baking sheets and decorations before starting so you can shape the cookies while the mixture is warm.
Keep the heat low: High heat can cause the marshmallow mixture to become overly stiff or develop a toasted flavor. Low, gentle heat gives you a smoother consistency.
Grease your hands: The mixture is naturally sticky. Lightly buttered or greased fingers make shaping the wreaths much easier.
Don’t crush the cereal: Fold the cornflakes gently into the marshmallow mixture to preserve their texture.
Adjust the green color gradually: Gel food coloring is concentrated, so a small amount usually goes a long way.
Avoid making the holes too small: The center opening may shrink slightly as the cookies settle. Make the holes a little larger than you want the finished openings to be.
Delicious Variations
1. Chocolate Christmas Wreath Cookies
Add ½ cup of melted white chocolate to the marshmallow mixture after removing it from the heat. Mix until smooth before folding in the cornflakes. The result is a richer, sweeter wreath with a creamy flavor.
2. Peanut Butter Christmas Wreaths
Add 2 tablespoons of creamy peanut butter to the melted butter and marshmallow mixture. Stir until smooth before adding the green coloring and cereal. This creates a slightly nutty flavor that pairs beautifully with the crispy cornflakes.
3. Coconut Christmas Wreath Cookies
Fold ¼ cup of finely shredded coconut into the cereal mixture. The coconut adds a delicate texture and a subtle tropical flavor.
4. Sprinkle Christmas Wreaths
Replace the red candies with a mixture of red, white, and green Christmas sprinkles. This is an easy way to customize the cookies for different holiday celebrations.
5. Mini Christmas Wreaths
Use approximately 2 tablespoons of mixture per cookie to create smaller wreaths. These bite-sized treats are perfect for dessert trays and holiday parties.
6. White Chocolate Drizzle
After the wreaths have set, drizzle a little melted white chocolate over the top. Let the chocolate firm before serving. This creates an elegant finish without changing the classic wreath shape.
Serving Suggestions
These festive cookies look wonderful on a Christmas dessert table. Arrange them on a white serving platter with red and green candies scattered around the edges for a simple holiday presentation.
They also pair beautifully with:
- Hot chocolate topped with whipped cream.
- Warm apple cider with cinnamon.
- Coffee or vanilla lattes.
- Christmas sugar cookies and gingerbread cookies.
- Brownie bites and peppermint bark.
- Holiday dessert boards with chocolates, fudge, and candy.
For a thoughtful homemade gift, place each wreath in a small food-safe cellophane bag and tie it with a red or green ribbon. Add a handwritten holiday tag for an extra-special touch.
Tips for Perfect Christmas Wreath Cookies
- Use fresh cornflakes for the best crispy texture.
- Melt the butter and marshmallows slowly over low heat.
- Use gel food coloring instead of liquid coloring for a stronger green shade.
- Grease your hands before shaping each wreath.
- Add the red candies before the marshmallow mixture sets.
- Make the center holes slightly larger because they may close up as the cookies cool.
- Allow the cookies to set completely before stacking or packaging them.
- Store them in a cool, dry place to help maintain their texture.
Storage Instructions
Store the completely cooled Christmas wreath cookies in an airtight container at room temperature in a cool, dry place for up to 3 days for the best texture.
Place parchment paper between layers if you need to stack them. Keep the container away from heat, direct sunlight, and humidity, which can make the marshmallow coating sticky.
Refrigeration is generally unnecessary and may make the marshmallow mixture firmer or introduce moisture when the cookies are brought back to room temperature.
Can You Freeze Christmas Wreath Cookies?
Freezing is possible, although the cornflakes may lose some of their crispness after thawing.
For best results, place the fully set cookies in a single layer in a freezer-safe airtight container, separating layers with parchment paper. Freeze for up to 1 month for best quality.
Thaw them in their closed container at room temperature. Keeping the container closed while thawing helps reduce condensation on the cookies.
For the freshest appearance and crunch, making these treats shortly before your holiday celebration is recommended.
Make-Ahead Instructions
You can prepare these Christmas wreath cookies one or two days before your event. Once completely set, store them in an airtight container in a cool, dry place.
For a holiday party, make the wreaths the day before and arrange them on your serving platter shortly before guests arrive.
If you’re preparing several batches, work with one batch at a time. Marshmallow mixtures become difficult to shape once they cool, so it’s better to make manageable quantities rather than preparing a very large mixture all at once.
Recipe Details
- Prep Time: 15 minutes
- Cook Time: 5 minutes
- Cooling and Setting Time: 30–45 minutes
- Total Time: 50–65 minutes
- Yield: 16 cookies
- Serving Size: 1 Christmas wreath cookie
- Category: Dessert, Christmas Cookies
- Cuisine: American
- Method: No-Bake
Nutritional Information
Approximate nutritional values per cookie, based on 16 cookies and the ingredients listed above:
- Calories: 125
- Protein: 1 gram
- Carbohydrates: 26 grams
- Total Fat: 2 grams
- Saturated Fat: 1 gram
- Sugar: 13 grams
- Fiber: Less than 1 gram
- Sodium: 125 mg
Nutritional values are estimates and may vary depending on the cereal, marshmallow brand, butter, and decorations used.
Frequently Asked Questions
1. Do Christmas wreath cookies need to be baked?
No! These cookies are completely no-bake. The butter and marshmallows are gently melted on the stovetop, then mixed with cornflakes and shaped into wreaths. They simply need time to cool and set.
2. Why are my Christmas wreath cookies too sticky?
The mixture may be too warm, or the marshmallow-to-cereal ratio may be too high. Make sure to measure the cornflakes accurately and allow the cookies enough time to cool. Lightly greasing your hands also makes shaping much easier.
3. Can I use liquid food coloring instead of gel?
Yes, but gel coloring is recommended because it creates a stronger green color without adding much moisture. If using liquid coloring, add it gradually and avoid using too much.
4. Can I use large marshmallows?
Yes. Large marshmallows work as a substitute for mini marshmallows. They may take a little longer to melt, so stir continuously over low heat until the mixture is smooth.
5. How do I keep the wreath shape from falling apart?
Make sure the cornflakes are evenly coated with melted marshmallow. Shape the cookies while the mixture is still warm, press the cereal gently together, and allow each wreath to set completely before moving it.
6. Can I make these cookies without cornflakes?
Cornflakes are the traditional choice because their shape creates the classic wreath appearance. Crispy rice cereal can be used for a different texture, but the finished cookies will look less like traditional Christmas wreaths.
7. What can I use instead of red cinnamon candies?
Small red candy-coated chocolates, red sugar pearls, or red holiday sprinkles are all good alternatives. Choose decorations that are small enough to resemble holly berries.
8. How far in advance can I make these cookies?
For the best crunch and appearance, make them one day before serving. They can be stored in an airtight container for up to 3 days, although humidity can soften the cereal.
9. Can children help make this recipe?
Absolutely! Children can help add the decorations and shape the wreaths once the mixture has cooled enough to handle safely. An adult should handle the hot saucepan and melted marshmallow mixture.
10. Why did my marshmallow mixture become hard before I finished shaping the cookies?
The mixture naturally firms as it cools. Work quickly, prepare everything before melting the marshmallows, and shape the wreaths in small batches. If the mixture becomes too stiff, gently warm it again over very low heat while stirring.
Conclusion
These No-Bake Christmas Wreath Cookies are an easy, festive, and delicious addition to any holiday celebration. With crispy cornflakes, sweet marshmallows, and cheerful red decorations, they bring the classic look of Christmas wreaths straight to your dessert table.
They’re simple enough for beginner cooks, fun to make with family, and beautiful enough to share with friends and neighbors. Make a batch for your next Christmas party, holiday cookie exchange, or cozy family gathering. One bite of their sweet, crunchy goodness, and you’ll want to make them every Christmas!
Print
No-Bake Christmas Wreath Cookies – Easy Holiday Treat
Ingredients
This recipe makes approximately 16 Christmas wreath cookies.
- 4 cups crispy cornflakes cereal
- 4 tablespoons unsalted butter
- 10 ounces mini marshmallows (about 5½ cups)
- ½ teaspoon vanilla extract
- ½ teaspoon green gel food coloring, or as needed
- ⅛ teaspoon salt
- ¼ cup small red cinnamon candies or red candy-coated chocolates
- Nonstick cooking spray or butter, for greasing your hands and work surface
Optional decorations:
- Small white sugar pearls
- Edible Christmas sprinkles
- A light dusting of powdered sugar for a snowy presentation
Instructions
Line two large baking sheets with parchment paper or silicone baking mats. Lightly grease a large mixing bowl, a heatproof spatula, and your hands with nonstick cooking spray or a little butter.
Have the cornflakes and red decorations ready before melting the marshmallows. The mixture becomes harder to shape as it cools, so working efficiently is important.
Step 2: Melt the Butter and Marshmallows
Place the butter in a large saucepan over low heat. Allow it to melt completely, then add the mini marshmallows.
Stir continuously with a heatproof spatula until the marshmallows are melted and the mixture is smooth. Keep the heat low to prevent scorching or making the marshmallow mixture too firm.
Remove the saucepan from the heat.
Step 3: Add Vanilla and Green Coloring
Stir the vanilla extract and salt into the melted marshmallow mixture.
Add the green gel food coloring a little at a time, mixing thoroughly after each addition. Continue until the mixture reaches a bright, festive green color.
Remember that the cornflakes will lighten the overall appearance slightly, so a fairly vibrant marshmallow mixture works well.
Step 4: Fold in the Cornflakes
Add the cornflakes to the saucepan gradually, folding gently with a greased spatula.
Continue mixing until the cereal is evenly coated with the green marshmallow mixture. Try not to crush the cornflakes because their crisp shape gives the cookies their beautiful wreath texture.
Work carefully while the mixture is still warm and pliable.
Step 5: Shape the Christmas Wreaths
Scoop approximately ¼ cup of the mixture for each cookie and place it on the prepared baking sheets.
With lightly greased fingers, gently shape each mound into a small circle. Press a hole into the center using your finger or the rounded end of a greased wooden spoon.
Adjust the edges gently to create a wreath shape. Don’t worry if every wreath looks slightly different; their homemade appearance is part of their charm.
Step 6: Add the Christmas Decorations
While the marshmallow mixture is still soft, gently press three small red candies onto each wreath to resemble holly berries.
You can also add a few white sugar pearls or festive sprinkles for extra decoration.
Make sure the candies are lightly pressed into the surface so they stay in place once the cookies set.
Step 7: Let the Cookies Set
Allow the wreath cookies to cool at room temperature for approximately 30–45 minutes, or until they are firm enough to handle.
Once set, carefully lift them from the parchment paper and transfer them to a serving platter or an airtight storage container.
Your beautiful No-Bake Christmas Wreath Cookies are ready to enjoy!
Notes
Work quickly: Melted marshmallow becomes firmer as it cools. Prepare your baking sheets and decorations before starting so you can shape the cookies while the mixture is warm.
Keep the heat low: High heat can cause the marshmallow mixture to become overly stiff or develop a toasted flavor. Low, gentle heat gives you a smoother consistency.
Grease your hands: The mixture is naturally sticky. Lightly buttered or greased fingers make shaping the wreaths much easier.
Don’t crush the cereal: Fold the cornflakes gently into the marshmallow mixture to preserve their texture.
Adjust the green color gradually: Gel food coloring is concentrated, so a small amount usually goes a long way.
Avoid making the holes too small: The center opening may shrink slightly as the cookies settle. Make the holes a little larger than you want the finished openings to be.
