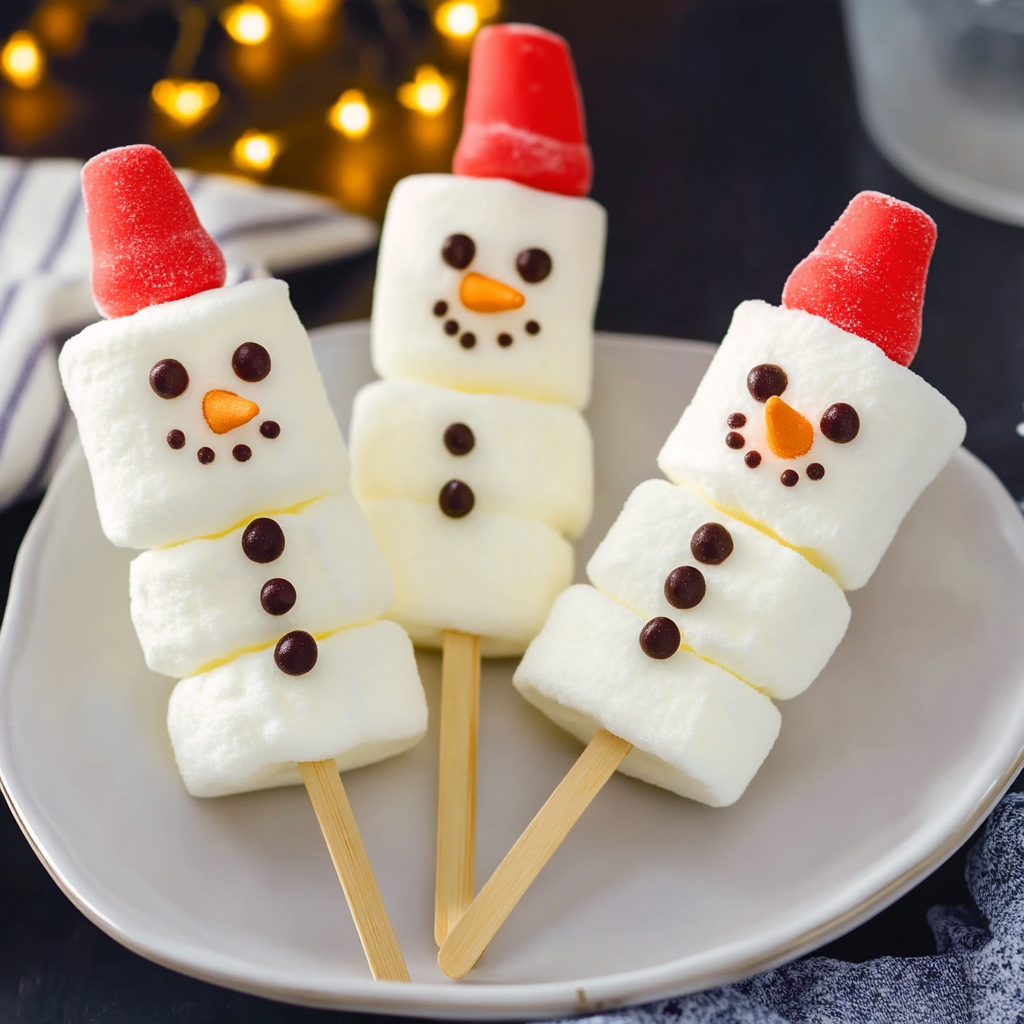
Looking for an adorable Christmas treat that’s easy to make, fun to decorate, and guaranteed to bring smiles to everyone’s faces? These Marshmallow Snowman Pops are the perfect holiday dessert! Made with soft, fluffy marshmallows stacked together, dipped in smooth white chocolate, and decorated with tiny candy details, these little snowmen are almost too cute to eat.
Each pop looks like a miniature snowman, complete with a sweet little face, an orange carrot nose, colorful buttons, and a festive scarf. They’re simple enough for beginners, making them a wonderful activity to enjoy with children during the holiday season. Best of all, there’s no baking involved!
Whether you’re preparing treats for a Christmas party, a school celebration, a winter-themed dessert table, or homemade holiday gifts, these marshmallow snowman pops are a fun and budget-friendly option. You only need a handful of ingredients, a little creativity, and a few minutes to turn ordinary marshmallows into charming Christmas treats.
The combination of soft marshmallows and sweet white chocolate creates a delicious bite, while the colorful decorations make every snowman unique. Arrange them in a festive display, wrap them individually, or serve them alongside hot chocolate for a magical winter treat.
Why You’ll Love These Marshmallow Snowman Pops
- No baking required: No oven, cake mix, or complicated preparation needed.
- Easy ingredients: Made with marshmallows, white chocolate, and simple candy decorations.
- Perfect for Christmas: Their adorable snowman design makes them ideal for holiday celebrations.
- Fun to decorate: Everyone can create their own little snowman with different expressions and accessories.
- Great for parties: They look beautiful standing upright in a festive display.
- Perfect homemade gifts: Wrap them individually for a sweet Christmas surprise.
Ingredients
This recipe makes approximately 12 marshmallow snowman pops.
- 36 large white marshmallows
- 12 ounces white chocolate melting wafers
- 12 lollipop sticks or sturdy paper treat sticks
- 12 small orange candy-coated pieces or orange fondant pieces for the noses
- 24 mini chocolate chips for the eyes
- 24 mini chocolate chips or small candy pieces for the buttons
- 12 small pieces of red fruit leather or fondant for scarves
- 12 small chocolate candies or mini peanut butter cups for hats, optional
- Red, green, and blue decorating icing, optional
- Christmas sprinkles, optional
Ingredient Notes and Substitutions
Large Marshmallows: Use fresh, soft marshmallows of similar size. Each snowman needs three marshmallows to create the head, middle, and bottom sections.
White Chocolate Melting Wafers: These provide a smooth coating and are designed to melt and set easily. White candy melts also work well and are convenient for decorating.
Lollipop Sticks: Use food-safe lollipop sticks or sturdy paper treat sticks. Choose a length that comfortably supports three marshmallows.
Mini Chocolate Chips: These make simple snowman eyes and buttons. You can also use tiny round chocolate candies or edible black decorating gel.
Orange Candy Pieces: Small orange candy-coated pieces or orange fondant make cute carrot noses. Cut them into tiny triangles if necessary.
Fruit Leather: Thin strips of red fruit leather create colorful scarves. You can also use fondant or narrow strips of soft candy.
Mini Peanut Butter Cups: These can be used to create little top hats. If serving guests with nut allergies, choose an appropriate nut-free chocolate candy instead.
How to Make Marshmallow Snowman Pops
Step 1: Prepare the Marshmallows
Unwrap the marshmallows and place them on a clean work surface.
For each snowman, select three marshmallows of similar size. Arrange them vertically so they form the head, middle, and bottom sections.
Make sure the marshmallows are fresh and soft. Older marshmallows can become firm and may be harder to thread onto the sticks.
Step 2: Assemble the Snowmen
Carefully push one lollipop stick through the center of three marshmallows, starting at the bottom and moving upward.
Leave enough of the stick exposed at the bottom to hold comfortably.
Press the marshmallows gently together so they stay aligned, but avoid squeezing them too tightly.
Repeat until all 12 snowmen are assembled.
Step 3: Melt the White Chocolate
Place the white chocolate melting wafers in a microwave-safe bowl.
Microwave in 20–30 second intervals, stirring thoroughly after each interval until the chocolate is completely melted and smooth.
Avoid overheating the chocolate. If it becomes too thick, use a small amount of a manufacturer-recommended thinning agent or compatible shortening, following the product instructions.
Allow the melted chocolate to cool slightly so it is warm and fluid but not hot.
Step 4: Coat the Marshmallow Snowmen
Hold one marshmallow pop over the bowl of melted white chocolate.
Using a spoon, gently pour the chocolate over the marshmallows, turning the pop as needed to cover the sides and front.
Allow the excess chocolate to drip back into the bowl.
Place the coated pop upright in a foam block or a pop stand, or lay it carefully on a parchment-lined baking sheet if you prefer a flat-backed design.
Repeat with the remaining snowmen.
Step 5: Add the Snowman Faces
While the white chocolate coating is still soft, gently attach two mini chocolate chips to the top marshmallow to create the eyes.
Add one small orange candy or fondant triangle underneath the eyes to create the carrot nose.
Use a tiny amount of melted chocolate as edible glue if the coating has already started to set.
Step 6: Decorate the Buttons and Scarves
Add two small chocolate chips or colorful candy pieces to the middle and bottom marshmallows to create buttons.
Cut the red fruit leather into narrow strips. Wrap one strip around the neck area between the head and middle marshmallows.
Overlap the ends slightly and press gently so the scarf stays in place.
You can also use green, blue, or white fondant strips for different scarf designs.
Step 7: Add the Snowman Hats
For an extra festive touch, place a small chocolate candy or mini peanut butter cup on top of each snowman’s head.
Secure it with a little melted chocolate.
Alternatively, pipe a small hat shape using dark chocolate or black decorating icing.
Step 8: Let the Chocolate Set
Leave the snowman pops upright in a pop stand or foam block until the chocolate coating has completely hardened.
If needed, refrigerate them briefly to help the coating set.
Once firm, arrange the marshmallow snowman pops in a festive display or wrap them individually for holiday gifts.
Helpful Cooking Notes
- Use fresh marshmallows for the best texture and easiest assembly.
- Make sure the sticks are centered so the snowmen stand straight.
- Avoid pushing the stick too forcefully, as marshmallows can split.
- Melt white chocolate slowly and stir frequently to prevent overheating.
- Keep water away from the melted chocolate because even a small amount can cause it to seize.
- Let excess chocolate drip off before placing the pops in the stand.
- Add candy decorations while the coating is still wet so they stick securely.
- If the chocolate sets before decorating, use a tiny amount of melted chocolate to attach the details.
- Allow the pops to set completely before wrapping them.
Fun Christmas Variations
1. Chocolate Snowman Pops
Use milk or dark chocolate melting wafers instead of white chocolate. Decorate with white chocolate details to create a different snowman design.
2. Peppermint Snowman Pops
Sprinkle a little finely crushed peppermint candy over the white chocolate coating before it sets. The peppermint adds a festive flavor and a little crunch.
3. Coconut Snowman Pops
While the coating is still wet, sprinkle the marshmallows with finely shredded coconut. This creates a snowy appearance and adds a light coconut flavor.
4. Snowman Pops with Mini Marshmallows
Use mini marshmallows for smaller snowman pops. Thread them onto shorter treat sticks and adjust the decorating pieces to match their size.
5. Grinch-Inspired Snowman Pops
Add a little green food coloring specifically made for candy melts to create green-coated marshmallow pops. Decorate them with red hearts for a playful holiday variation.
6. Snowman Pops with Chocolate Hats
Use mini chocolate sandwich cookies or small chocolate candies to create hats. Attach them with melted chocolate for a charming winter look.
Serving Suggestions
Marshmallow Snowman Pops are perfect for Christmas dessert tables, school parties, winter celebrations, and holiday movie nights.
Serve them with:
- Hot chocolate topped with whipped cream.
- Christmas sugar cookies and gingerbread cookies.
- Peppermint bark and chocolate truffles.
- Mini brownies and holiday cupcakes.
- Candy cane pieces and festive chocolates.
- A winter-themed dessert board with white, red, and green treats.
For a beautiful presentation, arrange the snowman pops upright in a decorated foam block covered with tissue paper or placed inside a festive container. Add cotton-like decorative snow around the base, making sure any non-edible decoration stays separate from the food.
You can also place each pop in a clear treat bag and tie it with a red or green ribbon for homemade Christmas gifts.
Tips for the Best Marshmallow Snowman Pops
Choose Fresh Marshmallows: Soft marshmallows are easier to assemble and have a better texture.
Keep the Snowmen Straight: Insert the stick through the center of each marshmallow to prevent leaning.
Use Smooth Chocolate: Properly melted coating creates a cleaner finish and makes decorating easier.
Work in Small Batches: Coat a few snowmen at a time so the chocolate doesn’t set before you add the decorations.
Use Edible Decorations: Choose food-safe candies, icing, and fondant for the faces and accessories.
Let Them Set Completely: The coating should be firm before you wrap or transport the pops.
Customize Every Snowman: Different scarves, hats, and expressions make the display look even more adorable.
Storage Instructions
Store finished marshmallow snowman pops in a cool, dry place in an airtight container for up to 3 days for the best texture, provided the decorations and coating are shelf-stable and the package instructions allow it.
Keep them away from heat, direct sunlight, and humidity, which can soften the marshmallows and affect the chocolate coating.
If your decorations contain perishable ingredients, follow their refrigeration requirements. Avoid refrigerating ordinary chocolate-coated marshmallow pops unnecessarily, as condensation can make the coating sticky.
Can You Freeze Marshmallow Snowman Pops?
Freezing is not recommended for the finished pops. Marshmallows can change texture after freezing and thawing, while condensation may affect the chocolate coating and decorations.
For the best results, prepare them a day or two before your event and store them in an airtight container in a cool, dry place.
Make-Ahead Instructions
These Christmas treats are easy to prepare ahead of time.
You can assemble and decorate the snowman pops up to 2 days before your celebration. Allow the chocolate coating to set completely, then arrange the pops in a single layer in an airtight container.
If you need to stack them, place parchment paper between the layers and avoid pressing down on the decorations.
For parties or gifts, wrap each pop individually in a clear food-safe treat bag once the chocolate has fully hardened.
Recipe Details
- Prep Time: 25 minutes
- Cook Time: 0 minutes
- Setting Time: 20 minutes
- Total Time: 45 minutes
- Yield: 12 marshmallow snowman pops
- Serving Size: 1 pop
- Category: Dessert
- Method: No-Bake
- Cuisine: American
Nutritional Information
Estimated nutrition per snowman pop:
- Calories: 185
- Protein: 2 g
- Carbohydrates: 34 g
- Fat: 5 g
- Saturated Fat: 4 g
- Fiber: 0 g
- Sugar: 26 g
- Sodium: 45 mg
Nutrition values are estimates and will vary depending on the white chocolate, marshmallow brand, and decorations used.
Frequently Asked Questions
How many marshmallows do I need for each snowman?
Each snowman uses three large marshmallows: one for the head, one for the middle, and one for the bottom. This recipe makes approximately 12 pops using 36 marshmallows.
Can I use regular white chocolate instead of melting wafers?
Yes. White chocolate bars can be chopped and melted gently. However, ordinary white chocolate may need tempering to set with a firm, glossy finish. Melting wafers are generally easier for beginners.
How do I keep the marshmallows from sliding off the stick?
Use fresh marshmallows and thread the stick carefully through their centers. Gently press the marshmallows together without crushing them. Allowing the chocolate coating to set while the pop is upright also helps hold the shape.
Can children help make these snowman pops?
Yes! This is a fun decorating activity for children. An adult should handle the melted chocolate and supervise the use of sticks. Children can help add the eyes, noses, buttons, and scarves once the coating is at a safe temperature.
What can I use for the snowman’s nose?
Small orange candy pieces, orange fondant triangles, or edible orange decorating icing all work well. Make the nose small enough to stay securely attached.
How do I make the snowman pops stand upright?
Place the sticks into a foam block or a dedicated cake-pop stand while the chocolate coating sets. Make sure the stand is stable and the sticks are inserted far enough to support the pops.
Can I make these snowman pops without sticks?
Absolutely! Stack three marshmallows and secure them with a little melted chocolate. Once set, place them on a dessert platter as small snowman bites instead of pops.
Why is my white chocolate coating too thick?
White chocolate can become thick if overheated or if it contains very little cocoa butter. Melt it gently and use a compatible, manufacturer-recommended thinning agent if necessary. Do not add water or ordinary food coloring.
Can I use food coloring to make colored snowmen?
Yes, but use oil-based or candy-specific food coloring designed for chocolate. Regular water-based food coloring can cause melted chocolate to seize.
How far in advance can I make marshmallow snowman pops?
You can prepare them up to 2 days in advance for the best texture. Store them in an airtight container in a cool, dry place away from heat and humidity.
Conclusion
These Marshmallow Snowman Pops are the perfect combination of easy preparation, sweet flavor, and adorable Christmas charm. With fluffy marshmallows, smooth white chocolate, and colorful candy decorations, they make a festive treat that looks beautiful and tastes delicious.
Whether you’re making them with the family, preparing a Christmas party dessert table, or wrapping them as homemade holiday gifts, these little snowmen are sure to bring smiles. Grab your marshmallows, melt some white chocolate, and have fun creating a whole family of sweet little snowmen!
Print
Marshmallow Snowman Pops
Ingredients
This recipe makes approximately 12 marshmallow snowman pops.
- 36 large white marshmallows
- 12 ounces white chocolate melting wafers
- 12 lollipop sticks or sturdy paper treat sticks
- 12 small orange candy-coated pieces or orange fondant pieces for the noses
- 24 mini chocolate chips for the eyes
- 24 mini chocolate chips or small candy pieces for the buttons
- 12 small pieces of red fruit leather or fondant for scarves
- 12 small chocolate candies or mini peanut butter cups for hats, optional
- Red, green, and blue decorating icing, optional
- Christmas sprinkles, optional
Instructions
Unwrap the marshmallows and place them on a clean work surface.
For each snowman, select three marshmallows of similar size. Arrange them vertically so they form the head, middle, and bottom sections.
Make sure the marshmallows are fresh and soft. Older marshmallows can become firm and may be harder to thread onto the sticks.
Step 2: Assemble the Snowmen
Carefully push one lollipop stick through the center of three marshmallows, starting at the bottom and moving upward.
Leave enough of the stick exposed at the bottom to hold comfortably.
Press the marshmallows gently together so they stay aligned, but avoid squeezing them too tightly.
Repeat until all 12 snowmen are assembled.
Step 3: Melt the White Chocolate
Place the white chocolate melting wafers in a microwave-safe bowl.
Microwave in 20–30 second intervals, stirring thoroughly after each interval until the chocolate is completely melted and smooth.
Avoid overheating the chocolate. If it becomes too thick, use a small amount of a manufacturer-recommended thinning agent or compatible shortening, following the product instructions.
Allow the melted chocolate to cool slightly so it is warm and fluid but not hot.
Step 4: Coat the Marshmallow Snowmen
Hold one marshmallow pop over the bowl of melted white chocolate.
Using a spoon, gently pour the chocolate over the marshmallows, turning the pop as needed to cover the sides and front.
Allow the excess chocolate to drip back into the bowl.
Place the coated pop upright in a foam block or a pop stand, or lay it carefully on a parchment-lined baking sheet if you prefer a flat-backed design.
Repeat with the remaining snowmen.
Step 5: Add the Snowman Faces
While the white chocolate coating is still soft, gently attach two mini chocolate chips to the top marshmallow to create the eyes.
Add one small orange candy or fondant triangle underneath the eyes to create the carrot nose.
Use a tiny amount of melted chocolate as edible glue if the coating has already started to set.
Step 6: Decorate the Buttons and Scarves
Add two small chocolate chips or colorful candy pieces to the middle and bottom marshmallows to create buttons.
Cut the red fruit leather into narrow strips. Wrap one strip around the neck area between the head and middle marshmallows.
Overlap the ends slightly and press gently so the scarf stays in place.
You can also use green, blue, or white fondant strips for different scarf designs.
Step 7: Add the Snowman Hats
For an extra festive touch, place a small chocolate candy or mini peanut butter cup on top of each snowman’s head.
Secure it with a little melted chocolate.
Alternatively, pipe a small hat shape using dark chocolate or black decorating icing.
Step 8: Let the Chocolate Set
Leave the snowman pops upright in a pop stand or foam block until the chocolate coating has completely hardened.
If needed, refrigerate them briefly to help the coating set.
Once firm, arrange the marshmallow snowman pops in a festive display or wrap them individually for holiday gifts.
Notes
- Use fresh marshmallows for the best texture and easiest assembly.
- Make sure the sticks are centered so the snowmen stand straight.
- Avoid pushing the stick too forcefully, as marshmallows can split.
- Melt white chocolate slowly and stir frequently to prevent overheating.
- Keep water away from the melted chocolate because even a small amount can cause it to seize.
- Let excess chocolate drip off before placing the pops in the stand.
- Add candy decorations while the coating is still wet so they stick securely.
- If the chocolate sets before decorating, use a tiny amount of melted chocolate to attach the details.
- Allow the pops to set completely before wrapping them.
