There is something truly special about biting into a freshly made cream puff. The delicate pastry shell is light and airy, the vanilla cream filling is smooth and luscious, and a light dusting of powdered sugar gives each pastry a beautiful bakery-style finish. These Homemade Cream Puffs are an elegant dessert that looks impressive but can be made in your own kitchen with simple ingredients and a little patience.
Cream puffs are a classic French-inspired pastry made from a dough called pâte à choux, or choux pastry. Unlike many other pastries, choux pastry does not rely on baking powder or yeast to rise. Instead, its structure develops when water in the dough turns into steam during baking, causing the pastry to puff up and form a hollow center. Once baked properly, the shells become light, golden, and sturdy enough to hold a generous filling of homemade vanilla pastry cream or whipped cream.
One of the best things about this easy cream puff recipe is its versatility. You can fill the shells with traditional vanilla custard, sweetened whipped cream, chocolate pastry cream, or even a combination of cream and mascarpone. You can also decorate them with powdered sugar, melted chocolate, caramel drizzle, or a simple chocolate glaze to create a dessert suitable for birthdays, holidays, afternoon tea, and dinner parties.
Although cream puffs may look like something purchased from a professional bakery, the preparation process is surprisingly straightforward once you understand the basic techniques. The most important steps are cooking the dough properly, incorporating the eggs gradually, baking the pastry until it is thoroughly dried, and allowing the shells to cool before filling them.
This homemade cream puffs recipe is ideal for beginner bakers who want to learn a classic pastry technique as well as experienced home cooks looking for a reliable dessert. The shells can be baked ahead of time, and the vanilla filling can be prepared separately, making it easier to assemble everything before serving.
Whether you call them cream puffs, vanilla cream-filled pastries, or French choux pastries, these delicious treats combine a delicate texture with a rich, creamy center. Once you make them from scratch, you may find yourself returning to this recipe whenever you want a dessert that feels both comforting and elegant.
Ingredients for Homemade Cream Puffs
This recipe makes approximately 18–24 medium cream puffs, depending on how large you pipe the pastry. It includes a classic choux pastry shell, a creamy vanilla filling, and an optional powdered sugar topping.
Ingredients for the choux pastry shells
- 1 cup (240 ml) water: Provides the moisture that creates steam and helps the pastry puff during baking.
- 1/2 cup (113 g) unsalted butter: Adds richness and helps create a tender pastry shell.
- 1 tablespoon granulated sugar: Adds a subtle sweetness and helps the shells develop a golden color.
- 1/4 teaspoon salt: Balances the flavor and enhances the pastry.
- 1 cup (125 g) all-purpose flour: Provides the structure needed for the hollow pastry shells.
- 4 large eggs, approximately 200 g without shells: Help bind the dough and provide the structure needed for the pastry to expand.
The exact number of eggs can vary slightly according to flour absorption and egg size. Add them gradually and judge the dough by its consistency rather than forcing in the entire quantity if the dough is already correct.
Ingredients for the homemade vanilla cream filling
- 2 cups (480 ml) whole milk: Creates the creamy base of the pastry filling.
- 1/2 cup (100 g) granulated sugar: Sweetens the custard.
- 4 large egg yolks: Add richness and help thicken the pastry cream.
- 3 tablespoons cornstarch: Thickens the filling and helps it hold its shape inside the pastry.
- 2 tablespoons (28 g) unsalted butter: Adds a smooth, rich finish.
- 2 teaspoons pure vanilla extract: Gives the cream its classic vanilla flavor.
- 1 small pinch of salt: Balances the sweetness.
Optional ingredients for a lighter cream filling
If you prefer a lighter filling rather than traditional pastry cream, you can prepare a whipped cream filling using:
- 1 cup (240 ml) cold heavy whipping cream
- 2–3 tablespoons powdered sugar
- 1 teaspoon vanilla extract
Whipped cream creates a softer, airier filling. It is best added shortly before serving because it does not hold its shape as long as properly prepared pastry cream.
Ingredients for decorating
- Powdered sugar for dusting
- Melted chocolate for drizzling
- Chocolate ganache for dipping
- Fresh berries for serving, if desired
The decoration is optional. A simple dusting of powdered sugar is enough to make homemade cream puffs look beautiful and inviting.
Preparation: How to Make Homemade Cream Puffs
Follow these detailed steps to prepare the pastry shells, make the vanilla cream filling, and assemble your homemade cream puffs.
Step 1: Prepare the oven and baking sheets
Preheat your oven to 400°F (200°C). Line two baking sheets with parchment paper or silicone baking mats.
Make sure your oven has reached the correct temperature before baking. A properly heated oven is important because the initial heat helps the pastry expand quickly and develop its hollow interior.
If you have a piping bag, fit it with a large round tip. If you do not have one, you can use a sturdy plastic piping bag with the corner cut off or carefully spoon the dough onto the baking sheets.
Prepare a small bowl of water and a clean finger or spoon. You can use a little water to smooth any sharp peaks left on the pastry mounds before baking.
Step 2: Heat the water, butter, sugar, and salt
Place the water, butter, sugar, and salt in a medium saucepan.
Heat over medium heat until the butter has melted and the mixture reaches a full boil. Stir occasionally to help the ingredients combine evenly.
Once the mixture boils, remove it briefly from the heat and add the flour all at once. Adding the flour while the liquid is hot helps it absorb the moisture evenly.
Work efficiently because the dough should begin coming together immediately after the flour is added.
Step 3: Add the flour and cook the dough
Stir the flour into the hot liquid with a sturdy wooden spoon or heat-resistant spatula until no dry flour remains.
Return the saucepan to medium-low heat and continue stirring the dough for approximately 1–2 minutes. The dough should form a cohesive ball and pull away from the sides of the saucepan.
A thin film may develop on the bottom of the pan. This is normal and indicates that moisture is evaporating from the dough.
This step is important because the flour needs to absorb the liquid and the dough must lose some moisture before the eggs are added. If the dough contains too much moisture, the pastry may not hold its shape or develop the desired hollow center.
Transfer the dough to a mixing bowl and allow it to cool for approximately 5–10 minutes, stirring occasionally. The dough should remain warm but not so hot that it cooks the eggs when they are added.
Step 4: Add the eggs gradually
Add the eggs one at a time, mixing thoroughly after each addition. An electric mixer with a paddle attachment can make this process easier, although a sturdy spoon also works.
At first, the dough may look slippery or separated. Continue mixing until each egg is incorporated before adding the next.
After the third egg, check the consistency before adding the fourth. The dough should be smooth, glossy, and thick enough to hold its shape while remaining soft enough to pipe.
When lifted with a spatula, the dough should fall slowly and form a broad V-shaped ribbon. If the dough is too stiff, add a little of the remaining beaten egg at a time.
Avoid adding too much egg. Dough that is overly loose can spread excessively, resulting in flat pastries rather than tall, hollow shells.
Step 5: Pipe the cream puff shells
Transfer the choux pastry dough to the prepared piping bag.
Pipe small mounds approximately 1 1/2–2 inches wide onto the baking sheets, leaving about 2 inches between each mound to allow for expansion.
Hold the piping bag vertically and apply even pressure. When you finish piping each mound, stop squeezing before lifting the bag to reduce the formation of sharp peaks.
If peaks remain, lightly dampen your finger and gently smooth them down.
Try to keep the mounds similar in size so that they bake evenly. Larger pastries may need additional baking time, while smaller ones may finish sooner.
If you are new to piping, do not worry about achieving perfect shapes. Cream puffs are naturally rustic, and a little variation gives homemade pastries their charm.
Step 6: Bake until puffed and golden
Place the baking sheets in the preheated oven.
Bake at 400°F (200°C) for approximately 15 minutes, then reduce the temperature to 350°F (175°C) and continue baking for another 15–25 minutes, depending on the size of the pastries and your oven.
Avoid opening the oven door during the initial baking period. A sudden drop in temperature can cause the shells to collapse before their structure has set.
The cream puffs should become noticeably larger, golden brown, and firm to the touch. Pale pastry shells often contain too much moisture and are more likely to collapse after baking.
When the shells are fully puffed and golden, remove one and check that the interior is mostly hollow and not excessively wet.
For additional drying, turn off the oven and make a small slit in the side of each puff to release steam. Return them to the oven for approximately 5 minutes with the oven off and the door slightly open, if safe for your oven.
Transfer the shells to a wire rack and allow them to cool completely before filling.
Step 7: Prepare the vanilla pastry cream
While the shells cool, prepare the vanilla filling.
In a medium bowl, whisk together the egg yolks, sugar, cornstarch, and a small splash of the milk until smooth. This mixture should be free of lumps.
Pour the remaining milk into a saucepan and heat it over medium heat until steaming but not boiling vigorously.
Slowly pour some of the hot milk into the egg mixture while whisking continuously. This process, called tempering, gradually warms the egg yolks and helps prevent them from scrambling.
Pour the tempered egg mixture back into the saucepan with the remaining milk.
Cook over medium heat, whisking constantly, until the custard thickens and begins to bubble gently. Continue cooking for approximately 30–60 seconds after thickening, while whisking, to help cook the cornstarch properly.
Remove the saucepan from the heat. Stir in the butter, vanilla extract, and salt until the mixture becomes smooth and glossy.
If you notice lumps, strain the custard through a fine-mesh sieve while it is still warm.
Step 8: Cool the pastry cream properly
Transfer the vanilla pastry cream to a shallow, heatproof container.
Place plastic wrap directly against the surface of the custard to prevent a skin from forming. Refrigerate until completely cold, generally at least 2 hours.
Do not leave the custard at room temperature for an extended period. Because it contains milk and eggs, it needs to be cooled and stored safely.
Once chilled, whisk the pastry cream briefly until smooth. If it is very firm, whisking helps restore a creamy texture suitable for piping.
For a lighter filling, you can fold a little separately whipped cream into the cold pastry cream. This creates a softer, more delicate filling, although it may reduce the amount of time the finished cream puffs hold their shape.
Step 9: Fill the homemade cream puffs
Once the shells have cooled completely and the filling is cold, prepare a piping bag fitted with a small round tip.
You have two options for filling the pastries.
Option A: Fill through the bottom.
Make a small hole in the bottom of each pastry shell and pipe the vanilla cream inside until the puff feels pleasantly full. This method keeps the outside of the pastry intact.
Option B: Slice the shells in half.
Use a serrated knife to cut each shell horizontally. Pipe or spoon the vanilla cream onto the bottom half, then replace the top.
This method allows you to see the cream filling and creates a beautiful presentation for dessert platters.
Do not overfill the shells, as excess cream can spill out and make the pastries difficult to handle.
Step 10: Decorate and serve
Arrange the filled cream puffs on a serving plate.
Dust the tops with powdered sugar just before serving. You can also drizzle melted chocolate over the pastries or dip their tops in chocolate ganache for a more elaborate finish.
For a bakery-style presentation, arrange the pastries in a pyramid or serve them individually on dessert plates.
Homemade cream puffs taste best when the shells retain some of their crispness. Because the filling gradually softens the pastry, assemble them as close to serving time as practical.
Keep the filled pastries refrigerated and serve them chilled or slightly cool.
Variations of Homemade Cream Puffs
One reason cream puffs remain a favorite dessert is that the basic choux pastry can accommodate many different fillings and decorations.
1. Chocolate cream puffs
For a chocolate version, prepare a chocolate pastry cream by whisking unsweetened cocoa powder into the custard mixture or melting finely chopped chocolate into the finished hot pastry cream.
Allow the filling to chill completely before piping it into the shells.
You can finish the pastries with melted chocolate or chocolate ganache for an extra-rich dessert.
2. Strawberry cream puffs
Fill the pastry shells with vanilla pastry cream and add finely chopped fresh strawberries.
Alternatively, prepare a strawberry-flavored whipped cream filling by folding a small amount of strawberry puree into whipped cream. Use a thick puree and avoid adding excessive liquid, which can make the filling runny.
These cream puffs are especially attractive during spring and summer.
3. Lemon cream puffs
Add finely grated lemon zest to the pastry cream while preparing it. A little lemon juice can also be used, but excessive acidity may change the texture.
The bright citrus flavor balances the richness of the custard and gives the dessert a refreshing finish.
4. Coffee cream puffs
Dissolve a small amount of instant espresso powder into the warm milk before making the pastry cream.
Coffee pairs beautifully with vanilla and chocolate and creates an elegant dessert for dinner parties or afternoon coffee service.
5. Whipped cream puffs
Replace the pastry cream with freshly whipped cream sweetened with powdered sugar and vanilla.
This variation produces a lighter filling with a delicate texture. Because whipped cream is less stable than custard, fill the pastries shortly before serving and keep them refrigerated.
6. Chocolate-dipped cream puffs
Dip the tops of the filled or unfilled pastry shells in melted chocolate and allow the coating to set.
For a neat finish, use semisweet chocolate or a simple ganache made with chocolate and cream.
Chocolate-dipped cream puffs are excellent for holiday dessert platters and special celebrations.
7. Mini cream puffs
Pipe smaller mounds of choux pastry to create bite-sized pastries.
Reduce the baking time as needed and check the shells for golden color and dryness. Mini cream puffs are convenient for buffets, parties, and afternoon tea.
8. Vanilla mascarpone cream puffs
Fold a little mascarpone cheese into a vanilla cream filling for a richer, more stable texture.
Keep the mascarpone chilled before using it and avoid overmixing. This variation is especially delicious with chocolate drizzle or fresh berries.
9. Caramel cream puffs
Fill the shells with vanilla pastry cream and finish them with a light caramel drizzle.
For a more intense caramel flavor, swirl a small amount of thick caramel sauce into the filling. Avoid adding so much sauce that the cream becomes too loose.
10. Holiday cream puffs
For Christmas and other festive occasions, decorate the pastries with white chocolate, dark chocolate, powdered sugar, or finely chopped nuts.
You can arrange the cream puffs into a festive display or serve them individually on a dessert platter.
Cooking Notes
Making excellent homemade cream puffs depends on the texture of the dough, the baking process, and the moisture level of the finished pastry.
Measure the flour accurately. Too much flour can produce stiff dough that does not expand properly, while too little flour may cause the pastry to spread.
Cook the flour mixture thoroughly. Heating the dough after adding the flour helps evaporate excess moisture and prepares the starch to form a strong structure.
Add eggs gradually. The amount of egg needed varies with the flour and the size of the eggs. Focus on the final dough consistency rather than adding every egg automatically.
Do not open the oven too early. Choux pastry needs stable heat to puff and set. Opening the oven door during the initial rise can cause the shells to collapse.
Bake the shells until thoroughly dry. Golden color alone is not always enough. The shells should feel firm and should not have a wet interior.
Cool the pastry cream quickly and safely. Transfer it to a shallow container, cover the surface, and refrigerate promptly.
Fill only completely cooled shells. Warm pastry can melt the cream filling and produce a messy result.
Fill close to serving time. The moisture from the cream gradually softens the shells. Assemble them shortly before serving for the best texture.
Keep filled cream puffs refrigerated. Milk, eggs, whipped cream, and custard require appropriate refrigeration.
Serving Suggestions
Homemade cream puffs are elegant enough for special occasions but simple enough to serve as an everyday dessert.
Serve with coffee or tea
Cream puffs pair beautifully with coffee, espresso, black tea, or herbal tea. The light pastry and vanilla filling provide a sweet contrast to the slight bitterness of coffee.
Add fresh fruit
Serve the pastries with fresh strawberries, raspberries, blueberries, or sliced peaches. The natural fruit flavors provide a refreshing contrast to the rich cream.
Create a dessert platter
Arrange the cream puffs alongside brownies, cookies, mini cheesecakes, and chocolate-covered strawberries.
Choose a mix of shapes and colors to make the platter attractive without requiring elaborate decoration.
Serve as an elegant dinner-party dessert
Place two or three medium cream puffs on each dessert plate. Add a little chocolate sauce or berry sauce and finish with a light dusting of powdered sugar.
Make a cream puff tower
For celebrations, stack the pastries into a small tower and drizzle with chocolate or caramel sauce.
If you build a tall structure, use a stable arrangement and avoid adding excessive liquid toppings, which can make the pastries slippery.
Serve chilled
Chilled cream puffs are particularly enjoyable on warm days. The vanilla filling becomes pleasantly cool while the pastry remains delicate.
For the best texture, fill the shells shortly before serving.
Tips for Perfect Homemade Cream Puffs
- Use room-temperature eggs when practical. They incorporate more easily into the warm dough.
- Cook the dough until it pulls away from the saucepan. This indicates that the flour has absorbed the liquid and excess moisture is evaporating.
- Check the dough after three eggs. Add the final egg gradually, because the dough may not need every drop.
- Pipe evenly sized mounds. Similar sizes help the pastries bake at the same rate.
- Leave space between the shells. Choux pastry expands significantly during baking.
- Avoid opening the oven too early. Stable heat is essential for proper expansion.
- Bake until golden and firm. Underbaked shells are more likely to collapse.
- Dry the shells if necessary. A short additional period in the turned-off oven can help remove excess moisture.
- Cool the pastry cream completely. Warm filling can soften the shells and cause them to lose their shape.
- Use a piping bag for neat filling. It provides better control and distributes the cream evenly.
- Dust with powdered sugar before serving. This creates a fresh, bakery-style appearance.
- Store the shells and filling separately when preparing ahead. Assemble the pastries close to serving time for the best texture.
- Avoid overfilling. Too much filling can split the shells or make them difficult to serve.
- Use a serrated knife when slicing. This helps cut the delicate shells without crushing them.
- Keep the finished pastries refrigerated. Proper storage helps maintain food safety and filling quality.
Prep Time, Cooking Time, and Total Time
The following estimates are for approximately 18–24 medium homemade cream puffs.
- Prep Time: 30 minutes
- Cooking Time: 35–40 minutes
- Cooling and Filling Time: 2 hours
- Total Time: Approximately 3 hours to 3 hours and 10 minutes
The total time includes chilling the pastry cream. You can save time on serving day by preparing the filling in advance and baking the shells separately.
Nutritional Information
The following values are estimates for one medium cream puff filled with vanilla pastry cream, assuming the recipe makes 24 pieces. Actual nutrition will depend on shell size, filling quantity, and decoration.
- Calories: Approximately 140–190 per cream puff
- Protein: Approximately 3–4 g
- Sodium: Approximately 80–130 mg
Calories: Most calories come from the flour, butter, eggs, milk, sugar, and pastry cream. Larger pastries and additional chocolate toppings will increase the calorie content.
Protein: Eggs and milk provide most of the protein in the recipe.
Sodium: The amount depends on the butter, salt, and other ingredients used.
These are approximate estimates rather than laboratory-tested values. For more precise nutritional information, calculate the recipe using your actual ingredients and the final number of pastries.
Frequently Asked Questions About Homemade Cream Puffs
1. What are homemade cream puffs made of?
Homemade cream puffs are made from choux pastry, which typically contains water, butter, flour, eggs, and a little salt. After baking, the hollow pastry shells are filled with vanilla pastry cream, whipped cream, or another sweet filling.
2. Why did my cream puffs collapse?
Cream puffs may collapse if the pastry is underbaked, contains too much moisture, or is exposed to a sudden temperature change before the structure sets.
Bake the shells until they are golden and firm. If necessary, allow additional time in the turned-off oven to help dry the interior.
3. Can I make cream puff shells ahead of time?
Yes. Bake the shells, allow them to cool completely, and store them in an airtight container for short-term use.
If they lose their crispness, reheat them briefly in a low oven until dry, then cool completely before filling. Avoid filling them until you are ready to serve.
4. Can I freeze homemade cream puffs?
Unfilled baked shells freeze well when stored in a freezer-safe container. Freeze them after they have cooled completely.
Thaw the shells and briefly crisp them in the oven if needed. Cool them fully before adding the filling. Filled cream puffs can be frozen in some circumstances, but the custard and pastry textures may change during thawing.
5. Why is my choux pastry dough too runny?
The dough may contain too much egg or may not have been cooked long enough after the flour was added.
Add eggs gradually and check the consistency after each addition. The finished dough should be glossy and pipeable but thick enough to hold its shape.
6. Why are my cream puff shells flat?
Flat shells can result from overly loose dough, incorrect oven temperature, or insufficient steam development.
Make sure the flour mixture is cooked properly, add eggs gradually, and bake in a fully preheated oven.
7. How do I know when cream puffs are fully baked?
The shells should be golden brown, firm, and relatively light for their size. A properly baked shell should have a hollow interior and should not feel damp or heavy.
If the shells remain pale and soft, they may need additional baking time.
8. Can I use whipped cream instead of pastry cream?
Yes. Sweetened whipped cream creates a light and airy filling.
However, whipped cream is less stable than traditional pastry cream, so the finished pastries should be kept refrigerated and assembled close to serving time.
9. How long do homemade cream puffs last?
Filled cream puffs are best enjoyed on the day they are assembled. They can generally be refrigerated for up to about 2 days, depending on the filling and storage conditions, although the shells will soften over time.
Unfilled shells can be stored separately and filled shortly before serving.
10. Should cream puffs be refrigerated?
Yes. Once filled with pastry cream, custard, or whipped cream, the pastries should be refrigerated because their fillings are perishable.
Store them in a covered container to protect them from absorbing odors and to maintain food safety.
11. Can I make cream puffs without a piping bag?
Yes. You can use a spoon to place small portions of dough onto the baking sheet. The shapes may be less uniform, but the pastry can still puff properly if the dough has the correct consistency.
For filling, cut each shell in half and spoon the cream inside.
12. What is the difference between cream puffs and profiteroles?
The terms are often used for very similar choux pastry desserts. Cream puffs are commonly filled with whipped cream or pastry cream and dusted with powdered sugar.
Profiteroles are frequently served with chocolate sauce and may be filled with pastry cream or ice cream. Regional traditions and recipes vary.
13. Can I make chocolate cream puffs?
Absolutely. You can fill the shells with chocolate pastry cream and decorate them with melted chocolate or ganache.
This variation is perfect for chocolate lovers and works well for birthdays and special occasions.
14. Why are my cream puff shells soggy?
Soggy shells may be underbaked, insufficiently dried, or stored in a humid environment.
Bake them until they are golden and firm, allow them to cool completely, and keep the unfilled shells in an airtight container. Fill them close to serving time.
15. Can I make the vanilla filling the day before?
Yes. Prepare the pastry cream, transfer it to a shallow container, cover the surface directly, and refrigerate it promptly.
Whisk the chilled filling until smooth before piping it into the shells.
16. How do I prevent lumps in the pastry cream?
Whisk the egg yolks, sugar, and cornstarch together until smooth before adding the hot milk. Temper the egg mixture gradually and whisk continuously while cooking.
If small lumps remain, strain the finished pastry cream through a fine-mesh sieve.
17. Can I make mini cream puffs for parties?
Yes. Pipe smaller portions of choux pastry and adjust the baking time to suit their size.
Mini cream puffs are convenient for dessert tables, buffets, weddings, and afternoon tea.
18. What is the best way to decorate cream puffs?
A dusting of powdered sugar is the simplest option. For a richer appearance, add melted chocolate, chocolate ganache, caramel sauce, or fresh berries.
Decorate shortly before serving for the best presentation.
19. Can I make cream puffs without a mixer?
Yes. Choux pastry can be made by hand with a sturdy spoon or spatula. You will need to mix thoroughly when incorporating the eggs, but an electric mixer is not essential.
A whisk is useful for preparing smooth pastry cream.
20. What should I do if the pastry shells are soft after cooling?
If the shells are unfilled, return them to a low oven for several minutes to help dry them out. Allow them to cool completely before filling.
If they have already been filled, reheating is generally not recommended because it may damage the cream filling.
Conclusion
These Homemade Cream Puffs are a beautiful example of how simple ingredients can become an elegant, bakery-style dessert. With their golden, airy choux pastry shells and smooth vanilla cream filling, they offer a delicious combination of light texture and rich flavor.
Although the technique may seem unfamiliar at first, making cream puffs becomes much easier once you understand how to prepare the dough, incorporate the eggs, and bake the shells until they are thoroughly dry. Preparing the pastry cream separately and allowing it to chill before filling also helps produce a smooth, delicious result.
One of the best things about this easy homemade cream puff recipe is its versatility. You can use traditional vanilla custard, whipped cream, chocolate pastry cream, or a flavored filling of your choice. A simple dusting of powdered sugar creates a classic finish, while chocolate drizzle or fresh berries can make the pastries suitable for more elaborate celebrations.
For the best results, measure your ingredients carefully, avoid opening the oven too early, and allow the shells to cool completely before adding the filling. When possible, assemble the pastries shortly before serving so that the delicate shells retain as much of their crispness as possible.
Whether you are preparing dessert for a family gathering, a holiday celebration, afternoon tea, or a special dinner, homemade cream puffs are sure to make the occasion feel more memorable.
Try this recipe, experiment with your favorite fillings, and enjoy the satisfaction of creating delicious French-inspired pastries from scratch. Once you taste the combination of light pastry and creamy vanilla filling, these homemade cream puffs may become one of your favorite desserts to prepare and share.
Print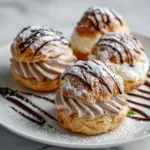
Homemade Cream Puffs Recipe – Light, Airy Pastry Filled with Vanilla Cream
- Total Time: 3 hours
Description
Cream puffs are a classic French-inspired pastry made from a dough called pâte à choux, or choux pastry. Unlike many other pastries, choux pastry does not rely on baking powder or yeast to rise. Instead, its structure develops when water in the dough turns into steam during baking, causing the pastry to puff up and form a hollow center.
Ingredients
Ingredients for the choux pastry shells
- 1 cup (240 ml) water: Provides the moisture that creates steam and helps the pastry puff during baking.
- 1/2 cup (113 g) unsalted butter: Adds richness and helps create a tender pastry shell.
- 1 tablespoon granulated sugar: Adds a subtle sweetness and helps the shells develop a golden color.
- 1/4 teaspoon salt: Balances the flavor and enhances the pastry.
- 1 cup (125 g) all-purpose flour: Provides the structure needed for the hollow pastry shells.
- 4 large eggs, approximately 200 g without shells: Help bind the dough and provide the structure needed for the pastry to expand.
The exact number of eggs can vary slightly according to flour absorption and egg size. Add them gradually and judge the dough by its consistency rather than forcing in the entire quantity if the dough is already correct.
Ingredients for the homemade vanilla cream filling
- 2 cups (480 ml) whole milk: Creates the creamy base of the pastry filling.
- 1/2 cup (100 g) granulated sugar: Sweetens the custard.
- 4 large egg yolks: Add richness and help thicken the pastry cream.
- 3 tablespoons cornstarch: Thickens the filling and helps it hold its shape inside the pastry.
- 2 tablespoons (28 g) unsalted butter: Adds a smooth, rich finish.
- 2 teaspoons pure vanilla extract: Gives the cream its classic vanilla flavor.
- 1 small pinch of salt: Balances the sweetness.
Optional ingredients for a lighter cream filling
If you prefer a lighter filling rather than traditional pastry cream, you can prepare a whipped cream filling using:
- 1 cup (240 ml) cold heavy whipping cream
- 2–3 tablespoons powdered sugar
- 1 teaspoon vanilla extract
Instructions
Preheat your oven to 400°F (200°C). Line two baking sheets with parchment paper or silicone baking mats.
Make sure your oven has reached the correct temperature before baking. A properly heated oven is important because the initial heat helps the pastry expand quickly and develop its hollow interior.
If you have a piping bag, fit it with a large round tip. If you do not have one, you can use a sturdy plastic piping bag with the corner cut off or carefully spoon the dough onto the baking sheets.
Prepare a small bowl of water and a clean finger or spoon. You can use a little water to smooth any sharp peaks left on the pastry mounds before baking.
Step 2: Heat the water, butter, sugar, and salt
Place the water, butter, sugar, and salt in a medium saucepan.
Heat over medium heat until the butter has melted and the mixture reaches a full boil. Stir occasionally to help the ingredients combine evenly.
Once the mixture boils, remove it briefly from the heat and add the flour all at once. Adding the flour while the liquid is hot helps it absorb the moisture evenly.
Work efficiently because the dough should begin coming together immediately after the flour is added.
Step 3: Add the flour and cook the dough
Stir the flour into the hot liquid with a sturdy wooden spoon or heat-resistant spatula until no dry flour remains.
Return the saucepan to medium-low heat and continue stirring the dough for approximately 1–2 minutes. The dough should form a cohesive ball and pull away from the sides of the saucepan.
A thin film may develop on the bottom of the pan. This is normal and indicates that moisture is evaporating from the dough.
This step is important because the flour needs to absorb the liquid and the dough must lose some moisture before the eggs are added. If the dough contains too much moisture, the pastry may not hold its shape or develop the desired hollow center.
Transfer the dough to a mixing bowl and allow it to cool for approximately 5–10 minutes, stirring occasionally. The dough should remain warm but not so hot that it cooks the eggs when they are added.
Step 4: Add the eggs gradually
Add the eggs one at a time, mixing thoroughly after each addition. An electric mixer with a paddle attachment can make this process easier, although a sturdy spoon also works.
At first, the dough may look slippery or separated. Continue mixing until each egg is incorporated before adding the next.
After the third egg, check the consistency before adding the fourth. The dough should be smooth, glossy, and thick enough to hold its shape while remaining soft enough to pipe.
When lifted with a spatula, the dough should fall slowly and form a broad V-shaped ribbon. If the dough is too stiff, add a little of the remaining beaten egg at a time.
Avoid adding too much egg. Dough that is overly loose can spread excessively, resulting in flat pastries rather than tall, hollow shells.
Step 5: Pipe the cream puff shells
Transfer the choux pastry dough to the prepared piping bag.
Pipe small mounds approximately 1 1/2–2 inches wide onto the baking sheets, leaving about 2 inches between each mound to allow for expansion.
Hold the piping bag vertically and apply even pressure. When you finish piping each mound, stop squeezing before lifting the bag to reduce the formation of sharp peaks.
If peaks remain, lightly dampen your finger and gently smooth them down.
Try to keep the mounds similar in size so that they bake evenly. Larger pastries may need additional baking time, while smaller ones may finish sooner.
If you are new to piping, do not worry about achieving perfect shapes. Cream puffs are naturally rustic, and a little variation gives homemade pastries their charm.
Step 6: Bake until puffed and golden
Place the baking sheets in the preheated oven.
Bake at 400°F (200°C) for approximately 15 minutes, then reduce the temperature to 350°F (175°C) and continue baking for another 15–25 minutes, depending on the size of the pastries and your oven.
Avoid opening the oven door during the initial baking period. A sudden drop in temperature can cause the shells to collapse before their structure has set.
The cream puffs should become noticeably larger, golden brown, and firm to the touch. Pale pastry shells often contain too much moisture and are more likely to collapse after baking.
When the shells are fully puffed and golden, remove one and check that the interior is mostly hollow and not excessively wet.
For additional drying, turn off the oven and make a small slit in the side of each puff to release steam. Return them to the oven for approximately 5 minutes with the oven off and the door slightly open, if safe for your oven.
Transfer the shells to a wire rack and allow them to cool completely before filling.
Step 7: Prepare the vanilla pastry cream
While the shells cool, prepare the vanilla filling.
In a medium bowl, whisk together the egg yolks, sugar, cornstarch, and a small splash of the milk until smooth. This mixture should be free of lumps.
Pour the remaining milk into a saucepan and heat it over medium heat until steaming but not boiling vigorously.
Slowly pour some of the hot milk into the egg mixture while whisking continuously. This process, called tempering, gradually warms the egg yolks and helps prevent them from scrambling.
Pour the tempered egg mixture back into the saucepan with the remaining milk.
Cook over medium heat, whisking constantly, until the custard thickens and begins to bubble gently. Continue cooking for approximately 30–60 seconds after thickening, while whisking, to help cook the cornstarch properly.
Remove the saucepan from the heat. Stir in the butter, vanilla extract, and salt until the mixture becomes smooth and glossy.
If you notice lumps, strain the custard through a fine-mesh sieve while it is still warm.
Step 8: Cool the pastry cream properly
Transfer the vanilla pastry cream to a shallow, heatproof container.
Place plastic wrap directly against the surface of the custard to prevent a skin from forming. Refrigerate until completely cold, generally at least 2 hours.
Do not leave the custard at room temperature for an extended period. Because it contains milk and eggs, it needs to be cooled and stored safely.
Once chilled, whisk the pastry cream briefly until smooth. If it is very firm, whisking helps restore a creamy texture suitable for piping.
For a lighter filling, you can fold a little separately whipped cream into the cold pastry cream. This creates a softer, more delicate filling, although it may reduce the amount of time the finished cream puffs hold their shape.
Step 9: Fill the homemade cream puffs
Once the shells have cooled completely and the filling is cold, prepare a piping bag fitted with a small round tip.
You have two options for filling the pastries.
Option A: Fill through the bottom.
Make a small hole in the bottom of each pastry shell and pipe the vanilla cream inside until the puff feels pleasantly full. This method keeps the outside of the pastry intact.
Option B: Slice the shells in half.
Use a serrated knife to cut each shell horizontally. Pipe or spoon the vanilla cream onto the bottom half, then replace the top.
This method allows you to see the cream filling and creates a beautiful presentation for dessert platters.
Do not overfill the shells, as excess cream can spill out and make the pastries difficult to handle.
Step 10: Decorate and serve
Arrange the filled cream puffs on a serving plate.
Dust the tops with powdered sugar just before serving. You can also drizzle melted chocolate over the pastries or dip their tops in chocolate ganache for a more elaborate finish.
For a bakery-style presentation, arrange the pastries in a pyramid or serve them individually on dessert plates.
Homemade cream puffs taste best when the shells retain some of their crispness. Because the filling gradually softens the pastry, assemble them as close to serving time as practical.
Keep the filled pastries refrigerated and serve them chilled or slightly cool.
Notes
Making excellent homemade cream puffs depends on the texture of the dough, the baking process, and the moisture level of the finished pastry.
Measure the flour accurately. Too much flour can produce stiff dough that does not expand properly, while too little flour may cause the pastry to spread.
Cook the flour mixture thoroughly. Heating the dough after adding the flour helps evaporate excess moisture and prepares the starch to form a strong structure.
Add eggs gradually. The amount of egg needed varies with the flour and the size of the eggs. Focus on the final dough consistency rather than adding every egg automatically.
Do not open the oven too early. Choux pastry needs stable heat to puff and set. Opening the oven door during the initial rise can cause the shells to collapse.
Bake the shells until thoroughly dry. Golden color alone is not always enough. The shells should feel firm and should not have a wet interior.
Cool the pastry cream quickly and safely. Transfer it to a shallow container, cover the surface, and refrigerate promptly.
Fill only completely cooled shells. Warm pastry can melt the cream filling and produce a messy result.
Fill close to serving time. The moisture from the cream gradually softens the shells. Assemble them shortly before serving for the best texture.
Keep filled cream puffs refrigerated. Milk, eggs, whipped cream, and custard require appropriate refrigeration.
- Prep Time: 30 minutes
- Cooling and Filling Time: 2 hours
- Cook Time: 35–40 minutes
Nutrition
- Calories: 140–190 per cream puff
- Sodium: 80–130 mg
- Protein: 3–4 g
