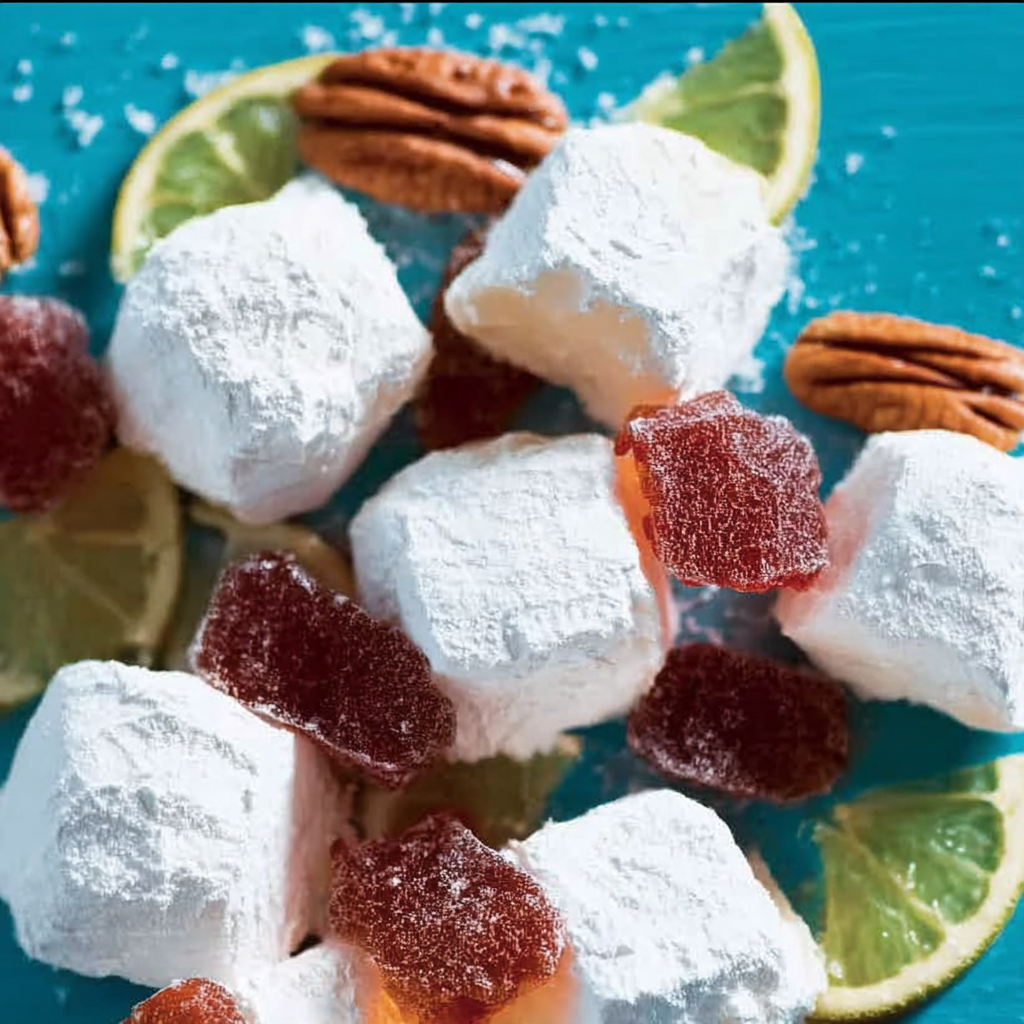
If you love old-fashioned homemade candy but want to skip the complicated process of boiling sugar syrup, this No-Cook Divinity Candy recipe is a wonderful treat to try. Inspired by traditional Southern divinity, this easy version offers a sweet, fluffy texture, a delicate vanilla flavor, and the option to add crunchy pecans for extra richness. It is a lovely addition to Christmas candy trays, holiday dessert tables, homemade gift boxes, and family celebrations.
Traditional divinity candy is famous for its light, cloudlike texture and sweet, melt-in-your-mouth consistency. Classic recipes usually require cooked sugar syrup, precise temperatures, and careful beating to create the characteristic fluffy candy. Although traditional divinity is delicious, the cooking process can be challenging for beginners, especially when humidity or inaccurate temperatures affect the final result.
This no-cook-inspired version takes a different approach by using marshmallow creme and powdered sugar to create a sweet, fluffy confection without boiling a sugar syrup. It is designed for home cooks who want a simpler candy-making experience with fewer specialized tools. The resulting candy is similar in spirit to divinity, although its texture is typically denser and more fudge-like than traditional egg-white divinity.
One of the best things about this easy no-cook divinity candy recipe is its simplicity. You can prepare the mixture with a handful of ingredients, add vanilla for warmth, fold in chopped pecans if desired, and shape the candy into individual pieces. There is no need for a candy thermometer or a saucepan full of boiling sugar syrup.
This recipe is particularly useful during the busy holiday season, when you may want to prepare several homemade treats without spending hours in the kitchen. The candy can be shaped into small portions, arranged in decorative paper cups, or packaged in food-safe containers to give as thoughtful homemade gifts.
The flavor is sweet and creamy, while vanilla gives the candy a classic homemade aroma. Pecans add a pleasant crunch that contrasts with the soft candy base. You can also customize the recipe with different extracts, chopped nuts, or a light chocolate drizzle.
If you are searching for an easy no-cook candy recipe, a simple Southern-inspired holiday sweet, or a beginner-friendly alternative to traditional divinity, this recipe is a convenient place to start.
Important note: This is a no-cook, marshmallow-creme-style divinity candy rather than traditional egg-white divinity. The method avoids cooking sugar syrup, but the candy still needs time to firm up. For the best result, measure the ingredients carefully, add the powdered sugar gradually, and allow the finished pieces to set before serving.
Ingredients for No-Cook Divinity Candy
The following ingredients make approximately 20–24 small candies, depending on the size of each portion.
1. Marshmallow creme
- 1 jar (approximately 7 ounces or 198 g) marshmallow creme
Marshmallow creme provides the fluffy, sweet base for this easy candy. Its soft consistency makes it easy to combine with powdered sugar and flavorings.
Choose a marshmallow creme or marshmallow fluff product rather than ordinary marshmallows, which have a different texture and may require a different preparation method.
2. Powdered sugar
- 3–4 cups (approximately 360–480 g) powdered sugar, added gradually
Powdered sugar thickens the mixture and helps the candies hold their shape. Begin with the smaller amount and add more as needed until the mixture becomes thick enough to scoop or shape.
The exact quantity depends on the brand of marshmallow creme, room temperature, and the consistency you prefer.
3. Unsalted butter
- 2 tablespoons (28 g) softened unsalted butter
Butter adds richness and helps create a smoother, more pleasant texture. Allow the butter to soften at room temperature before mixing.
Avoid melting it completely, as excess liquid fat can change the consistency of the candy.
4. Vanilla extract
- 1 teaspoon pure vanilla extract
Vanilla gives the candy a classic sweet flavor and enhances its homemade character.
Pure vanilla extract is ideal, although another suitable vanilla flavoring can be used according to its label instructions.
5. Chopped pecans
- 1/2 cup (approximately 55–60 g) finely chopped pecans, optional
Pecans are a traditional Southern-inspired addition that provides a buttery flavor and a satisfying crunch.
Chop them into small pieces so that they distribute evenly throughout the candy mixture. If you prefer a smooth candy, simply omit the pecans.
6. Salt
- A small pinch of salt, optional
A little salt balances the sweetness and enhances the vanilla and pecan flavors. Since marshmallow creme and powdered sugar are already sweet, you generally do not need much.
7. Optional finishing ingredients
- Extra chopped pecans for decoration
- Melted white chocolate for drizzling
- Melted semisweet chocolate for a contrasting finish
- A small amount of almond extract for a different flavor
- Festive sprinkles for holiday candy trays
Use these additions sparingly so the candy retains its simple, sweet character.
Preparation: How to Make No-Cook Divinity Candy
This easy preparation method eliminates the traditional step of boiling sugar syrup. Follow the instructions carefully to create a thick, scoopable candy mixture that can be shaped and allowed to set.
Step 1: Prepare your workspace
Before mixing the ingredients, prepare a large baking sheet or flat tray by lining it with parchment paper or a silicone baking mat.
Make sure the surface is clean, dry, and large enough to hold all the candy pieces without crowding them.
Measure the powdered sugar into a separate bowl. Keep the marshmallow creme, softened butter, vanilla extract, and optional chopped pecans close at hand.
Preparing everything in advance makes the process easier because the candy mixture may become thicker as you work.
If you plan to make decorative candy shapes, prepare a small cookie scoop or two spoons. A cookie scoop helps create more uniform portions, while two spoons are useful for shaping small mounds.
Step 2: Soften and mix the butter
Place the softened butter in a medium mixing bowl.
Using a hand mixer or sturdy spoon, beat the butter until it becomes smooth and creamy. This helps it blend evenly into the marshmallow creme.
Scrape down the sides of the bowl with a spatula as needed.
The butter should be soft enough to mix easily but not melted or oily. If it has become very warm, let it cool slightly before continuing.
Step 3: Add the marshmallow creme
Add the marshmallow creme to the bowl with the softened butter.
Mix slowly at first, then increase the speed slightly until the ingredients are reasonably well combined.
The mixture should look thick, creamy, and sticky. It may not become completely smooth immediately, but continued mixing and scraping the sides of the bowl should help distribute the butter.
Add the vanilla extract and optional pinch of salt. Mix again until the flavorings are evenly incorporated.
At this stage, the mixture will still be too soft to shape. The powdered sugar will provide most of the structure needed for the finished candy.
Step 4: Gradually add the powdered sugar
Add approximately 1 cup of powdered sugar to the marshmallow mixture and mix on low speed until incorporated.
Continue adding the powdered sugar in small batches, mixing after each addition. Scrape down the sides of the bowl to ensure that no pockets of dry sugar remain.
After approximately 3 cups, check the consistency before adding more.
The mixture should become thick enough to hold a mound when scooped. If it remains extremely sticky and soft, add more powdered sugar a tablespoon or two at a time.
Avoid adding all the sugar at once because this can create lumps and make it difficult to judge the final texture.
The goal is a soft, pliable mixture that can be shaped without spreading excessively. It should not be so dry that it crumbles when handled.
Step 5: Fold in the chopped pecans
If you are using pecans, add the chopped nuts to the thickened mixture.
Fold them in with a sturdy spatula until they are evenly distributed. Avoid excessive mixing, which can make the process unnecessarily difficult as the candy becomes thicker.
For a more decorative appearance, reserve a few pecan pieces to place on top of each candy before it sets.
If you prefer plain vanilla divinity-style candy, skip the pecans and continue to the next step.
You can also divide the mixture into two portions and add pecans to only one half, creating two different varieties in the same batch.
Step 6: Shape the candy
Use a small cookie scoop or two teaspoons to portion the mixture onto the prepared parchment paper.
Aim for approximately 1 tablespoon per piece for small candies, or slightly more if you prefer larger portions.
Leave a little space between the candies so that they are easy to lift once set.
If the mixture is sticky, lightly grease the spoon or scoop with a small amount of butter. Use only a little, since excess butter can make the candy greasy.
Shape each portion into a soft mound. Traditional divinity often has a fluffy, irregular appearance, so the pieces do not need to be perfectly smooth.
If desired, press a few chopped pecans gently onto the top of each piece.
Step 7: Allow the candy to set
Leave the shaped candies at room temperature until they become firm enough to handle.
Depending on the moisture in the ingredients, the amount of powdered sugar used, and the temperature of your kitchen, setting may take approximately 1–3 hours or longer.
The finished candies should hold their shape when lifted carefully. They will generally remain softer and denser than traditional cooked divinity.
If the surface stays excessively sticky, the mixture may need additional powdered sugar or more time to set. Add any extra sugar gradually rather than mixing in a large quantity at once.
Avoid covering the candy tightly while it is still warm or very moist, because trapped moisture can make the surface sticky.
Step 8: Decorate and finish
Once the candies have set, you can decorate them with a small amount of melted chocolate, white chocolate, or additional chopped pecans.
For a simple holiday presentation, place the candies in small paper candy cups and arrange them on a platter.
If using melted chocolate, allow it to set completely before stacking or packaging the candies.
Keep decorations light so that the vanilla flavor remains noticeable.
Step 9: Serve or package the candy
Once the candy is firm and the decorations have set, transfer the pieces to a clean, food-safe container.
If stacking the candies, place parchment paper between layers to help prevent sticking.
Serve the candy at a gathering, arrange it on a holiday dessert tray, or package it in decorative boxes as a homemade gift.
Because this recipe uses a marshmallow-creme base and butter, store it according to food-safety guidance for the products used. Refrigeration may be appropriate, especially in warm conditions, although chilling can make the candy firmer.
Variations of No-Cook Divinity Candy
One advantage of this recipe is that you can create several different flavors without changing the basic preparation method.
1. No-Cook Divinity Candy with Pecans
Pecans are a classic choice for Southern-inspired candy. Add finely chopped pecans to the mixture before shaping.
For additional flavor, lightly toast the pecans and allow them to cool completely before using them.
This variation provides a pleasant crunch and a buttery nut flavor that complements the vanilla.
2. Vanilla Bean Divinity Candy
Replace some or all of the vanilla extract with vanilla bean paste, following the product’s recommended substitution ratio.
The tiny vanilla bean specks create an attractive appearance and provide a more pronounced vanilla aroma.
This version is particularly nice for gift boxes and special occasions.
3. Chocolate-Dipped Divinity Candy
Once the candies have set, dip the bottoms or one side of each piece in melted semisweet chocolate.
Place them on parchment paper and let the chocolate firm up before serving.
The slight bitterness of the chocolate balances the sweet marshmallow base and makes the candy taste more like a confection from a specialty candy shop.
4. White Chocolate Divinity Candy
Drizzle melted white chocolate over the finished candies.
White chocolate complements vanilla and gives the candy a festive appearance, especially when decorated with a few chopped pecans.
Allow the drizzle to set before packaging.
5. Almond Vanilla Candy
Add a very small amount of almond extract alongside the vanilla.
Almond extract has a strong flavor, so begin with just a few drops and adjust carefully. Too much can overwhelm the delicate vanilla taste.
This variation works especially well with pecans or almonds.
6. Coconut Divinity Candy
Fold a small quantity of finely shredded coconut into the mixture.
Coconut provides additional texture and a mild sweetness. Use unsweetened coconut if you want to avoid making the candy even sweeter.
Keep the quantity moderate so the mixture remains easy to shape.
7. Holiday Divinity Candy
For Christmas or other celebrations, add festive sprinkles or decorate the candies with a small amount of colored white chocolate.
You can also make different shapes or place the candies in decorative paper cups.
If you are preparing the candy for a group, label the ingredients and clearly identify any nuts.
8. Maple Pecan Divinity Candy
Add a small amount of maple extract to the vanilla mixture and fold in chopped pecans.
Maple and pecan are a classic combination that creates a warm, autumn-inspired flavor.
Use maple extract rather than adding a large quantity of liquid maple syrup, which may make the candy too soft.
9. Mini Divinity Bites
Use a teaspoon to portion smaller candies.
Mini bites are convenient for dessert tables, party favors, and candy gift assortments. They also make portion sizes easier to manage.
Because they are smaller, they may set more quickly than larger pieces.
10. No-Pecan Vanilla Divinity
For a simple version, omit the nuts entirely and prepare the candy with vanilla alone.
This creates a smooth, sweet confection for people who prefer candies without crunchy pieces. If the candy is intended for someone with a nut allergy, verify all ingredients and avoid cross-contact during preparation.
Cooking Note
Although this recipe is described as no-cook, it is more accurately a no-sugar-syrup version of divinity candy. It does not require boiling sugar or reaching a candy-making temperature.
Measure the powdered sugar gradually. Different marshmallow creme products can vary in consistency, so the ideal quantity may vary slightly.
Use softened butter. Softened butter blends more evenly than cold butter and is less likely to create lumps.
Do not melt the butter. Melted butter may make the mixture greasy and can prevent the candy from setting as expected.
Mix on low speed when adding sugar. Powdered sugar can create a cloud when mixed too quickly. Gradual mixing helps prevent mess and produces a more even texture.
Allow sufficient setting time. The candies may be soft at first. Give them time to firm up before attempting to stack or package them.
Understand the texture. This shortcut recipe produces a marshmallow-based candy that is typically denser than traditional divinity made with whipped egg whites and cooked sugar syrup.
Store the candy carefully. Heat and humidity can affect its texture. Refrigerate when appropriate for the ingredients and local conditions.
Keep allergens in mind. The recipe contains dairy and may contain pecans or other nuts depending on your chosen variation. Check ingredient labels for additional allergens.
Serving Suggestions
No-Cook Divinity Candy is easy to serve in several ways, making it a convenient addition to holiday celebrations and everyday dessert tables.
Serve with coffee or tea
The sweet vanilla flavor pairs well with unsweetened coffee, espresso, black tea, or green tea.
Serve one or two candies alongside a hot drink for a simple afternoon treat.
Arrange on a holiday candy tray
Combine the candy with chocolate fudge, pecan pralines, chocolate bark, cookies, and other small sweets.
The light color of the vanilla candy adds variety to a platter filled with darker chocolate desserts.
Package as homemade gifts
Place the completely set candies in food-safe tins or decorative boxes lined with parchment paper.
Separate layers to help prevent sticking, and include a label listing the ingredients and any relevant allergens.
Serve at parties
Arrange the candies in small paper cups on a dessert table. Their individual portions make them easy for guests to pick up and enjoy.
For larger gatherings, make a mixture of plain vanilla pieces and pecan-studded candies to offer different textures.
Add to dessert boards
Use the candies as part of a dessert board with fresh fruit, cookies, chocolate pieces, and other small treats.
Because the candy is sweet, pairing it with less-sweet accompaniments helps balance the overall selection.
Tips for Perfect No-Cook Divinity Candy
- Use fresh ingredients. Fresh marshmallow creme and properly stored powdered sugar help provide a consistent texture.
- Measure carefully. Too much powdered sugar can make the candy dry, while too little can leave it sticky and difficult to shape.
- Add the sugar gradually. This helps prevent lumps and gives you better control over the consistency.
- Use softened butter. Soft butter blends more evenly and reduces the risk of lumps.
- Choose good-quality vanilla. Vanilla is one of the main flavors, so a good extract makes a noticeable difference.
- Chop the pecans finely. Smaller pieces are easier to distribute and make the candy easier to shape.
- Avoid excessive moisture. Do not add extra liquid flavorings without adjusting the consistency.
- Use parchment paper. It makes the candies easier to lift after setting.
- Keep portions consistent. A small cookie scoop helps create candies of similar size.
- Allow the candy to set completely. Moving the pieces too soon may deform them or cause them to stick together.
- Keep the kitchen cool and dry. High humidity can make sugar-based candies sticky.
- Store in an airtight container. Protect the candies from moisture and odors, while following safe-storage guidance for the ingredients.
- Do not expect the exact texture of traditional divinity. The marshmallow-creme version is a shortcut recipe with a different texture from the classic cooked confection.
- Test your preferred consistency. Start with the recommended amount of powdered sugar and add more in small increments if needed.
- Decorate after setting. Waiting until the candies are firm makes chocolate drizzling and packaging easier.
Prep Time, Cooking Time, and Total Time
These are estimates for a batch of approximately 20–24 small candies.
- Prep Time: 15 minutes
- Cooking Time: 0 minutes
- Setting Time: 1–3 hours
- Total Time: Approximately 1 hour and 15 minutes to 3 hours and 15 minutes
The recipe does not require stovetop cooking or an oven, but it does require time for the candy to firm up. Actual setting time depends on the consistency of the mixture and the temperature and humidity of your kitchen.
Nutritional Information
The following values are rough estimates for one candy, assuming the batch makes 24 pieces using marshmallow creme, 3–4 cups of powdered sugar, butter, vanilla, and pecans. Actual nutrition will vary by brand, quantity, and final yield.
- Calories: Approximately 100–140 per piece
- Protein: Approximately 0–1 g per piece
- Sodium: Approximately 15–45 mg per piece
Calories
Most of the calories come from the marshmallow creme, powdered sugar, and butter. Pecans contribute additional calories from fat, along with a small amount of protein.
Smaller pieces can make portion sizes easier to manage.
Protein
This candy contains relatively little protein. Pecans contribute a small amount, but the recipe is primarily a sweet treat rather than a protein-rich food.
Sodium
Sodium levels depend on the marshmallow creme, butter, and optional salt. Using unsalted butter and omitting the extra salt can help reduce sodium.
These are estimates rather than laboratory-tested values. For more accurate nutritional information, calculate the recipe using the exact products and quantities you use.
Frequently Asked Questions About No-Cook Divinity Candy
1. What is No-Cook Divinity Candy?
No-Cook Divinity Candy is a shortcut confection inspired by traditional Southern divinity. This version uses marshmallow creme, powdered sugar, butter, and vanilla to make a sweet candy without boiling sugar syrup.
It is convenient for beginners, although the texture is generally denser than traditional divinity.
2. Is this the same as traditional divinity candy?
No. Traditional divinity is usually made with whipped egg whites and cooked sugar syrup. It is known for its airy, delicate texture and can be sensitive to humidity and cooking temperature.
This shortcut version uses marshmallow creme as its base and produces a different, more marshmallow-like texture.
3. Do I need a candy thermometer?
No. This recipe does not require a candy thermometer because there is no sugar syrup to boil.
You only need ordinary mixing equipment, a bowl, a spatula, and parchment paper.
4. Why is my no-cook divinity mixture too sticky?
The mixture may contain too little powdered sugar, or the marshmallow creme may be particularly soft.
Add powdered sugar gradually, one tablespoon at a time, until the mixture becomes thick enough to shape. Avoid adding too much at once, as this can make the candy dry and crumbly.
5. Why is my candy too dry or crumbly?
Too much powdered sugar can make the candy stiff and difficult to shape. Measure carefully and stop adding sugar once the mixture holds its shape.
If the mixture becomes too stiff, gently work in a very small amount of marshmallow creme, then reassess the texture.
6. Can I make this candy without pecans?
Yes. Simply omit the pecans and prepare the vanilla mixture as directed.
You can also substitute another suitable nut if allergies are not a concern, or add a small amount of shredded coconut for texture.
7. How long does No-Cook Divinity Candy take to set?
The candy typically needs approximately 1–3 hours to firm up, although the exact time depends on the moisture content and room conditions.
Allow the pieces to set completely before stacking or packaging them.
8. How should I store No-Cook Divinity Candy?
Store the candy in a clean, airtight container and follow the storage guidance appropriate for the ingredients used. Because this version contains marshmallow creme and butter, refrigeration may be appropriate, particularly in a warm kitchen.
Keep the candy protected from moisture and avoid leaving it in direct sunlight or near heat.
9. Can I freeze No-Cook Divinity Candy?
Freezing may change the texture, so it is best to test a small quantity first. If freezing, place the fully set candies in an airtight freezer-safe container with parchment between layers.
Thaw them in the refrigerator and allow them to adjust gradually before opening the container to reduce condensation.
10. Can I use marshmallows instead of marshmallow creme?
Not as a direct substitution in this recipe. Marshmallows have a different structure and moisture balance, and replacing the creme may require melting and reformulating the mixture.
For predictable results, use marshmallow creme or choose a recipe specifically developed for marshmallows.
11. Can I add food coloring?
Yes. A small amount of food coloring can create festive colors for special occasions.
Use concentrated gel coloring sparingly because adding too much liquid can affect the consistency.
12. Can I use almond extract instead of vanilla?
Yes, but almond extract has a much stronger flavor. Begin with a few drops and adjust carefully.
You can also combine a small amount of almond extract with vanilla for a more complex flavor.
13. Can I make this recipe ahead of time?
Yes. Prepare the candy in advance, allow it to set fully, and store it appropriately in an airtight container.
For the best texture, avoid exposing the candy to heat or humidity before serving.
14. Is this candy suitable for Christmas gifts?
Yes. Its small portions and simple preparation make it a convenient choice for holiday candy boxes.
Package the candies only after they have set completely, and include an ingredient label, especially if the recipe contains pecans or other allergens.
15. Why does my candy look different from traditional divinity?
The recipe uses marshmallow creme rather than whipped egg whites and cooked sugar syrup. As a result, the texture is usually denser and more uniform.
If you want the classic airy, slightly crumbly texture, a traditional divinity recipe is the better option.
16. Can I make this recipe dairy-free?
A dairy-free version may be possible using a suitable plant-based butter alternative, but the texture can change depending on the product.
Check the marshmallow creme ingredients as well, since formulations vary. Use a recipe tested with your intended substitutions for the most reliable result.
17. How can I make the candy look more professional?
Use a small cookie scoop to create uniform portions, add a few pecan pieces on top, and finish with a thin chocolate drizzle after the candies have set.
Place each piece in a paper candy cup for an attractive presentation.
18. Can I make smaller candies for a party?
Absolutely. Use a teaspoon to portion small bites. Smaller candies are convenient for dessert tables and gift assortments.
Keep the pieces similar in size so that they set at approximately the same rate.
Conclusion
This No-Cook Divinity Candy recipe offers a simple way to prepare a sweet, vanilla-flavored confection without the traditional process of boiling sugar syrup. Made with marshmallow creme, powdered sugar, butter, and vanilla, the candy is easy to customize with pecans, chocolate, coconut, or other flavorings.
Its straightforward preparation makes it particularly useful for holiday baking seasons, when homemade treats are popular but time in the kitchen may be limited. You can prepare a batch for Christmas gatherings, package the pieces as edible gifts, or add them to a dessert tray alongside fudge, cookies, and other homemade sweets.
For the best results, add the powdered sugar gradually, aim for a thick but workable consistency, and allow the candies enough time to set before serving. Remember that this marshmallow-creme version has a different texture from traditional egg-white divinity, but it offers a convenient alternative for anyone looking for a no-cook candy recipe.
Whether you enjoy the candy plain, studded with pecans, or finished with a chocolate drizzle, this easy homemade confection is a delightful addition to your collection of simple sweets.
Prepare a batch, share it with family and friends, and enjoy the sweet vanilla flavor of homemade No-Cook Divinity Candy.
Print
No-Cook Divinity Candy – Easy, Fluffy Homemade Southern Candy
- Total Time: 1 hour and 15 minutes
Description
this No-Cook Divinity Candy recipe is a wonderful treat to try. Inspired by traditional Southern divinity, this easy version offers a sweet, fluffy texture, a delicate vanilla flavor, and the option to add crunchy pecans for extra richness. It is a lovely addition to Christmas candy trays, holiday dessert tables, homemade gift boxes, and family celebrations.
Ingredients
1. Marshmallow creme
- 1 jar (approximately 7 ounces or 198 g) marshmallow creme
Marshmallow creme provides the fluffy, sweet base for this easy candy. Its soft consistency makes it easy to combine with powdered sugar and flavorings.
Choose a marshmallow creme or marshmallow fluff product rather than ordinary marshmallows, which have a different texture and may require a different preparation method.
2. Powdered sugar
- 3–4 cups (approximately 360–480 g) powdered sugar, added gradually
Powdered sugar thickens the mixture and helps the candies hold their shape. Begin with the smaller amount and add more as needed until the mixture becomes thick enough to scoop or shape.
The exact quantity depends on the brand of marshmallow creme, room temperature, and the consistency you prefer.
3. Unsalted butter
- 2 tablespoons (28 g) softened unsalted butter
Butter adds richness and helps create a smoother, more pleasant texture. Allow the butter to soften at room temperature before mixing.
Avoid melting it completely, as excess liquid fat can change the consistency of the candy.
4. Vanilla extract
- 1 teaspoon pure vanilla extract
Vanilla gives the candy a classic sweet flavor and enhances its homemade character.
Pure vanilla extract is ideal, although another suitable vanilla flavoring can be used according to its label instructions.
5. Chopped pecans
- 1/2 cup (approximately 55–60 g) finely chopped pecans, optional
Pecans are a traditional Southern-inspired addition that provides a buttery flavor and a satisfying crunch.
Chop them into small pieces so that they distribute evenly throughout the candy mixture. If you prefer a smooth candy, simply omit the pecans.
6. Salt
- A small pinch of salt, optional
A little salt balances the sweetness and enhances the vanilla and pecan flavors. Since marshmallow creme and powdered sugar are already sweet, you generally do not need much.
7. Optional finishing ingredients
- Extra chopped pecans for decoration
- Melted white chocolate for drizzling
- Melted semisweet chocolate for a contrasting finish
- A small amount of almond extract for a different flavor
- Festive sprinkles for holiday candy trays
Use these additions sparingly so the candy retains its simple, sweet character.
Instructions
Before mixing the ingredients, prepare a large baking sheet or flat tray by lining it with parchment paper or a silicone baking mat.
Make sure the surface is clean, dry, and large enough to hold all the candy pieces without crowding them.
Measure the powdered sugar into a separate bowl. Keep the marshmallow creme, softened butter, vanilla extract, and optional chopped pecans close at hand.
Preparing everything in advance makes the process easier because the candy mixture may become thicker as you work.
If you plan to make decorative candy shapes, prepare a small cookie scoop or two spoons. A cookie scoop helps create more uniform portions, while two spoons are useful for shaping small mounds.
Step 2: Soften and mix the butter
Place the softened butter in a medium mixing bowl.
Using a hand mixer or sturdy spoon, beat the butter until it becomes smooth and creamy. This helps it blend evenly into the marshmallow creme.
Scrape down the sides of the bowl with a spatula as needed.
The butter should be soft enough to mix easily but not melted or oily. If it has become very warm, let it cool slightly before continuing.
Step 3: Add the marshmallow creme
Add the marshmallow creme to the bowl with the softened butter.
Mix slowly at first, then increase the speed slightly until the ingredients are reasonably well combined.
The mixture should look thick, creamy, and sticky. It may not become completely smooth immediately, but continued mixing and scraping the sides of the bowl should help distribute the butter.
Add the vanilla extract and optional pinch of salt. Mix again until the flavorings are evenly incorporated.
At this stage, the mixture will still be too soft to shape. The powdered sugar will provide most of the structure needed for the finished candy.
Step 4: Gradually add the powdered sugar
Add approximately 1 cup of powdered sugar to the marshmallow mixture and mix on low speed until incorporated.
Continue adding the powdered sugar in small batches, mixing after each addition. Scrape down the sides of the bowl to ensure that no pockets of dry sugar remain.
After approximately 3 cups, check the consistency before adding more.
The mixture should become thick enough to hold a mound when scooped. If it remains extremely sticky and soft, add more powdered sugar a tablespoon or two at a time.
Avoid adding all the sugar at once because this can create lumps and make it difficult to judge the final texture.
The goal is a soft, pliable mixture that can be shaped without spreading excessively. It should not be so dry that it crumbles when handled.
Step 5: Fold in the chopped pecans
If you are using pecans, add the chopped nuts to the thickened mixture.
Fold them in with a sturdy spatula until they are evenly distributed. Avoid excessive mixing, which can make the process unnecessarily difficult as the candy becomes thicker.
For a more decorative appearance, reserve a few pecan pieces to place on top of each candy before it sets.
If you prefer plain vanilla divinity-style candy, skip the pecans and continue to the next step.
You can also divide the mixture into two portions and add pecans to only one half, creating two different varieties in the same batch.
Step 6: Shape the candy
Use a small cookie scoop or two teaspoons to portion the mixture onto the prepared parchment paper.
Aim for approximately 1 tablespoon per piece for small candies, or slightly more if you prefer larger portions.
Leave a little space between the candies so that they are easy to lift once set.
If the mixture is sticky, lightly grease the spoon or scoop with a small amount of butter. Use only a little, since excess butter can make the candy greasy.
Shape each portion into a soft mound. Traditional divinity often has a fluffy, irregular appearance, so the pieces do not need to be perfectly smooth.
If desired, press a few chopped pecans gently onto the top of each piece.
Step 7: Allow the candy to set
Leave the shaped candies at room temperature until they become firm enough to handle.
Depending on the moisture in the ingredients, the amount of powdered sugar used, and the temperature of your kitchen, setting may take approximately 1–3 hours or longer.
The finished candies should hold their shape when lifted carefully. They will generally remain softer and denser than traditional cooked divinity.
If the surface stays excessively sticky, the mixture may need additional powdered sugar or more time to set. Add any extra sugar gradually rather than mixing in a large quantity at once.
Avoid covering the candy tightly while it is still warm or very moist, because trapped moisture can make the surface sticky.
Step 8: Decorate and finish
Once the candies have set, you can decorate them with a small amount of melted chocolate, white chocolate, or additional chopped pecans.
For a simple holiday presentation, place the candies in small paper candy cups and arrange them on a platter.
If using melted chocolate, allow it to set completely before stacking or packaging the candies.
Keep decorations light so that the vanilla flavor remains noticeable.
Step 9: Serve or package the candy
Once the candy is firm and the decorations have set, transfer the pieces to a clean, food-safe container.
If stacking the candies, place parchment paper between layers to help prevent sticking.
Serve the candy at a gathering, arrange it on a holiday dessert tray, or package it in decorative boxes as a homemade gift.
Because this recipe uses a marshmallow-creme base and butter, store it according to food-safety guidance for the products used. Refrigeration may be appropriate, especially in warm conditions, although chilling can make the candy firmer.
Notes
Although this recipe is described as no-cook, it is more accurately a no-sugar-syrup version of divinity candy. It does not require boiling sugar or reaching a candy-making temperature.
Measure the powdered sugar gradually. Different marshmallow creme products can vary in consistency, so the ideal quantity may vary slightly.
Use softened butter. Softened butter blends more evenly than cold butter and is less likely to create lumps.
Do not melt the butter. Melted butter may make the mixture greasy and can prevent the candy from setting as expected.
Mix on low speed when adding sugar. Powdered sugar can create a cloud when mixed too quickly. Gradual mixing helps prevent mess and produces a more even texture.
Allow sufficient setting time. The candies may be soft at first. Give them time to firm up before attempting to stack or package them.
Understand the texture. This shortcut recipe produces a marshmallow-based candy that is typically denser than traditional divinity made with whipped egg whites and cooked sugar syrup.
Store the candy carefully. Heat and humidity can affect its texture. Refrigerate when appropriate for the ingredients and local conditions.
Keep allergens in mind. The recipe contains dairy and may contain pecans or other nuts depending on your chosen variation. Check ingredient labels for additional allergens.
- Prep Time: 15 minutes
- Setting Time: 1–3 hours
- Cook Time: 0 minutes
Nutrition
- Calories: 100–140 per piece
- Sodium: 15–45 mg per piece
- Protein: 0–1 g per piece
