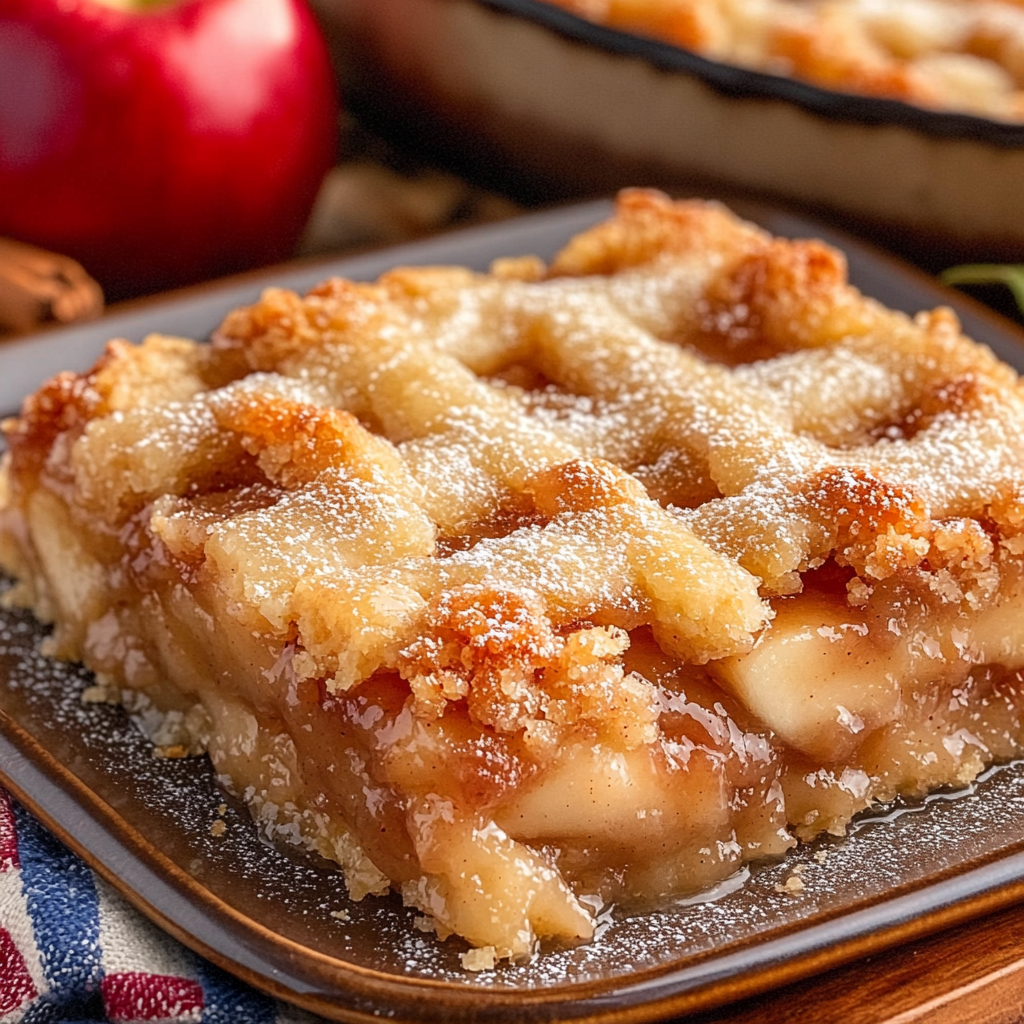
Homemade Apple Pie Bars are everything you love about a classic apple pie, transformed into an easy-to-serve dessert bar. Instead of preparing a traditional pie crust and worrying about rolling, shaping, and transferring delicate pastry, this recipe gives you a buttery shortbread-style crust, a generous layer of tender cinnamon apples, and a golden crumb topping baked together in one pan.
These easy apple pie bars are packed with warm fall flavors from fresh apples, cinnamon, brown sugar, and a touch of nutmeg. The buttery crust provides the perfect contrast to the soft apple filling, while the crumb topping becomes lightly crisp and golden in the oven.
This homemade apple dessert is perfect for Thanksgiving, fall gatherings, Sunday dinners, bake sales, potlucks, holiday parties, or simply enjoying with a cup of coffee on a cool afternoon. They have all the comforting flavor of traditional homemade apple pie without the extra work.
One of the best things about these apple pie bars is their texture. The bottom crust stays rich and buttery, the middle becomes soft and jammy with cinnamon-spiced apples, and the top develops a delicious golden crumble. Serve them warm with vanilla ice cream for an unforgettable apple dessert.
Whether you’re looking for an easy fall baking recipe, a Thanksgiving dessert, or a simple way to use fresh apples, these Homemade Apple Pie Bars are a recipe worth keeping.
Ingredients
For the Buttery Crust and Crumb Topping:
- 2 cups all-purpose flour
- ¾ cup granulated sugar
- ½ cup packed light brown sugar
- 1 cup unsalted butter, melted
- ½ teaspoon salt
- 1 teaspoon vanilla extract
- ½ teaspoon ground cinnamon
For the Apple Filling:
- 5–6 medium apples, peeled, cored, and thinly sliced
- ½ cup granulated sugar
- ¼ cup packed brown sugar
- 2 tablespoons all-purpose flour
- 1 tablespoon lemon juice
- 1 teaspoon ground cinnamon
- ¼ teaspoon ground nutmeg
- 1 teaspoon vanilla extract
- Pinch of salt
Optional Glaze:
- 1 cup powdered sugar
- 1–2 tablespoons milk or heavy cream
- ½ teaspoon vanilla extract
Preparation
Step 1: Prepare the Baking Pan
Preheat your oven to 350°F (175°C).
Line a 9×13-inch baking pan with parchment paper, leaving a little parchment hanging over the sides. This makes it much easier to lift the finished apple pie bars from the pan after cooling.
Lightly grease the parchment and the exposed sides of the pan with butter or nonstick cooking spray.
Step 2: Make the Buttery Crust Mixture
In a large mixing bowl, combine the all-purpose flour, granulated sugar, brown sugar, salt, and cinnamon.
Pour in the melted butter and vanilla extract. Stir everything together until the mixture forms a soft, crumbly dough.
The mixture should be moist enough to hold together when pressed but still have a slightly crumbly texture.
Step 3: Form the Bottom Crust
Set aside approximately 1 to 1½ cups of the crumb mixture for the topping.
Press the remaining mixture firmly and evenly into the bottom of the prepared baking pan.
Use the bottom of a measuring cup or the back of a spoon to create an even layer.
Bake the crust for approximately 15–18 minutes, just until it begins to look lightly golden around the edges.
Do not overbake the crust at this stage because it will bake again with the apple filling.
Step 4: Prepare the Fresh Apple Filling
While the crust is baking, prepare the apples.
Peel, core, and thinly slice the apples. Try to slice them into relatively similar thicknesses so they cook evenly.
Place the sliced apples in a large bowl.
Add the granulated sugar, brown sugar, flour, lemon juice, cinnamon, nutmeg, vanilla extract, and salt.
Gently toss everything together until the apples are evenly coated.
The flour helps absorb some of the natural juices released by the apples while baking, creating a thicker apple pie-style filling instead of a watery layer.
Step 5: Add the Apple Layer
Remove the partially baked crust from the oven.
Arrange the cinnamon-coated apples evenly over the warm crust.
Spread them into one even layer, making sure the apples reach the corners of the pan.
If there is a little extra apple juice and cinnamon mixture remaining in the bowl, drizzle it lightly over the apples.
Step 6: Add the Crumb Topping
Take the reserved crust mixture and crumble it evenly over the apples.
You can use larger crumbs for a rustic homemade appearance or smaller crumbs for a more traditional crumble topping.
Make sure some of the apple filling remains visible between the crumbs so the finished bars have a beautiful golden, homemade appearance.
Step 7: Bake the Apple Pie Bars
Place the pan back into the preheated oven.
Bake for approximately 40–50 minutes, or until the topping is golden brown and the apple filling is bubbling around the edges.
The apples should be tender when pierced with a knife, and the crumb topping should look golden and set.
If the topping begins browning too quickly, loosely cover the pan with aluminum foil for the final portion of baking.
Step 8: Cool Completely
Remove the apple pie bars from the oven and place the pan on a cooling rack.
Allow the bars to cool for at least 1½–2 hours before slicing.
For the cleanest cuts, refrigerate them for an additional 30–60 minutes after they have cooled.
This cooling time is important because it allows the apple filling to firm up and prevents the bars from falling apart when sliced.
Step 9: Prepare the Optional Glaze
If you want an extra sweet finish, prepare a simple vanilla glaze.
Whisk together the powdered sugar, milk or heavy cream, and vanilla extract until smooth.
Add a tiny amount of milk at a time until you reach your desired consistency.
The glaze should be thick enough to drizzle but thin enough to flow easily from a spoon.
Step 10: Slice the Apple Pie Bars
Use the parchment paper overhang to carefully lift the cooled dessert from the pan.
Transfer it to a cutting board.
Using a sharp knife, cut the apple pie into squares or rectangular bars.
For neat bakery-style pieces, wipe the knife clean between cuts.
Step 11: Drizzle and Serve
Drizzle the vanilla glaze over the cooled apple pie bars.
You can drizzle the entire dessert before slicing or drizzle each individual serving.
For an especially delicious presentation, serve a warm apple pie bar with a scoop of vanilla ice cream and a light sprinkle of cinnamon.
Variation
1. Caramel Apple Pie Bars
Drizzle homemade or store-bought caramel sauce over the finished bars before serving. The combination of caramel, cinnamon apples, and buttery crust creates an irresistible caramel apple dessert.
2. Apple Pecan Pie Bars
Add ½–¾ cup chopped pecans to the crumb topping. The pecans become toasted and crunchy while baking and add wonderful texture.
3. Apple Crumble Bars
Increase the amount of crumb topping and add ½ cup old-fashioned rolled oats for a heartier apple crumble texture.
4. Apple Cranberry Bars
Add ½ cup dried cranberries to the apple filling for a sweet-tart flavor combination that’s especially delicious during Thanksgiving and Christmas.
5. Caramel Pecan Apple Bars
Combine chopped pecans with a generous caramel drizzle after baking for a rich, holiday-style dessert.
6. Maple Apple Pie Bars
Replace part of the brown sugar with pure maple syrup and add a small amount of maple extract or extra vanilla for a warm maple flavor.
7. Apple Cinnamon Cheesecake Bars
Spread a thin layer of sweetened cream cheese between the crust and apple filling for a creamy cheesecake-style variation.
8. Gluten-Free Apple Pie Bars
Use a reliable 1-to-1 gluten-free all-purpose flour blend in place of regular flour. Make sure the other ingredients are also certified gluten-free if needed.
COOKING Note:
Choose apples that hold their shape well during baking. Granny Smith, Honeycrisp, Pink Lady, Braeburn, and Fuji are excellent choices.
For the best flavor, you can also combine two different varieties of apples. A tart apple mixed with a naturally sweet apple creates a more balanced filling.
Avoid cutting the apples too thick because they may remain firm after the bars are finished baking. Thin, even slices cook more consistently and create a softer apple pie filling.
Do not skip the cooling stage. Freshly baked apple pie bars are extremely soft and the filling needs time to set. Cutting them too early can result in messy, loose bars.
For extra-crispy edges, allow the bars to cool completely in the pan before slicing.
Serving Suggestions:
Serve Homemade Apple Pie Bars warm with:
- Vanilla ice cream
- Whipped cream
- Caramel sauce
- Powdered sugar
- Cinnamon sugar
- Homemade whipped cream
- Vanilla glaze
- Salted caramel
- Chopped toasted pecans
- A drizzle of maple syrup
- A cup of hot coffee
- Apple cider
- Hot tea
For Thanksgiving or Christmas, arrange the bars on a large serving platter and drizzle them with vanilla icing or caramel sauce just before serving.
For an extra special dessert, warm one apple pie bar for several seconds and place it beside a scoop of vanilla ice cream. The contrast between the warm cinnamon apples and cold creamy ice cream makes this simple dessert incredibly satisfying.
Tips:
Use the Right Apples
Use apples that are firm enough to hold their shape during baking. A combination of tart and sweet apples gives the filling the best flavor.
Slice Apples Evenly
Thin, evenly sliced apples cook at the same rate and create a smoother filling.
Don’t Add Too Much Liquid
Apples naturally release juice while baking. The flour in the filling helps absorb those juices, so avoid adding unnecessary liquid.
Pack the Crust Firmly
Press the bottom crust firmly into the pan. A compact crust creates a sturdy base for the apple filling.
Reserve Enough Crumb Topping
Remember to set aside enough of the dough mixture before pressing the rest into the pan.
Don’t Overbake
Bake until the topping is golden and the apples are tender. Overbaking can make the crust overly hard and dry.
Let the Bars Cool
Cooling allows the apple filling to set and makes slicing much easier.
Chill for Cleaner Slices
For picture-perfect apple pie bars, refrigerate them after cooling before cutting.
Use Parchment Paper
Parchment makes removing the entire dessert from the pan much easier and helps prevent sticking.
Make Them Ahead
These bars are excellent for preparing a day ahead. Store them covered in the refrigerator and bring them closer to room temperature before serving.
Add Caramel
If you love caramel apples, a generous caramel drizzle takes these apple pie bars to another level.
Don’t Overcrowd the Apples
Spread the apple slices evenly rather than piling them too high in the center. This helps them bake evenly.
Prep Time:
25 minutes
Cooking Time:
55–65 minutes
Total Time:
1 hour 20 minutes to 1 hour 30 minutes, plus cooling time
Nutritional Information:
Approximate per serving and will vary depending on serving size, apples used, and optional glaze.
- Calories: 310–350
- Protein: 3–4 g
- Sodium: 150–210 mg
FAQs
Can I make Homemade Apple Pie Bars ahead of time?
Yes. Homemade Apple Pie Bars are excellent for making ahead. Prepare them the day before serving, allow them to cool completely, cover them, and refrigerate.
What are the best apples for apple pie bars?
Granny Smith, Honeycrisp, Pink Lady, Braeburn, and Fuji are excellent options. You can also combine tart and sweet apples for a more complex flavor.
Do I have to peel the apples?
Peeling is recommended because it creates a softer, smoother apple pie filling. However, you can leave the peel on if you prefer a more rustic dessert.
Why are my apple pie bars falling apart?
The most common reason is cutting them while they are still warm. The filling needs time to cool and set. Allow the bars to cool completely before slicing.
Can I freeze apple pie bars?
Yes. Allow the bars to cool completely, cut them into individual portions, wrap them tightly, and place them in a freezer-safe container. Freeze for up to about 2–3 months for the best quality.
How do I thaw frozen apple pie bars?
Transfer them to the refrigerator and allow them to thaw overnight. You can also warm individual bars gently in the microwave before serving.
Can I use store-bought caramel sauce?
Absolutely. Store-bought caramel sauce works perfectly for an easy caramel apple pie bar variation.
Can I add nuts?
Yes. Chopped pecans or walnuts are delicious in the crumb topping. Pecans pair especially well with cinnamon apples and brown sugar.
Can I use oats in the topping?
Yes. Add old-fashioned rolled oats to the crumb mixture to turn these into delicious apple crumble bars.
Should apple pie bars be refrigerated?
Because of the fresh apple filling, refrigeration is recommended for longer storage. Store covered in the refrigerator for several days.
Can I serve apple pie bars warm?
Absolutely. Warm them gently and serve with vanilla ice cream, whipped cream, or caramel sauce.
How do I get clean slices?
Cool the bars completely, then refrigerate them before slicing. Use a sharp knife and wipe it clean between cuts.
Can I use a different size pan?
A 9×13-inch pan creates a good thickness for these bars. Using a smaller pan will make them thicker and may require additional baking time.
Why is my apple filling watery?
Some apple varieties release more moisture than others. Using a small amount of flour in the filling helps absorb excess juices. Also, allow the bars to cool fully before judging the final consistency.
Can I make these apple pie bars without the glaze?
Yes. The glaze is completely optional. The bars are already sweet and flavorful without it.
Can I add lemon zest?
Yes. A little fresh lemon zest can brighten the apple filling and complement the cinnamon beautifully.
Are these good for Thanksgiving?
Absolutely. Homemade Apple Pie Bars are an easy alternative to traditional apple pie and are perfect for Thanksgiving, Friendsgiving, fall parties, and holiday dessert tables.
Conclusion
These Homemade Apple Pie Bars bring all the comforting flavors of classic homemade apple pie into an easy, portable dessert. With a buttery golden crust, tender cinnamon-spiced apples, and a delicious crumb topping, every bite combines sweet, warm, buttery, and slightly tart flavors.
They’re much easier than making a traditional apple pie while still delivering that classic homemade taste everyone loves. Fresh apples, brown sugar, cinnamon, vanilla, and butter come together to create a cozy dessert that’s perfect for fall baking.
Whether you’re preparing dessert for Thanksgiving, a family dinner, a holiday gathering, or simply craving an easy apple dessert, these Homemade Apple Pie Bars are a delicious choice. Serve them plain, dusted with powdered sugar, drizzled with caramel, or warm with vanilla ice cream for the ultimate apple pie experience.
Print
Homemade Apple Pie Bars Recipe
- Total Time: 1 hour 20 minutes
Description
Homemade Apple Pie Bars are everything you love about a classic apple pie, transformed into an easy-to-serve dessert bar. Instead of preparing a traditional pie crust and worrying about rolling, shaping, and transferring delicate pastry, this recipe gives you a buttery shortbread-style crust, a generous layer of tender cinnamon apples, and a golden crumb topping baked together in one pan.
Ingredients
For the Buttery Crust and Crumb Topping:
- 2 cups all-purpose flour
- ¾ cup granulated sugar
- ½ cup packed light brown sugar
- 1 cup unsalted butter, melted
- ½ teaspoon salt
- 1 teaspoon vanilla extract
- ½ teaspoon ground cinnamon
For the Apple Filling:
- 5–6 medium apples, peeled, cored, and thinly sliced
- ½ cup granulated sugar
- ¼ cup packed brown sugar
- 2 tablespoons all-purpose flour
- 1 tablespoon lemon juice
- 1 teaspoon ground cinnamon
- ¼ teaspoon ground nutmeg
- 1 teaspoon vanilla extract
- Pinch of salt
Optional Glaze:
- 1 cup powdered sugar
- 1–2 tablespoons milk or heavy cream
- ½ teaspoon vanilla extract
Instructions
Preheat your oven to 350°F (175°C).
Line a 9×13-inch baking pan with parchment paper, leaving a little parchment hanging over the sides. This makes it much easier to lift the finished apple pie bars from the pan after cooling.
Lightly grease the parchment and the exposed sides of the pan with butter or nonstick cooking spray.
In a large mixing bowl, combine the all-purpose flour, granulated sugar, brown sugar, salt, and cinnamon.
Pour in the melted butter and vanilla extract. Stir everything together until the mixture forms a soft, crumbly dough.
The mixture should be moist enough to hold together when pressed but still have a slightly crumbly texture.
Set aside approximately 1 to 1½ cups of the crumb mixture for the topping.
Press the remaining mixture firmly and evenly into the bottom of the prepared baking pan.
Use the bottom of a measuring cup or the back of a spoon to create an even layer.
Bake the crust for approximately 15–18 minutes, just until it begins to look lightly golden around the edges.
Do not overbake the crust at this stage because it will bake again with the apple filling.
While the crust is baking, prepare the apples.
Peel, core, and thinly slice the apples. Try to slice them into relatively similar thicknesses so they cook evenly.
Place the sliced apples in a large bowl.
Add the granulated sugar, brown sugar, flour, lemon juice, cinnamon, nutmeg, vanilla extract, and salt.
Gently toss everything together until the apples are evenly coated.
The flour helps absorb some of the natural juices released by the apples while baking, creating a thicker apple pie-style filling instead of a watery layer.
Remove the partially baked crust from the oven.
Arrange the cinnamon-coated apples evenly over the warm crust.
Spread them into one even layer, making sure the apples reach the corners of the pan.
If there is a little extra apple juice and cinnamon mixture remaining in the bowl, drizzle it lightly over the apples.
Take the reserved crust mixture and crumble it evenly over the apples.
You can use larger crumbs for a rustic homemade appearance or smaller crumbs for a more traditional crumble topping.
Make sure some of the apple filling remains visible between the crumbs so the finished bars have a beautiful golden, homemade appearance.
Place the pan back into the preheated oven.
Bake for approximately 40–50 minutes, or until the topping is golden brown and the apple filling is bubbling around the edges.
The apples should be tender when pierced with a knife, and the crumb topping should look golden and set.
If the topping begins browning too quickly, loosely cover the pan with aluminum foil for the final portion of baking.
Remove the apple pie bars from the oven and place the pan on a cooling rack.
Allow the bars to cool for at least 1½–2 hours before slicing.
For the cleanest cuts, refrigerate them for an additional 30–60 minutes after they have cooled.
This cooling time is important because it allows the apple filling to firm up and prevents the bars from falling apart when sliced.
If you want an extra sweet finish, prepare a simple vanilla glaze.
Whisk together the powdered sugar, milk or heavy cream, and vanilla extract until smooth.
Add a tiny amount of milk at a time until you reach your desired consistency.
The glaze should be thick enough to drizzle but thin enough to flow easily from a spoon.
Use the parchment paper overhang to carefully lift the cooled dessert from the pan.
Transfer it to a cutting board.
Using a sharp knife, cut the apple pie into squares or rectangular bars.
For neat bakery-style pieces, wipe the knife clean between cuts.
Drizzle the vanilla glaze over the cooled apple pie bars.
You can drizzle the entire dessert before slicing or drizzle each individual serving.
For an especially delicious presentation, serve a warm apple pie bar with a scoop of vanilla ice cream and a light sprinkle of cinnamon.
Notes
Choose apples that hold their shape well during baking. Granny Smith, Honeycrisp, Pink Lady, Braeburn, and Fuji are excellent choices.
For the best flavor, you can also combine two different varieties of apples. A tart apple mixed with a naturally sweet apple creates a more balanced filling.
Avoid cutting the apples too thick because they may remain firm after the bars are finished baking. Thin, even slices cook more consistently and create a softer apple pie filling.
Do not skip the cooling stage. Freshly baked apple pie bars are extremely soft and the filling needs time to set. Cutting them too early can result in messy, loose bars.
For extra-crispy edges, allow the bars to cool completely in the pan before slicing.
- Prep Time: 25 minutes
- Cook Time: 55–65 minutes
Nutrition
- Calories: 310–350
- Sodium: 150–210 mg
- Protein: 3–4 g
