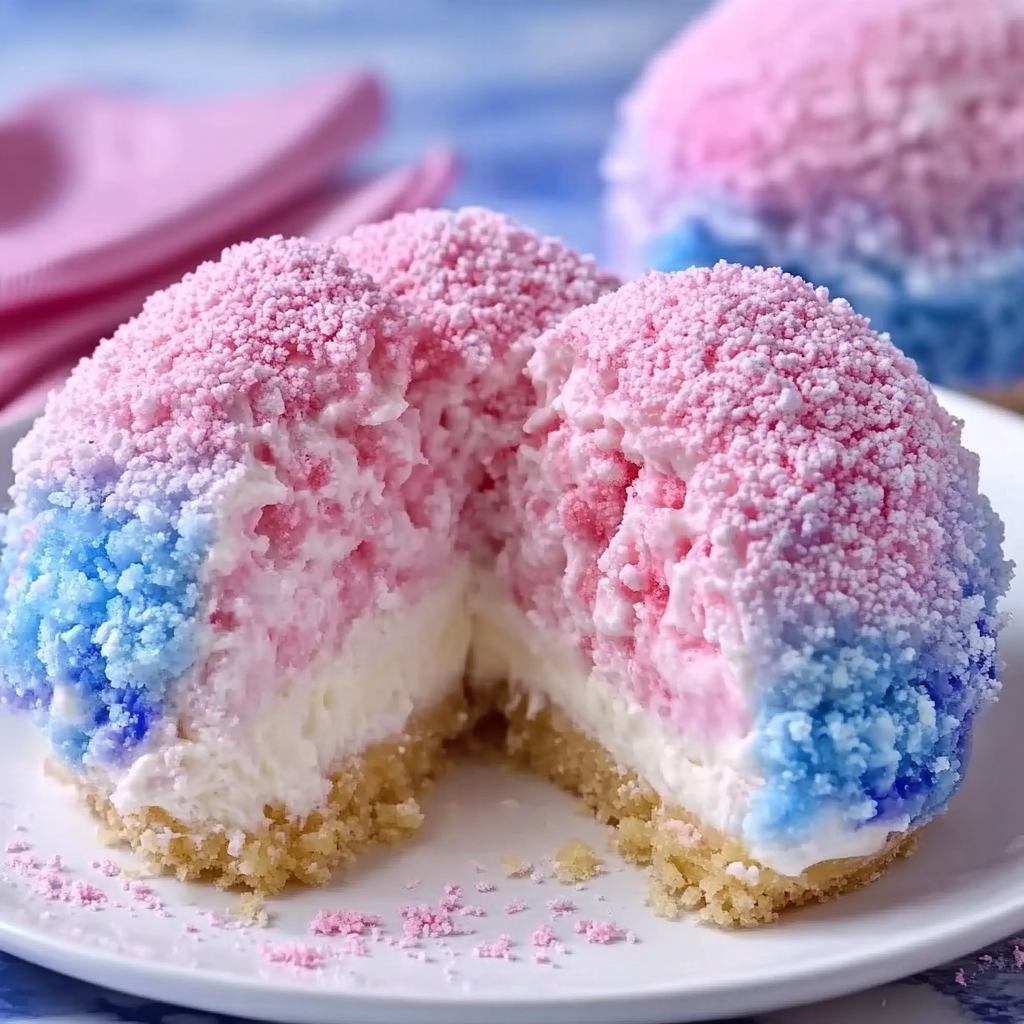
Bring a little carnival magic to your dessert table with this dreamy Cotton Candy Cheesecake! It combines a buttery graham cracker crust with a smooth, fluffy cheesecake filling flavored with sweet cotton candy. Beautiful swirls of pink and blue make every slice look like a colorful cloud, while the creamy texture melts in your mouth.
The best part is that this cheesecake is completely no-bake. You don’t need a water bath, complicated baking techniques, or special equipment. The crust comes together with crushed graham crackers and melted butter, while the filling is made with cream cheese, whipped cream, powdered sugar, and cotton candy flavoring.
After chilling, the cheesecake becomes firm enough to slice while keeping its light, mousse-like texture. The pastel colors make it especially fun for birthday parties, baby showers, summer celebrations, carnival-themed events, and family gatherings.
If you love fun desserts that taste as wonderful as they look, this Cotton Candy Cheesecake is a must-try. Serve it cold, add a little whipped cream, and finish each slice with a sprinkle of cotton candy-inspired decorations for an unforgettable dessert.
Why You’ll Love This Cotton Candy Cheesecake
- No oven required: This recipe is completely no-bake, making it convenient when you don’t want to heat up the kitchen.
- Fun cotton candy flavor: Cotton candy flavoring gives the cheesecake its sweet, nostalgic carnival-inspired taste.
- Beautiful pastel colors: Pink and blue swirls create a lovely presentation without complicated decorating.
- Creamy texture: Whipped cream makes the filling light, fluffy, and smooth.
- Perfect for celebrations: It’s a wonderful choice for birthdays, baby showers, summer parties, and holiday dessert tables.
- Make-ahead friendly: The cheesecake needs several hours to chill, so you can prepare it the day before serving.
Ingredients
This recipe makes one 9-inch cheesecake, approximately 12 slices.
For the Graham Cracker Crust
- 2 cups graham cracker crumbs
- 1/3 cup unsalted butter, melted
- 2 tablespoons granulated sugar
- 1 pinch salt
For the Cotton Candy Cheesecake Filling
- 24 ounces full-fat cream cheese, softened
- 1 cup powdered sugar
- 1 cup cold heavy whipping cream
- 1/3 cup sour cream, at room temperature
- 1 teaspoon vanilla extract
- 1 1/2 teaspoons cotton candy flavoring, or to taste
- A few drops of pink gel food coloring
- A few drops of blue gel food coloring
For the Topping
- 1 cup whipped cream or prepared whipped topping
- Pink and blue sprinkles
- Small pieces of cotton candy, optional
- Extra cotton candy flavoring, optional
Ingredient Notes and Substitutions
Graham crackers: These create a buttery, slightly sweet crust that complements the cotton candy filling. You can use digestive biscuits or vanilla wafer cookies instead.
Unsalted butter: Melted butter binds the crumbs together and helps the crust hold its shape when chilled. If using salted butter, omit the extra pinch of salt.
Cream cheese: Full-fat block cream cheese is best for a firm, creamy filling. Avoid whipped or spreadable cream cheese because it contains more air and may produce a softer cheesecake.
Powdered sugar: Powdered sugar dissolves smoothly into the cream cheese and helps create a silky texture. It also adds sweetness without making the filling grainy.
Heavy whipping cream: Cold heavy cream creates the fluffy texture that makes this cheesecake feel light. Use cream with at least 36% milk fat for the best whipping results.
Sour cream: This adds a subtle tang that balances the sweetness of the cotton candy flavoring. Full-fat Greek yogurt can be used as an alternative, although the flavor will be slightly different.
Cotton candy flavoring: This is the ingredient that gives the cheesecake its signature carnival flavor. Use a food-grade flavoring intended for baking or desserts. Different brands vary in strength, so start with the recommended amount on the bottle and adjust carefully.
Gel food coloring: Pink and blue gel colors create vibrant pastel swirls without adding too much liquid. You can use only pink, only blue, or any colors you prefer.
Whipped cream: Freshly whipped cream makes a beautiful topping. Prepared whipped topping can also be used for convenience.
How to Make Cotton Candy Cheesecake
Step 1: Prepare the Graham Cracker Crust
Place the graham crackers in a food processor and pulse until they become fine crumbs. If you don’t have a food processor, put them in a sealed plastic bag and crush them with a rolling pin.
Transfer the crumbs to a medium mixing bowl. Add the melted butter, granulated sugar, and a pinch of salt.
Stir until all the crumbs are evenly coated and the mixture resembles wet sand.
Press the mixture firmly into the bottom of a 9-inch springform pan. Use the bottom of a measuring cup to create an even layer, pressing slightly up the sides if desired.
Place the crust in the refrigerator for at least 20–30 minutes while preparing the filling.
Step 2: Beat the Cream Cheese
Place the softened cream cheese in a large mixing bowl.
Using an electric mixer, beat on medium speed for approximately 2–3 minutes until smooth and creamy.
Scrape down the sides and bottom of the bowl with a spatula to remove any lumps.
Add the powdered sugar and mix on low speed until incorporated. Then add the sour cream, vanilla extract, and cotton candy flavoring.
Beat again until the mixture is smooth and fluffy.
Taste the filling and adjust the cotton candy flavoring if necessary, following the manufacturer’s recommended amount.
Step 3: Whip the Heavy Cream
In a separate chilled bowl, pour in the cold heavy whipping cream.
Beat with an electric mixer on medium-high speed until stiff peaks form. This usually takes approximately 3–5 minutes, depending on your mixer.
The whipped cream should hold its shape when you lift the beaters. Be careful not to overwhip it, as it can become grainy and begin turning into butter.
Step 4: Combine the Cheesecake Filling
Add approximately one-third of the whipped cream to the cream cheese mixture and gently fold it in to loosen the filling.
Add the remaining whipped cream in two additions, folding gently with a spatula until no large white streaks remain.
Avoid vigorous mixing because this can deflate the whipped cream and make the cheesecake less fluffy.
The finished filling should be thick, smooth, and airy.
Step 5: Divide and Color the Filling
Divide the cheesecake mixture evenly between two separate bowls.
Add a few drops of pink gel food coloring to one bowl and a few drops of blue gel food coloring to the other.
Gently fold each mixture until the colors are evenly distributed.
Add more coloring a little at a time until you achieve your preferred pastel shades.
Step 6: Create the Cotton Candy Swirl
Remove the chilled crust from the refrigerator.
Spoon alternating portions of pink and blue cheesecake filling over the crust. Continue layering the colors until all the filling has been used.
Use a butter knife or skewer to gently swirl the colors together. Make only a few passes so the pink and blue remain distinct rather than blending into one uniform color.
Smooth the top lightly with an offset spatula.
Step 7: Chill Until Firm
Cover the springform pan loosely with plastic wrap or foil.
Refrigerate for at least 6–8 hours, preferably overnight, to allow the cheesecake to become firm enough to slice.
Do not rush this step. Proper chilling is essential for a clean slice and a stable no-bake filling.
Step 8: Decorate and Serve
Once the cheesecake is fully chilled, carefully remove the sides of the springform pan.
Spread or pipe whipped cream around the edges or across the top.
Add pink and blue sprinkles for a festive finish.
If you want to use real cotton candy as decoration, add small pieces immediately before serving. Cotton candy dissolves quickly when exposed to moisture, so it should not be added ahead of time.
For clean slices, dip a sharp knife in warm water, wipe it dry, and cut through the cheesecake. Repeat between slices.
Serve chilled and enjoy!
Helpful Cooking Notes
Use block cream cheese. It contains less excess moisture than spreadable cream cheese and helps the cheesecake set properly.
Make sure the cream cheese is softened. Cold cream cheese can create lumps that are difficult to remove once the filling is mixed.
Keep the whipping cream cold. Cold cream whips more easily and creates a stable, fluffy filling.
Fold gently. Use a spatula rather than beating the whipped cream into the filling. This preserves the air that gives the cheesecake its light texture.
Use gel food coloring. Gel colors provide vibrant pink and blue shades without thinning the filling.
Don’t overmix the swirl. A few gentle passes with a skewer create beautiful ribbons of color.
Allow enough chilling time. The cheesecake needs at least 6–8 hours in the refrigerator. Overnight chilling usually gives the best results.
Add cotton candy at the last minute. Real cotton candy absorbs moisture quickly and will dissolve if placed on the cheesecake too early.
Delicious Variations
Cotton Candy Oreo Cheesecake
Replace the graham cracker crust with 2 cups of finely crushed chocolate sandwich cookies mixed with 5 tablespoons of melted butter. The chocolate crust adds a delicious contrast to the sweet pastel filling.
Cotton Candy Cheesecake with a White Chocolate Crust
Use 2 cups of crushed vanilla wafer cookies and mix them with 1/3 cup melted butter. Add 2 tablespoons of finely chopped white chocolate for a richer cookie base.
Strawberry Cotton Candy Cheesecake
Add 2 tablespoons of thick strawberry preserves to the pink portion of the filling. Fold gently to create a fruity pink layer that complements the cotton candy flavor.
Cotton Candy Mini Cheesecakes
Divide the graham cracker mixture between a lined muffin pan and press firmly into the bottoms of the cups. Add the colored filling and refrigerate until firm. Mini cheesecakes are perfect for parties and individual servings.
Cotton Candy Cheesecake Bars
Prepare the crust and filling in an 8-by-8-inch square pan. Spread the pink and blue filling over the crust and chill until firm. Cut into squares for easy serving.
Cotton Candy Chocolate Cheesecake
Drizzle melted white chocolate over the finished cheesecake and decorate with pastel sprinkles. You can also add a thin layer of chocolate ganache over the crust before adding the filling, allowing it to firm up first.
Cotton Candy Birthday Cheesecake
Add 1/4 cup of colorful rainbow sprinkles to the finished filling. Use a combination of pink, blue, and yellow decorations for a cheerful birthday dessert.
Serving Suggestions
Cotton Candy Cheesecake is a fun centerpiece for colorful dessert tables.
- Birthday parties: Serve with cupcakes, cookies, and colorful candy.
- Baby showers: Use soft pink and blue swirls for a beautiful pastel dessert.
- Carnival-themed parties: Pair with popcorn, cotton candy, and fun fair-inspired treats.
- Summer gatherings: Serve cold with fresh strawberries and blueberries.
- Holiday dessert tables: Decorate with seasonal sprinkles to match your celebration.
- Afternoon dessert: Enjoy a chilled slice with coffee, milk, or a vanilla latte.
For an extra-special presentation, serve each slice with a swirl of whipped cream and a small piece of cotton candy placed on top just before bringing it to the table.
Tips for the Perfect Cotton Candy Cheesecake
- Use full-fat block cream cheese for the best structure.
- Let the cream cheese soften before mixing.
- Use cold heavy cream to achieve stiff peaks.
- Choose a good-quality food-grade cotton candy flavoring.
- Add flavoring gradually because different brands have different strengths.
- Use gel food coloring instead of liquid coloring.
- Fold the whipped cream gently to keep the filling airy.
- Press the crust firmly into the pan so it doesn’t crumble.
- Chill the cheesecake overnight whenever possible.
- Add real cotton candy decorations immediately before serving.
- Use a warm, clean knife for neat slices.
- Keep the cheesecake refrigerated until serving.
Storage Instructions
Store Cotton Candy Cheesecake covered in the refrigerator.
Because the filling contains cream cheese and whipped cream, keep it refrigerated at 40°F or below. It is best enjoyed within 3–4 days.
If the cheesecake has already been sliced, cover the exposed edges carefully to prevent them from drying out or absorbing refrigerator odors.
Do not leave the cheesecake at room temperature for more than 2 hours in total, or 1 hour when the temperature is above 90°F.
Freezing Instructions
This cheesecake can be frozen without its whipped cream or cotton candy decorations.
- Chill the cheesecake completely until firm.
- Remove the springform pan sides.
- Place the cheesecake in the freezer uncovered for approximately 1 hour until the surface becomes firm.
- Wrap it tightly in plastic wrap, followed by aluminum foil.
- Freeze for up to 1 month for the best texture and flavor.
To thaw, transfer the wrapped cheesecake to the refrigerator and let it thaw overnight.
Add freshly whipped cream, sprinkles, and cotton candy decorations after thawing and just before serving.
Individual slices can also be frozen separately using the same wrapping method.
Make-Ahead Instructions
Cotton Candy Cheesecake is an excellent dessert to prepare ahead of a party or celebration.
You can make the entire cheesecake one day before serving. Prepare the crust, mix the filling, create the pink and blue swirls, and refrigerate overnight.
Keep the cheesecake covered in the refrigerator until you’re ready to decorate it.
For the freshest appearance, add whipped cream, sprinkles, and any cotton candy decorations shortly before serving.
This makes it easy to prepare a beautiful dessert without rushing on the day of your event.
Recipe Details
- Prep Time: 30 minutes
- Chilling Time: 6–8 hours
- Cook Time: 0 minutes
- Total Time: Approximately 6 hours 30 minutes to 8 hours 30 minutes
- Yield: 1 (9-inch) cheesecake
- Servings: 12 slices
Nutritional Information
Approximate nutrition per slice, based on 12 servings:
- Calories: 485
- Protein: 6 g
- Carbohydrates: 38 g
- Fat: 35 g
- Saturated Fat: 21 g
- Sugar: 29 g
- Sodium: 310 mg
Nutritional values are estimates and may vary depending on the brands of cream cheese, whipping cream, graham crackers, and cotton candy flavoring used. Optional toppings are not included.
Frequently Asked Questions
Does Cotton Candy Cheesecake taste like real cotton candy?
Yes! Cotton candy flavoring gives the filling that familiar sweet, carnival-inspired taste. The flavor is similar to classic spun sugar, while the cream cheese adds a little tang that keeps the dessert from tasting overly sweet.
Can I make Cotton Candy Cheesecake without an oven?
Absolutely. This is a completely no-bake cheesecake. The crust and filling are prepared without baking, and the refrigerator does all the work to help it set.
What does cotton candy flavoring taste like?
Cotton candy flavoring has a sweet, nostalgic taste inspired by spun sugar. Depending on the brand, it may have light vanilla or fruity notes. Use a food-grade flavoring intended for desserts.
Can I use liquid food coloring?
Yes, but gel food coloring is recommended. Liquid coloring can thin the cheesecake filling if too much is added. If using liquid coloring, add only a few drops at a time.
Why isn’t my no-bake cheesecake firm?
The filling may not have been chilled long enough, or the whipped cream may not have reached stiff peaks. Make sure you use block cream cheese, properly whipped heavy cream, and enough refrigeration time.
Can I use Cool Whip instead of heavy whipping cream?
Yes. You can replace the 1 cup of heavy whipping cream with approximately 2 cups of thawed whipped topping. Fold it gently into the cream cheese mixture. The texture and sweetness will be slightly different, and the cheesecake may need additional chilling time.
Can I make this cheesecake in a regular pie dish?
Yes. A deep 9-inch pie dish can work, although the filling may be thicker or the crust-to-filling ratio may change. A springform pan is recommended because it makes removing and slicing the cheesecake easier.
How do I get a beautiful pink and blue swirl?
Divide the filling into two bowls and color each separately. Spoon alternating portions into the crust, then gently drag a skewer through the colors a few times. Avoid overmixing so the pastel shades remain visible.
Can I use real cotton candy in the filling?
It is not recommended. Real cotton candy dissolves quickly when it comes into contact with moisture and can disappear into the cream cheese mixture. Cotton candy flavoring provides a more reliable taste without changing the filling’s texture.
Can I make mini Cotton Candy Cheesecakes?
Yes! Use a lined muffin pan, add a small amount of crust to each liner, and divide the filling between the cups. Refrigerate until firm. Mini cheesecakes are especially convenient for parties and dessert buffets.
Conclusion
This Cotton Candy Cheesecake is a beautiful, creamy, and colorful dessert that brings a little carnival-inspired fun to any celebration. With its buttery graham cracker crust, fluffy cotton candy filling, and pretty pink and blue swirls, every slice is as delightful to look at as it is to eat.
Best of all, it requires no baking and can be prepared ahead of time, making it an easy choice for birthdays, baby showers, summer parties, and family gatherings. Add a little whipped cream, a few sprinkles, and a touch of cotton candy on top for a dessert everyone will remember!
Print
Cotton Candy Cheesecake – Creamy No-Bake Cheesecake with a Colorful Swirl
Ingredients
This recipe makes one 9-inch cheesecake, approximately 12 slices.
For the Graham Cracker Crust
- 2 cups graham cracker crumbs
- 1/3 cup unsalted butter, melted
- 2 tablespoons granulated sugar
- 1 pinch salt
For the Cotton Candy Cheesecake Filling
- 24 ounces full-fat cream cheese, softened
- 1 cup powdered sugar
- 1 cup cold heavy whipping cream
- 1/3 cup sour cream, at room temperature
- 1 teaspoon vanilla extract
- 1 1/2 teaspoons cotton candy flavoring, or to taste
- A few drops of pink gel food coloring
- A few drops of blue gel food coloring
For the Topping
- 1 cup whipped cream or prepared whipped topping
- Pink and blue sprinkles
- Small pieces of cotton candy, optional
- Extra cotton candy flavoring, optional
Instructions
Place the graham crackers in a food processor and pulse until they become fine crumbs. If you don’t have a food processor, put them in a sealed plastic bag and crush them with a rolling pin.
Transfer the crumbs to a medium mixing bowl. Add the melted butter, granulated sugar, and a pinch of salt.
Stir until all the crumbs are evenly coated and the mixture resembles wet sand.
Press the mixture firmly into the bottom of a 9-inch springform pan. Use the bottom of a measuring cup to create an even layer, pressing slightly up the sides if desired.
Place the crust in the refrigerator for at least 20–30 minutes while preparing the filling.
Step 2: Beat the Cream Cheese
Place the softened cream cheese in a large mixing bowl.
Using an electric mixer, beat on medium speed for approximately 2–3 minutes until smooth and creamy.
Scrape down the sides and bottom of the bowl with a spatula to remove any lumps.
Add the powdered sugar and mix on low speed until incorporated. Then add the sour cream, vanilla extract, and cotton candy flavoring.
Beat again until the mixture is smooth and fluffy.
Taste the filling and adjust the cotton candy flavoring if necessary, following the manufacturer’s recommended amount.
Step 3: Whip the Heavy Cream
In a separate chilled bowl, pour in the cold heavy whipping cream.
Beat with an electric mixer on medium-high speed until stiff peaks form. This usually takes approximately 3–5 minutes, depending on your mixer.
The whipped cream should hold its shape when you lift the beaters. Be careful not to overwhip it, as it can become grainy and begin turning into butter.
Step 4: Combine the Cheesecake Filling
Add approximately one-third of the whipped cream to the cream cheese mixture and gently fold it in to loosen the filling.
Add the remaining whipped cream in two additions, folding gently with a spatula until no large white streaks remain.
Avoid vigorous mixing because this can deflate the whipped cream and make the cheesecake less fluffy.
The finished filling should be thick, smooth, and airy.
Step 5: Divide and Color the Filling
Divide the cheesecake mixture evenly between two separate bowls.
Add a few drops of pink gel food coloring to one bowl and a few drops of blue gel food coloring to the other.
Gently fold each mixture until the colors are evenly distributed.
Add more coloring a little at a time until you achieve your preferred pastel shades.
Step 6: Create the Cotton Candy Swirl
Remove the chilled crust from the refrigerator.
Spoon alternating portions of pink and blue cheesecake filling over the crust. Continue layering the colors until all the filling has been used.
Use a butter knife or skewer to gently swirl the colors together. Make only a few passes so the pink and blue remain distinct rather than blending into one uniform color.
Smooth the top lightly with an offset spatula.
Step 7: Chill Until Firm
Cover the springform pan loosely with plastic wrap or foil.
Refrigerate for at least 6–8 hours, preferably overnight, to allow the cheesecake to become firm enough to slice.
Do not rush this step. Proper chilling is essential for a clean slice and a stable no-bake filling.
Step 8: Decorate and Serve
Once the cheesecake is fully chilled, carefully remove the sides of the springform pan.
Spread or pipe whipped cream around the edges or across the top.
Add pink and blue sprinkles for a festive finish.
If you want to use real cotton candy as decoration, add small pieces immediately before serving. Cotton candy dissolves quickly when exposed to moisture, so it should not be added ahead of time.
For clean slices, dip a sharp knife in warm water, wipe it dry, and cut through the cheesecake. Repeat between slices.
Serve chilled and enjoy!
Notes
Use block cream cheese. It contains less excess moisture than spreadable cream cheese and helps the cheesecake set properly.
Make sure the cream cheese is softened. Cold cream cheese can create lumps that are difficult to remove once the filling is mixed.
Keep the whipping cream cold. Cold cream whips more easily and creates a stable, fluffy filling.
Fold gently. Use a spatula rather than beating the whipped cream into the filling. This preserves the air that gives the cheesecake its light texture.
Use gel food coloring. Gel colors provide vibrant pink and blue shades without thinning the filling.
Don’t overmix the swirl. A few gentle passes with a skewer create beautiful ribbons of color.
Allow enough chilling time. The cheesecake needs at least 6–8 hours in the refrigerator. Overnight chilling usually gives the best results.
Add cotton candy at the last minute. Real cotton candy absorbs moisture quickly and will dissolve if placed on the cheesecake too early.
