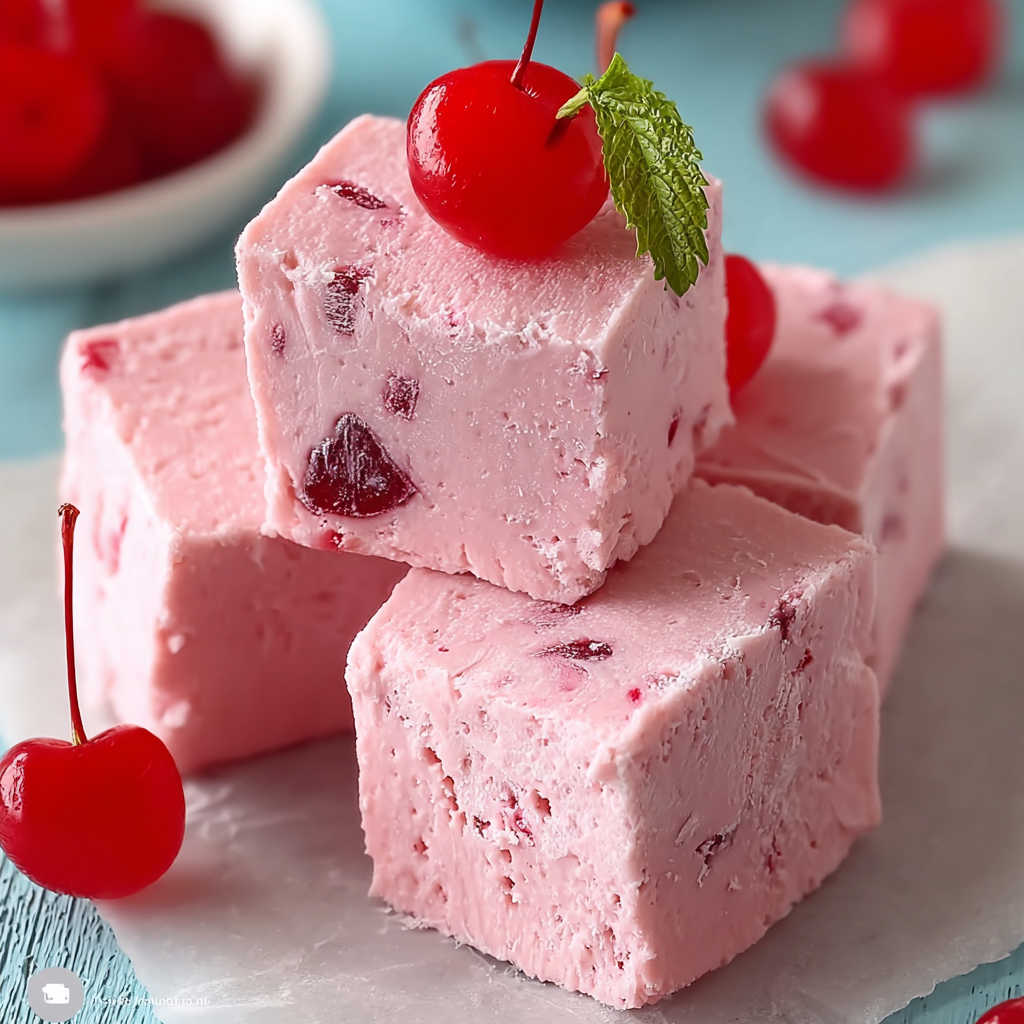
This No-Bake Cherry Fudge is a deliciously creamy homemade treat filled with sweet cherry flavor and rich white chocolate goodness. Each bite is smooth, sweet, and wonderfully fruity, with little pieces of maraschino cherries adding a beautiful pop of color and texture.
Unlike traditional fudge recipes that require boiling sugar and carefully monitoring temperatures, this easy version comes together with just a few simple ingredients and no candy thermometer. Simply melt, mix, chill, and slice!
The pretty pink color makes this cherry fudge especially lovely for Christmas candy trays, Valentine’s Day dessert tables, holiday parties, and homemade edible gifts. Whether you’re a longtime fudge lover or trying homemade candy for the first time, this No-Bake Cherry Fudge is an easy recipe you’ll want to make again and again.
Why You’ll Love This No-Bake Cherry Fudge
- No baking required: You don’t need an oven or complicated candy-making equipment.
- Easy ingredients: This recipe uses simple ingredients that are easy to find at most American grocery stores.
- Creamy texture: White chocolate and sweetened condensed milk create a smooth, rich fudge.
- Beautiful cherry flavor: Maraschino cherries add sweetness, fruity flavor, and pretty red pieces throughout.
- Festive appearance: The pink color makes this fudge perfect for Christmas, Valentine’s Day, and special celebrations.
- Great for gifting: Cut it into neat squares and package it in decorative candy boxes.
- Make-ahead friendly: Prepare it in advance and refrigerate until you’re ready to serve.
Ingredients You’ll Need
For the Cherry Fudge
- 3 cups white chocolate chips (approximately 18 ounces)
- 1 can (14 ounces) sweetened condensed milk
- 2 tablespoons unsalted butter
- 1/3 cup maraschino cherry juice, divided
- 1/2 teaspoon pure vanilla extract
- 1/4 teaspoon almond extract, optional
- 3/4 cup maraschino cherries, finely chopped and thoroughly dried
- 2–3 drops red or pink gel food coloring, optional
For Decoration
- 2 tablespoons finely chopped maraschino cherries, well drained
- 1/4 cup melted white chocolate for drizzling
- A few festive sprinkles, optional
Ingredient Notes and Substitutions
White Chocolate Chips: White chocolate provides the creamy base and sweetness. Choose good-quality white chocolate chips or chopped white chocolate for the best flavor.
Sweetened Condensed Milk: This is essential for creating the smooth, fudgy texture without traditional sugar cooking. Make sure you use sweetened condensed milk rather than evaporated milk.
Maraschino Cherry Juice: This adds the signature cherry flavor and a little natural color. Because too much liquid can prevent fudge from setting properly, use only the measured amount.
Maraschino Cherries: These add delicious fruity pieces throughout the fudge. Drain them thoroughly and pat them dry with paper towels before chopping.
Butter: A little unsalted butter adds richness and helps create a smooth consistency.
Vanilla Extract: Vanilla balances the sweetness and enhances the overall flavor.
Almond Extract: Optional, but particularly delicious with cherries. Use only a small amount because almond extract is concentrated.
Gel Food Coloring: Optional. A little pink or red gel coloring gives the fudge a more vibrant appearance without adding much liquid.
How to Make No-Bake Cherry Fudge
Step 1: Prepare the Pan
Line an 8-by-8-inch square baking pan with parchment paper.
Leave a little parchment paper hanging over the sides so you can lift the finished fudge out easily.
Lightly grease the parchment paper if necessary.
Set the pan aside.
Step 2: Prepare the Cherries
Drain the maraschino cherries in a fine-mesh strainer.
Finely chop 3/4 cup of cherries and spread them between layers of paper towels.
Gently press to remove as much moisture as possible.
Set aside the additional cherries for decorating.
This step is important because excess moisture can affect the texture of the fudge and make it difficult to set.
Step 3: Prepare the Cherry Flavoring
Measure 2 tablespoons of maraschino cherry juice into a small bowl.
Add the vanilla extract and optional almond extract.
Stir gently to combine.
Keep the remaining cherry juice aside for another use rather than adding more liquid to the fudge mixture.
Step 4: Melt the White Chocolate
Place the white chocolate chips, sweetened condensed milk, and butter in a large microwave-safe bowl.
Microwave in 20-second intervals, stirring thoroughly after each interval.
Continue until the chocolate is almost completely melted and the mixture becomes smooth and creamy.
White chocolate can scorch easily, so use short intervals and avoid overheating.
If you prefer, use a double boiler over gently simmering water, stirring continuously until smooth.
Step 5: Add the Cherry Flavor
Remove the bowl from the heat.
Add the measured cherry juice mixture and stir gently until incorporated.
Add the optional gel food coloring a little at a time until you reach your preferred shade of pink.
The mixture should remain thick, smooth, and glossy.
Step 6: Fold in the Cherries
Gently fold the chopped, dried maraschino cherries into the fudge mixture using a silicone spatula.
Distribute the cherry pieces evenly throughout the mixture.
Avoid excessive stirring because the cherries can release additional moisture and streak the fudge.
Step 7: Transfer to the Pan
Pour the cherry fudge mixture into the prepared baking pan.
Use a spatula to spread it evenly into the corners.
Gently tap the pan against the countertop to remove large air pockets.
Smooth the surface with the back of a spoon or an offset spatula.
Step 8: Decorate the Fudge
Sprinkle the top with the reserved chopped cherries, making sure they are thoroughly dried.
For an elegant finish, drizzle melted white chocolate over the surface.
You can also add a few festive sprinkles for a beautiful Christmas or Valentine’s Day appearance.
Step 9: Chill Until Firm
Cover the pan loosely with plastic wrap or foil and refrigerate for approximately 4–6 hours, or preferably overnight.
The fudge should become firm enough to cut into clean squares.
Step 10: Slice and Serve
Once completely chilled, lift the fudge out of the pan using the parchment paper overhang.
Place it on a cutting board.
Using a sharp knife, cut it into approximately 36 small squares.
For cleaner cuts, warm the knife under hot water, dry it completely, and wipe it between slices.
Arrange the finished pieces on a serving platter or transfer them to an airtight container.
Helpful Cooking Notes
- Dry the cherries thoroughly: Excess moisture can prevent the fudge from setting properly.
- Use good-quality white chocolate: White chocolate is the main ingredient, so its quality matters.
- Measure cherry juice carefully: Adding too much liquid can make the fudge soft.
- Melt slowly: White chocolate is sensitive to heat and can become grainy if overheated.
- Use gel food coloring: It provides a stronger color without adding much liquid.
- Don’t skip chilling: The fudge needs several hours to become firm.
- Use a sharp knife: A warm, dry knife creates cleaner squares.
- Store refrigerated: The finished fudge contains fruit and dairy ingredients that require refrigeration.
Delicious Variations
Chocolate Cherry Fudge
Replace the white chocolate with semi-sweet chocolate chips. The result is a rich chocolate fudge with sweet cherry pieces throughout.
For a chocolate-covered cherry flavor, add a little almond extract.
White Chocolate Cherry Almond Fudge
Add 1/2 cup finely chopped toasted almonds to the fudge mixture. The almonds add a lovely crunch that pairs beautifully with cherries and white chocolate.
Cherry Coconut Fudge
Fold 1/2 cup sweetened shredded coconut into the mixture along with the chopped cherries. Coconut gives the fudge a delicious tropical twist.
Chocolate Drizzled Cherry Fudge
Prepare the original white chocolate cherry fudge and finish it with a drizzle of melted semi-sweet chocolate.
The contrasting colors create a beautiful bakery-style appearance.
Cherry Cheesecake Fudge
Add 2 ounces softened cream cheese to the mixture and reduce the cherry juice slightly. This creates a tangier, cheesecake-inspired flavor. Keep this variation refrigerated and use it within a few days.
Christmas Cherry Fudge
Use a festive pink or red color and decorate the top with white chocolate drizzle and red-and-green sprinkles.
Cut the fudge into small squares and arrange them in holiday paper candy liners.
Serving Suggestions
No-Bake Cherry Fudge is a wonderful addition to holiday dessert tables and homemade candy collections.
- Arrange the squares on a Christmas candy platter with chocolate truffles, peanut butter fudge, and coconut snowballs.
- Serve alongside coffee, hot chocolate, or a cup of tea.
- Add the pieces to homemade Christmas gift boxes.
- Place individual squares in mini paper candy liners.
- Serve as a sweet treat after dinner.
- Package small portions in clear treat bags tied with festive ribbon.
For a beautiful presentation, arrange the pink fudge squares on a white serving platter and decorate the edges with a few extra dried cherry pieces.
Tips for the Best No-Bake Cherry Fudge
- Use sweetened condensed milk: Evaporated milk is not a suitable substitute.
- Choose good-quality white chocolate: This helps create a smooth, creamy texture.
- Remove excess cherry moisture: Pat the cherries dry several times.
- Don’t add extra cherry juice: Too much liquid can make the fudge difficult to set.
- Use gel food coloring: A little goes a long way.
- Melt chocolate gently: Short microwave intervals help prevent scorching.
- Allow enough chilling time: Overnight chilling is ideal for clean slices.
- Use parchment paper: It makes removing the fudge much easier.
- Keep pieces small: This rich candy is best enjoyed in bite-sized portions.
Storage Instructions
Because this fudge contains sweetened condensed milk and chopped cherries, store it in an airtight container in the refrigerator.
It will keep for approximately 5–7 days when properly refrigerated.
Place parchment paper between layers to prevent the squares from sticking together.
For the best texture, remove only the amount you plan to serve and return the remaining fudge to the refrigerator promptly.
Avoid leaving it at room temperature for more than 2 hours, or more than 1 hour when the temperature is above 90°F.
Can You Freeze No-Bake Cherry Fudge?
Yes! This fudge freezes well when properly wrapped.
Allow it to become completely firm in the refrigerator, then cut it into individual squares.
Arrange the pieces in a freezer-safe container, separating the layers with parchment paper.
Seal tightly and freeze for up to 2 months for the best quality.
When ready to enjoy, transfer the container to the refrigerator and allow the fudge to thaw overnight while covered.
Avoid thawing it uncovered because condensation can affect the texture and appearance.
Make-Ahead Instructions
This No-Bake Cherry Fudge is perfect for preparing ahead of Christmas and other special occasions.
You can prepare the entire batch a few days before your event and keep it refrigerated in an airtight container.
For the best presentation, add the decorative white chocolate drizzle and any extra toppings before serving.
You can also freeze the fudge in advance and thaw it overnight in the refrigerator when needed.
No-Bake Cherry Fudge Recipe Details
- Prep Time: 20 minutes
- Cook Time: 5 minutes
- Chilling Time: 4–6 hours
- Total Time: Approximately 4 hours 25 minutes to 6 hours 25 minutes
- Yield: 36 small squares
- Category: Dessert, Candy
- Method: No-Bake
- Cuisine: American
Nutritional Information
Estimated per square, based on 36 pieces without optional decorations. Actual values depend on the chocolate and ingredient brands used.
- Calories: 115
- Protein: 2 g
- Carbohydrates: 17 g
- Total Fat: 5 g
- Saturated Fat: 3 g
- Sugar: 16 g
- Sodium: 20 mg
Frequently Asked Questions
Why is my cherry fudge not setting?
The most common reasons are too much liquid, insufficient chilling, or chocolate that was not properly melted. Make sure the cherries are thoroughly dried, measure the cherry juice carefully, and refrigerate the fudge until completely firm.
Can I use fresh cherries instead of maraschino cherries?
Maraschino cherries are recommended because they provide the classic sweet cherry flavor and bright color. Fresh cherries contain more moisture and can affect the fudge texture. If you use fresh cherries, cook them down first, cool completely, and remove excess moisture.
Can I use cherry extract instead of cherry juice?
Yes. A small amount of food-grade cherry extract can provide cherry flavor without adding liquid. Start with a few drops and adjust carefully according to the product instructions.
Can I make this fudge without food coloring?
Absolutely! The cherry juice gives the fudge a slight pink tint. If you prefer a natural-looking color, simply leave out the food coloring.
Can I use evaporated milk instead of condensed milk?
No. Sweetened condensed milk is thick and sweet, while evaporated milk is thinner and unsweetened. They are not interchangeable in this recipe.
Can I use milk chocolate instead of white chocolate?
Yes! Milk chocolate creates a sweeter, richer fudge with a more traditional chocolate flavor. Semi-sweet chocolate is another delicious option.
How do I cut the fudge into clean squares?
Make sure the fudge is completely chilled and firm. Use a sharp knife warmed under hot water, then dry it thoroughly before slicing. Wipe the blade between cuts.
Can I add nuts to cherry fudge?
Definitely! Add 1/2 cup chopped pecans, almonds, or walnuts for extra crunch. Fold them into the mixture along with the cherries.
Is No-Bake Cherry Fudge good for Christmas gifts?
Yes! Its pretty pink color and creamy texture make it a lovely addition to homemade holiday candy boxes. Cut it into small squares, place them in candy liners, and keep refrigerated until gifting.
Can I make this fudge ahead of time?
Absolutely! Prepare it several days ahead and refrigerate in an airtight container. You can also freeze individual pieces for up to 2 months.
Final Thoughts
This No-Bake Cherry Fudge is a simple homemade candy that combines creamy white chocolate with sweet, fruity cherries in every bite. Its beautiful pink color, smooth texture, and delicious cherry flavor make it a wonderful treat for Christmas celebrations, Valentine’s Day, and any occasion that calls for something sweet.
With no oven required and just a little chilling time, it’s an easy recipe to prepare even during the busiest holiday season. Cut it into pretty little squares, arrange them on your favorite candy platter, and enjoy sharing this delicious cherry fudge with family and friends!
Print
No-Bake Cherry Fudge
Ingredients
For the Cherry Fudge
- 3 cups white chocolate chips (approximately 18 ounces)
- 1 can (14 ounces) sweetened condensed milk
- 2 tablespoons unsalted butter
- 1/3 cup maraschino cherry juice, divided
- 1/2 teaspoon pure vanilla extract
- 1/4 teaspoon almond extract, optional
- 3/4 cup maraschino cherries, finely chopped and thoroughly dried
- 2–3 drops red or pink gel food coloring, optional
For Decoration
- 2 tablespoons finely chopped maraschino cherries, well drained
- 1/4 cup melted white chocolate for drizzling
- A few festive sprinkles, optional
Instructions
Line an 8-by-8-inch square baking pan with parchment paper.
Leave a little parchment paper hanging over the sides so you can lift the finished fudge out easily.
Lightly grease the parchment paper if necessary.
Set the pan aside.
Step 2: Prepare the Cherries
Drain the maraschino cherries in a fine-mesh strainer.
Finely chop 3/4 cup of cherries and spread them between layers of paper towels.
Gently press to remove as much moisture as possible.
Set aside the additional cherries for decorating.
This step is important because excess moisture can affect the texture of the fudge and make it difficult to set.
Step 3: Prepare the Cherry Flavoring
Measure 2 tablespoons of maraschino cherry juice into a small bowl.
Add the vanilla extract and optional almond extract.
Stir gently to combine.
Keep the remaining cherry juice aside for another use rather than adding more liquid to the fudge mixture.
Step 4: Melt the White Chocolate
Place the white chocolate chips, sweetened condensed milk, and butter in a large microwave-safe bowl.
Microwave in 20-second intervals, stirring thoroughly after each interval.
Continue until the chocolate is almost completely melted and the mixture becomes smooth and creamy.
White chocolate can scorch easily, so use short intervals and avoid overheating.
If you prefer, use a double boiler over gently simmering water, stirring continuously until smooth.
Step 5: Add the Cherry Flavor
Remove the bowl from the heat.
Add the measured cherry juice mixture and stir gently until incorporated.
Add the optional gel food coloring a little at a time until you reach your preferred shade of pink.
The mixture should remain thick, smooth, and glossy.
Step 6: Fold in the Cherries
Gently fold the chopped, dried maraschino cherries into the fudge mixture using a silicone spatula.
Distribute the cherry pieces evenly throughout the mixture.
Avoid excessive stirring because the cherries can release additional moisture and streak the fudge.
Step 7: Transfer to the Pan
Pour the cherry fudge mixture into the prepared baking pan.
Use a spatula to spread it evenly into the corners.
Gently tap the pan against the countertop to remove large air pockets.
Smooth the surface with the back of a spoon or an offset spatula.
Step 8: Decorate the Fudge
Sprinkle the top with the reserved chopped cherries, making sure they are thoroughly dried.
For an elegant finish, drizzle melted white chocolate over the surface.
You can also add a few festive sprinkles for a beautiful Christmas or Valentine’s Day appearance.
Step 9: Chill Until Firm
Cover the pan loosely with plastic wrap or foil and refrigerate for approximately 4–6 hours, or preferably overnight.
The fudge should become firm enough to cut into clean squares.
Step 10: Slice and Serve
Once completely chilled, lift the fudge out of the pan using the parchment paper overhang.
Place it on a cutting board.
Using a sharp knife, cut it into approximately 36 small squares.
For cleaner cuts, warm the knife under hot water, dry it completely, and wipe it between slices.
Arrange the finished pieces on a serving platter or transfer them to an airtight container.
Notes
- Dry the cherries thoroughly: Excess moisture can prevent the fudge from setting properly.
- Use good-quality white chocolate: White chocolate is the main ingredient, so its quality matters.
- Measure cherry juice carefully: Adding too much liquid can make the fudge soft.
- Melt slowly: White chocolate is sensitive to heat and can become grainy if overheated.
- Use gel food coloring: It provides a stronger color without adding much liquid.
- Don’t skip chilling: The fudge needs several hours to become firm.
- Use a sharp knife: A warm, dry knife creates cleaner squares.
- Store refrigerated: The finished fudge contains fruit and dairy ingredients that require refrigeration.
