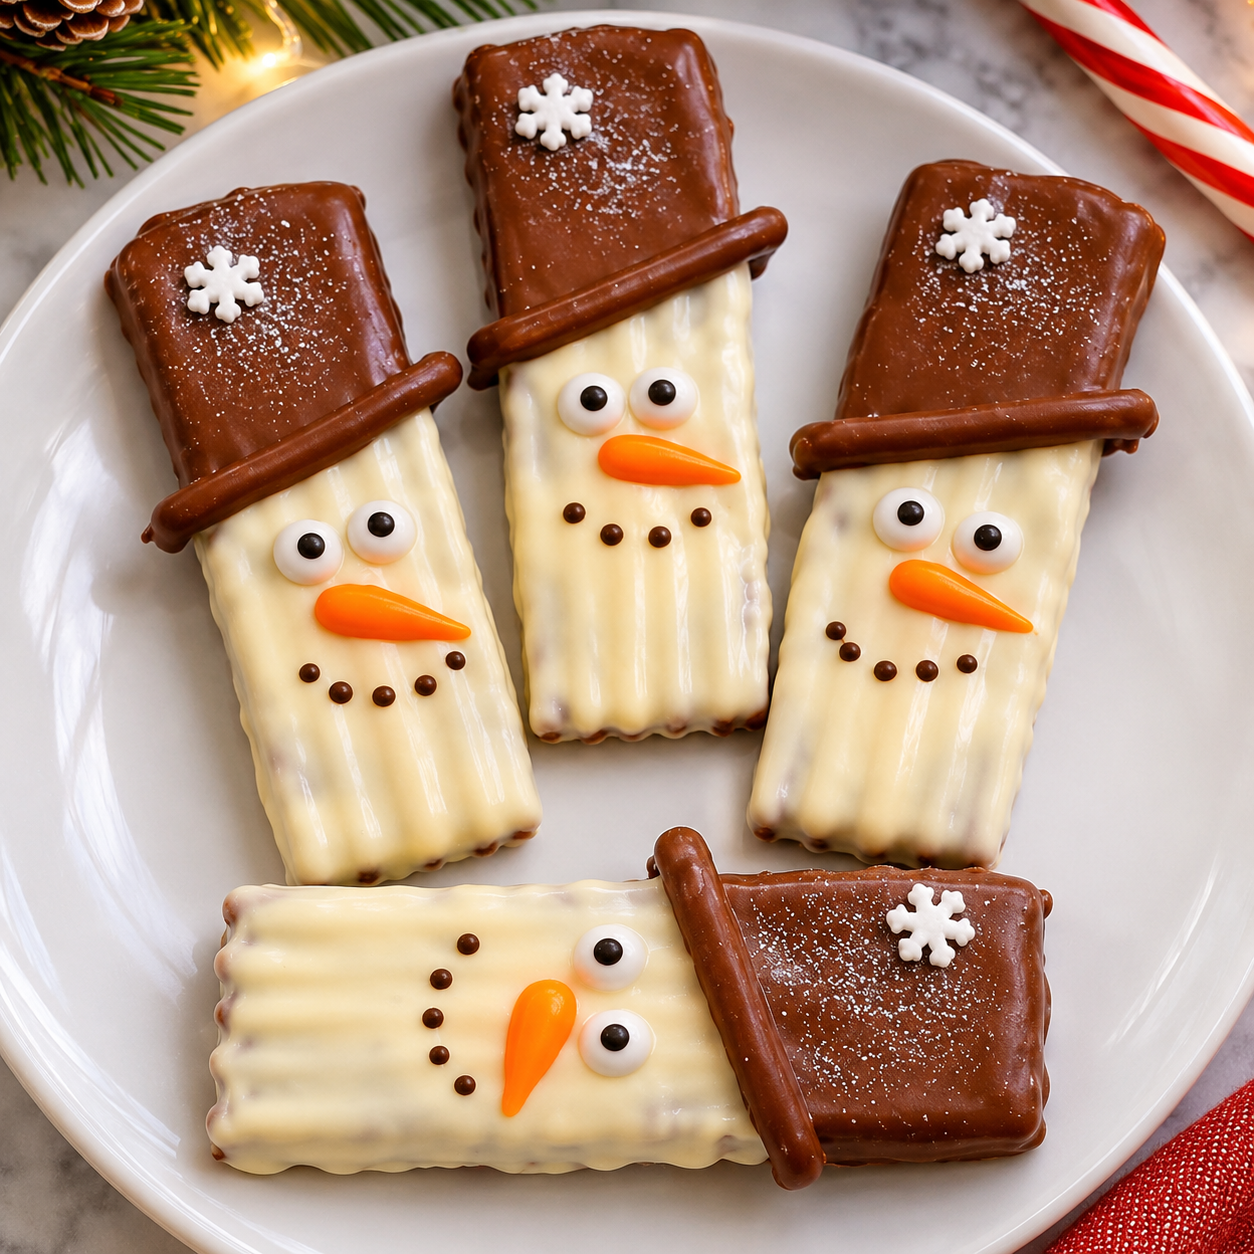
Bring a little extra holiday magic to your dessert table with these adorable Christmas Snowman Chocolate Treats! Made with smooth, sweet white chocolate, fluffy marshmallows, and colorful Christmas decorations, these charming little snowmen are as fun to make as they are delicious to eat.
Each treat features a creamy white chocolate coating, a cheerful snowman face, and festive details that make them look almost too cute to enjoy. Best of all, you don’t need an oven, complicated equipment, or advanced decorating skills. With a few simple ingredients and a little creativity, you can make a batch of these delightful snowman treats right in your kitchen.
They’re perfect for Christmas parties, cookie exchanges, school celebrations, holiday dessert tables, and homemade edible gifts. Kids will love helping decorate the snowmen, while adults will appreciate how easy they are to prepare during the busy holiday season.
Whether you arrange them on a Christmas platter, package them in little treat bags, or serve them alongside cookies and hot chocolate, these Christmas Snowman Chocolate Treats are guaranteed to bring smiles to your holiday celebrations.
Why You’ll Love These Christmas Snowman Chocolate Treats
- No oven required: Everything comes together with simple melting, dipping, and decorating.
- Adorable holiday design: Each snowman has a cute face and festive decorations.
- Easy ingredients: White chocolate, marshmallows, and basic candy decorations create the perfect combination.
- Great for kids: Little helpers can add the eyes, noses, buttons, and scarves.
- Perfect for gifting: Package the finished treats in clear bags or small Christmas boxes.
- Make-ahead friendly: Prepare them in advance and store them properly until your celebration.
Ingredients You’ll Need
This recipe makes approximately 12 snowman chocolate treats using large marshmallows as the base.
For the Snowmen
- 24 large marshmallows
- 16 ounces white chocolate melting wafers
- 12 ounces white candy melts, if needed for additional coating
- 12 lollipop sticks or sturdy paper treat sticks
- 24 mini chocolate chips for the eyes
- 12 small orange candy pieces or orange fondant triangles for the noses
- 24 small chocolate candies for the buttons
- ½ cup mini pretzel sticks, broken into small pieces for the arms
For the Decorations
- ½ cup assorted Christmas sprinkles
- ¼ cup red and green candy melts
- 2 tablespoons mini chocolate chips
- Red and green decorating icing
- Small candy-coated chocolates for optional hats or buttons
Note: The recipe uses two marshmallows per snowman, stacked vertically to create the body and head. The additional candy melts and decorations are used for details and optional designs.
Ingredient Notes and Substitutions
White chocolate melting wafers: These are ideal because they melt smoothly and are designed to create a coating that sets firmly. You can also use white candy melts. If using real white chocolate, follow the package instructions and temper it if a firm, glossy finish is desired.
Marshmallows: Large marshmallows make a convenient snowman shape. Choose fresh marshmallows that are soft but not sticky.
Lollipop sticks: These help hold the marshmallow snowmen together and make dipping easier. Sturdy paper treat sticks can also work.
Mini chocolate chips: Perfect for creating small snowman eyes and mouth details. You can also use tiny black decorating candies.
Orange candy pieces: Small orange candies or carefully shaped orange fondant make cute carrot noses. Use a little melted coating as edible glue.
Pretzel sticks: These create charming snowman arms. Break them into short pieces and insert them carefully into the sides of the marshmallows.
Christmas sprinkles: Red, green, and white sprinkles add color and make the finished treats look festive.
Decorating icing: Red and green icing can be used to create scarves, hats, and other colorful details.
How to Make Christmas Snowman Chocolate Treats
Step 1: Prepare the Marshmallows
Line a baking sheet or large tray with parchment paper.
Arrange the large marshmallows on your work surface. For each snowman, choose two marshmallows and stack them vertically, with one forming the body and the other forming the head.
Insert a lollipop stick carefully through the center of the two marshmallows. Push it far enough to hold them together securely, but leave enough stick at the bottom to make handling easy.
Repeat until you have 12 snowman shapes.
If the marshmallows slide around, gently press them together and place the tray in the refrigerator for about 10 minutes.
Step 2: Melt the White Chocolate
Place the white chocolate melting wafers in a microwave-safe bowl.
Microwave in 20–30-second intervals, stirring thoroughly after each interval. Continue until the coating is completely melted and smooth.
Avoid overheating the white chocolate because it can become thick, grainy, or scorched.
If the coating becomes too thick, use a manufacturer-recommended thinning product or a small amount of compatible cocoa butter. Avoid adding water or juice, which can cause chocolate to seize.
Step 3: Coat the Snowmen
Hold one marshmallow snowman by its stick and carefully dip it into the melted white chocolate.
Turn it gently to cover both marshmallows completely. Lift it out and allow the excess coating to drip back into the bowl.
If necessary, use a spoon to cover any uncovered areas.
Place the coated snowman upright in a prepared stand or lay it carefully on parchment paper. Repeat with the remaining snowmen.
Allow the coating to set until firm. If your kitchen is warm, refrigerate the tray briefly to help the coating harden.
Step 4: Add the Snowman Faces
Once the white chocolate coating has started to set but is still slightly tacky, decorate the faces.
Add two mini chocolate chips for the eyes. Place a small orange candy or fondant triangle in the center for the carrot nose.
Use tiny chocolate chips or black decorating icing to create a smiling mouth.
Work gently and avoid pressing too hard into the coating.
Step 5: Decorate the Snowman Bodies
Add two or three small chocolate candies down the front of each snowman to create buttons.
Insert small pretzel pieces into the sides of the lower marshmallow to make arms. If the coating has already hardened, use a small dab of melted white chocolate to attach them.
For a festive look, pipe red or green icing around the neck to create scarves. Add a few Christmas sprinkles for extra color.
Step 6: Add Optional Christmas Hats
For a more decorative snowman, use a small chocolate candy, mini cookie, or a simple piece of fondant to create a hat.
Attach the hat with a small amount of melted chocolate.
You can also add a little red or green candy melt detail to create a festive winter hat.
Step 7: Let the Treats Set
Allow the finished snowmen to sit on parchment paper until all the decorations are firm.
If needed, refrigerate them for 10–15 minutes to help the chocolate coating set completely.
Once firm, transfer them carefully to a serving platter or package them in individual treat bags.
Helpful Cooking Notes
Use melting wafers for easy dipping: They are designed to melt smoothly and set without the extra tempering steps required by many real chocolate products.
Melt slowly: White chocolate can overheat easily. Short microwave intervals and frequent stirring help prevent scorching.
Keep moisture away: Even a small amount of water can cause melted chocolate to seize and become difficult to work with.
Decorate before the coating fully hardens: Eyes, noses, and buttons attach more easily when the coating is slightly tacky.
Use melted chocolate as edible glue: If a decoration does not stick, add a tiny dab of melted coating to attach it.
Keep the snowmen upright: A lollipop stand or a piece of foam designed for food-safe treat displays can help keep the sticks upright while the coating sets.
Work in small batches: Decorate a few snowmen at a time so the coating does not harden before you finish adding the details.
Keep decorations small: Heavy candies can slide down the marshmallow surface before the coating sets.
Fun Variations
1. Snowman Oreo Chocolate Treats
Use whole Oreo cookies or mini sandwich cookies as part of the snowman design. Dip them in white melting wafers and decorate with chocolate eyes, orange noses, and colorful scarves.
2. Snowman Marshmallow Pops
Instead of stacking two marshmallows, use one large marshmallow per pop. Dip it in white chocolate and decorate it with a simple snowman face. This creates smaller treats that are perfect for party favors.
3. Chocolate Snowman Truffles
Prepare small round chocolate cookie truffles, stack two different-sized balls together, and coat them in white melting wafers. Decorate with candy eyes, orange noses, and chocolate buttons.
4. Peppermint Snowman Treats
Add a little finely crushed peppermint candy to the melted white chocolate coating or sprinkle it over the finished treats before the coating sets.
5. Snowman Hot Chocolate Treats
Serve these snowman pops alongside mugs of hot chocolate. Guests can enjoy the marshmallow treats separately or use the marshmallows as a sweet addition to their drinks.
6. Mini Snowman Chocolate Bites
Use mini marshmallows or small round candies to create bite-sized snowmen. These are perfect for dessert trays and small holiday snack plates.
How to Serve Christmas Snowman Chocolate Treats
These cute snowmen look wonderful on a Christmas dessert table. Their white chocolate coating and colorful decorations make them stand out among traditional holiday cookies and candies.
Here are some fun serving ideas:
- Christmas dessert platters: Arrange them alongside sugar cookies, brownies, and peppermint bark.
- Hot chocolate stations: Display the snowman pops beside mugs of hot cocoa and bowls of marshmallows.
- Holiday party favors: Wrap each snowman individually in a clear treat bag with a festive ribbon.
- Christmas cookie exchanges: Include them in holiday treat boxes for friends and family.
- Kids’ holiday parties: Serve them with milk, hot chocolate, or other festive snacks.
- Edible Christmas gifts: Arrange several snowmen in a decorative box lined with parchment paper.
For a beautiful presentation, place the snowmen on a white platter with red and green candies scattered around them.
Tips for Perfect Snowman Chocolate Treats
- Use fresh marshmallows so the snowmen hold their shape.
- Choose melting wafers designed for candy coating.
- Make sure all bowls and utensils are completely dry.
- Melt the white chocolate slowly and stir frequently.
- Insert the sticks gently to avoid splitting the marshmallows.
- Let excess coating drip off before placing each snowman on parchment.
- Add decorations while the coating is slightly tacky.
- Use a toothpick to position tiny eyes and buttons precisely.
- Keep the pretzel arms short and lightweight.
- Allow the treats to set completely before packaging.
- Store them away from heat and humidity.
- Use food-safe packaging materials when preparing treats as gifts.
Storage Instructions
Once the chocolate coating has fully set, place the snowman treats in an airtight container, separating layers with parchment paper.
Store them in a cool, dry place according to the melting wafer or candy coating manufacturer’s storage instructions. If your kitchen is warm or the package recommends refrigeration, refrigerate the treats in an airtight container.
For the best texture and appearance, enjoy them within 3–5 days. Marshmallows can gradually become firmer or change texture over time.
Avoid storing them near direct sunlight, ovens, heaters, or other sources of warmth. Before serving refrigerated treats, allow them to sit briefly in their closed container so condensation does not form directly on the chocolate.
Can You Make Christmas Snowman Chocolate Treats Ahead of Time?
Yes! These treats are excellent for preparing ahead of Christmas celebrations.
You can make them 1–2 days before your party. Allow the coating and decorations to set completely, then store the snowmen in an airtight container.
If you are preparing them for gifts, package them individually after the chocolate has hardened. Add ribbons and decorative labels shortly before giving them away.
For the best appearance, keep the treats in a cool environment until serving.
Can You Freeze Snowman Chocolate Treats?
Freezing is possible, but it is not the best option if you want to preserve their original appearance and texture. Marshmallows can become sticky or change texture after thawing, and condensation may affect the chocolate coating.
If you decide to freeze them, place the fully set treats in a freezer-safe airtight container with parchment between layers. Freeze for up to 1 month for best quality.
Thaw them in the refrigerator while still covered, then bring the closed container toward room temperature before opening to help reduce condensation.
Recipe Details
- Prep Time: 35 minutes
- Cook Time: 5 minutes
- Setting Time: 25 minutes
- Total Time: 1 hour 5 minutes
- Yield: 12 snowman treats
- Serving Size: 1 snowman
- Category: Dessert, Christmas Treats
- Cuisine: American
- Method: No-Bake
Nutritional Information
Estimated nutrition per snowman treat:
- Calories: 245
- Protein: 2g
- Carbohydrates: 38g
- Fat: 10g
- Saturated Fat: 6g
- Cholesterol: 5mg
- Sodium: 75mg
- Fiber: 0g
- Sugar: 31g
Nutrition values are estimates and will vary depending on the chocolate coating, marshmallows, and decorations used.
Frequently Asked Questions
1. Can I use regular white chocolate chips instead of melting wafers?
Yes, but white chocolate chips may melt into a thicker coating and may not set as smoothly. Use a suitable melting product if you want an easy dipping experience. If using real white chocolate, melt carefully and temper it when necessary for a firm, glossy finish.
2. How do I keep the marshmallows from sliding apart?
Insert the stick gently through the center of both marshmallows, then refrigerate the assembled shapes briefly before dipping. You can also use a tiny amount of melted chocolate between the marshmallows as edible glue.
3. Why is my white chocolate too thick?
It may have overheated or the coating may simply be too cool. Warm it gently in short intervals while stirring. If it remains too thick, use a manufacturer-recommended thinning agent or compatible cocoa butter.
4. How do I make the snowman faces look neat?
Use mini chocolate chips for the eyes and mouth, and small orange fondant triangles for the noses. A toothpick or clean decorating tool makes it easier to position the tiny details.
5. Can children help make these treats?
Yes! Children can help add sprinkles, chocolate buttons, and other decorations once the melted coating has cooled enough to handle safely. An adult should handle hot melted chocolate and supervise the use of sticks and small decorations.
6. Can I make these treats without lollipop sticks?
Absolutely. You can place the marshmallow snowmen directly on parchment paper and decorate them as small standing or lying snowman candies. Use melted chocolate to attach the marshmallows together.
7. How long do Christmas Snowman Chocolate Treats last?
For the best quality, enjoy them within 3–5 days when stored in an airtight container under suitable conditions for the coating. Follow the manufacturer’s storage instructions and keep them away from heat and humidity.
8. Can I use candy eyes instead of chocolate chips?
Yes! Small edible candy eyes are a convenient option and create a cute snowman expression. Attach them with a little melted white chocolate or icing.
9. What can I use for the snowman’s carrot nose?
Small pieces of orange fondant, orange candy melts, or tiny orange candy decorations work well. Choose lightweight decorations that will stay attached to the coating.
10. Can I make these snowmen in different sizes?
Yes! Use mini marshmallows for tiny snowmen or stack large marshmallows for taller versions. Adjust the amount of coating and decorations according to the size.
Conclusion
These Christmas Snowman Chocolate Treats are a sweet and adorable addition to any holiday celebration. With fluffy marshmallows, a smooth white chocolate coating, and cheerful snowman decorations, they’re easy to make and guaranteed to bring a little Christmas magic to your dessert table.
Whether you’re preparing them for a Christmas party, making edible gifts, or enjoying a fun afternoon of holiday baking with the family, these no-bake treats are a wonderful way to celebrate the season.
Make a batch, decorate each snowman with its own little personality, and enjoy a festive homemade treat that’s almost too cute to eat!
Print
Christmas Snowman Chocolate Treats – Easy No-Bake Christmas Candy
Ingredients
This recipe makes approximately 12 snowman chocolate treats using large marshmallows as the base.
For the Snowmen
- 24 large marshmallows
- 16 ounces white chocolate melting wafers
- 12 ounces white candy melts, if needed for additional coating
- 12 lollipop sticks or sturdy paper treat sticks
- 24 mini chocolate chips for the eyes
- 12 small orange candy pieces or orange fondant triangles for the noses
- 24 small chocolate candies for the buttons
- ½ cup mini pretzel sticks, broken into small pieces for the arms
For the Decorations
- ½ cup assorted Christmas sprinkles
- ¼ cup red and green candy melts
- 2 tablespoons mini chocolate chips
- Red and green decorating icing
- Small candy-coated chocolates for optional hats or buttons
Note: The recipe uses two marshmallows per snowman, stacked vertically to create the body and head. The additional candy melts and decorations are used for details and optional designs.
Instructions
Line a baking sheet or large tray with parchment paper.
Arrange the large marshmallows on your work surface. For each snowman, choose two marshmallows and stack them vertically, with one forming the body and the other forming the head.
Insert a lollipop stick carefully through the center of the two marshmallows. Push it far enough to hold them together securely, but leave enough stick at the bottom to make handling easy.
Repeat until you have 12 snowman shapes.
If the marshmallows slide around, gently press them together and place the tray in the refrigerator for about 10 minutes.
Step 2: Melt the White Chocolate
Place the white chocolate melting wafers in a microwave-safe bowl.
Microwave in 20–30-second intervals, stirring thoroughly after each interval. Continue until the coating is completely melted and smooth.
Avoid overheating the white chocolate because it can become thick, grainy, or scorched.
If the coating becomes too thick, use a manufacturer-recommended thinning product or a small amount of compatible cocoa butter. Avoid adding water or juice, which can cause chocolate to seize.
Step 3: Coat the Snowmen
Hold one marshmallow snowman by its stick and carefully dip it into the melted white chocolate.
Turn it gently to cover both marshmallows completely. Lift it out and allow the excess coating to drip back into the bowl.
If necessary, use a spoon to cover any uncovered areas.
Place the coated snowman upright in a prepared stand or lay it carefully on parchment paper. Repeat with the remaining snowmen.
Allow the coating to set until firm. If your kitchen is warm, refrigerate the tray briefly to help the coating harden.
Step 4: Add the Snowman Faces
Once the white chocolate coating has started to set but is still slightly tacky, decorate the faces.
Add two mini chocolate chips for the eyes. Place a small orange candy or fondant triangle in the center for the carrot nose.
Use tiny chocolate chips or black decorating icing to create a smiling mouth.
Work gently and avoid pressing too hard into the coating.
Step 5: Decorate the Snowman Bodies
Add two or three small chocolate candies down the front of each snowman to create buttons.
Insert small pretzel pieces into the sides of the lower marshmallow to make arms. If the coating has already hardened, use a small dab of melted white chocolate to attach them.
For a festive look, pipe red or green icing around the neck to create scarves. Add a few Christmas sprinkles for extra color.
Step 6: Add Optional Christmas Hats
For a more decorative snowman, use a small chocolate candy, mini cookie, or a simple piece of fondant to create a hat.
Attach the hat with a small amount of melted chocolate.
You can also add a little red or green candy melt detail to create a festive winter hat.
Step 7: Let the Treats Set
Allow the finished snowmen to sit on parchment paper until all the decorations are firm.
If needed, refrigerate them for 10–15 minutes to help the chocolate coating set completely.
Once firm, transfer them carefully to a serving platter or package them in individual treat bags.
Notes
Use melting wafers for easy dipping: They are designed to melt smoothly and set without the extra tempering steps required by many real chocolate products.
Melt slowly: White chocolate can overheat easily. Short microwave intervals and frequent stirring help prevent scorching.
Keep moisture away: Even a small amount of water can cause melted chocolate to seize and become difficult to work with.
Decorate before the coating fully hardens: Eyes, noses, and buttons attach more easily when the coating is slightly tacky.
Use melted chocolate as edible glue: If a decoration does not stick, add a tiny dab of melted coating to attach it.
Keep the snowmen upright: A lollipop stand or a piece of foam designed for food-safe treat displays can help keep the sticks upright while the coating sets.
Work in small batches: Decorate a few snowmen at a time so the coating does not harden before you finish adding the details.
Keep decorations small: Heavy candies can slide down the marshmallow surface before the coating sets.
