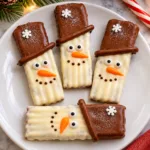
Ingredients
This recipe makes approximately 12 snowman chocolate treats using large marshmallows as the base.
For the Snowmen
- 24 large marshmallows
- 16 ounces white chocolate melting wafers
- 12 ounces white candy melts, if needed for additional coating
- 12 lollipop sticks or sturdy paper treat sticks
- 24 mini chocolate chips for the eyes
- 12 small orange candy pieces or orange fondant triangles for the noses
- 24 small chocolate candies for the buttons
- ½ cup mini pretzel sticks, broken into small pieces for the arms
For the Decorations
- ½ cup assorted Christmas sprinkles
- ¼ cup red and green candy melts
- 2 tablespoons mini chocolate chips
- Red and green decorating icing
- Small candy-coated chocolates for optional hats or buttons
Note: The recipe uses two marshmallows per snowman, stacked vertically to create the body and head. The additional candy melts and decorations are used for details and optional designs.
Instructions
Line a baking sheet or large tray with parchment paper.
Arrange the large marshmallows on your work surface. For each snowman, choose two marshmallows and stack them vertically, with one forming the body and the other forming the head.
Insert a lollipop stick carefully through the center of the two marshmallows. Push it far enough to hold them together securely, but leave enough stick at the bottom to make handling easy.
Repeat until you have 12 snowman shapes.
If the marshmallows slide around, gently press them together and place the tray in the refrigerator for about 10 minutes.
Step 2: Melt the White Chocolate
Place the white chocolate melting wafers in a microwave-safe bowl.
Microwave in 20–30-second intervals, stirring thoroughly after each interval. Continue until the coating is completely melted and smooth.
Avoid overheating the white chocolate because it can become thick, grainy, or scorched.
If the coating becomes too thick, use a manufacturer-recommended thinning product or a small amount of compatible cocoa butter. Avoid adding water or juice, which can cause chocolate to seize.
Step 3: Coat the Snowmen
Hold one marshmallow snowman by its stick and carefully dip it into the melted white chocolate.
Turn it gently to cover both marshmallows completely. Lift it out and allow the excess coating to drip back into the bowl.
If necessary, use a spoon to cover any uncovered areas.
Place the coated snowman upright in a prepared stand or lay it carefully on parchment paper. Repeat with the remaining snowmen.
Allow the coating to set until firm. If your kitchen is warm, refrigerate the tray briefly to help the coating harden.
Step 4: Add the Snowman Faces
Once the white chocolate coating has started to set but is still slightly tacky, decorate the faces.
Add two mini chocolate chips for the eyes. Place a small orange candy or fondant triangle in the center for the carrot nose.
Use tiny chocolate chips or black decorating icing to create a smiling mouth.
Work gently and avoid pressing too hard into the coating.
Step 5: Decorate the Snowman Bodies
Add two or three small chocolate candies down the front of each snowman to create buttons.
Insert small pretzel pieces into the sides of the lower marshmallow to make arms. If the coating has already hardened, use a small dab of melted white chocolate to attach them.
For a festive look, pipe red or green icing around the neck to create scarves. Add a few Christmas sprinkles for extra color.
Step 6: Add Optional Christmas Hats
For a more decorative snowman, use a small chocolate candy, mini cookie, or a simple piece of fondant to create a hat.
Attach the hat with a small amount of melted chocolate.
You can also add a little red or green candy melt detail to create a festive winter hat.
Step 7: Let the Treats Set
Allow the finished snowmen to sit on parchment paper until all the decorations are firm.
If needed, refrigerate them for 10–15 minutes to help the chocolate coating set completely.
Once firm, transfer them carefully to a serving platter or package them in individual treat bags.
Notes
Use melting wafers for easy dipping: They are designed to melt smoothly and set without the extra tempering steps required by many real chocolate products.
Melt slowly: White chocolate can overheat easily. Short microwave intervals and frequent stirring help prevent scorching.
Keep moisture away: Even a small amount of water can cause melted chocolate to seize and become difficult to work with.
Decorate before the coating fully hardens: Eyes, noses, and buttons attach more easily when the coating is slightly tacky.
Use melted chocolate as edible glue: If a decoration does not stick, add a tiny dab of melted coating to attach it.
Keep the snowmen upright: A lollipop stand or a piece of foam designed for food-safe treat displays can help keep the sticks upright while the coating sets.
Work in small batches: Decorate a few snowmen at a time so the coating does not harden before you finish adding the details.
Keep decorations small: Heavy candies can slide down the marshmallow surface before the coating sets.