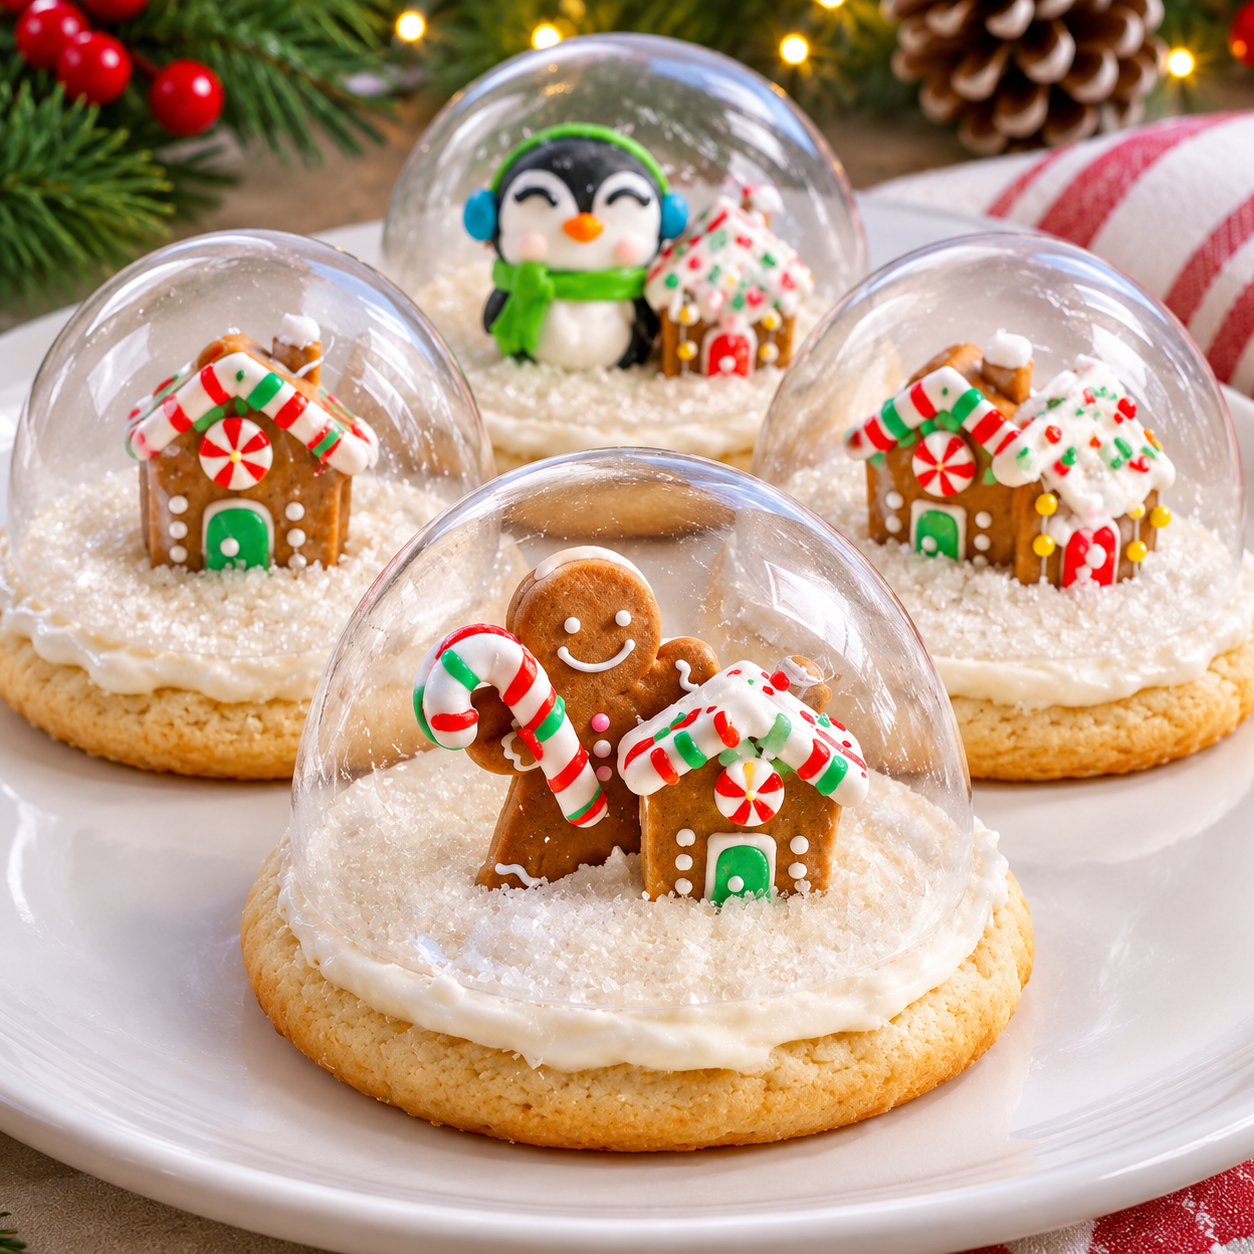
Bring a little winter magic to your holiday dessert table with these beautiful Christmas Snow Globe Cookies! Inspired by the charming look of miniature snow globes, these festive cookies feature buttery sugar cookie bases decorated with smooth royal icing, snowy winter scenes, tiny Christmas trees, and adorable seasonal details. They look like little pieces of holiday art and taste just as wonderful as they look.
These cookies are perfect for anyone who loves decorating Christmas treats. Each cookie becomes a miniature winter wonderland, complete with snow-covered landscapes, evergreen trees, snowflakes, and festive decorations. You can keep the designs simple with white icing and a few sprinkles or get creative with colorful Christmas details.
The best part is that you can prepare the cookie dough ahead of time and decorate the cookies with family and friends. Whether you’re making a Christmas cookie platter, preparing homemade holiday gifts, or looking for a special dessert for a Christmas party, these Christmas Snow Globe Cookies are guaranteed to attract attention.
Why You’ll Love These Christmas Snow Globe Cookies
- Beautiful presentation: Each cookie looks like a tiny snow globe filled with a magical winter scene.
- Buttery and delicious: The sugar cookie base has a tender texture and sweet vanilla flavor.
- Perfect for Christmas: Their snowy decorations make them ideal for holiday celebrations.
- Fun decorating project: Everyone can create their own miniature winter wonderland.
- Make-ahead friendly: The dough and baked cookies can be prepared before decorating day.
- Great homemade gifts: Package them in clear cookie bags or festive boxes for a thoughtful Christmas present.
Ingredients You’ll Need
For the Sugar Cookies
- 2 ¾ cups all-purpose flour
- 1 teaspoon baking powder
- ½ teaspoon salt
- 1 cup unsalted butter, softened
- 1 cup granulated sugar
- 1 large egg
- 2 teaspoons vanilla extract
- ½ teaspoon almond extract (optional)
For the Royal Icing
- 4 cups powdered sugar, sifted
- 3 tablespoons meringue powder
- 5–6 tablespoons warm water, plus more as needed
- ½ teaspoon vanilla extract
- Blue gel food coloring
- White gel food coloring or white icing for snowy details
- Green gel food coloring
- Brown and red gel food coloring, optional
For Decorating
- White nonpareils or snowflake sprinkles
- White sanding sugar
- Small star sprinkles
- Mini Christmas tree decorations made with royal icing
- Edible silver or pearl sprinkles
- Optional edible glitter labeled for food use
Equipment:
- Round cookie cutter, approximately 3 inches
- Snow globe-shaped cookie cutter, if available
- Rolling pin
- Parchment paper
- Baking sheets
- Piping bags
- Small round piping tips
- Toothpicks
- Cooling rack
Ingredient Notes and Substitutions
Unsalted butter: Softened butter gives the cookies a rich flavor and helps create a tender texture. Let it soften naturally rather than melting it.
All-purpose flour: Measure using the spoon-and-level method. Too much flour can make the cookies dry and difficult to roll.
Vanilla extract: Adds classic sugar cookie flavor. Almond extract is optional and gives the cookies a bakery-style taste.
Meringue powder: Helps royal icing dry firm and makes it suitable for detailed cookie decorating. Use a commercially prepared royal icing mix if you prefer.
Gel food coloring: Gel colors provide strong color without adding too much liquid. Blue is especially useful for creating the snowy glass-like background of the snow globes.
Snowflake sprinkles: Small white decorations create the appearance of falling snow. Choose decorations that are edible and appropriate for cookies.
How to Make Christmas Snow Globe Cookies
Step 1: Prepare the Cookie Dough
In a medium bowl, whisk together the flour, baking powder, and salt. Set aside.
In a large mixing bowl, beat the softened butter and granulated sugar for approximately 2–3 minutes, until light and creamy.
Add the egg, vanilla extract, and almond extract if using. Mix until everything is well combined.
Gradually add the dry ingredients, mixing on low speed until a soft dough forms. Avoid overmixing, as this can make the cookies tough.
Divide the dough into two portions, flatten each into a disk, and wrap tightly in plastic wrap.
Refrigerate for at least 1 hour, or until firm enough to roll.
Step 2: Roll and Cut the Cookies
Preheat the oven to 350°F (175°C). Line two baking sheets with parchment paper.
Lightly flour your work surface and rolling pin. Roll the chilled dough to approximately ¼ inch thick.
Cut the dough into snow globe shapes using a snow globe cookie cutter. If you don’t have one, use round cookie cutters and create a simple globe design with icing later.
Transfer the cookies carefully to the prepared baking sheets, leaving approximately 1 inch between them.
Gather the scraps, gently reroll, and continue cutting until all the dough is used.
Step 3: Bake the Cookies
Bake for 9–12 minutes, depending on the size and thickness of the cookies.
The edges should look set, while the centers remain relatively pale. Avoid waiting for the cookies to become deeply golden.
Remove the baking sheets from the oven and allow the cookies to rest for about 5 minutes.
Transfer them to a cooling rack and let them cool completely before decorating.
Important: Warm cookies can melt the icing and cause decorations to slide, so make sure they are completely cool.
Step 4: Prepare the Royal Icing
In a large mixing bowl, combine the powdered sugar and meringue powder.
Add 5 tablespoons of warm water and the vanilla extract. Beat on low speed until combined, then increase to medium speed and mix for approximately 4–5 minutes, until the icing becomes smooth and glossy.
Add more water a little at a time if needed.
Divide the icing into separate bowls:
- White icing for snow and outlines
- Light blue icing for the snow globe background
- Dark blue icing for decorative accents
- Green icing for Christmas trees
- Brown icing for tree trunks
- Red icing for ornaments and other festive details
Keep the icing covered with a damp towel or airtight covering while working to prevent it from drying out.
Step 5: Create the Snow Globe Background
Transfer the light blue icing into a piping bag.
Pipe an outline around the rounded upper portion of each cookie, leaving the bottom section available for the snow globe base if your cookie shape includes one.
Flood the outlined area with slightly thinner blue icing. Use a toothpick to guide the icing into the edges and remove any visible air bubbles.
Allow the blue icing to dry until its surface is firm enough to support additional decorations.
This usually takes several hours, depending on the icing consistency, humidity, and room temperature.
Step 6: Add the Christmas Trees and Snowy Details
Use green royal icing to pipe one or two small evergreen trees inside each snow globe.
Create the trees by piping small zigzag layers from top to bottom. Add a tiny brown trunk underneath each tree.
Use white icing to create a snowy ground at the bottom of the globe.
Add small white dots, snowflakes, and tiny stars to create the appearance of falling snow.
You can also add little red ornaments or a miniature present beside the tree for extra Christmas charm.
Step 7: Decorate the Snow Globe Bases
If your cookie cutter includes a flat base, decorate it with darker blue, red, or white icing.
Add simple lines, dots, or tiny decorative patterns to make the base look like the stand of a traditional snow globe.
For round cookies, you can pipe a curved base along the bottom edge to create the same effect.
Add a few silver or pearl sprinkles for an elegant holiday finish.
Step 8: Let the Cookies Dry Completely
Place the decorated cookies on a flat surface in a cool, dry location.
Allow the royal icing to dry completely, preferably overnight, before stacking, wrapping, or packaging the cookies.
Once the icing is fully firm, your Christmas Snow Globe Cookies are ready to display and enjoy!
Helpful Decorating Notes
- Use completely cooled cookies: Decorating warm cookies can cause icing to melt or slide.
- Keep icing covered: Royal icing dries quickly when exposed to air.
- Adjust icing consistency: Thicker icing works well for outlines and details, while thinner icing is better for flooding larger areas.
- Allow drying between layers: Make sure the blue background is firm before adding trees and other details.
- Use small piping tips: Fine details make the winter scenes look more realistic.
- Avoid excessive decorations: A few carefully placed trees and snowflakes can look more beautiful than an overcrowded design.
- Practice first: Decorate one cookie before piping the entire batch so you can adjust the colors and design.
Fun Christmas Snow Globe Cookie Variations
Snowman Snow Globe Cookies
Create a tiny snowman inside each globe using white royal icing. Add small black dots for eyes and buttons, plus an orange icing nose.
Christmas Village Snow Globe Cookies
Pipe small houses with colorful roofs, white snowy rooftops, and tiny evergreen trees. These cookies look especially beautiful with a light blue background.
Santa Snow Globe Cookies
Create a miniature Santa scene using red, white, and black icing. Add a few white snowflakes around Santa for a festive winter effect.
Pink Winter Wonderland Cookies
Use soft pink icing for the background, white snowflakes, and pastel Christmas trees. This creates an elegant, modern holiday look.
Gingerbread Snow Globe Cookies
Decorate the inside of each globe with miniature gingerbread houses and little candy-inspired details. Use brown, white, and red icing for a cozy Christmas appearance.
Serving Suggestions
These cookies look wonderful on a Christmas dessert table. Arrange them on a white serving platter with extra snowflake sprinkles and a few festive decorations around the edges.
They also pair beautifully with:
- Hot chocolate with whipped cream
- Warm apple cider
- Coffee or vanilla lattes
- Christmas sugar cookies
- Gingerbread men
- Peppermint brownies
- Mini Christmas cheesecakes
For a special presentation, place each cookie in an individual clear treat bag tied with a red or silver ribbon. They make lovely homemade gifts for neighbors, teachers, coworkers, and friends.
Tips for Perfect Snow Globe Cookies
- Chill the dough: Cold dough is easier to roll and helps the cookies hold their shape.
- Keep the thickness consistent: Rolling the dough to ¼ inch helps the cookies bake evenly.
- Don’t overbake: Pale cookies have a softer, more tender texture.
- Use gel colors: They provide vibrant shades without making the icing too runny.
- Plan your design: Decide where the trees, snowflakes, and other decorations will go before piping.
- Work in sections: Complete the background first, then add the detailed decorations after it dries.
- Allow enough drying time: Royal icing needs to become completely firm before the cookies are packaged.
Storage Instructions
Once the royal icing has dried completely, store the cookies in an airtight container in a cool, dry place.
For the best quality, enjoy them within approximately 5–7 days. Avoid storing decorated cookies in a humid area because moisture can soften the icing and make the decorations sticky.
Place parchment paper between layers if you need to stack them, and handle the cookies carefully to prevent the decorations from cracking.
If your icing contains perishable ingredients, follow the appropriate refrigeration and food-safety instructions for those ingredients.
Can You Freeze Christmas Snow Globe Cookies?
Yes! The baked, undecorated sugar cookies freeze very well.
Allow the cookies to cool completely, then place them in an airtight freezer-safe container with parchment paper between the layers. Freeze for up to 2 months for the best quality.
Thaw them in their covered container at room temperature to reduce condensation on the cookies.
Decorated cookies can also be frozen if the royal icing is completely dry and the decorations are suitable for freezing. However, colors and decorative details may be affected by condensation during thawing. For the best appearance, freeze the undecorated cookies and decorate them after thawing.
Make-Ahead Instructions
These Christmas cookies are perfect for preparing in stages.
- Cookie dough: Prepare up to 2 days ahead and keep refrigerated.
- Baked cookies: Bake up to 2 days ahead and store in an airtight container.
- Royal icing: Prepare ahead and store in an airtight container in the refrigerator according to the meringue powder manufacturer’s instructions. Bring to a workable consistency before decorating.
- Decorated cookies: Decorate 1–2 days before your celebration to give the icing enough time to dry completely.
Preparing the cookies ahead of time makes holiday baking much more manageable.
Christmas Snow Globe Cookies Recipe Details
- Prep Time: 45 minutes
- Chilling Time: 1 hour
- Cook Time: 10 minutes
- Decorating Time: 45 minutes
- Icing Drying Time: 8–12 hours
- Total Time: Approximately 11 hours 40 minutes
- Yield: 24 cookies
- Difficulty: Intermediate
- Method: Baking and royal icing decorating
Nutritional Information
Estimated nutrition per cookie, assuming 24 cookies:
- Calories: 185
- Protein: 2 g
- Carbohydrates: 30 g
- Fat: 7 g
- Saturated Fat: 4 g
- Sugar: 20 g
- Sodium: 75 mg
Nutrition values are estimates and may vary depending on cookie size, icing quantity, and decorating ingredients.
Frequently Asked Questions
1. What are Christmas Snow Globe Cookies?
Christmas Snow Globe Cookies are decorated sugar cookies designed to look like miniature snow globes. They usually feature a blue or winter-themed background, snowy details, Christmas trees, snowmen, or other festive decorations made with royal icing.
2. Can I make these cookies without a snow globe cookie cutter?
Absolutely! A round cookie cutter works perfectly. You can create the snow globe effect by piping a curved base along the bottom of each round cookie.
3. Do I need royal icing?
Royal icing is recommended because it dries firm and makes it easier to create detailed decorations. You can use a ready-made royal icing mix to save time.
4. Why is my royal icing too runny?
Too much water can make royal icing difficult to control. Add a little sifted powdered sugar and mix until it reaches the desired consistency.
5. How do I make the snow globe look realistic?
Use a light blue background, white snowy ground, tiny evergreen trees, and small snowflake details. Leaving some open space around the decorations helps create the appearance of a glass globe.
6. How long does royal icing take to dry?
The surface may become firm within a few hours, but detailed decorated cookies should ideally dry overnight before packaging. Humidity and icing thickness can affect drying time.
7. Can I make these cookies ahead of Christmas?
Yes! You can prepare the cookie dough, bake the cookies, and freeze the undecorated bases in advance. Decorate them closer to Christmas for the freshest appearance.
8. Can I use regular buttercream instead of royal icing?
You can use buttercream, but it will remain softer and won’t create the same smooth, firm finish. Royal icing is better for detailed snow globe designs and stacking.
9. How do I package Christmas Snow Globe Cookies as gifts?
Wait until the icing is completely dry, then place each cookie in a clear food-safe treat bag. Seal with a festive ribbon or place the cookies in a holiday gift box with parchment paper between layers.
10. Are these cookies suitable for a Christmas cookie exchange?
Yes! Their unique snow globe design makes them stand out from traditional Christmas cookies. Package each cookie individually to protect the decorations during transport.
Conclusion
These Christmas Snow Globe Cookies are a beautiful way to bring a little winter wonderland magic into your holiday baking. With buttery sugar cookies, smooth royal icing, tiny Christmas trees, and delicate snowy decorations, every cookie becomes a festive miniature masterpiece.
They’re perfect for Christmas parties, cookie exchanges, homemade gifts, and fun decorating afternoons with family. Prepare a batch, get creative with the winter scenes, and enjoy sharing these magical holiday cookies with everyone you love!
Print
Christmas Snow Globe Cookies – Easy Festive Holiday Dessert
Ingredients
For the Sugar Cookies
- 2 ¾ cups all-purpose flour
- 1 teaspoon baking powder
- ½ teaspoon salt
- 1 cup unsalted butter, softened
- 1 cup granulated sugar
- 1 large egg
- 2 teaspoons vanilla extract
- ½ teaspoon almond extract (optional)
For the Royal Icing
- 4 cups powdered sugar, sifted
- 3 tablespoons meringue powder
- 5–6 tablespoons warm water, plus more as needed
- ½ teaspoon vanilla extract
- Blue gel food coloring
- White gel food coloring or white icing for snowy details
- Green gel food coloring
- Brown and red gel food coloring, optional
For Decorating
- White nonpareils or snowflake sprinkles
- White sanding sugar
- Small star sprinkles
- Mini Christmas tree decorations made with royal icing
- Edible silver or pearl sprinkles
- Optional edible glitter labeled for food use
Equipment:
- Round cookie cutter, approximately 3 inches
- Snow globe-shaped cookie cutter, if available
- Rolling pin
- Parchment paper
- Baking sheets
- Piping bags
- Small round piping tips
- Toothpicks
- Cooling rack
Instructions
Step 1: Prepare the Cookie Dough
In a medium bowl, whisk together the flour, baking powder, and salt. Set aside.
In a large mixing bowl, beat the softened butter and granulated sugar for approximately 2–3 minutes, until light and creamy.
Add the egg, vanilla extract, and almond extract if using. Mix until everything is well combined.
Gradually add the dry ingredients, mixing on low speed until a soft dough forms. Avoid overmixing, as this can make the cookies tough.
Divide the dough into two portions, flatten each into a disk, and wrap tightly in plastic wrap.
Refrigerate for at least 1 hour, or until firm enough to roll.
Step 2: Roll and Cut the Cookies
Preheat the oven to 350°F (175°C). Line two baking sheets with parchment paper.
Lightly flour your work surface and rolling pin. Roll the chilled dough to approximately ¼ inch thick.
Cut the dough into snow globe shapes using a snow globe cookie cutter. If you don’t have one, use round cookie cutters and create a simple globe design with icing later.
Transfer the cookies carefully to the prepared baking sheets, leaving approximately 1 inch between them.
Gather the scraps, gently reroll, and continue cutting until all the dough is used.
Step 3: Bake the Cookies
Bake for 9–12 minutes, depending on the size and thickness of the cookies.
The edges should look set, while the centers remain relatively pale. Avoid waiting for the cookies to become deeply golden.
Remove the baking sheets from the oven and allow the cookies to rest for about 5 minutes.
Transfer them to a cooling rack and let them cool completely before decorating.
Important: Warm cookies can melt the icing and cause decorations to slide, so make sure they are completely cool.
Step 4: Prepare the Royal Icing
In a large mixing bowl, combine the powdered sugar and meringue powder.
Add 5 tablespoons of warm water and the vanilla extract. Beat on low speed until combined, then increase to medium speed and mix for approximately 4–5 minutes, until the icing becomes smooth and glossy.
Add more water a little at a time if needed.
Divide the icing into separate bowls:
- White icing for snow and outlines
- Light blue icing for the snow globe background
- Dark blue icing for decorative accents
- Green icing for Christmas trees
- Brown icing for tree trunks
- Red icing for ornaments and other festive details
Keep the icing covered with a damp towel or airtight covering while working to prevent it from drying out.
Step 5: Create the Snow Globe Background
Transfer the light blue icing into a piping bag.
Pipe an outline around the rounded upper portion of each cookie, leaving the bottom section available for the snow globe base if your cookie shape includes one.
Flood the outlined area with slightly thinner blue icing. Use a toothpick to guide the icing into the edges and remove any visible air bubbles.
Allow the blue icing to dry until its surface is firm enough to support additional decorations.
This usually takes several hours, depending on the icing consistency, humidity, and room temperature.
Step 6: Add the Christmas Trees and Snowy Details
Use green royal icing to pipe one or two small evergreen trees inside each snow globe.
Create the trees by piping small zigzag layers from top to bottom. Add a tiny brown trunk underneath each tree.
Use white icing to create a snowy ground at the bottom of the globe.
Add small white dots, snowflakes, and tiny stars to create the appearance of falling snow.
You can also add little red ornaments or a miniature present beside the tree for extra Christmas charm.
Step 7: Decorate the Snow Globe Bases
If your cookie cutter includes a flat base, decorate it with darker blue, red, or white icing.
Add simple lines, dots, or tiny decorative patterns to make the base look like the stand of a traditional snow globe.
For round cookies, you can pipe a curved base along the bottom edge to create the same effect.
Add a few silver or pearl sprinkles for an elegant holiday finish.
Step 8: Let the Cookies Dry Completely
Place the decorated cookies on a flat surface in a cool, dry location.
Allow the royal icing to dry completely, preferably overnight, before stacking, wrapping, or packaging the cookies.
Once the icing is fully firm, your Christmas Snow Globe Cookies are ready to display and enjoy!
Notes
- Use completely cooled cookies: Decorating warm cookies can cause icing to melt or slide.
- Keep icing covered: Royal icing dries quickly when exposed to air.
- Adjust icing consistency: Thicker icing works well for outlines and details, while thinner icing is better for flooding larger areas.
- Allow drying between layers: Make sure the blue background is firm before adding trees and other details.
- Use small piping tips: Fine details make the winter scenes look more realistic.
- Avoid excessive decorations: A few carefully placed trees and snowflakes can look more beautiful than an overcrowded design.
- Practice first: Decorate one cookie before piping the entire batch so you can adjust the colors and design.
