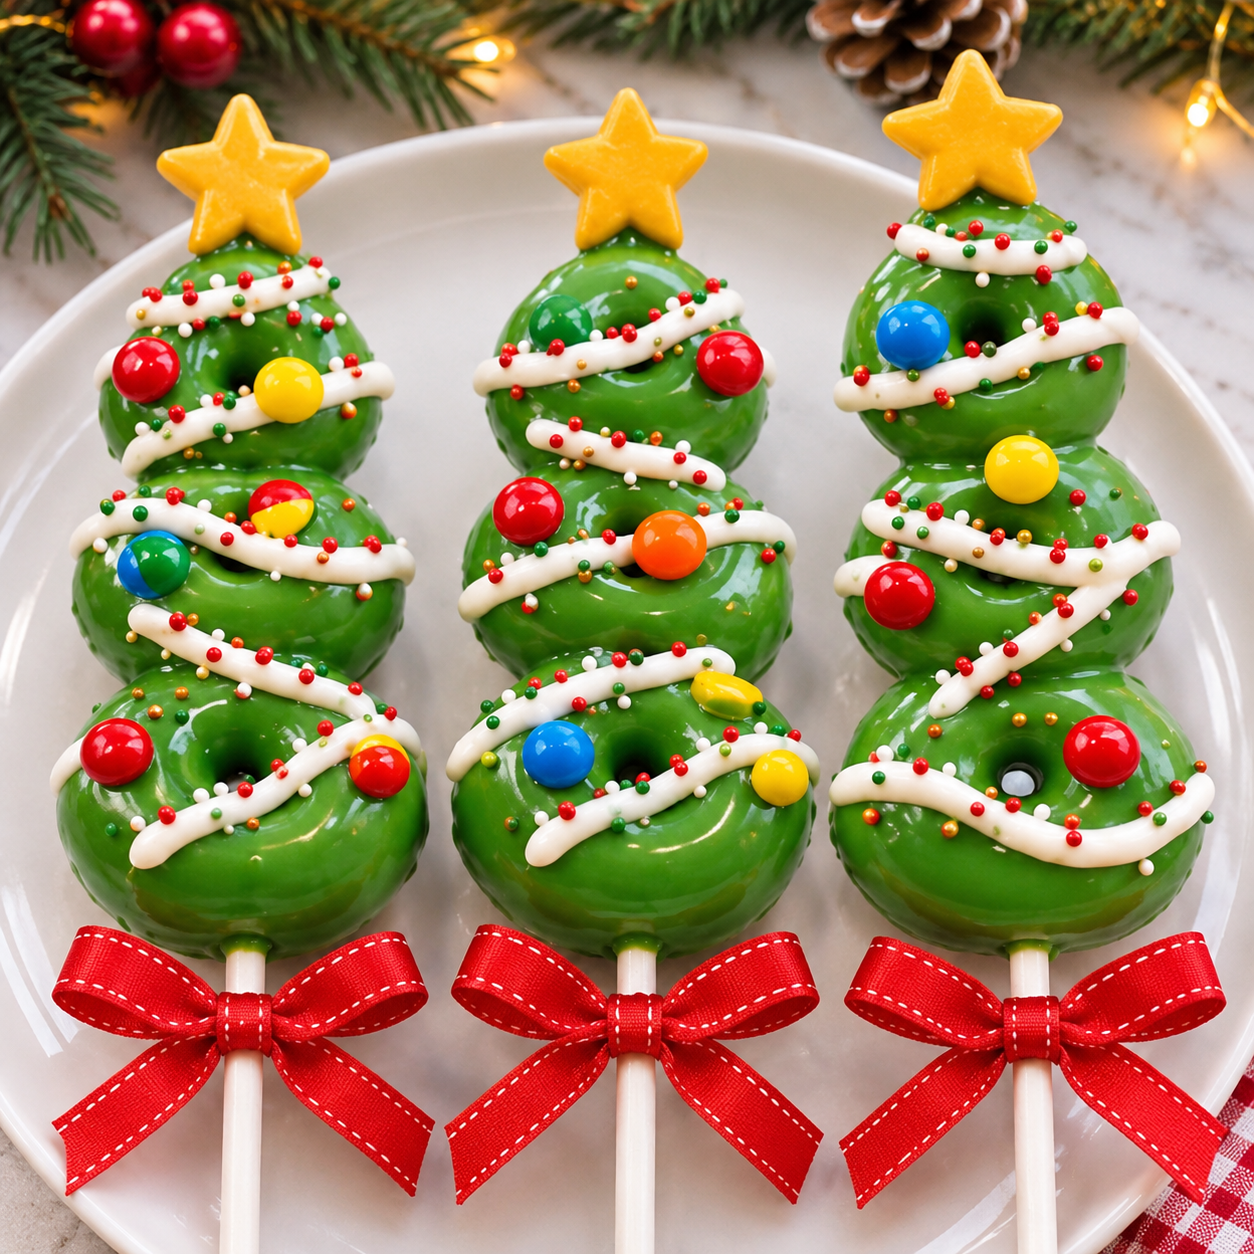
If you’re looking for a cute, festive, and incredibly easy Christmas dessert, these Christmas Tree Donut Pops are sure to make everyone smile! Made with soft mini donuts, a smooth green candy coating, colorful sprinkles, and adorable star decorations, these little treats look just like miniature Christmas trees. They’re perfect for holiday parties, school celebrations, Christmas dessert tables, and cozy family gatherings.
The best part is that you don’t need to bake anything from scratch. Store-bought mini donuts make preparation quick and simple, while the green candy coating transforms them into cheerful holiday treats. Add a few colorful decorations, place each donut on a lollipop stick, and you’ll have a beautiful batch of Christmas desserts that look impressive without requiring complicated decorating skills.
Whether you’re preparing treats with your children, hosting a Christmas party, or looking for something different to add to your holiday dessert platter, these Christmas Tree Donut Pops are a fun and delicious choice.
Why You’ll Love These Christmas Tree Donut Pops
- No baking required: Store-bought mini donuts make this recipe wonderfully simple.
- Festive appearance: Green coating, colorful sprinkles, and little stars create an adorable Christmas tree design.
- Kid-friendly activity: Children can help decorate the donuts with sprinkles and edible decorations.
- Perfect for parties: Individual pops are easy to serve and enjoy.
- Quick preparation: You can prepare a festive dessert without spending hours in the kitchen.
- Easy to customize: Change the colors and decorations to match your Christmas theme.
Ingredients You’ll Need
This recipe uses simple ingredients that are easy to find in most American grocery stores.
For the donut pops:
- 12 mini powdered sugar donuts or plain mini cake donuts
- 12 lollipop sticks or sturdy paper treat sticks
- 12 oz green candy melts or green melting wafers
- 1 tablespoon vegetable shortening, only if needed and compatible with the coating manufacturer’s directions
For decorating:
- 2 tablespoons red Christmas sprinkles
- 2 tablespoons yellow and white star sprinkles
- 2 tablespoons mini colorful round sprinkles
- 12 small yellow star-shaped candies or edible star decorations
- Optional: white sanding sugar for a snowy effect
Helpful note: Green candy melts are ideal because they’re designed to melt smoothly and set into a firm coating. If using another type of chocolate, follow its melting instructions.
Ingredient Notes and Substitutions
Mini donuts: Powdered sugar mini donuts create a soft, sweet center. Plain mini cake donuts are another excellent option, especially if you want a cleaner exterior before decorating.
Green candy melts: These give the donuts their classic Christmas tree color. You can also use white melting wafers colored with an oil-based candy color. Avoid regular water-based food coloring because it can cause melted chocolate to seize.
Lollipop sticks: Use food-safe sticks that are long enough to hold comfortably. Paper treat sticks also work well.
Christmas sprinkles: Choose a combination of red, yellow, white, and colorful sprinkles to resemble ornaments and lights.
Star decorations: Small edible stars make the finished treats look like miniature Christmas trees. If you cannot find star-shaped candies, use yellow star sprinkles.
How to Make Christmas Tree Donut Pops
Step 1: Prepare the Donuts
Remove the mini donuts from their packaging and arrange them on a parchment-lined baking sheet.
If the donuts are very soft or delicate, place them in the refrigerator for about 10–15 minutes. This makes them easier to handle and helps prevent them from breaking during dipping.
Insert a lollipop stick carefully into the side or bottom of each donut, depending on its shape. Push the stick in gently, avoiding excessive pressure that could split the donut.
Arrange the prepared donut pops on the baking sheet.
Step 2: Melt the Green Candy Coating
Place the green candy melts in a microwave-safe bowl.
Microwave in 20–30-second intervals, stirring thoroughly after each interval. Continue until the coating is completely melted and smooth.
Be careful not to overheat it. If the coating seems too thick, add a small amount of compatible shortening only if recommended by the candy coating manufacturer. Stir until the texture is smooth and easy to work with.
Allow the melted coating to cool slightly if it feels very hot.
Step 3: Dip the Donut Pops
Hold one donut by its stick and carefully dip it into the melted green candy coating.
Turn the donut gently until the surface is covered. Lift it out and allow the excess coating to drip back into the bowl.
You can gently rotate the stick to help distribute the coating evenly.
Place the coated donut back onto the parchment-lined baking sheet. Repeat with the remaining donuts.
Tip: If the donut is too wide to dip completely, use a spoon to pour the green coating over the exposed areas while holding it above the bowl.
Step 4: Decorate Like Christmas Trees
While the green coating is still wet, decorate each donut with red, yellow, and colorful sprinkles.
Arrange the decorations like little Christmas ornaments. Add a few white sprinkles to create the appearance of tiny lights.
Place a small yellow star decoration near the top of each donut. Work quickly so the sprinkles stick before the coating begins to set.
For an extra festive appearance, lightly sprinkle white sanding sugar over the green coating.
Step 5: Let the Donut Pops Set
Place the decorated donut pops on the parchment-lined tray.
Allow them to stand at cool room temperature until the candy coating becomes firm, usually about 20–30 minutes, depending on the coating and room temperature.
Once completely set, carefully transfer the Christmas Tree Donut Pops to a serving platter or arrange them upright in a treat stand.
Your adorable Christmas dessert is ready to serve!
Helpful Cooking and Decorating Notes
- Choose sturdy donuts: Mini cake donuts are generally easier to handle than very delicate yeast donuts.
- Avoid overheating the coating: Excessive heat can make candy melts thick or difficult to work with.
- Work in small batches: Dip a few donuts at a time so the coating doesn’t set before you finish decorating.
- Decorate immediately: Sprinkles and stars need to be added while the coating is still wet.
- Keep the sticks secure: Insert each stick gently and avoid twisting it too much.
- Use parchment paper: This prevents the coated donuts from sticking to the tray.
- Check the consistency: The coating should be fluid enough to cover the donuts but thick enough to cling to the surface.
Fun Variations
Chocolate Christmas Tree Donut Pops
Use chocolate mini donuts instead of powdered sugar donuts. The chocolate center pairs beautifully with the sweet green coating.
White Christmas Tree Donut Pops
Dip the donuts in white melting wafers and decorate them with silver, blue, and white sprinkles for a snowy winter look.
Grinch Christmas Donut Pops
Use bright lime-green candy melts and decorate with tiny red heart sprinkles for a fun Grinch-inspired holiday variation.
Sprinkle Explosion Donut Pops
Cover the entire surface with colorful Christmas sprinkles while the coating is wet. This version is especially popular with children.
Chocolate Drizzle Christmas Donuts
After the green coating has completely set, drizzle a little melted white or red candy coating over each donut to create a decorative garland effect.
Serving Suggestions
Christmas Tree Donut Pops look wonderful on a holiday dessert table. Arrange them upright in a festive stand, or place them flat on a large white platter decorated with fresh rosemary sprigs and Christmas ornaments.
They pair beautifully with:
- Hot chocolate topped with whipped cream
- Warm apple cider
- Christmas punch
- Coffee or vanilla lattes
- Sugar cookies and gingerbread treats
- Mini brownies and chocolate truffles
For a Christmas party, arrange the donut pops in rows or create a larger tree-shaped display using a tiered dessert stand. Their bright green color makes them stand out among traditional holiday cookies and cakes.
They are also a lovely addition to children’s Christmas parties, classroom celebrations, and holiday gift boxes.
Tips for the Best Christmas Tree Donut Pops
- Start with room-temperature donuts: If they are too cold, condensation can affect the candy coating.
- Use a deep dipping bowl: A narrow, deep bowl makes it easier to coat the donuts evenly.
- Keep decorations ready: Arrange all sprinkles and stars before melting the candy coating.
- Avoid adding too much shortening: Excessive thinning can make the coating too runny and affect how it sets.
- Let each pop set completely: This prevents decorations from shifting when you move the treats.
- Use a treat stand: A stand keeps the decorations intact and creates a beautiful presentation.
- Don’t overcrowd the tray: Leave enough room between the pops so they don’t stick together.
Storage Instructions
For the best texture and flavor, serve these donut pops on the day they are prepared.
Store leftover donut pops in an airtight container according to the storage instructions on the original donut packaging. Because commercially prepared donuts vary in ingredients and shelf-life recommendations, follow the manufacturer’s guidance.
If the donuts have a cream, custard, or other perishable filling, refrigerate them promptly and follow the filling’s food-safety storage requirements.
Avoid placing the finished pops in a warm or humid location, as heat and moisture can soften the candy coating and affect the sprinkles.
Can You Freeze Christmas Tree Donut Pops?
Freezing is generally not recommended for the best results. Donuts can become dry or change texture after thawing, while condensation may make the candy coating sticky or dull.
For a holiday party, it’s better to prepare these treats close to serving time rather than freezing them in advance.
Make-Ahead Instructions
You can make holiday preparation easier by organizing the decorations ahead of time.
- Measure the sprinkles and place them in small bowls.
- Prepare the lollipop sticks and parchment-lined baking sheet.
- Arrange the serving stand or dessert platter.
- Keep the donuts sealed in their original packaging until you’re ready to decorate.
For the freshest results, dip and decorate the donuts on the day you plan to serve them.
Christmas Tree Donut Pops Recipe Details
- Prep Time: 20 minutes
- Cook Time: 0 minutes
- Setting Time: 30 minutes
- Total Time: 50 minutes
- Servings: 12 donut pops
- Difficulty: Easy
- Method: No-bake
Nutritional Information
Estimated nutrition per donut pop, based on 12 servings:
- Calories: 230
- Protein: 2 g
- Carbohydrates: 32 g
- Fat: 11 g
- Saturated Fat: 7 g
- Sugar: 22 g
- Sodium: 170 mg
Nutritional values are estimates and will vary depending on the brand of mini donuts, candy melts, and decorations used.
Frequently Asked Questions
1. Can I use regular donuts instead of mini donuts?
Yes! You can use regular-sized donuts, but they will be larger and may require longer lollipop sticks. Mini donuts are easier to decorate and serve as individual holiday treats.
2. Do I need to bake the donuts?
No. This is a no-bake recipe made with ready-to-eat mini donuts. Simply dip them in melted green candy coating and decorate.
3. Can I use white chocolate instead of green candy melts?
Yes. Use white melting wafers and color them with an oil-based green candy color. Regular water-based food coloring may cause the chocolate to seize.
4. Why is my candy coating too thick?
Candy melts can become thick if they are overheated or if moisture gets into the bowl. Melt them slowly and stir frequently. If necessary, use a small amount of manufacturer-approved thinning agent.
5. How do I keep the sprinkles from falling off?
Add the sprinkles immediately after dipping each donut, while the candy coating is still wet. Once the coating sets, the decorations will stay in place.
6. Can I make these Christmas donut pops without sticks?
Absolutely! You can prepare them as regular decorated mini Christmas tree donuts. Place them directly on a serving platter and decorate them in the same way.
7. Can kids help make this recipe?
Yes! Children can help choose sprinkles and decorate the donuts once the coating has been prepared. An adult should handle the melted candy coating and supervise the use of lollipop sticks.
8. How long do the candy melts take to set?
Most candy coatings set in approximately 20–30 minutes at a cool room temperature. Setting time can vary depending on the coating brand, thickness, and humidity.
9. Can I use different colors?
Of course! Red, white, blue, and silver coatings can create beautiful winter-themed donut pops. You can also use different sprinkle combinations for a coordinated holiday dessert table.
10. Are Christmas Tree Donut Pops good for a Christmas party?
Definitely! They’re individually portioned, easy to serve, and colorful enough to become a centerpiece on your Christmas dessert table.
Conclusion
These Christmas Tree Donut Pops are proof that holiday desserts don’t have to be complicated to be beautiful and delicious. With soft mini donuts, smooth green candy coating, colorful sprinkles, and adorable star decorations, you can create a festive Christmas treat that everyone will love.
They’re quick to prepare, fun to decorate, and perfect for Christmas parties, family celebrations, and holiday dessert tables. Make a batch this season and enjoy these sweet little Christmas trees with your favorite holiday drinks!
Print
Christmas Tree Donut Pops – Easy No-Bake Holiday Dessert for Kids
Ingredients
This recipe uses simple ingredients that are easy to find in most American grocery stores.
For the donut pops:
- 12 mini powdered sugar donuts or plain mini cake donuts
- 12 lollipop sticks or sturdy paper treat sticks
- 12 oz green candy melts or green melting wafers
- 1 tablespoon vegetable shortening, only if needed and compatible with the coating manufacturer’s directions
For decorating:
- 2 tablespoons red Christmas sprinkles
- 2 tablespoons yellow and white star sprinkles
- 2 tablespoons mini colorful round sprinkles
- 12 small yellow star-shaped candies or edible star decorations
- Optional: white sanding sugar for a snowy effect
Helpful note: Green candy melts are ideal because they’re designed to melt smoothly and set into a firm coating. If using another type of chocolate, follow its melting instructions.
Instructions
Remove the mini donuts from their packaging and arrange them on a parchment-lined baking sheet.
If the donuts are very soft or delicate, place them in the refrigerator for about 10–15 minutes. This makes them easier to handle and helps prevent them from breaking during dipping.
Insert a lollipop stick carefully into the side or bottom of each donut, depending on its shape. Push the stick in gently, avoiding excessive pressure that could split the donut.
Arrange the prepared donut pops on the baking sheet.
Step 2: Melt the Green Candy Coating
Place the green candy melts in a microwave-safe bowl.
Microwave in 20–30-second intervals, stirring thoroughly after each interval. Continue until the coating is completely melted and smooth.
Be careful not to overheat it. If the coating seems too thick, add a small amount of compatible shortening only if recommended by the candy coating manufacturer. Stir until the texture is smooth and easy to work with.
Allow the melted coating to cool slightly if it feels very hot.
Step 3: Dip the Donut Pops
Hold one donut by its stick and carefully dip it into the melted green candy coating.
Turn the donut gently until the surface is covered. Lift it out and allow the excess coating to drip back into the bowl.
You can gently rotate the stick to help distribute the coating evenly.
Place the coated donut back onto the parchment-lined baking sheet. Repeat with the remaining donuts.
Tip: If the donut is too wide to dip completely, use a spoon to pour the green coating over the exposed areas while holding it above the bowl.
Step 4: Decorate Like Christmas Trees
While the green coating is still wet, decorate each donut with red, yellow, and colorful sprinkles.
Arrange the decorations like little Christmas ornaments. Add a few white sprinkles to create the appearance of tiny lights.
Place a small yellow star decoration near the top of each donut. Work quickly so the sprinkles stick before the coating begins to set.
For an extra festive appearance, lightly sprinkle white sanding sugar over the green coating.
Step 5: Let the Donut Pops Set
Place the decorated donut pops on the parchment-lined tray.
Allow them to stand at cool room temperature until the candy coating becomes firm, usually about 20–30 minutes, depending on the coating and room temperature.
Once completely set, carefully transfer the Christmas Tree Donut Pops to a serving platter or arrange them upright in a treat stand.
Your adorable Christmas dessert is ready to serve!
Notes
- Choose sturdy donuts: Mini cake donuts are generally easier to handle than very delicate yeast donuts.
- Avoid overheating the coating: Excessive heat can make candy melts thick or difficult to work with.
- Work in small batches: Dip a few donuts at a time so the coating doesn’t set before you finish decorating.
- Decorate immediately: Sprinkles and stars need to be added while the coating is still wet.
- Keep the sticks secure: Insert each stick gently and avoid twisting it too much.
- Use parchment paper: This prevents the coated donuts from sticking to the tray.
- Check the consistency: The coating should be fluid enough to cover the donuts but thick enough to cling to the surface.
