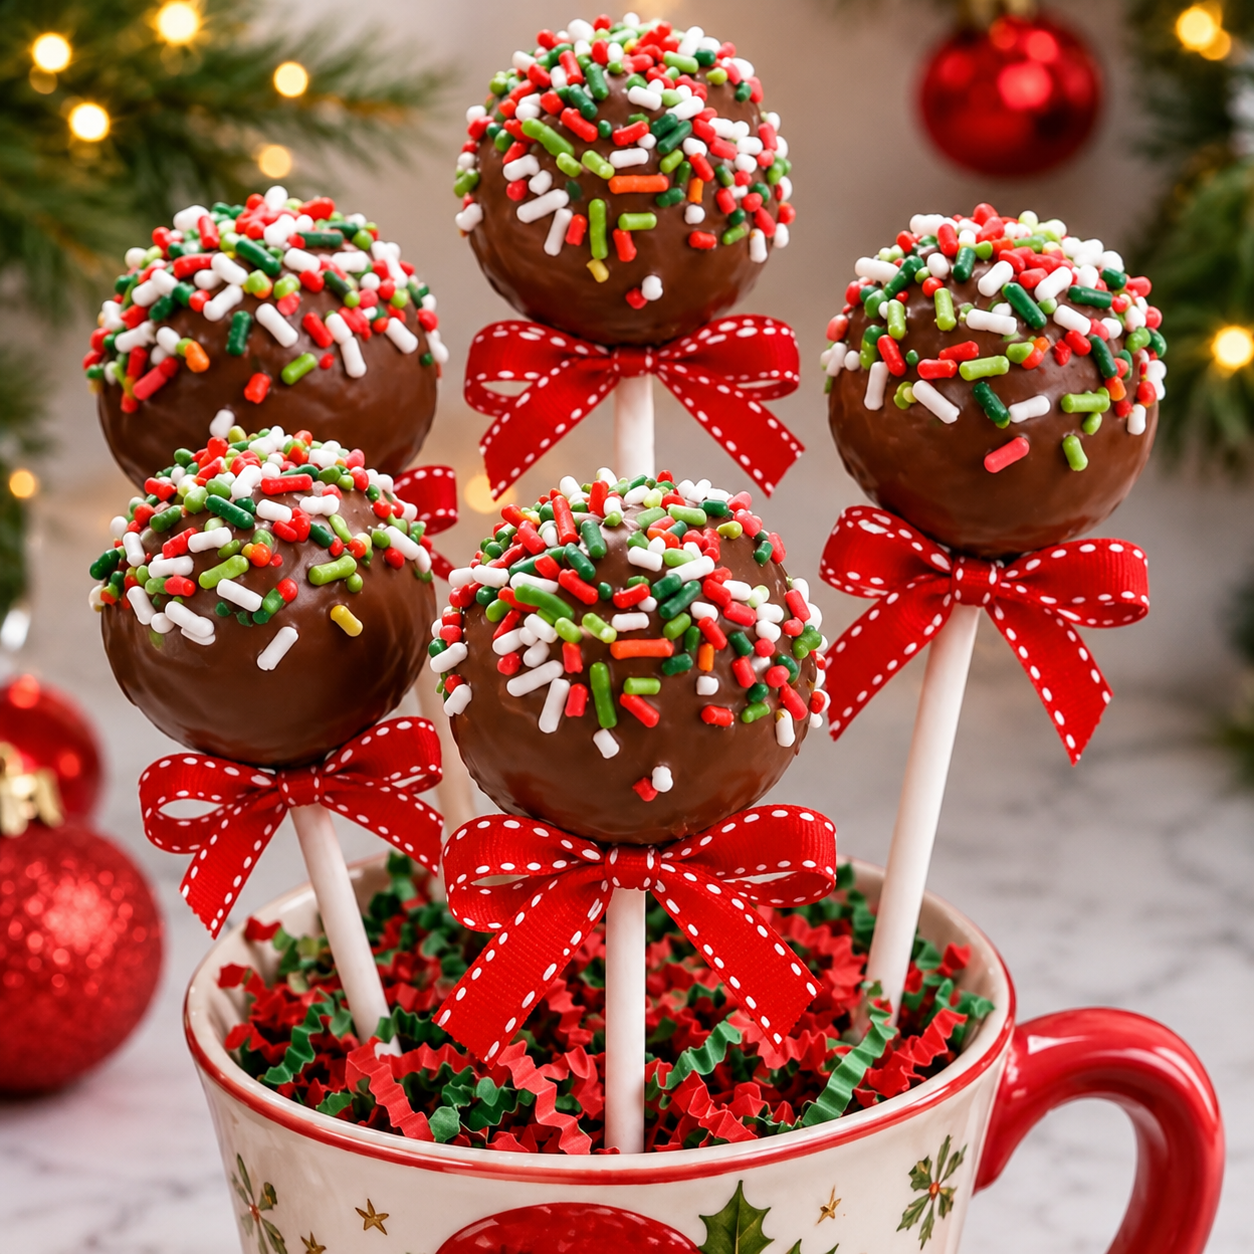
Make your holiday dessert table extra special with these delicious Christmas Brownie Pops! They’re rich, fudgy, wonderfully chocolatey, and decorated with festive red, green, and white sprinkles. Each little brownie pop is dipped in smooth melted chocolate, placed on a stick, and finished with cheerful Christmas decorations that make them almost too pretty to eat.
The best part? These homemade brownie pops are surprisingly easy to prepare. You can use your favorite homemade brownie recipe or a boxed brownie mix to create a soft, rich brownie center that holds together beautifully. Once the brownies are cooled and crumbled, a little chocolate frosting or ganache brings everything together into perfectly shaped balls ready for dipping.
These festive treats are perfect for Christmas parties, holiday cookie exchanges, school celebrations, family gatherings, and edible gifts. They’re also a fun recipe to make with children, who can help add the sprinkles and decorate each pop with their own creative designs.
Whether you display them in a decorative stand, arrange them on a Christmas platter, or wrap them individually for gifting, these Christmas Brownie Pops are a delicious way to bring holiday cheer to every celebration.
Why You’ll Love These Christmas Brownie Pops
- Rich and fudgy: The brownie centers have a deep chocolate flavor and soft, moist texture.
- Festive and colorful: Red, green, white, and gold decorations make them perfect for Christmas.
- Easy to customize: Use different chocolate coatings, sprinkles, and decorative drizzles.
- Perfect party treats: Individual portions make serving simple and mess-free.
- Great for gifting: Package them in clear bags with festive ribbons for homemade holiday presents.
- Make-ahead friendly: Prepare the brownie centers in advance and decorate them closer to serving time.
Ingredients You’ll Need
This recipe makes approximately 24 brownie pops.
For the Brownie Centers
- 1 box (18–19 ounces) fudge brownie mix
- Ingredients listed on the brownie mix package, usually eggs, vegetable oil, and water
- ⅓ cup chocolate frosting, added gradually as needed
- ½ teaspoon vanilla extract, optional
For the Chocolate Coating
- 16 ounces milk chocolate melting wafers
- 8 ounces white chocolate melting wafers
- 2 tablespoons red candy melts
- 2 tablespoons green candy melts
For Decorating
- ½ cup Christmas sprinkles
- 2 tablespoons red and green sugar sprinkles
- 2 tablespoons mini chocolate chips, optional
- 24 sturdy lollipop sticks
- 2 tablespoons crushed peppermint candies, optional
You can use homemade brownies instead of a boxed mix. Bake them in an 8-inch square pan and allow them to cool completely before crumbling.
Ingredient Notes and Substitutions
Brownie mix: A fudge-style brownie mix creates the richest and softest centers. Avoid adding extra liquid beyond the package instructions because overly soft brownies can make the pops difficult to shape.
Chocolate frosting: A small amount binds the brownie crumbs together. Add it gradually because different brownie recipes have different moisture levels. You may not need the entire amount.
Milk chocolate melting wafers: These create a smooth coating that is easy to dip and sets firmly. You can substitute semisweet or dark chocolate melting wafers.
White chocolate melting wafers: These provide a beautiful contrast and are perfect for white chocolate brownie pops or decorative drizzles.
Red and green candy melts: Use these for colorful Christmas decorations. Melt them separately according to the package instructions.
Lollipop sticks: Choose sturdy sticks that can support the weight of the brownie balls. Paper or plastic treat sticks designed for cake pops are suitable.
Christmas sprinkles: A combination of red, green, white, and gold sprinkles creates a festive finish. Add them before the coating sets.
How to Make Christmas Brownie Pops
Step 1: Bake the Brownies
Preheat your oven according to the brownie mix package instructions, usually 350°F (175°C).
Prepare an 8-inch square baking pan with parchment paper or nonstick baking spray.
Prepare the brownie batter according to the package directions. Pour the batter into the prepared pan and spread it evenly.
Bake according to the package instructions, checking for doneness near the end of the suggested baking time. A toothpick inserted into the center should come out with a few moist crumbs rather than wet batter.
Remove the brownies from the oven and allow them to cool completely in the pan.
Important: Do not crumble warm brownies. They need to cool completely so the mixture holds together properly when shaped.
Step 2: Crumble the Brownies
Transfer the cooled brownies to a large mixing bowl.
Remove any very hard or overly crisp edges if you prefer a softer texture.
Use clean hands or a fork to crumble the brownies into fine, even crumbs. Break up any large pieces so the mixture will shape smoothly.
Step 3: Add the Frosting
Add approximately 2 tablespoons of chocolate frosting to the brownie crumbs and mix thoroughly.
Continue adding frosting one tablespoon at a time until the mixture holds together when pressed between your fingers.
You want a soft, moldable texture that resembles thick cookie dough. It should not feel wet, sticky, or overly greasy.
Add the vanilla extract if desired and mix until evenly incorporated.
Step 4: Shape the Brownie Balls
Scoop approximately 1 tablespoon of the brownie mixture at a time and roll it between your palms to form a smooth ball.
Aim for evenly sized balls so they look consistent when displayed.
Place each ball on a parchment-lined baking sheet.
Repeat with the remaining mixture until you have approximately 24 brownie balls.
Refrigerate for 30–45 minutes, or until firm enough to dip.
Step 5: Prepare the Lollipop Sticks
Melt a small amount of milk chocolate melting wafers in a microwave-safe bowl.
Dip the tip of each lollipop stick about ½ inch into the melted chocolate.
Insert the chocolate-coated end into the center of a chilled brownie ball, pushing it in approximately halfway.
The melted chocolate acts as an edible glue and helps keep the brownie ball attached to the stick.
Return the brownie pops to the refrigerator for about 10 minutes so the chocolate can set.
Step 6: Melt the Chocolate Coating
Place the milk chocolate melting wafers in a microwave-safe bowl.
Heat in 20–30-second intervals, stirring after each interval until completely smooth.
In separate bowls, melt the white chocolate, red candy melts, and green candy melts according to their package instructions.
Keep the melted coatings warm and fluid enough for dipping, but avoid overheating them.
If a coating becomes too thick, use a manufacturer-recommended thinning product or compatible cocoa butter. Do not add water or juice, as moisture can cause chocolate to seize.
Step 7: Dip the Brownie Pops
Remove a few chilled brownie pops from the refrigerator at a time.
Hold each pop by the stick and dip it into the melted chocolate, covering the entire brownie ball.
Gently rotate the pop to coat it evenly. Lift it out and allow the excess chocolate to drip back into the bowl.
Avoid stirring or moving the pop too aggressively, as this can loosen the brownie from the stick.
Place the finished pop upright in a cake pop stand or a food-safe foam block. You can also lay it carefully on parchment paper if you prefer a flat-bottomed finish.
Step 8: Add Christmas Decorations
While the chocolate coating is still wet, sprinkle each pop with red, green, white, and gold Christmas sprinkles.
For a more decorative look, drizzle melted white chocolate over the milk chocolate pops using a spoon or piping bag.
You can also create festive stripes with red and green candy melts.
For peppermint brownie pops, sprinkle a little finely crushed peppermint candy over the coating before it sets.
Work with a few pops at a time so the chocolate does not harden before you finish decorating.
Step 9: Let the Brownie Pops Set
Allow the decorated brownie pops to rest until the coating is completely firm.
If your kitchen is warm, refrigerate them briefly to help the chocolate set.
Once firm, transfer the pops carefully to a serving platter or individual treat bags.
Helpful Cooking Notes
Let the brownies cool completely: Warm brownies can become too soft when mixed with frosting and may not hold their shape.
Add frosting gradually: Too much frosting makes the mixture sticky and difficult to roll. Start with a small amount and add more only when needed.
Keep the brownie balls uniform: Using a tablespoon or small cookie scoop helps create evenly sized pops.
Chill before dipping: Firm brownie balls are easier to coat and less likely to fall off the sticks.
Secure the sticks with chocolate: Dipping the stick tip in melted chocolate before inserting it creates a stronger connection.
Use melting wafers for easy coating: They are designed to melt smoothly and set without the additional tempering process required by many real chocolate products.
Avoid overheating: Chocolate can become thick or grainy when overheated. Use short microwave intervals and stir frequently.
Decorate immediately: Add sprinkles and other decorations while the coating is wet so they attach properly.
Work in small batches: Keep the remaining brownie balls chilled while decorating to help them maintain their shape.
Delicious Christmas Brownie Pops Variations
1. White Chocolate Christmas Brownie Pops
Dip the brownie balls in white chocolate melting wafers and decorate with red and green sprinkles. Add a little white chocolate drizzle for a beautiful snowy appearance.
2. Peppermint Chocolate Brownie Pops
Use dark or semisweet chocolate coating and sprinkle crushed peppermint candies over the top. The combination of rich chocolate and cool peppermint is perfect for Christmas.
3. Red Velvet Brownie Pops
Prepare red velvet brownies instead of traditional chocolate brownies. Bind the crumbs with a small amount of cream cheese frosting, then dip in white chocolate.
Because cream cheese frosting is perishable, refrigerate these pops and follow conservative food-safety storage times.
4. Christmas Tree Brownie Pops
Shape the brownie mixture into small cones instead of balls. Dip them in green candy melts and decorate with tiny red and gold sprinkles to resemble miniature Christmas trees.
5. Snowman Brownie Pops
Use white chocolate coating and add small chocolate chips for eyes and buttons. Use tiny orange fondant pieces for carrot noses and red icing for scarves.
6. Dark Chocolate Brownie Pops
Use dark chocolate melting wafers for the coating and finish with white chocolate drizzle. This creates a slightly less sweet version with a deeper chocolate flavor.
How to Serve Christmas Brownie Pops
These brownie pops make a beautiful addition to holiday dessert tables. Their colorful decorations and individual portions make them especially convenient for parties and celebrations.
Here are some fun ways to serve them:
- Christmas dessert table: Display them in a decorative cake pop stand alongside cookies and cupcakes.
- Holiday cookie platters: Arrange them between sugar cookies, chocolate truffles, and peppermint bark.
- Hot chocolate bar: Serve them beside mugs of hot cocoa and bowls of marshmallows.
- Christmas party favors: Wrap each pop in a clear cellophane bag and tie it with a red or green ribbon.
- Homemade gift boxes: Place several brownie pops in a decorative holiday box lined with parchment paper.
- Kids’ Christmas parties: Serve them with milk and other festive snacks.
For a beautiful presentation, use a mixture of milk chocolate, white chocolate, and colorful decorations so the pops have different patterns and finishes.
Tips for Perfect Christmas Brownie Pops
- Choose a fudgy brownie recipe rather than a dry, cake-like brownie.
- Allow the brownies to cool completely before crumbling.
- Add frosting gradually to avoid an overly sticky mixture.
- Roll the brownie balls evenly so they have a consistent size.
- Chill the balls before inserting the sticks.
- Use melted chocolate to secure each stick.
- Dip the pops gently and allow excess coating to drip off.
- Add decorations before the coating hardens.
- Use a cake pop stand to keep the finished pops upright.
- Store the finished treats in a covered container away from heat and humidity.
- Refrigerate the pops because the brownie mixture contains perishable ingredients.
- Let refrigerated pops warm slightly in their closed container before opening to reduce condensation.
Storage Instructions
Because these brownie pops contain homemade brownies and frosting, store them in an airtight container in the refrigerator at 40°F (4°C) or below.
For the best texture and flavor, enjoy them within 3–4 days.
Separate layers with parchment paper to prevent the chocolate decorations from sticking together.
Do not leave the brownie pops at room temperature for more than 2 hours, or more than 1 hour when temperatures are above 90°F (32°C).
If serving them at a party, display a smaller batch and keep the remaining pops refrigerated until needed.
Can You Make Christmas Brownie Pops Ahead of Time?
Absolutely! These treats are perfect for preparing ahead of a holiday celebration.
You can bake the brownies one day in advance, allow them to cool completely, and store them covered until you’re ready to make the pops.
You can also shape the brownie balls and refrigerate them overnight in an airtight container. Dip and decorate them the next day.
For the best presentation, allow the chocolate coating to set completely before packaging or arranging the pops on your dessert table.
Can You Freeze Christmas Brownie Pops?
Yes, brownie pops can be frozen, although the chocolate coating may develop condensation or lose some of its original appearance after thawing.
For the best quality, freeze the undipped brownie balls in an airtight freezer-safe container for up to 2 months.
Thaw them overnight in the refrigerator, insert the sticks, and dip them in fresh melted chocolate before serving.
You can also freeze fully decorated pops, but allow them to thaw slowly in the refrigerator while still covered to reduce condensation.
Recipe Details
- Prep Time: 30 minutes
- Cook Time: 25 minutes
- Cooling Time: 1 hour
- Chilling Time: 45 minutes
- Decorating and Setting Time: 30 minutes
- Total Time: 3 hours 10 minutes
- Yield: 24 brownie pops
- Serving Size: 1 brownie pop
- Category: Dessert, Christmas Treats
- Cuisine: American
- Method: Baking and Dipping
Nutritional Information
Estimated nutrition per brownie pop:
- Calories: 225
- Protein: 2g
- Carbohydrates: 30g
- Fat: 11g
- Saturated Fat: 6g
- Cholesterol: 20mg
- Sodium: 105mg
- Fiber: 1g
- Sugar: 23g
Nutrition values are estimates based on 24 brownie pops and will vary depending on the brownie mix, frosting, chocolate coating, and decorations used.
Frequently Asked Questions
1. Can I use boxed brownie mix for Christmas Brownie Pops?
Yes! Boxed brownie mix is a convenient option and works very well. Choose a fudge-style mix and prepare it according to the package instructions. Let the brownies cool completely before crumbling.
2. Why are my brownie pops falling off the sticks?
This usually happens when the brownie mixture is too soft, the balls are too large, or the sticks are not secured properly. Chill the brownie balls before dipping and always dip the stick tip in melted chocolate before inserting it.
3. How much frosting should I add?
Start with approximately 2 tablespoons for the brownie batch and add more gradually until the crumbs hold together when pressed. The exact amount depends on how moist your brownies are.
4. Can I make brownie pops without sticks?
Yes! Simply roll the brownie mixture into small balls and dip them in chocolate. These become delicious Christmas brownie bites that are easy to serve on a dessert platter.
5. What chocolate is best for dipping brownie pops?
Milk chocolate, semisweet chocolate, dark chocolate, and white chocolate melting wafers all work well. Melting wafers are especially convenient because they are formulated to melt and set easily.
6. How do I make the chocolate coating smooth?
Use completely dry bowls and utensils, melt the coating slowly, and stir frequently. If it becomes too thick, use a suitable manufacturer-recommended thinning product rather than adding water or milk.
7. Can I decorate the brownie pops with icing?
Yes! Red, green, and white decorating icing can be used to create stripes, snowflakes, Christmas trees, and other festive designs. Apply icing after the chocolate coating has set.
8. How long do Christmas Brownie Pops last?
Because these pops contain brownie and frosting, keep them refrigerated and enjoy them within 3–4 days for the best quality. Avoid leaving them at room temperature for extended periods.
9. Can I make these brownie pops for a Christmas cookie exchange?
Absolutely! Their individual portions make them easy to package and share. Place each pop in a clear treat bag and tie it with a festive ribbon.
10. Can I make different flavors in one batch?
Yes! Divide the brownie mixture into portions and add different flavors or coatings. Try peppermint, vanilla, peanut butter, or caramel-inspired variations, making sure any added ingredients are suitable for the mixture’s texture.
Conclusion
These Christmas Brownie Pops are everything a holiday dessert should be: rich, fudgy, chocolatey, and beautifully decorated. With a soft brownie center and a smooth chocolate coating, they’re a delicious treat that looks wonderful on any Christmas dessert table.
They’re easy to customize, fun to decorate, and perfect for parties, edible gifts, and festive family gatherings. Make a batch with your favorite chocolate coatings and Christmas sprinkles, and enjoy these adorable brownie pops throughout the holiday season!
Print
Christmas Brownie Pops – Easy Festive Chocolate Brownie Pops
Ingredients
This recipe makes approximately 24 brownie pops.
For the Brownie Centers
- 1 box (18–19 ounces) fudge brownie mix
- Ingredients listed on the brownie mix package, usually eggs, vegetable oil, and water
- ⅓ cup chocolate frosting, added gradually as needed
- ½ teaspoon vanilla extract, optional
For the Chocolate Coating
- 16 ounces milk chocolate melting wafers
- 8 ounces white chocolate melting wafers
- 2 tablespoons red candy melts
- 2 tablespoons green candy melts
For Decorating
- ½ cup Christmas sprinkles
- 2 tablespoons red and green sugar sprinkles
- 2 tablespoons mini chocolate chips, optional
- 24 sturdy lollipop sticks
- 2 tablespoons crushed peppermint candies, optional
Instructions
Preheat your oven according to the brownie mix package instructions, usually 350°F (175°C).
Prepare an 8-inch square baking pan with parchment paper or nonstick baking spray.
Prepare the brownie batter according to the package directions. Pour the batter into the prepared pan and spread it evenly.
Bake according to the package instructions, checking for doneness near the end of the suggested baking time. A toothpick inserted into the center should come out with a few moist crumbs rather than wet batter.
Remove the brownies from the oven and allow them to cool completely in the pan.
Important: Do not crumble warm brownies. They need to cool completely so the mixture holds together properly when shaped.
Step 2: Crumble the Brownies
Transfer the cooled brownies to a large mixing bowl.
Remove any very hard or overly crisp edges if you prefer a softer texture.
Use clean hands or a fork to crumble the brownies into fine, even crumbs. Break up any large pieces so the mixture will shape smoothly.
Step 3: Add the Frosting
Add approximately 2 tablespoons of chocolate frosting to the brownie crumbs and mix thoroughly.
Continue adding frosting one tablespoon at a time until the mixture holds together when pressed between your fingers.
You want a soft, moldable texture that resembles thick cookie dough. It should not feel wet, sticky, or overly greasy.
Add the vanilla extract if desired and mix until evenly incorporated.
Step 4: Shape the Brownie Balls
Scoop approximately 1 tablespoon of the brownie mixture at a time and roll it between your palms to form a smooth ball.
Aim for evenly sized balls so they look consistent when displayed.
Place each ball on a parchment-lined baking sheet.
Repeat with the remaining mixture until you have approximately 24 brownie balls.
Refrigerate for 30–45 minutes, or until firm enough to dip.
Step 5: Prepare the Lollipop Sticks
Melt a small amount of milk chocolate melting wafers in a microwave-safe bowl.
Dip the tip of each lollipop stick about ½ inch into the melted chocolate.
Insert the chocolate-coated end into the center of a chilled brownie ball, pushing it in approximately halfway.
The melted chocolate acts as an edible glue and helps keep the brownie ball attached to the stick.
Return the brownie pops to the refrigerator for about 10 minutes so the chocolate can set.
Step 6: Melt the Chocolate Coating
Place the milk chocolate melting wafers in a microwave-safe bowl.
Heat in 20–30-second intervals, stirring after each interval until completely smooth.
In separate bowls, melt the white chocolate, red candy melts, and green candy melts according to their package instructions.
Keep the melted coatings warm and fluid enough for dipping, but avoid overheating them.
If a coating becomes too thick, use a manufacturer-recommended thinning product or compatible cocoa butter. Do not add water or juice, as moisture can cause chocolate to seize.
Step 7: Dip the Brownie Pops
Remove a few chilled brownie pops from the refrigerator at a time.
Hold each pop by the stick and dip it into the melted chocolate, covering the entire brownie ball.
Gently rotate the pop to coat it evenly. Lift it out and allow the excess chocolate to drip back into the bowl.
Avoid stirring or moving the pop too aggressively, as this can loosen the brownie from the stick.
Place the finished pop upright in a cake pop stand or a food-safe foam block. You can also lay it carefully on parchment paper if you prefer a flat-bottomed finish.
Step 8: Add Christmas Decorations
While the chocolate coating is still wet, sprinkle each pop with red, green, white, and gold Christmas sprinkles.
For a more decorative look, drizzle melted white chocolate over the milk chocolate pops using a spoon or piping bag.
You can also create festive stripes with red and green candy melts.
For peppermint brownie pops, sprinkle a little finely crushed peppermint candy over the coating before it sets.
Work with a few pops at a time so the chocolate does not harden before you finish decorating.
Step 9: Let the Brownie Pops Set
Allow the decorated brownie pops to rest until the coating is completely firm.
If your kitchen is warm, refrigerate them briefly to help the chocolate set.
Once firm, transfer the pops carefully to a serving platter or individual treat bags.
Notes
Let the brownies cool completely: Warm brownies can become too soft when mixed with frosting and may not hold their shape.
Add frosting gradually: Too much frosting makes the mixture sticky and difficult to roll. Start with a small amount and add more only when needed.
Keep the brownie balls uniform: Using a tablespoon or small cookie scoop helps create evenly sized pops.
Chill before dipping: Firm brownie balls are easier to coat and less likely to fall off the sticks.
Secure the sticks with chocolate: Dipping the stick tip in melted chocolate before inserting it creates a stronger connection.
Use melting wafers for easy coating: They are designed to melt smoothly and set without the additional tempering process required by many real chocolate products.
Avoid overheating: Chocolate can become thick or grainy when overheated. Use short microwave intervals and stir frequently.
Decorate immediately: Add sprinkles and other decorations while the coating is wet so they attach properly.
Work in small batches: Keep the remaining brownie balls chilled while decorating to help them maintain their shape.
