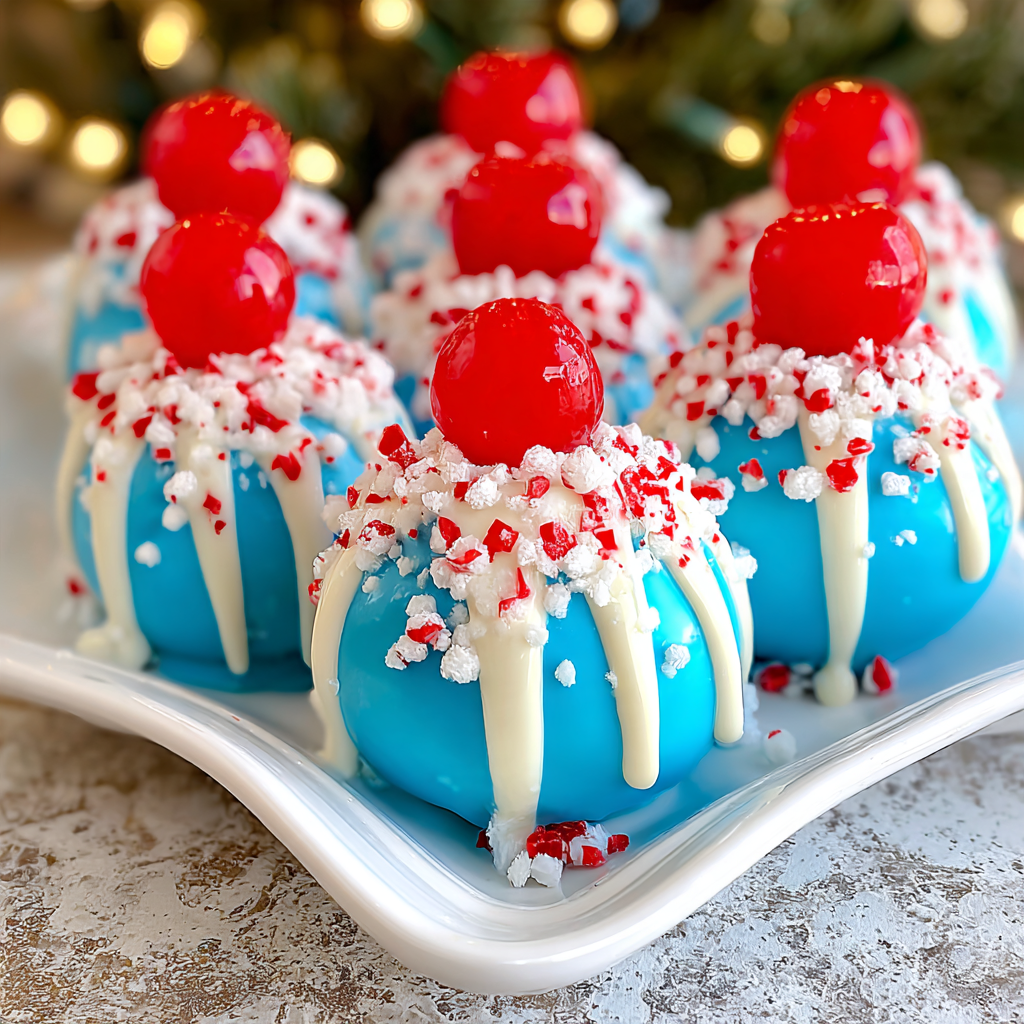
Looking for a Christmas dessert that’s a little different from the usual red and green holiday treats? These Christmas Blue Cherry Bombs are a beautiful, delicious surprise! With their creamy cherry cheesecake centers, sweet bursts of cherry, and gorgeous blue chocolate coating, they’re the kind of festive treats that immediately catch everyone’s attention.
Each little bomb has a soft, sweet filling made with cream cheese, crushed vanilla cookies, and chopped maraschino cherries. The center is rolled into bite-sized balls, dipped in smooth blue candy coating, and finished with white chocolate drizzle, sparkling sugar, and a few festive decorations.
The flavor is just as wonderful as the appearance. The vanilla cookie crumbs create a delicate sweetness, the cream cheese adds a rich cheesecake texture, and the cherries bring a fruity flavor that makes every bite feel special.
Best of all, these Christmas Blue Cherry Bombs are completely no-bake. You don’t need an oven, complicated techniques, or fancy equipment. A mixing bowl, a baking sheet, and a little refrigerator space are all you need to create a beautiful batch of homemade Christmas candy.
Serve them at your Christmas party, arrange them on a holiday dessert platter, or package them in decorative candy boxes for homemade gifts. If you love cherry desserts and eye-catching holiday sweets, this recipe deserves a place in your Christmas collection.
Why You’ll Love These Christmas Blue Cherry Bombs
- A unique Christmas color: The beautiful blue coating creates a fun alternative to traditional red and green desserts.
- Creamy cheesecake center: Cream cheese and vanilla cookie crumbs create a smooth, rich filling.
- Sweet cherry flavor: Chopped maraschino cherries add little fruity surprises in every bite.
- No baking required: These treats come together without turning on the oven.
- Perfect for holiday parties: Their bite-sized shape makes them easy to serve and share.
- Beautiful homemade gifts: Arrange them in mini candy cups and place them in festive gift boxes.
- Make-ahead friendly: Prepare them in advance and keep them refrigerated until your celebration.
Ingredients You’ll Need
This recipe makes approximately 24 Christmas Blue Cherry Bombs.
For the Cherry Cheesecake Filling
- 2 cups finely crushed vanilla sandwich cookies: These create the sweet, soft base for the filling. Use the cookies with their filling included.
- 8 ounces full-fat cream cheese, softened: Gives the centers their creamy cheesecake texture.
- ½ cup maraschino cherries, finely chopped and thoroughly patted dry: Adds sweet cherry flavor and beautiful little pieces throughout the filling.
- 1 teaspoon vanilla extract: Enhances the flavor and complements the cherries.
- ¼ cup powdered sugar: Adds sweetness and helps create a smooth dessert filling.
- 1–2 teaspoons maraschino cherry juice, optional: Adds extra cherry flavor if the mixture needs a little moisture.
For the Blue Chocolate Coating
- 16 ounces blue candy melting wafers: Creates the beautiful blue outer shell and gives the bombs a smooth finish.
- ½ teaspoon neutral vegetable oil, optional: Can help adjust the coating consistency if needed. Follow the package instructions.
For the Decoration
- ½ cup white chocolate melting wafers: For a pretty white drizzle.
- 2 tablespoons white sanding sugar or edible pearl sprinkles: Adds a delicate sparkling finish.
- Blue and silver Christmas sprinkles: Complements the blue coating beautifully.
- Small pieces of maraschino cherries, optional: For a colorful finishing touch.
Ingredient Notes and Substitutions
Vanilla Sandwich Cookies: Regular vanilla sandwich cookies work beautifully because their creamy filling helps bind the crumbs. You can also use vanilla wafers, although you may need a little additional cream cheese to achieve the right consistency.
Cream Cheese: Full-fat block cream cheese is best. Avoid whipped cream cheese because it contains more air and can make the filling too soft to roll.
Maraschino Cherries: These cherries give the bombs their signature flavor. Drain them thoroughly, chop them finely, and pat them dry between paper towels before adding them to the filling.
Blue Candy Melting Wafers: Choose a good-quality blue candy coating designed for dipping. It melts smoothly and sets into a firm outer shell. If you only have white melting wafers, use oil-based candy coloring to achieve a blue shade. Regular water-based food coloring can cause melted chocolate to seize.
White Chocolate: White chocolate melting wafers are ideal for decorating. Melt them separately and drizzle over the set blue coating.
Cherry Extract: If you want a stronger cherry flavor, add a tiny amount of cherry extract instead of increasing the cherry juice. This adds flavor without introducing extra moisture.
How to Make Christmas Blue Cherry Bombs
Step 1: Crush the Vanilla Cookies
Place the vanilla sandwich cookies in a food processor and pulse until they become fine crumbs.
If you don’t have a food processor, place the cookies in a sealed freezer bag and crush them with a rolling pin.
Transfer the crumbs to a large mixing bowl. Make sure the crumbs are evenly crushed, with no large cookie pieces remaining.
Fine crumbs help the filling hold together and create a smooth texture when the bombs are rolled.
Step 2: Prepare the Cherries
Drain the maraschino cherries in a fine-mesh strainer.
Pat them dry thoroughly using paper towels, then chop them into very small pieces.
Press the chopped cherries gently between fresh paper towels to remove as much excess liquid as possible.
This step is important because too much moisture can make the cheesecake mixture sticky and difficult to shape.
Step 3: Make the Cherry Cheesecake Filling
In a separate bowl, beat the softened cream cheese until smooth and creamy.
Add the powdered sugar and vanilla extract. Mix until everything is fully combined.
Gradually add the crushed vanilla cookies, mixing until a thick dough forms.
Fold in the finely chopped cherries with a spatula.
If the mixture feels too dry, add 1 teaspoon of maraschino cherry juice at a time, using no more than 2 teaspoons.
The finished mixture should be soft but firm enough to roll into balls without sticking excessively to your hands.
Step 4: Shape the Cherry Bombs
Scoop approximately 1 tablespoon of filling for each bomb.
Roll the mixture between your palms to create smooth, round balls.
Place each ball on a baking sheet lined with parchment paper.
Continue until all the mixture has been shaped. You should have approximately 24 evenly sized balls.
Refrigerate for 30–45 minutes, or until the centers are firm enough to dip.
Step 5: Melt the Blue Candy Coating
Place the blue candy melting wafers in a microwave-safe bowl.
Microwave in 20–30-second intervals, stirring thoroughly after each interval, until the wafers are completely melted and smooth.
Avoid overheating the coating. If it becomes too thick for dipping, follow the manufacturer’s instructions for adjusting its consistency.
For a more even coating, use a deep, narrow bowl that allows each ball to be submerged easily.
Step 6: Dip the Cherry Bombs
Remove the chilled cheesecake balls from the refrigerator.
Using a dipping fork or regular fork, lower one ball into the melted blue coating.
Turn it gently until the entire surface is covered.
Lift the ball out and allow the excess coating to drip back into the bowl.
Carefully transfer it to the parchment-lined baking sheet.
Repeat with the remaining balls, working in small batches so the centers stay firm.
Step 7: Add the White Chocolate Drizzle
Once the blue coating has set, melt the white chocolate wafers in a separate microwave-safe bowl.
Heat in short intervals, stirring between each one, until smooth.
Transfer the melted white chocolate into a piping bag or a small zip-top bag with a tiny corner cut off.
Drizzle thin white chocolate lines across the blue bombs.
The white drizzle creates a beautiful contrast and gives the treats a snowy winter appearance.
Step 8: Decorate with Christmas Sprinkles
While the white chocolate drizzle is still slightly wet, add white sanding sugar, silver pearls, and blue Christmas sprinkles.
You can also place a tiny piece of well-drained maraschino cherry on top of selected bombs for an extra cherry detail.
For a more elegant finish, decorate some bombs with white drizzle and others with silver sprinkles so the dessert platter has a variety of textures.
Step 9: Chill Until Firm
Place the decorated bombs in the refrigerator for approximately 15–20 minutes, or until the coating and decorations are completely set.
Once firm, transfer them to an airtight container.
Keep refrigerated until serving time.
Helpful Cooking Notes
Dry the cherries carefully: Excess liquid is the most common reason cherry cheesecake fillings become too soft. Pat the cherries dry before chopping and again after chopping.
Use room-temperature cream cheese: Softened cream cheese blends more smoothly with the powdered sugar and cookie crumbs.
Adjust the filling gradually: If the mixture is too soft, refrigerate it first. If it remains sticky, add a little more crushed vanilla cookie crumbs, one tablespoon at a time.
Chill before dipping: Firm centers are easier to coat and less likely to fall apart in the melted candy coating.
Use the right coloring: If coloring white melting wafers, choose oil-based candy coloring. Water-based food coloring can ruin the coating’s texture.
Don’t overheat the coating: Heat in short intervals and stir frequently to keep the coating smooth.
Decorate before the drizzle sets: Add the sprinkles while the white chocolate is still wet so they stay in place.
Keep refrigerated: These treats contain cream cheese, so they should remain chilled until serving.
Delicious Variations
1. Blueberry Cherry Bombs
Add 1–2 tablespoons of freeze-dried blueberry powder to the filling for a subtle blueberry flavor. Reduce the crushed cookie crumbs slightly if necessary to maintain the right texture.
2. White Chocolate Cherry Bombs
Use white chocolate melting wafers for the outer coating instead of blue. Finish with blue and silver sprinkles for a beautiful winter-inspired appearance.
3. Chocolate Cherry Bombs
Replace the vanilla sandwich cookies with chocolate sandwich cookies and use dark chocolate melting wafers for the coating. This creates a richer chocolate-and-cherry dessert.
4. Blue Raspberry Cherry Bombs
Add a tiny amount of blue raspberry flavoring made for candy and baking to the filling. Use it sparingly so it complements rather than overwhelms the cherry flavor.
5. Cherry Cheesecake Oreo Bombs
Replace the vanilla sandwich cookies with golden sandwich cookies or chocolate sandwich cookies, depending on your preferred flavor. Keep the cream cheese and cherries for a delicious cheesecake-inspired center.
6. Snowy Christmas Cherry Bombs
Use white candy coating and decorate with silver pearls, white sanding sugar, and a few blue sprinkles. These look like little snowballs on a Christmas dessert platter.
How to Serve Christmas Blue Cherry Bombs
These treats are especially beautiful when served on a white or silver dessert platter. Their blue color creates a lovely winter theme that stands out among traditional Christmas desserts.
Here are a few serving ideas:
- Christmas dessert platter: Arrange them alongside chocolate truffles, peppermint Oreo balls, and Christmas cookies.
- Mini candy cups: Place each bomb in a blue, silver, or white paper liner.
- Holiday gift boxes: Arrange them in decorative candy boxes with parchment paper between the layers. Keep them refrigerated and let recipients know they contain cream cheese.
- Winter wonderland dessert table: Combine the blue bombs with white chocolate pretzels, snowball cookies, and silver decorations.
- Christmas party favors: Package two or three bombs in small food-safe treat bags and tie them with festive ribbons.
For a beautiful presentation, alternate blue bombs with white chocolate-covered treats and silver decorations.
Tips for Perfect Blue Cherry Bombs
- Use finely crushed vanilla cookies for a smooth filling.
- Choose full-fat block cream cheese for the best consistency.
- Drain and dry the cherries thoroughly.
- Avoid adding too much cherry juice.
- Chill the filling balls until firm before dipping.
- Melt the blue coating slowly and stir frequently.
- Use a deep bowl to make dipping easier.
- Let excess coating drip off before placing each bomb on parchment.
- Add decorations before the white chocolate drizzle hardens.
- Refrigerate the finished treats in an airtight container.
Storage Instructions
Because these Christmas Blue Cherry Bombs contain cream cheese and chopped cherries, they must be stored in the refrigerator.
Place the finished bombs in an airtight container and refrigerate for up to 4–5 days.
If stacking them, separate the layers with parchment paper to protect the blue coating and decorations.
Keep the bombs refrigerated until serving and avoid leaving them at room temperature for more than 2 hours, or more than 1 hour when temperatures are above 90°F.
For the best flavor and texture, serve them chilled.
Freezing Instructions
These cherry cheesecake bombs can be frozen for longer storage.
First, allow the blue coating and decorations to set completely.
Arrange the bombs in a single layer on a parchment-lined baking sheet and freeze until firm. Transfer them to a freezer-safe airtight container, placing parchment paper between layers.
Freeze for up to 1–2 months for the best quality.
When ready to serve, transfer the container to the refrigerator and allow the treats to thaw overnight.
Avoid thawing them at room temperature because condensation may form on the blue coating.
Make-Ahead Instructions
These Christmas Blue Cherry Bombs are excellent for preparing ahead of holiday parties.
You can make the cheesecake filling, shape the balls, and refrigerate them in a covered container for up to 24 hours before dipping.
You can also finish the entire recipe a day or two before your celebration. Store the decorated bombs in an airtight container in the refrigerator.
For the best presentation, keep the treats chilled until just before serving.
Recipe Details
- Prep Time: 30 minutes
- Chilling Time: 45 minutes
- Setting Time: 20 minutes
- Cook Time: 0 minutes
- Total Time: Approximately 1 hour and 35 minutes
- Yield: 24 bombs
- Serving Size: 1 bomb
Nutritional Information
Approximate nutritional values per bomb, based on 24 servings:
- Calories: 165 kcal
- Protein: 2 g
- Carbohydrates: 20 g
- Fat: 9 g
- Saturated Fat: 5 g
- Sugar: 15 g
- Sodium: 105 mg
Nutrition values are estimates and may vary depending on the cookie, cream cheese, and candy coating brands used.
Frequently Asked Questions
1. What are Christmas Blue Cherry Bombs?
Christmas Blue Cherry Bombs are bite-sized no-bake desserts made with a creamy cherry cheesecake filling, sweet cookie crumbs, and a colorful blue candy coating. They’re decorated with white chocolate and festive sprinkles for a beautiful holiday finish.
2. Do I need to bake these cherry bombs?
No! This is a completely no-bake recipe. The filling is mixed, shaped into balls, chilled, dipped in melted candy coating, and decorated.
3. How do I get the beautiful blue color?
Use ready-made blue candy melting wafers. If you only have white melting wafers, add oil-based candy coloring a little at a time until you achieve your preferred shade of blue.
4. Can I use fresh cherries instead of maraschino cherries?
Yes, but fresh cherries contain more moisture and are less sweet. Remove the pits, chop the cherries finely, and pat them very dry before adding them to the filling. Maraschino cherries are generally easier to use for this recipe.
5. Why is my cheesecake filling too sticky?
The filling may be too sticky because the cream cheese was too warm or the cherries contained too much liquid. Chill the mixture for 20–30 minutes. If needed, add a little extra crushed cookie crumbs until it becomes firm enough to roll.
6. Can I use chocolate instead of blue candy coating?
Absolutely! Dark chocolate, milk chocolate, or white chocolate melting wafers can all be used. The final appearance will be different, but the cherry cheesecake center will taste just as delicious.
7. Can I make these treats ahead of time?
Yes! Prepare them up to 4–5 days in advance and store them in an airtight container in the refrigerator. You can also freeze them for up to 1–2 months for the best quality.
8. Are these Christmas Blue Cherry Bombs suitable for a dessert gift box?
Yes! Their small size and colorful coating make them perfect for homemade holiday gifts. Place them in mini paper candy cups and arrange them in a food-safe gift box. Keep refrigerated and let recipients know they contain cream cheese.
9. Can I make them without a food processor?
Yes. Place the cookies in a sealed freezer bag and crush them with a rolling pin until they become fine crumbs.
10. What can I use instead of maraschino cherry juice?
You can leave it out completely or use a tiny amount of cherry extract for extra flavor. The filling should be thick enough to roll, so avoid adding too much liquid.
Conclusion
These Christmas Blue Cherry Bombs are a fun and delicious way to add something special to your holiday dessert table. With their creamy cherry cheesecake centers, sweet vanilla cookie base, and gorgeous blue chocolate coating, they’re just as beautiful as they are tasty.
They’re easy to prepare, require no baking, and can be made ahead of time, making them perfect for Christmas parties, family gatherings, and homemade holiday gifts.
If you’re looking for a festive dessert that stands out from traditional Christmas treats, these little blue cherry bombs are a must-try. Make a batch, add your favorite decorations, and enjoy a sweet little taste of Christmas!
Print
Christmas Blue Cherry Bombs – Easy No-Bake Chocolate Cherry Treats
Ingredients
This recipe makes approximately 24 Christmas Blue Cherry Bombs.
For the Cherry Cheesecake Filling
- 2 cups finely crushed vanilla sandwich cookies: These create the sweet, soft base for the filling. Use the cookies with their filling included.
- 8 ounces full-fat cream cheese, softened: Gives the centers their creamy cheesecake texture.
- ½ cup maraschino cherries, finely chopped and thoroughly patted dry: Adds sweet cherry flavor and beautiful little pieces throughout the filling.
- 1 teaspoon vanilla extract: Enhances the flavor and complements the cherries.
- ¼ cup powdered sugar: Adds sweetness and helps create a smooth dessert filling.
- 1–2 teaspoons maraschino cherry juice, optional: Adds extra cherry flavor if the mixture needs a little moisture.
For the Blue Chocolate Coating
- 16 ounces blue candy melting wafers: Creates the beautiful blue outer shell and gives the bombs a smooth finish.
- ½ teaspoon neutral vegetable oil, optional: Can help adjust the coating consistency if needed. Follow the package instructions.
For the Decoration
- ½ cup white chocolate melting wafers: For a pretty white drizzle.
- 2 tablespoons white sanding sugar or edible pearl sprinkles: Adds a delicate sparkling finish.
- Blue and silver Christmas sprinkles: Complements the blue coating beautifully.
- Small pieces of maraschino cherries, optional: For a colorful finishing touch.
Instructions
Place the vanilla sandwich cookies in a food processor and pulse until they become fine crumbs.
If you don’t have a food processor, place the cookies in a sealed freezer bag and crush them with a rolling pin.
Transfer the crumbs to a large mixing bowl. Make sure the crumbs are evenly crushed, with no large cookie pieces remaining.
Fine crumbs help the filling hold together and create a smooth texture when the bombs are rolled.
Step 2: Prepare the Cherries
Drain the maraschino cherries in a fine-mesh strainer.
Pat them dry thoroughly using paper towels, then chop them into very small pieces.
Press the chopped cherries gently between fresh paper towels to remove as much excess liquid as possible.
This step is important because too much moisture can make the cheesecake mixture sticky and difficult to shape.
Step 3: Make the Cherry Cheesecake Filling
In a separate bowl, beat the softened cream cheese until smooth and creamy.
Add the powdered sugar and vanilla extract. Mix until everything is fully combined.
Gradually add the crushed vanilla cookies, mixing until a thick dough forms.
Fold in the finely chopped cherries with a spatula.
If the mixture feels too dry, add 1 teaspoon of maraschino cherry juice at a time, using no more than 2 teaspoons.
The finished mixture should be soft but firm enough to roll into balls without sticking excessively to your hands.
Step 4: Shape the Cherry Bombs
Scoop approximately 1 tablespoon of filling for each bomb.
Roll the mixture between your palms to create smooth, round balls.
Place each ball on a baking sheet lined with parchment paper.
Continue until all the mixture has been shaped. You should have approximately 24 evenly sized balls.
Refrigerate for 30–45 minutes, or until the centers are firm enough to dip.
Step 5: Melt the Blue Candy Coating
Place the blue candy melting wafers in a microwave-safe bowl.
Microwave in 20–30-second intervals, stirring thoroughly after each interval, until the wafers are completely melted and smooth.
Avoid overheating the coating. If it becomes too thick for dipping, follow the manufacturer’s instructions for adjusting its consistency.
For a more even coating, use a deep, narrow bowl that allows each ball to be submerged easily.
Step 6: Dip the Cherry Bombs
Remove the chilled cheesecake balls from the refrigerator.
Using a dipping fork or regular fork, lower one ball into the melted blue coating.
Turn it gently until the entire surface is covered.
Lift the ball out and allow the excess coating to drip back into the bowl.
Carefully transfer it to the parchment-lined baking sheet.
Repeat with the remaining balls, working in small batches so the centers stay firm.
Step 7: Add the White Chocolate Drizzle
Once the blue coating has set, melt the white chocolate wafers in a separate microwave-safe bowl.
Heat in short intervals, stirring between each one, until smooth.
Transfer the melted white chocolate into a piping bag or a small zip-top bag with a tiny corner cut off.
Drizzle thin white chocolate lines across the blue bombs.
The white drizzle creates a beautiful contrast and gives the treats a snowy winter appearance.
Step 8: Decorate with Christmas Sprinkles
While the white chocolate drizzle is still slightly wet, add white sanding sugar, silver pearls, and blue Christmas sprinkles.
You can also place a tiny piece of well-drained maraschino cherry on top of selected bombs for an extra cherry detail.
For a more elegant finish, decorate some bombs with white drizzle and others with silver sprinkles so the dessert platter has a variety of textures.
Step 9: Chill Until Firm
Place the decorated bombs in the refrigerator for approximately 15–20 minutes, or until the coating and decorations are completely set.
Once firm, transfer them to an airtight container.
Keep refrigerated until serving time.
Notes
Dry the cherries carefully: Excess liquid is the most common reason cherry cheesecake fillings become too soft. Pat the cherries dry before chopping and again after chopping.
Use room-temperature cream cheese: Softened cream cheese blends more smoothly with the powdered sugar and cookie crumbs.
Adjust the filling gradually: If the mixture is too soft, refrigerate it first. If it remains sticky, add a little more crushed vanilla cookie crumbs, one tablespoon at a time.
Chill before dipping: Firm centers are easier to coat and less likely to fall apart in the melted candy coating.
Use the right coloring: If coloring white melting wafers, choose oil-based candy coloring. Water-based food coloring can ruin the coating’s texture.
Don’t overheat the coating: Heat in short intervals and stir frequently to keep the coating smooth.
Decorate before the drizzle sets: Add the sprinkles while the white chocolate is still wet so they stay in place.
Keep refrigerated: These treats contain cream cheese, so they should remain chilled until serving.
