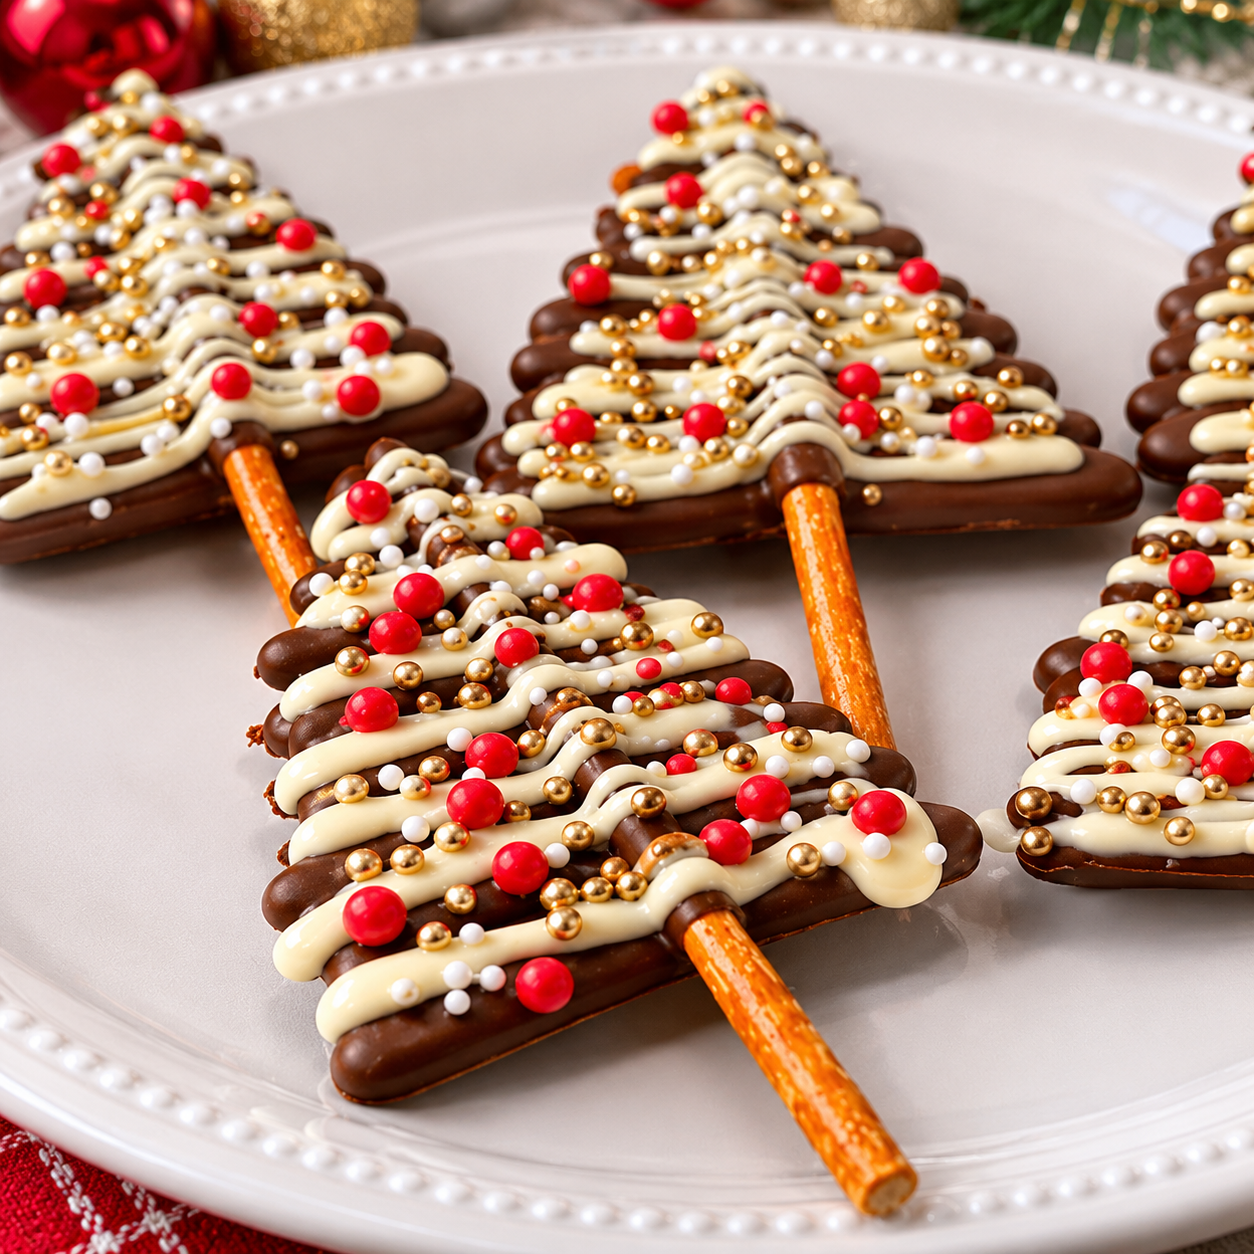
Bring a little extra sweetness to your holiday celebrations with these adorable Chocolate Christmas Trees! Made with rich melted chocolate, crunchy pretzel sticks, and colorful Christmas sprinkles, these festive treats look like miniature Christmas trees and are incredibly easy to make. They’re perfect for holiday dessert tables, Christmas parties, homemade gifts, and fun baking activities with the family.
Each chocolate tree features a pretzel stick as its trunk, surrounded by layers of chocolate piped into a festive tree shape. A handful of colorful sprinkles creates the look of tiny Christmas ornaments, while a little star decoration on top completes the design. The combination of smooth chocolate and salty, crunchy pretzels makes every bite delicious.
The best part? You don’t need an oven, complicated equipment, or advanced decorating skills. Simply melt the chocolate, pipe the tree shapes, add your favorite decorations, and let everything set. You can make them with milk chocolate, dark chocolate, or green candy melts for a classic Christmas appearance.
Whether you’re preparing treats for Santa, creating a festive dessert platter, or looking for an easy edible Christmas craft, these Chocolate Christmas Trees are sure to become a holiday favorite.
Why You’ll Love These Chocolate Christmas Trees
- No baking required: Prepare everything with melted chocolate and simple decorations.
- Festive appearance: The tree shapes and colorful sprinkles make them perfect for Christmas.
- Sweet and salty: Chocolate pairs wonderfully with crunchy pretzel sticks.
- Easy to customize: Use different chocolates, colors, and decorations.
- Kid-friendly activity: Children can help add sprinkles and edible stars once the chocolate is ready.
- Perfect for gifting: Package the finished trees in clear treat bags or holiday boxes.
Ingredients You’ll Need
For the chocolate Christmas trees:
- 12 oz green candy melts or green melting wafers
- 12 small pretzel sticks
- ½ teaspoon neutral vegetable shortening, optional and only if needed according to the coating manufacturer’s instructions
For decorating:
- 2 tablespoons red mini candy-coated chocolates
- 2 tablespoons yellow and white star sprinkles
- 2 tablespoons assorted Christmas sprinkles
- 12 small yellow star-shaped candies or edible decorations
- 1 tablespoon white sanding sugar, optional
- 2 oz melted white chocolate, optional for decorative drizzling
Optional chocolate variations:
- 4 oz milk chocolate melting wafers
- 4 oz dark chocolate melting wafers
Ingredient Notes and Substitutions
Green candy melts: These are ideal for creating the classic Christmas tree color. They melt smoothly and are designed to set firmly without tempering.
Pretzel sticks: Small pretzel sticks make excellent tree trunks. Their salty flavor also balances the sweetness of the chocolate.
Christmas sprinkles: Choose red, white, gold, and colorful sprinkles to create the appearance of ornaments and festive lights.
Star decorations: Small edible stars make the trees look complete. If you cannot find star-shaped candies, use yellow star sprinkles.
White chocolate: Optional white chocolate drizzle creates a snowy effect. Use melting wafers for convenient melting and setting.
Shortening: Only use a small amount if the coating needs thinning and the manufacturer recommends it. Avoid adding water, milk, or other liquids to melted candy coating.
How to Make Chocolate Christmas Trees
Step 1: Prepare the Baking Sheet
Line a large baking sheet or flat tray with parchment paper or a silicone baking mat.
Arrange the pretzel sticks on the tray, leaving enough space around each one for the chocolate tree shapes.
Place the pretzels vertically, with one end pointing upward. The chocolate tree will be piped around the upper portion, leaving a small section at the bottom visible as the trunk.
Make sure the tray fits comfortably in your refrigerator if you plan to chill the finished treats.
Step 2: Melt the Green Candy Coating
Place the green candy melts in a microwave-safe bowl.
Microwave in 20–30-second intervals, stirring thoroughly after each interval.
Continue until the coating is completely melted and smooth.
If the coating is too thick, add a very small amount of compatible shortening only if recommended by the manufacturer. Stir until the consistency is suitable for piping.
Allow the coating to cool slightly if it feels too hot.
Step 3: Transfer the Chocolate to a Piping Bag
Spoon the melted green coating into a piping bag or a sturdy resealable plastic bag.
Snip a small opening at the tip. Start with a narrow opening so you can control the thickness of the tree branches.
If you prefer more defined edges, use a small round piping tip.
Work with a manageable amount of chocolate at a time so it stays smooth and easy to pipe.
Step 4: Pipe the Christmas Tree Shapes
Starting near the top of each pretzel stick, pipe a small zigzag line from side to side.
Gradually make each zigzag wider as you move downward, creating a triangular evergreen tree shape.
Continue until the chocolate reaches the lower part of the pretzel, leaving a small portion visible as the trunk.
Make sure the chocolate layers connect so the tree holds together once it sets.
Repeat with the remaining pretzel sticks.
Helpful tip: If you want fuller trees, pipe a second light layer of chocolate over the first zigzag pattern before decorating.
Step 5: Add the Christmas Ornaments
While the green chocolate is still wet, add red mini candies and colorful sprinkles along the zigzag branches.
Use small yellow, white, and gold decorations to create the look of Christmas lights and ornaments.
Don’t add too many decorations. Leaving a little green chocolate visible helps the trees maintain their shape.
Step 6: Add the Stars
Place one small yellow star decoration at the top of each chocolate tree.
Press gently so the star attaches to the wet coating.
If using a star sprinkle, position it carefully with clean fingers or tweezers.
Step 7: Add a Snowy Chocolate Drizzle
For an extra festive touch, melt the white chocolate wafers in a separate microwave-safe bowl.
Heat in short intervals, stirring until smooth.
Transfer the melted white chocolate to a piping bag and drizzle thin lines over the trees to resemble falling snow.
You can also sprinkle a little white sanding sugar over the trees while the drizzle is still wet.
Step 8: Let the Trees Set
Allow the chocolate trees to set at a cool room temperature until firm, or place the tray in the refrigerator for approximately 15–20 minutes.
Once the coating is completely firm, carefully remove the trees from the parchment paper.
Arrange them upright in a festive treat stand or lay them flat on a serving platter.
Your beautiful Chocolate Christmas Trees are ready to serve!
Helpful Cooking Notes
- Use a clean, dry bowl: Even a small amount of water can cause melted chocolate to seize.
- Melt slowly: Short microwave intervals help prevent overheating.
- Keep the piping opening small: This gives you better control over the tree shape.
- Work quickly with decorations: Add sprinkles before the chocolate begins to set.
- Leave the pretzel trunk visible: It makes the finished design look more like a real Christmas tree.
- Avoid excessive chocolate: A thick coating can hide the zigzag tree shape and make the treats too heavy.
- Let the trees set completely: This prevents the decorations from shifting when you move them.
Fun Chocolate Christmas Tree Variations
Dark Chocolate Christmas Trees
Use dark chocolate melting wafers instead of green candy melts. Pipe the same triangular tree shapes and decorate with red, green, and gold sprinkles for an elegant chocolate version.
White Chocolate Snowy Trees
Use white melting wafers and add silver, blue, and white sprinkles. These look like miniature snow-covered Christmas trees.
Milk Chocolate Christmas Trees
Use milk chocolate melting wafers for a classic chocolate flavor. Add colorful candy decorations and a yellow star on top.
Peppermint Chocolate Christmas Trees
Sprinkle finely crushed peppermint candy over the wet chocolate coating. The refreshing peppermint flavor pairs beautifully with rich chocolate.
Coconut Snow Christmas Trees
Add a little finely shredded coconut over the chocolate before it sets. It creates a snowy appearance and adds extra texture.
Peanut Butter Chocolate Trees
Add a small amount of peanut butter to a separate batch of compatible chocolate coating only if the coating’s instructions allow it, or create a peanut butter-flavored drizzle using a suitable confectionery coating. Clearly label these treats for guests with peanut allergies.
Serving Suggestions
Chocolate Christmas Trees look beautiful on a holiday dessert table. Arrange them upright in a decorative stand or place them flat on a white serving platter with extra Christmas sprinkles around the edges.
They pair perfectly with:
- Hot chocolate topped with whipped cream
- Peppermint mocha
- Christmas sugar cookies
- Gingerbread men
- Chocolate truffles
- Marshmallow snowman pops
- Christmas popcorn
- Holiday brownies
For a festive dessert display, combine green chocolate trees with white chocolate snowflakes, red-and-green pretzel treats, and small Christmas cookies.
They also make wonderful edible gifts. Place each fully set tree in a clear food-safe treat bag and tie it with a red or green ribbon. Use a sturdy box to protect the chocolate decorations during transport.
Tips for Perfect Chocolate Christmas Trees
- Choose melting wafers: They’re convenient and usually set more easily than ordinary chocolate chips.
- Use a piping bag: It helps create neat, consistent zigzag branches.
- Make the trees gradually wider: This creates the recognizable triangular Christmas tree shape.
- Add decorations immediately: Sprinkles need to stick while the chocolate is wet.
- Use small pretzel sticks: They provide a sturdy base without overwhelming the chocolate.
- Don’t overheat the coating: Excessive heat can make it thick and difficult to pipe.
- Keep the tray level: This helps the trees set evenly without losing their shape.
Storage Instructions
Once completely set, store the Chocolate Christmas Trees in an airtight container in a cool, dry place.
For the best quality, enjoy them within approximately 1–2 weeks, provided you use shelf-stable candy coatings, pretzels, and decorations.
Keep them away from direct sunlight, warm kitchens, and humid areas. Heat can soften the chocolate coating, while moisture can affect the pretzels and decorations.
If you use any perishable filling or decoration, follow its specific food-safety storage requirements.
Can You Freeze Chocolate Christmas Trees?
Freezing is generally unnecessary, but it is possible if you need to prepare them well in advance.
Place the fully set trees in a freezer-safe airtight container, separating layers with parchment paper. Freeze for up to 1 month for the best quality.
To thaw, transfer the covered container to the refrigerator first, then allow it to reach room temperature while still covered. This helps reduce condensation on the chocolate.
Keep in mind that moisture can affect the crispness of the pretzels and the appearance of the decorations.
Make-Ahead Instructions
These no-bake Christmas treats are easy to prepare before your holiday celebration.
- Decorations: Measure and separate the sprinkles and stars ahead of time.
- Pretzel sticks: Arrange them on parchment-lined trays before melting the coating.
- Chocolate coating: Melt just before piping for the easiest handling.
- Finished trees: Prepare several days ahead and store in an airtight container in a cool, dry place.
For the best appearance, keep the finished trees away from heat and humidity until serving time.
Chocolate Christmas Trees Recipe Details
- Prep Time: 20 minutes
- Cook Time: 0 minutes
- Setting Time: 20 minutes
- Total Time: 40 minutes
- Yield: 12 chocolate trees
- Serving Size: 1 tree
- Difficulty: Easy
- Method: No-bake
Nutritional Information
Estimated nutrition per chocolate Christmas tree:
- Calories: 125
- Protein: 1 g
- Carbohydrates: 17 g
- Fat: 6 g
- Saturated Fat: 4 g
- Sugar: 13 g
- Sodium: 85 mg
Nutritional values are estimates and will vary depending on the candy coating, pretzel size, and decorations used.
Frequently Asked Questions
1. Can I make Chocolate Christmas Trees without pretzels?
Yes! You can pipe the chocolate trees directly onto parchment paper. Let them set completely before removing them. Pretzel sticks are helpful because they create a trunk and add a delicious salty crunch.
2. Can I use regular chocolate instead of candy melts?
Yes, but ordinary chocolate may need tempering if you want a firm, glossy finish at room temperature. Chocolate melting wafers are easier for beginners because they’re designed to melt and set conveniently.
3. How do I make the chocolate trees green?
Use green candy melts or white melting wafers colored with oil-based candy coloring. Avoid ordinary water-based food coloring because it can cause melted chocolate to seize.
4. Why is my melted chocolate too thick?
It may have been overheated or may not be the right type for piping. Stir thoroughly and, if necessary, use a compatible thinning agent recommended by the manufacturer.
5. Can I make these Christmas trees with kids?
Absolutely! Children can help arrange the pretzels and add sprinkles and stars. An adult should handle the melted chocolate and supervise the piping process.
6. How do I keep the sprinkles from falling off?
Add all sprinkles and decorations while the green chocolate is still wet. Once the coating sets, the decorations will be held in place.
7. Can I make Chocolate Christmas Trees ahead of time?
Yes! They can be prepared several days in advance if made with shelf-stable ingredients. Store them in an airtight container in a cool, dry place.
8. What can I use instead of pretzel sticks?
You can use thin breadsticks, small biscuit sticks, or sturdy chocolate-covered wafer sticks. Make sure the base is strong enough to support the chocolate.
9. How do I make the trees look more realistic?
Pipe the chocolate in small zigzag layers, gradually widening toward the bottom. Add a star on top and small colorful sprinkles to resemble Christmas ornaments.
10. Are Chocolate Christmas Trees good for holiday gifts?
Definitely! Their festive appearance makes them perfect for homemade Christmas gift boxes, party favors, and edible holiday decorations. Package them carefully to prevent the chocolate branches from breaking.
Conclusion
These Chocolate Christmas Trees are a simple and festive way to add something special to your holiday celebrations. With smooth chocolate, crunchy pretzel trunks, colorful ornaments, and little stars, each treat looks like a miniature edible Christmas tree.
They’re easy to prepare, fun to decorate, and perfect for Christmas parties, dessert tables, and homemade gifts. Make a batch with your favorite chocolate and sprinkles, and enjoy a sweet little taste of Christmas!
Print
Chocolate Christmas Trees – Easy No-Bake Christmas Dessert
Ingredients
For the chocolate Christmas trees:
- 12 oz green candy melts or green melting wafers
- 12 small pretzel sticks
- ½ teaspoon neutral vegetable shortening, optional and only if needed according to the coating manufacturer’s instructions
For decorating:
- 2 tablespoons red mini candy-coated chocolates
- 2 tablespoons yellow and white star sprinkles
- 2 tablespoons assorted Christmas sprinkles
- 12 small yellow star-shaped candies or edible decorations
- 1 tablespoon white sanding sugar, optional
- 2 oz melted white chocolate, optional for decorative drizzling
Optional chocolate variations:
- 4 oz milk chocolate melting wafers
- 4 oz dark chocolate melting wafers
Instructions
Line a large baking sheet or flat tray with parchment paper or a silicone baking mat.
Arrange the pretzel sticks on the tray, leaving enough space around each one for the chocolate tree shapes.
Place the pretzels vertically, with one end pointing upward. The chocolate tree will be piped around the upper portion, leaving a small section at the bottom visible as the trunk.
Make sure the tray fits comfortably in your refrigerator if you plan to chill the finished treats.
Step 2: Melt the Green Candy Coating
Place the green candy melts in a microwave-safe bowl.
Microwave in 20–30-second intervals, stirring thoroughly after each interval.
Continue until the coating is completely melted and smooth.
If the coating is too thick, add a very small amount of compatible shortening only if recommended by the manufacturer. Stir until the consistency is suitable for piping.
Allow the coating to cool slightly if it feels too hot.
Step 3: Transfer the Chocolate to a Piping Bag
Spoon the melted green coating into a piping bag or a sturdy resealable plastic bag.
Snip a small opening at the tip. Start with a narrow opening so you can control the thickness of the tree branches.
If you prefer more defined edges, use a small round piping tip.
Work with a manageable amount of chocolate at a time so it stays smooth and easy to pipe.
Step 4: Pipe the Christmas Tree Shapes
Starting near the top of each pretzel stick, pipe a small zigzag line from side to side.
Gradually make each zigzag wider as you move downward, creating a triangular evergreen tree shape.
Continue until the chocolate reaches the lower part of the pretzel, leaving a small portion visible as the trunk.
Make sure the chocolate layers connect so the tree holds together once it sets.
Repeat with the remaining pretzel sticks.
Helpful tip: If you want fuller trees, pipe a second light layer of chocolate over the first zigzag pattern before decorating.
Step 5: Add the Christmas Ornaments
While the green chocolate is still wet, add red mini candies and colorful sprinkles along the zigzag branches.
Use small yellow, white, and gold decorations to create the look of Christmas lights and ornaments.
Don’t add too many decorations. Leaving a little green chocolate visible helps the trees maintain their shape.
Step 6: Add the Stars
Place one small yellow star decoration at the top of each chocolate tree.
Press gently so the star attaches to the wet coating.
If using a star sprinkle, position it carefully with clean fingers or tweezers.
Step 7: Add a Snowy Chocolate Drizzle
For an extra festive touch, melt the white chocolate wafers in a separate microwave-safe bowl.
Heat in short intervals, stirring until smooth.
Transfer the melted white chocolate to a piping bag and drizzle thin lines over the trees to resemble falling snow.
You can also sprinkle a little white sanding sugar over the trees while the drizzle is still wet.
Step 8: Let the Trees Set
Allow the chocolate trees to set at a cool room temperature until firm, or place the tray in the refrigerator for approximately 15–20 minutes.
Once the coating is completely firm, carefully remove the trees from the parchment paper.
Arrange them upright in a festive treat stand or lay them flat on a serving platter.
Your beautiful Chocolate Christmas Trees are ready to serve!
Notes
- Use a clean, dry bowl: Even a small amount of water can cause melted chocolate to seize.
- Melt slowly: Short microwave intervals help prevent overheating.
- Keep the piping opening small: This gives you better control over the tree shape.
- Work quickly with decorations: Add sprinkles before the chocolate begins to set.
- Leave the pretzel trunk visible: It makes the finished design look more like a real Christmas tree.
- Avoid excessive chocolate: A thick coating can hide the zigzag tree shape and make the treats too heavy.
- Let the trees set completely: This prevents the decorations from shifting when you move them.
