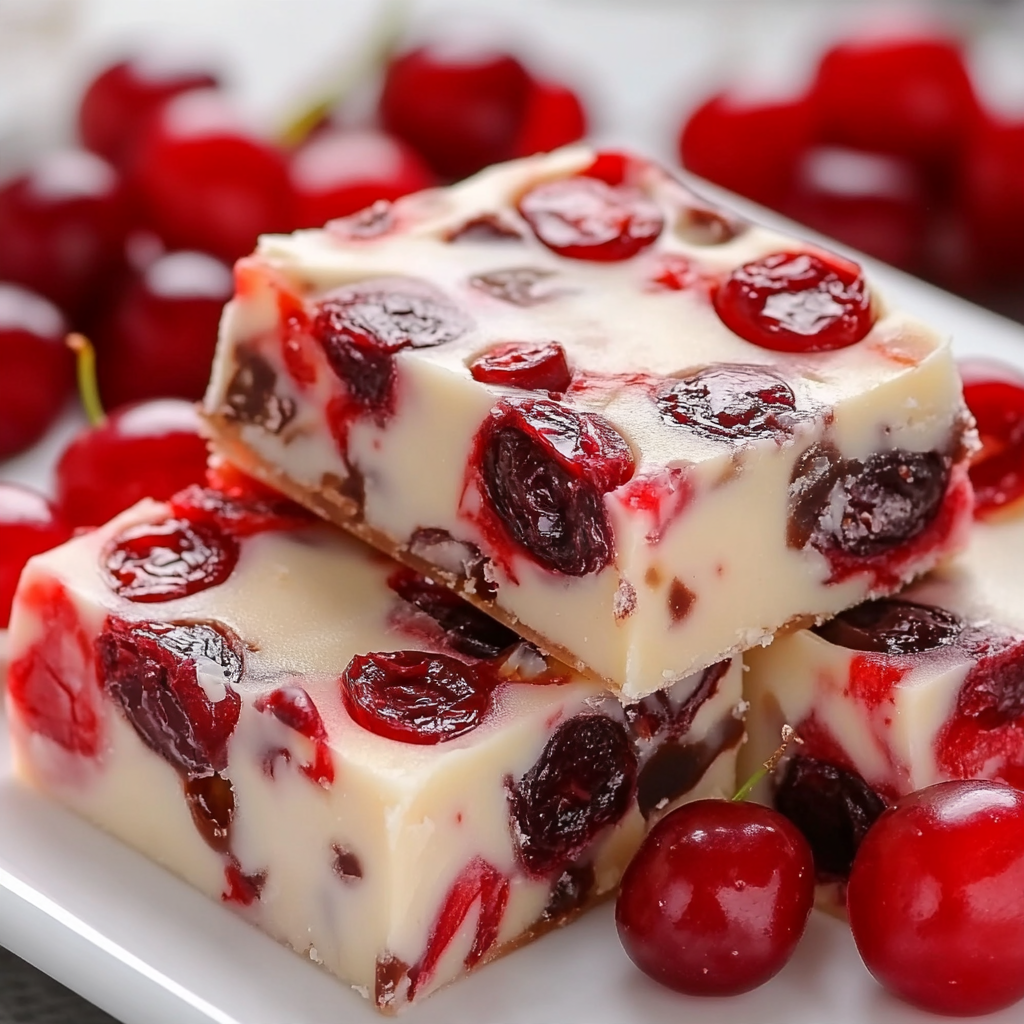
If you love the combination of sweet cherries and rich chocolate, this Cherry Garcia Fudge is a dessert you’ll want to make again and again. Inspired by the popular cherry-and-chocolate flavor combination, this homemade fudge brings together a smooth, creamy white chocolate base, sweet maraschino cherries, and generous pieces of semi-sweet chocolate. Every bite is rich, fruity, and wonderfully indulgent.
What makes this fudge especially delicious is the contrast of textures. The white chocolate mixture melts into a soft, velvety base, the cherries add little bursts of sweetness, and the chocolate chunks create pockets of rich cocoa flavor throughout. A little vanilla and almond extract bring everything together for a delicious cherry-chocolate taste.
The best part is that this recipe doesn’t require an oven, candy thermometer, or complicated candy-making techniques. The fudge comes together in a saucepan with a few simple ingredients, then sets in the refrigerator until firm enough to cut into beautiful squares.
Cherry Garcia Fudge is perfect for Christmas candy trays, holiday parties, homemade gifts, bake sales, and anytime you’re craving a chocolate-covered cherry-inspired dessert. Package the squares in decorative candy boxes or arrange them on a festive platter for a treat that looks just as wonderful as it tastes.
Why You’ll Love This Cherry Garcia Fudge
- Rich cherry and chocolate flavor: Sweet cherries and semi-sweet chocolate create a delicious combination.
- Creamy texture: White chocolate and sweetened condensed milk make a smooth, soft fudge.
- No oven required: This is an easy stovetop candy recipe.
- Beautiful appearance: Red cherry pieces and dark chocolate chunks look lovely against the creamy fudge.
- Perfect for holidays: A wonderful addition to Christmas dessert trays and homemade candy boxes.
- Make-ahead friendly: Prepare it in advance and refrigerate until ready to serve.
- Easy to customize: Use dark chocolate, milk chocolate, or extra cherries to create your favorite version.
Ingredients
This recipe makes approximately 36 small squares.
For the Cherry Garcia Fudge
- 3 cups white chocolate chips
- 1 can (14 ounces) sweetened condensed milk
- 2 tablespoons unsalted butter
- 1 teaspoon vanilla extract
- 1/4 teaspoon almond extract
- 1/2 cup finely chopped maraschino cherries, thoroughly drained and patted dry
- 3/4 cup semi-sweet chocolate chunks or chocolate chips
- 1 pinch salt
For the Topping
- 2 tablespoons finely chopped maraschino cherries, well dried
- 2 tablespoons semi-sweet chocolate chunks
- 1 tablespoon melted white chocolate, optional
Ingredient Notes and Substitutions
White chocolate chips: These create the creamy base of the fudge. Use good-quality white chocolate chips or white chocolate baking bars. White chocolate melting wafers can also work, but the final texture may be slightly different.
Sweetened condensed milk: This is essential for creating a smooth, creamy fudge without needing to cook sugar to a specific temperature. Make sure you use sweetened condensed milk, not evaporated milk.
Butter: A little unsalted butter adds richness and helps create a smooth consistency. Avoid substituting melted butter because the recipe relies on the proper balance of ingredients.
Maraschino cherries: These give the fudge its signature sweet cherry flavor and beautiful red color. Drain them very thoroughly and pat them dry with paper towels before chopping. Excess cherry syrup can prevent the fudge from setting properly.
Semi-sweet chocolate chunks: These add rich chocolate flavor and create little pockets of chocolate throughout the fudge. You can use chocolate chips or chop a semi-sweet baking bar into small pieces.
Vanilla extract: Vanilla enhances the sweetness of the white chocolate and rounds out the flavor.
Almond extract: Optional, but a small amount adds a lovely cherry-almond note. It is quite concentrated, so don’t use too much.
Salt: A small pinch balances the sweetness and makes the chocolate flavor stand out.
How to Make Cherry Garcia Fudge
Step 1: Prepare the Baking Pan
Line an 8-by-8-inch square baking pan with parchment paper, leaving some overhang on the sides.
The extra parchment makes it easier to lift the fudge out of the pan after it has chilled.
Lightly grease the parchment paper if desired.
Step 2: Prepare the Cherries
Drain the maraschino cherries in a fine-mesh strainer.
Place them between several layers of paper towels and gently press to remove as much moisture as possible.
Finely chop 1/2 cup of cherries for the fudge and another 2 tablespoons for the topping.
Set aside the topping cherries separately.
This step is especially important because excess cherry juice can make the fudge too soft and affect how well it sets.
Step 3: Melt the White Chocolate Mixture
Place the white chocolate chips, sweetened condensed milk, and butter in a medium heavy-bottomed saucepan.
Heat over low heat, stirring continuously with a silicone spatula until the white chocolate has melted and the mixture becomes smooth and creamy.
Do not allow the mixture to boil. White chocolate can overheat quickly, so gentle heat is essential.
Once smooth, remove the saucepan from the heat.
Step 4: Add the Flavoring
Stir in the vanilla extract, almond extract, and pinch of salt.
Mix until everything is evenly incorporated.
Allow the mixture to cool for approximately 5 minutes, stirring occasionally. It should remain soft and pourable but should no longer be extremely hot.
Step 5: Fold in the Cherries and Chocolate
Add the finely chopped, well-dried maraschino cherries and semi-sweet chocolate chunks.
Gently fold everything together with a spatula until the cherries and chocolate are evenly distributed.
Avoid vigorous stirring because the warm fudge mixture may begin melting the chocolate chunks. A little chocolate streaking is fine, but you want to preserve some distinct chocolate pieces.
Step 6: Transfer the Fudge to the Pan
Pour the fudge mixture into the prepared baking pan.
Use a spatula to spread it evenly into the corners.
Gently tap the pan against the countertop to remove any large air pockets.
Sprinkle the remaining chopped cherries and chocolate chunks over the top. Press them very lightly into the surface so they stay in place.
Step 7: Chill Until Firm
Cover the pan loosely with plastic wrap or foil.
Refrigerate for at least 4 hours, or preferably overnight, until the fudge is completely firm.
Do not cut it while the center is still soft. Proper chilling helps the squares hold their shape.
Step 8: Slice and Serve
Once firm, lift the fudge out of the pan using the parchment paper overhang.
Place it on a cutting board.
Use a large sharp knife to cut it into approximately 36 small squares. For cleaner cuts, warm the knife under hot water, wipe it dry, and repeat between cuts.
If desired, drizzle a little melted white chocolate over the squares for a pretty finishing touch.
Arrange the Cherry Garcia Fudge on a serving platter or place each piece in a small paper candy cup.
Keep refrigerated until ready to serve.
Helpful Cooking Notes
Dry the cherries thoroughly. This is the most important step for achieving firm fudge. Excess moisture can interfere with the texture and make the finished candy sticky.
Use low heat. White chocolate is delicate and can scorch or become grainy if heated too quickly.
Stir continuously while melting. This helps distribute the heat evenly and prevents the chocolate from sticking to the bottom of the saucepan.
Use sweetened condensed milk. Evaporated milk is not a suitable substitute because it does not contain the same amount of sugar or provide the same thick consistency.
Allow the mixture to cool slightly before adding chocolate chunks. This helps keep some of the chocolate pieces intact.
Don’t rush the chilling time. The fudge needs several hours in the refrigerator to become firm enough to slice cleanly.
Use a warm knife. Wiping the knife clean between cuts creates neat, professional-looking squares.
Delicious Variations
Dark Chocolate Cherry Garcia Fudge
Replace half of the white chocolate chips with dark chocolate chips. The combination creates a richer fudge with a beautiful chocolate flavor.
Milk Chocolate Cherry Fudge
Use milk chocolate chips instead of semi-sweet chocolate chunks. This makes the fudge sweeter and gives it a classic chocolate-covered cherry flavor.
Cherry Almond Fudge
Increase the almond extract slightly, using up to 1/2 teaspoon depending on your preference. Add 1/3 cup finely chopped toasted almonds for extra crunch.
Chocolate-Covered Cherry Fudge
Add 1/3 cup of chopped dark chocolate-covered cherries to the filling. Reduce the amount of semi-sweet chocolate chunks slightly so the fudge doesn’t become overloaded with additions.
Cherry Walnut Fudge
Replace the chocolate chunks with 3/4 cup chopped walnuts, or use a combination of walnuts and chocolate. The nuts add a delicious crunch.
Christmas Cherry Fudge
Add a few festive red and green sprinkles to the top before chilling. A white chocolate drizzle makes the squares look beautiful on Christmas candy trays.
Cherry Coconut Fudge
Fold 1/3 cup finely shredded coconut into the mixture along with the cherries and chocolate. Coconut adds a little chewiness and pairs beautifully with the sweet cherry flavor.
Serving Suggestions
Cherry Garcia Fudge is delicious on its own, but it also makes a wonderful addition to holiday dessert spreads.
- Christmas candy trays: Serve with peppermint bark, peanut butter fudge, chocolate truffles, and pecan pralines.
- Homemade gift boxes: Arrange the squares in small paper candy cups inside decorative boxes.
- Coffee and hot chocolate: The rich chocolate flavor pairs beautifully with a warm drink.
- Holiday dessert tables: Place the squares on a white platter with fresh cherries for a festive presentation.
- Ice cream topping: Chop a piece into small chunks and sprinkle over vanilla ice cream.
- After-dinner treats: Serve small squares alongside coffee or espresso.
Because this fudge is rich, cutting it into smaller squares makes it perfect for sharing.
Tips for Perfect Cherry Garcia Fudge
- Use high-quality white chocolate for a smooth base.
- Drain and dry the cherries thoroughly.
- Chop the cherries into small, even pieces.
- Melt the chocolate mixture slowly over low heat.
- Stir continuously to prevent scorching.
- Use sweetened condensed milk, not evaporated milk.
- Allow the mixture to cool slightly before adding chocolate chunks.
- Line the pan with parchment paper for easy removal.
- Refrigerate until completely firm before cutting.
- Wipe the knife between slices for clean edges.
- Store the fudge in an airtight container.
- Keep it refrigerated because it contains dairy and moist cherries.
Storage Instructions
Store Cherry Garcia Fudge in an airtight container in the refrigerator because the recipe contains sweetened condensed milk and maraschino cherries.
For the best texture and flavor, enjoy it within 5–7 days.
Separate layers with parchment paper to prevent the squares from sticking together.
For serving, remove only the number of pieces you plan to enjoy and return the remaining fudge to the refrigerator promptly.
Avoid leaving the fudge at room temperature for more than 2 hours in total, or 1 hour when the temperature is above 90°F.
Freezing Instructions
Cherry Garcia Fudge can be frozen for longer storage.
- Allow the fudge to become completely firm in the refrigerator.
- Cut it into individual squares.
- Arrange the squares in a freezer-safe container.
- Separate layers with parchment paper.
- Seal the container tightly.
- Freeze for up to 2 months for the best quality.
To thaw, transfer the container to the refrigerator and let the fudge thaw overnight.
Keep the container closed while thawing to reduce condensation forming on the chocolate surface.
Make-Ahead Instructions
This Cherry Garcia Fudge is an excellent choice for preparing ahead of Christmas or other special occasions.
You can prepare the entire batch up to 2–3 days before serving. Once the fudge is completely set, cut it into squares and store it in an airtight container in the refrigerator.
You can also prepare it a few weeks ahead and freeze it.
For the freshest appearance, add any decorative white chocolate drizzle shortly before serving if you prefer a freshly finished look.
Recipe Details
- Prep Time: 15 minutes
- Cook Time: 10 minutes
- Chilling Time: 4 hours
- Total Time: Approximately 4 hours 25 minutes
- Yield: 36 small squares
- Serving Size: 1 square
Nutritional Information
Approximate nutrition per square, based on 36 servings:
- Calories: 135
- Protein: 2 g
- Carbohydrates: 18 g
- Fat: 7 g
- Saturated Fat: 4 g
- Sugar: 16 g
- Sodium: 35 mg
Nutritional values are estimates and may vary depending on the brands of white chocolate, sweetened condensed milk, and chocolate chunks used.
Frequently Asked Questions
What is Cherry Garcia Fudge?
Cherry Garcia Fudge is a creamy chocolate-and-cherry-inspired candy made with a sweet white chocolate base, chopped cherries, and semi-sweet chocolate pieces. This homemade version combines fruity sweetness with rich chocolate in every bite.
Can I use fresh cherries instead of maraschino cherries?
Maraschino cherries are recommended because they provide a sweet flavor and consistent texture. Fresh cherries contain more moisture and may prevent the fudge from setting properly. If using fresh cherries, pit, chop, and dry them thoroughly, although the flavor and consistency will be different.
Why didn’t my Cherry Garcia Fudge set?
The most common reasons are excess moisture from the cherries, incorrect chocolate proportions, or insufficient chilling time. Make sure you measure the white chocolate accurately, dry the cherries thoroughly, and refrigerate the fudge until completely firm.
Can I use evaporated milk instead of sweetened condensed milk?
No. Sweetened condensed milk is much thicker and contains added sugar. Evaporated milk does not provide the same consistency and will not produce the same fudge texture.
Can I use chocolate chips instead of chocolate chunks?
Yes. Semi-sweet chocolate chips work perfectly. You can also chop a semi-sweet baking bar into small pieces for a more varied chocolate texture.
Can I make Cherry Garcia Fudge in the microwave?
Yes. Combine the white chocolate chips, sweetened condensed milk, and butter in a microwave-safe bowl. Heat in 20-second intervals, stirring thoroughly between each interval until smooth. Continue with the recipe as directed.
How do I prevent white chocolate from burning?
Use low heat and stir continuously. If using a microwave, heat in short intervals and never allow the chocolate to become extremely hot. White chocolate is sensitive to overheating.
Can I make this fudge without almond extract?
Absolutely. Simply leave it out and use vanilla extract only. The cherry and chocolate flavors will still be delicious.
Can I make Cherry Garcia Fudge ahead of time?
Yes. Prepare it several days ahead and keep it refrigerated. You can also freeze individual squares for up to 2 months for the best quality.
How should I package Cherry Garcia Fudge for Christmas gifts?
Cut the fudge into small squares and place each piece in a mini paper candy cup. Arrange them in a food-safe decorative box, separating layers with parchment paper. Keep the gift refrigerated and let the recipient know that the candy should be stored in the refrigerator.
Conclusion
This Cherry Garcia Fudge is a delicious combination of creamy white chocolate, sweet cherries, and rich semi-sweet chocolate chunks. Every square delivers a wonderful balance of fruity sweetness and chocolate flavor, making it a perfect treat for Christmas celebrations, homemade candy boxes, and special family gatherings.
With simple ingredients and an easy stovetop preparation, you can create a beautiful batch of homemade fudge without turning on the oven. Cut it into bite-sized squares, package it for gifting, or add it to your holiday dessert tray. If you love chocolate and cherries together, this creamy Cherry Garcia Fudge is a recipe worth making!
Print
Cherry Garcia Fudge
Ingredients
This recipe makes approximately 36 small squares.
For the Cherry Garcia Fudge
- 3 cups white chocolate chips
- 1 can (14 ounces) sweetened condensed milk
- 2 tablespoons unsalted butter
- 1 teaspoon vanilla extract
- 1/4 teaspoon almond extract
- 1/2 cup finely chopped maraschino cherries, thoroughly drained and patted dry
- 3/4 cup semi-sweet chocolate chunks or chocolate chips
- 1 pinch salt
For the Topping
- 2 tablespoons finely chopped maraschino cherries, well dried
- 2 tablespoons semi-sweet chocolate chunks
- 1 tablespoon melted white chocolate, optional
Instructions
Line an 8-by-8-inch square baking pan with parchment paper, leaving some overhang on the sides.
The extra parchment makes it easier to lift the fudge out of the pan after it has chilled.
Lightly grease the parchment paper if desired.
Step 2: Prepare the Cherries
Drain the maraschino cherries in a fine-mesh strainer.
Place them between several layers of paper towels and gently press to remove as much moisture as possible.
Finely chop 1/2 cup of cherries for the fudge and another 2 tablespoons for the topping.
Set aside the topping cherries separately.
This step is especially important because excess cherry juice can make the fudge too soft and affect how well it sets.
Step 3: Melt the White Chocolate Mixture
Place the white chocolate chips, sweetened condensed milk, and butter in a medium heavy-bottomed saucepan.
Heat over low heat, stirring continuously with a silicone spatula until the white chocolate has melted and the mixture becomes smooth and creamy.
Do not allow the mixture to boil. White chocolate can overheat quickly, so gentle heat is essential.
Once smooth, remove the saucepan from the heat.
Step 4: Add the Flavoring
Stir in the vanilla extract, almond extract, and pinch of salt.
Mix until everything is evenly incorporated.
Allow the mixture to cool for approximately 5 minutes, stirring occasionally. It should remain soft and pourable but should no longer be extremely hot.
Step 5: Fold in the Cherries and Chocolate
Add the finely chopped, well-dried maraschino cherries and semi-sweet chocolate chunks.
Gently fold everything together with a spatula until the cherries and chocolate are evenly distributed.
Avoid vigorous stirring because the warm fudge mixture may begin melting the chocolate chunks. A little chocolate streaking is fine, but you want to preserve some distinct chocolate pieces.
Step 6: Transfer the Fudge to the Pan
Pour the fudge mixture into the prepared baking pan.
Use a spatula to spread it evenly into the corners.
Gently tap the pan against the countertop to remove any large air pockets.
Sprinkle the remaining chopped cherries and chocolate chunks over the top. Press them very lightly into the surface so they stay in place.
Step 7: Chill Until Firm
Cover the pan loosely with plastic wrap or foil.
Refrigerate for at least 4 hours, or preferably overnight, until the fudge is completely firm.
Do not cut it while the center is still soft. Proper chilling helps the squares hold their shape.
Step 8: Slice and Serve
Once firm, lift the fudge out of the pan using the parchment paper overhang.
Place it on a cutting board.
Use a large sharp knife to cut it into approximately 36 small squares. For cleaner cuts, warm the knife under hot water, wipe it dry, and repeat between cuts.
If desired, drizzle a little melted white chocolate over the squares for a pretty finishing touch.
Arrange the Cherry Garcia Fudge on a serving platter or place each piece in a small paper candy cup.
Keep refrigerated until ready to serve.
Notes
Dry the cherries thoroughly. This is the most important step for achieving firm fudge. Excess moisture can interfere with the texture and make the finished candy sticky.
Use low heat. White chocolate is delicate and can scorch or become grainy if heated too quickly.
Stir continuously while melting. This helps distribute the heat evenly and prevents the chocolate from sticking to the bottom of the saucepan.
Use sweetened condensed milk. Evaporated milk is not a suitable substitute because it does not contain the same amount of sugar or provide the same thick consistency.
Allow the mixture to cool slightly before adding chocolate chunks. This helps keep some of the chocolate pieces intact.
Don’t rush the chilling time. The fudge needs several hours in the refrigerator to become firm enough to slice cleanly.
Use a warm knife. Wiping the knife clean between cuts creates neat, professional-looking squares.
