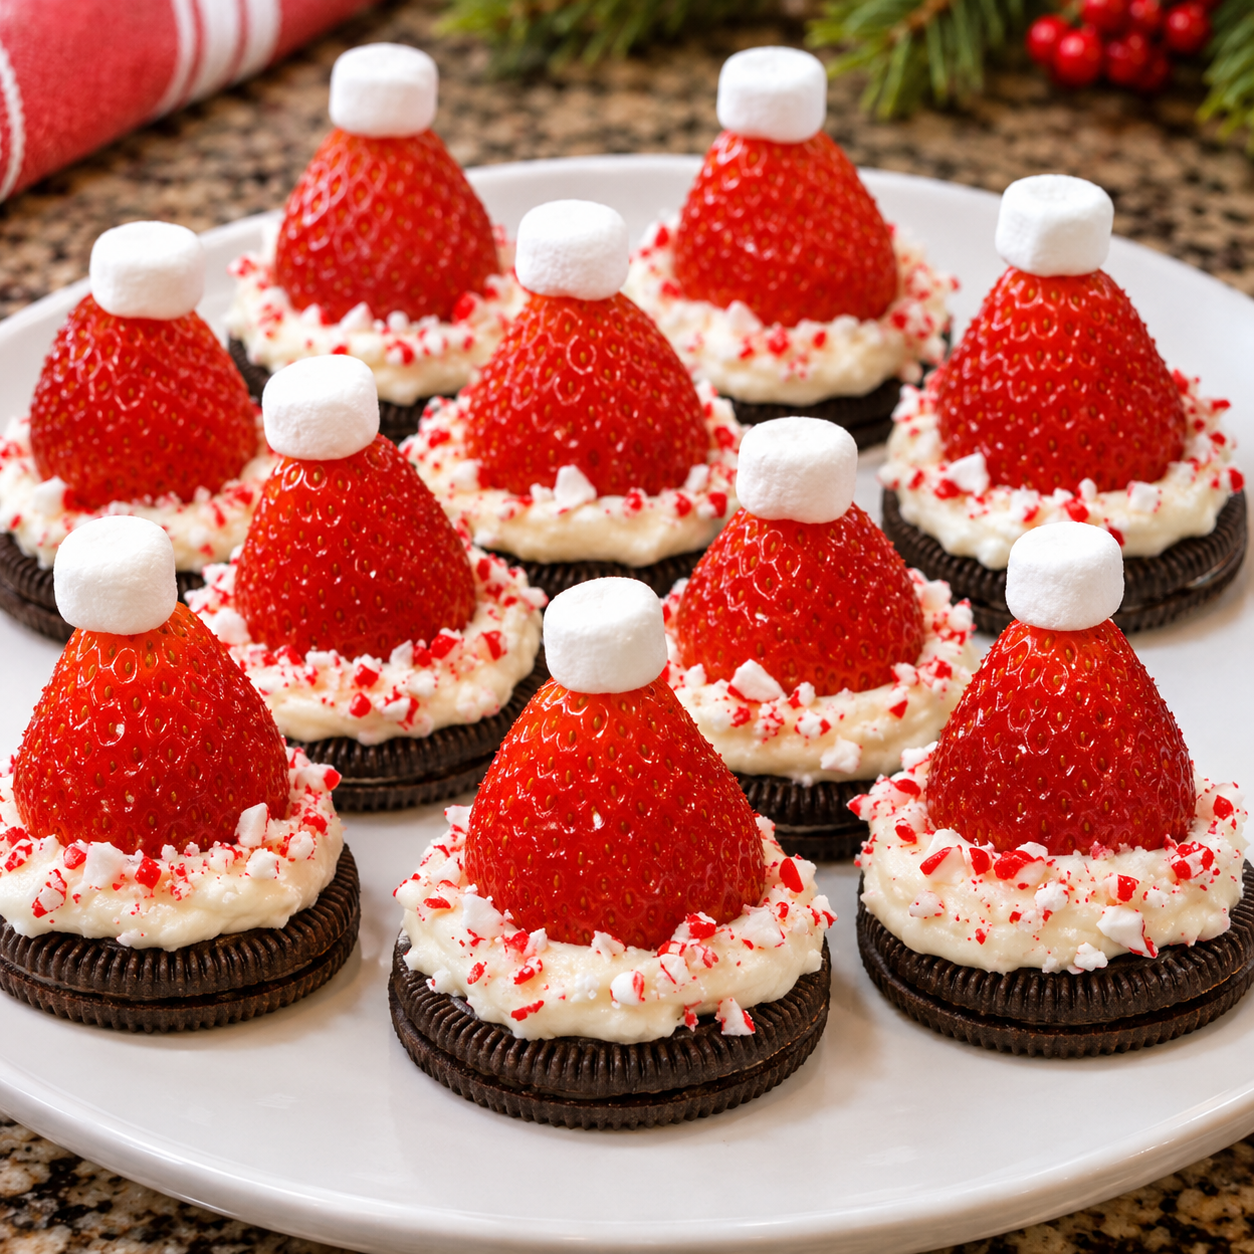
Bring a little extra Christmas magic to your dessert table with these adorable No-Bake Oreo Santa Hat Cheesecake Bites! They’re made with a rich, creamy Oreo cheesecake filling, a crunchy chocolate cookie base, and a bright red strawberry topping shaped like Santa’s iconic hat. Finished with a fluffy white whipped cream border and a little pom-pom on top, these bite-sized desserts are almost too cute to eat!
The combination of chocolate sandwich cookies, smooth cream cheese, sweet vanilla, and fresh strawberries creates a delicious balance of flavors and textures. Every bite is creamy, chocolatey, fruity, and wonderfully festive.
Best of all, you don’t need an oven or complicated baking techniques. Simply prepare the cookie bases, mix the cheesecake filling, assemble the little desserts, and refrigerate until firm. The Santa hat decorations make them look impressive, but the preparation is surprisingly simple.
These Christmas cheesecake bites are perfect for holiday parties, Christmas Eve celebrations, cookie exchanges, winter gatherings, and festive dessert platters. They’re also a fun recipe to make with family when you’re looking for something sweet and creative during the holiday season.
If you love easy no-bake desserts that look beautiful and taste even better, these Oreo Santa Hat Cheesecake Bites deserve a place on your Christmas recipe list!
Why You’ll Love These Oreo Santa Hat Cheesecake Bites
- No baking required: Everything comes together without turning on the oven.
- Festive Santa hat design: Fresh strawberries and whipped cream create an adorable Christmas presentation.
- Creamy Oreo cheesecake filling: Chocolate cookie crumbs and cream cheese make every bite rich and delicious.
- Perfect individual portions: Easy to serve at parties and holiday gatherings.
- Simple ingredients: Made with familiar ingredients available at most grocery stores.
- Make-ahead friendly: Prepare the cheesecake bases ahead and decorate shortly before serving.
- Great for Christmas parties: Their bright red and white colors make them stand out on any holiday dessert table.
Ingredients You’ll Need
This recipe makes approximately 18–20 mini cheesecake bites.
For the Oreo Cookie Bases
- 24 Oreo cookies, including the cream filling
- 4 tablespoons unsalted butter, melted
For the Cheesecake Filling
- 8 ounces (1 block) cream cheese, softened
- ½ cup powdered sugar
- ½ teaspoon vanilla extract
- ½ cup heavy whipping cream, cold
- ½ cup finely crushed Oreo cookie crumbs
- 2 tablespoons sour cream, optional, for extra tanginess
For the Santa Hat Topping
- 18–20 small fresh strawberries
- ½ cup heavy whipping cream, cold
- 2 tablespoons powdered sugar
- ½ teaspoon vanilla extract
Optional Decorations
- Extra Oreo crumbs for sprinkling
- White chocolate shavings
- Mini white chocolate chips
- Small white candy decorations
Ingredient Notes and Substitutions
Oreo cookies: Regular Oreo cookies work best for this recipe. Keep the cream filling inside when crushing them for the base. It helps create a flavorful chocolate cookie crust.
Unsalted butter: Melted butter binds the cookie crumbs together and helps the bases hold their shape. If using salted butter, you can leave out any additional salt.
Cream cheese: Use full-fat block cream cheese for a rich, stable cheesecake filling. Allow it to soften at room temperature before mixing. Avoid whipped cream cheese because it can make the filling too loose.
Powdered sugar: Powdered sugar dissolves smoothly into the cream cheese and adds sweetness without creating a grainy texture.
Heavy whipping cream: Cold heavy cream creates a light, fluffy texture when whipped. Make sure it is cold before beating so it reaches a stable consistency.
Sour cream: This is optional but adds a slight tang that balances the sweetness of the Oreo cookies.
Fresh strawberries: Choose small, firm strawberries with pointed tops. Their natural shape makes them look like little Santa hats. Wash and dry them thoroughly before assembly.
Vanilla extract: A little vanilla enhances the cheesecake flavor and complements the chocolate cookies.
How to Make No-Bake Oreo Santa Hat Cheesecake Bites
Step 1: Prepare the Oreo Cookie Crumbs
Place 24 Oreo cookies, including the cream filling, in a food processor.
Pulse until they become fine, even crumbs.
If you don’t have a food processor, place the cookies in a sealed food storage bag and crush them thoroughly with a rolling pin.
Transfer the crumbs to a mixing bowl and reserve ½ cup of finely crushed crumbs for the cheesecake filling.
Step 2: Make the Cookie Bases
Add the melted butter to the remaining Oreo crumbs.
Stir until the mixture resembles damp sand and holds together when pressed between your fingers.
Line a mini muffin pan with 18–20 mini paper liners.
Place approximately 1 tablespoon of the cookie mixture into each liner.
Press firmly with the back of a small spoon to create an even cookie base.
Refrigerate the pan for approximately 20 minutes while preparing the cheesecake filling.
Step 3: Prepare the Cream Cheese Mixture
Place the softened cream cheese in a large mixing bowl.
Add the powdered sugar, vanilla extract, and optional sour cream.
Beat with an electric mixer on medium-low speed until smooth and creamy.
Scrape down the sides of the bowl to remove any lumps.
Add the reserved Oreo crumbs and mix until evenly incorporated.
Step 4: Whip the Heavy Cream
Pour the cold heavy whipping cream into a separate chilled mixing bowl.
Beat with an electric mixer until stiff peaks form.
The whipped cream should hold its shape when the beaters are lifted.
Avoid overwhipping, as the cream can become grainy and begin to separate.
Step 5: Fold the Whipped Cream into the Cheesecake Filling
Add the whipped cream to the cream cheese mixture in two additions.
Gently fold with a spatula until the mixture becomes light, fluffy, and evenly combined.
Avoid stirring too vigorously because you want to preserve the air in the whipped cream.
Step 6: Fill the Oreo Bases
Remove the chilled cookie bases from the refrigerator.
Spoon or pipe the cheesecake filling evenly over each base.
Smooth the tops with a small spatula or the back of a spoon.
For a prettier presentation, transfer the filling to a piping bag fitted with a large round tip and pipe it into each liner.
Step 7: Chill Until Firm
Place the mini cheesecakes in the refrigerator for at least 3–4 hours, or until the filling is firm enough to support the strawberry decorations.
For the best results, allow them to chill overnight.
Keep them covered while refrigerating to prevent them from absorbing odors.
Step 8: Prepare the Strawberries
Wash the strawberries gently and remove the green leaves.
Pat them completely dry with paper towels.
Choose strawberries with pointed tops because they create the most recognizable Santa hat shape.
If necessary, trim a very small amount from the bottom so each strawberry can stand upright on the cheesecake.
Make sure the strawberries are completely dry before decorating.
Step 9: Make the Whipped Cream Decoration
Place the cold heavy whipping cream, powdered sugar, and vanilla extract in a chilled mixing bowl.
Beat until stiff peaks form.
Transfer the whipped cream to a piping bag fitted with a small star tip or round piping tip.
Keep the whipped cream refrigerated until you’re ready to decorate.
Step 10: Create the Santa Hats
Remove the chilled cheesecake bites from the refrigerator.
Pipe a small white whipped cream border around the top of each cheesecake.
Place one strawberry upright in the center, with its pointed end facing upward.
Pipe a small white whipped cream pom-pom at the tip of each strawberry to complete the Santa hat.
Add a little extra whipped cream around the bottom of the strawberry if needed to create a fluffy white trim.
Step 11: Add the Final Decorations
For an extra festive look, sprinkle a few Oreo crumbs around the edges or add small white chocolate decorations.
Arrange the finished cheesecake bites on a Christmas serving platter.
Refrigerate until ready to serve.
Your No-Bake Oreo Santa Hat Cheesecake Bites are ready to bring a little holiday cheer to the dessert table!
Helpful Cooking Notes
Use block cream cheese. It creates a thicker filling that holds its shape better than whipped cream cheese.
Make fine Oreo crumbs. Large cookie pieces can make the bases uneven and difficult to press firmly.
Whip the cream separately. Adding properly whipped cream creates a lighter cheesecake texture.
Use cold heavy cream. Cold cream whips more easily and produces a more stable topping.
Dry the strawberries thoroughly. Excess moisture can cause the whipped cream to soften and slide.
Choose similar-sized strawberries. This creates a more uniform Santa hat appearance.
Chill the cheesecake before decorating. The filling needs to be firm enough to support the strawberries.
Decorate close to serving time. Fresh strawberries and whipped cream look their best when added shortly before serving.
Delicious Variations to Try
Chocolate Santa Hat Cheesecake Bites
Add 2 tablespoons of melted and cooled semisweet chocolate to the cream cheese mixture. This creates a richer chocolate cheesecake filling that pairs beautifully with the strawberries.
White Chocolate Oreo Santa Bites
Fold ¼ cup of finely chopped white chocolate into the cheesecake filling. The creamy white chocolate adds sweetness and creates a delicious holiday flavor.
Strawberry Oreo Cheesecake Bites
Add 2 tablespoons of finely chopped freeze-dried strawberries to the filling for extra strawberry flavor. Freeze-dried fruit provides concentrated flavor without adding much moisture.
Peppermint Oreo Santa Cheesecake Bites
Add ¼ teaspoon peppermint extract to the cheesecake filling. You can also sprinkle a little crushed peppermint candy over the finished bites.
Start with a small amount of peppermint extract because its flavor can be strong.
Mini Santa Cheesecake Cups
Instead of using a mini muffin pan, prepare the cookie base and cheesecake filling in small clear dessert cups. Finish each one with a strawberry Santa hat for an easy individual dessert.
Chocolate-Dipped Strawberry Santa Hats
Dip the lower portion of each strawberry lightly in melted white chocolate and allow it to set before placing it on the cheesecake. Pipe whipped cream around the bottom and top to create the classic Santa hat appearance.
Raspberry Santa Hat Cheesecake Bites
Replace the strawberries with small raspberries for a different fruity decoration. Because raspberries are delicate, handle them gently and add them just before serving.
Serving Suggestions
These No-Bake Oreo Santa Hat Cheesecake Bites are perfect for Christmas dessert tables because they’re colorful, easy to serve, and individually portioned.
Here are some delicious ways to serve them:
- Christmas dessert platters: Arrange them with gingerbread cookies, chocolate truffles, and peppermint bark.
- Holiday parties: Place each cheesecake bite in a decorative mini cupcake liner.
- Christmas Eve dessert: Serve them after dinner with coffee or hot chocolate.
- Cookie exchanges: Add them to a festive dessert box, keeping them chilled until serving.
- Kids’ holiday celebrations: Arrange them on a snow-themed platter with mini marshmallows and Christmas sprinkles.
- Winter dessert boards: Pair them with fresh strawberries, chocolate-covered pretzels, and white chocolate treats.
For an especially beautiful presentation, arrange the cheesecake bites in rows on a white serving platter. Sprinkle a little Oreo crumb around the edges to create a snowy chocolate effect.
Tips for Perfect Oreo Santa Hat Cheesecake Bites
- Press the cookie bases firmly. This prevents them from crumbling when removed from the liners.
- Use softened cream cheese. It blends more smoothly and prevents lumps.
- Whip the cream to stiff peaks. This helps the filling maintain its shape.
- Don’t overmix the filling. Fold gently to keep the cheesecake light and fluffy.
- Chill long enough. Give the cheesecake at least 3–4 hours to firm up.
- Choose firm strawberries. Soft or overripe berries may release moisture and make decorating difficult.
- Dry every strawberry completely. This helps the whipped cream adhere properly.
- Use a piping bag for neat decorations. A star tip creates a beautiful Santa hat border.
- Add the strawberries shortly before serving. This keeps the decorations fresh and attractive.
Storage Instructions
Because these cheesecake bites contain cream cheese, whipped cream, and fresh strawberries, they must be refrigerated.
Store them in a covered airtight container in the refrigerator.
For the best appearance and texture, enjoy them within 1–2 days after decorating. The strawberries may gradually release moisture, and the whipped cream can soften over time.
If you want to prepare them further in advance, store the cheesecake bases and filling in the refrigerator without the strawberry hats. Add the fresh strawberries and whipped cream shortly before serving.
Do not leave the finished cheesecake bites at room temperature for more than 2 hours, or 1 hour when temperatures are above 90°F.
Can You Freeze Oreo Santa Hat Cheesecake Bites?
You can freeze the Oreo cheesecake bases without the fresh strawberries and whipped cream decorations.
Arrange the undecorated cheesecake bites in a single layer in a freezer-safe container and separate layers with parchment paper.
Freeze for up to 1 month for the best quality.
Thaw them overnight in the refrigerator, then prepare fresh whipped cream and add the strawberries just before serving.
Freezing the fully decorated bites is not recommended because fresh strawberries can become watery after thawing and whipped cream may lose its texture.
Make-Ahead Instructions
These Oreo Santa Hat Cheesecake Bites are ideal for preparing ahead of a busy Christmas celebration.
The day before serving:
- Crush the Oreo cookies.
- Prepare and press the cookie bases.
- Mix the cream cheese filling.
- Fill the mini muffin liners.
- Cover and refrigerate overnight.
On the day of serving:
- Wash and thoroughly dry the strawberries.
- Prepare the whipped cream.
- Pipe the white cream borders.
- Add the strawberries.
- Finish with the whipped cream pom-poms.
- Refrigerate until serving.
This method saves time and keeps the fresh decorations looking their best.
Recipe Details
- Prep Time: 35 minutes
- Cook Time: 0 minutes
- Chilling Time: 3–4 hours
- Total Time: Approximately 3 hours 35 minutes to 4 hours 35 minutes
- Yield: 18–20 mini cheesecake bites
- Serving Size: 1 cheesecake bite
Nutritional Information
Estimated nutrition per cheesecake bite, assuming 20 servings and including the strawberry and whipped cream decorations:
- Calories: 190
- Protein: 3 g
- Carbohydrates: 18 g
- Fat: 12 g
- Saturated Fat: 7 g
- Sugar: 13 g
- Sodium: 115 mg
Actual nutritional values will vary depending on the Oreo cookies, cream cheese, heavy cream, strawberries, and portion sizes used.
Frequently Asked Questions
1. Do these Oreo Santa Hat Cheesecake Bites need to be baked?
No! This is a completely no-bake dessert. The Oreo cookie base is made with crushed cookies and melted butter, while the cheesecake filling sets in the refrigerator.
2. Can I use store-bought whipped topping instead of heavy cream?
Yes. You can use thawed whipped topping as a convenient alternative. Fold it gently into the cream cheese mixture. The texture and sweetness may differ slightly from homemade whipped cream.
3. How do I keep the strawberry Santa hats from sliding off?
Make sure the cheesecake bites are thoroughly chilled and the strawberries are completely dry. Pipe a small amount of whipped cream onto the cheesecake before placing each strawberry on top.
4. Can I make these without a mini muffin pan?
Yes! You can assemble them in small paper baking cups or mini dessert cups. The cookie base can be pressed directly into the bottom of each cup.
5. Why is my cheesecake filling too soft?
The cream cheese may have been too warm, or the whipped cream may not have reached stiff peaks. Make sure the heavy cream is cold, whip it properly, and refrigerate the finished cheesecake bites for several hours.
6. Can I use frozen strawberries?
Fresh strawberries are strongly recommended. Frozen strawberries release moisture as they thaw and can make the whipped cream and cheesecake topping watery.
7. How far ahead can I make these cheesecake bites?
You can prepare the Oreo bases and cheesecake filling one day ahead. Add the fresh strawberry hats and whipped cream decorations on the day of serving for the best appearance.
8. Can I use Golden Oreos instead of regular Oreos?
Absolutely! Golden Oreos create a vanilla cookie base with a lighter color. The combination with cream cheese and strawberries is delicious.
9. How long do these cheesecake bites last?
Once decorated, store them covered in the refrigerator and enjoy them within 1–2 days for the best quality. The strawberries and whipped cream are freshest shortly after assembly.
10. Can I make these into larger Santa Hat cheesecakes?
Yes! Use a standard muffin pan with larger paper liners and increase the cookie base and filling portions. You may need to allow extra chilling time to ensure the centers become firm.
Conclusion
These No-Bake Oreo Santa Hat Cheesecake Bites are everything a Christmas dessert should be: creamy, chocolatey, fruity, festive, and absolutely adorable! With their crunchy Oreo bases, fluffy cheesecake filling, fresh strawberry hats, and whipped cream decorations, they’re guaranteed to bring smiles to your holiday table.
They’re easy to prepare, perfect for making ahead, and wonderful for Christmas parties, family gatherings, and winter celebrations.
Prepare the cheesecake bites in advance, add the fresh Santa hats just before serving, and enjoy a sweet little dessert that’s sure to become a holiday favorite!
Print
No-Bake Oreo Santa Hat Cheesecake Bites – Easy Christmas Dessert
Ingredients
This recipe makes approximately 18–20 mini cheesecake bites.
For the Oreo Cookie Bases
- 24 Oreo cookies, including the cream filling
- 4 tablespoons unsalted butter, melted
For the Cheesecake Filling
- 8 ounces (1 block) cream cheese, softened
- ½ cup powdered sugar
- ½ teaspoon vanilla extract
- ½ cup heavy whipping cream, cold
- ½ cup finely crushed Oreo cookie crumbs
- 2 tablespoons sour cream, optional, for extra tanginess
For the Santa Hat Topping
- 18–20 small fresh strawberries
- ½ cup heavy whipping cream, cold
- 2 tablespoons powdered sugar
- ½ teaspoon vanilla extract
Optional Decorations
- Extra Oreo crumbs for sprinkling
- White chocolate shavings
- Mini white chocolate chips
- Small white candy decorations
Instructions
Place 24 Oreo cookies, including the cream filling, in a food processor.
Pulse until they become fine, even crumbs.
If you don’t have a food processor, place the cookies in a sealed food storage bag and crush them thoroughly with a rolling pin.
Transfer the crumbs to a mixing bowl and reserve ½ cup of finely crushed crumbs for the cheesecake filling.
Step 2: Make the Cookie Bases
Add the melted butter to the remaining Oreo crumbs.
Stir until the mixture resembles damp sand and holds together when pressed between your fingers.
Line a mini muffin pan with 18–20 mini paper liners.
Place approximately 1 tablespoon of the cookie mixture into each liner.
Press firmly with the back of a small spoon to create an even cookie base.
Refrigerate the pan for approximately 20 minutes while preparing the cheesecake filling.
Step 3: Prepare the Cream Cheese Mixture
Place the softened cream cheese in a large mixing bowl.
Add the powdered sugar, vanilla extract, and optional sour cream.
Beat with an electric mixer on medium-low speed until smooth and creamy.
Scrape down the sides of the bowl to remove any lumps.
Add the reserved Oreo crumbs and mix until evenly incorporated.
Step 4: Whip the Heavy Cream
Pour the cold heavy whipping cream into a separate chilled mixing bowl.
Beat with an electric mixer until stiff peaks form.
The whipped cream should hold its shape when the beaters are lifted.
Avoid overwhipping, as the cream can become grainy and begin to separate.
Step 5: Fold the Whipped Cream into the Cheesecake Filling
Add the whipped cream to the cream cheese mixture in two additions.
Gently fold with a spatula until the mixture becomes light, fluffy, and evenly combined.
Avoid stirring too vigorously because you want to preserve the air in the whipped cream.
Step 6: Fill the Oreo Bases
Remove the chilled cookie bases from the refrigerator.
Spoon or pipe the cheesecake filling evenly over each base.
Smooth the tops with a small spatula or the back of a spoon.
For a prettier presentation, transfer the filling to a piping bag fitted with a large round tip and pipe it into each liner.
Step 7: Chill Until Firm
Place the mini cheesecakes in the refrigerator for at least 3–4 hours, or until the filling is firm enough to support the strawberry decorations.
For the best results, allow them to chill overnight.
Keep them covered while refrigerating to prevent them from absorbing odors.
Step 8: Prepare the Strawberries
Wash the strawberries gently and remove the green leaves.
Pat them completely dry with paper towels.
Choose strawberries with pointed tops because they create the most recognizable Santa hat shape.
If necessary, trim a very small amount from the bottom so each strawberry can stand upright on the cheesecake.
Make sure the strawberries are completely dry before decorating.
Step 9: Make the Whipped Cream Decoration
Place the cold heavy whipping cream, powdered sugar, and vanilla extract in a chilled mixing bowl.
Beat until stiff peaks form.
Transfer the whipped cream to a piping bag fitted with a small star tip or round piping tip.
Keep the whipped cream refrigerated until you’re ready to decorate.
Step 10: Create the Santa Hats
Remove the chilled cheesecake bites from the refrigerator.
Pipe a small white whipped cream border around the top of each cheesecake.
Place one strawberry upright in the center, with its pointed end facing upward.
Pipe a small white whipped cream pom-pom at the tip of each strawberry to complete the Santa hat.
Add a little extra whipped cream around the bottom of the strawberry if needed to create a fluffy white trim.
Step 11: Add the Final Decorations
For an extra festive look, sprinkle a few Oreo crumbs around the edges or add small white chocolate decorations.
Arrange the finished cheesecake bites on a Christmas serving platter.
Refrigerate until ready to serve.
Your No-Bake Oreo Santa Hat Cheesecake Bites are ready to bring a little holiday cheer to the dessert table!
Notes
Use block cream cheese. It creates a thicker filling that holds its shape better than whipped cream cheese.
Make fine Oreo crumbs. Large cookie pieces can make the bases uneven and difficult to press firmly.
Whip the cream separately. Adding properly whipped cream creates a lighter cheesecake texture.
Use cold heavy cream. Cold cream whips more easily and produces a more stable topping.
Dry the strawberries thoroughly. Excess moisture can cause the whipped cream to soften and slide.
Choose similar-sized strawberries. This creates a more uniform Santa hat appearance.
Chill the cheesecake before decorating. The filling needs to be firm enough to support the strawberries.
Decorate close to serving time. Fresh strawberries and whipped cream look their best when added shortly before serving.
