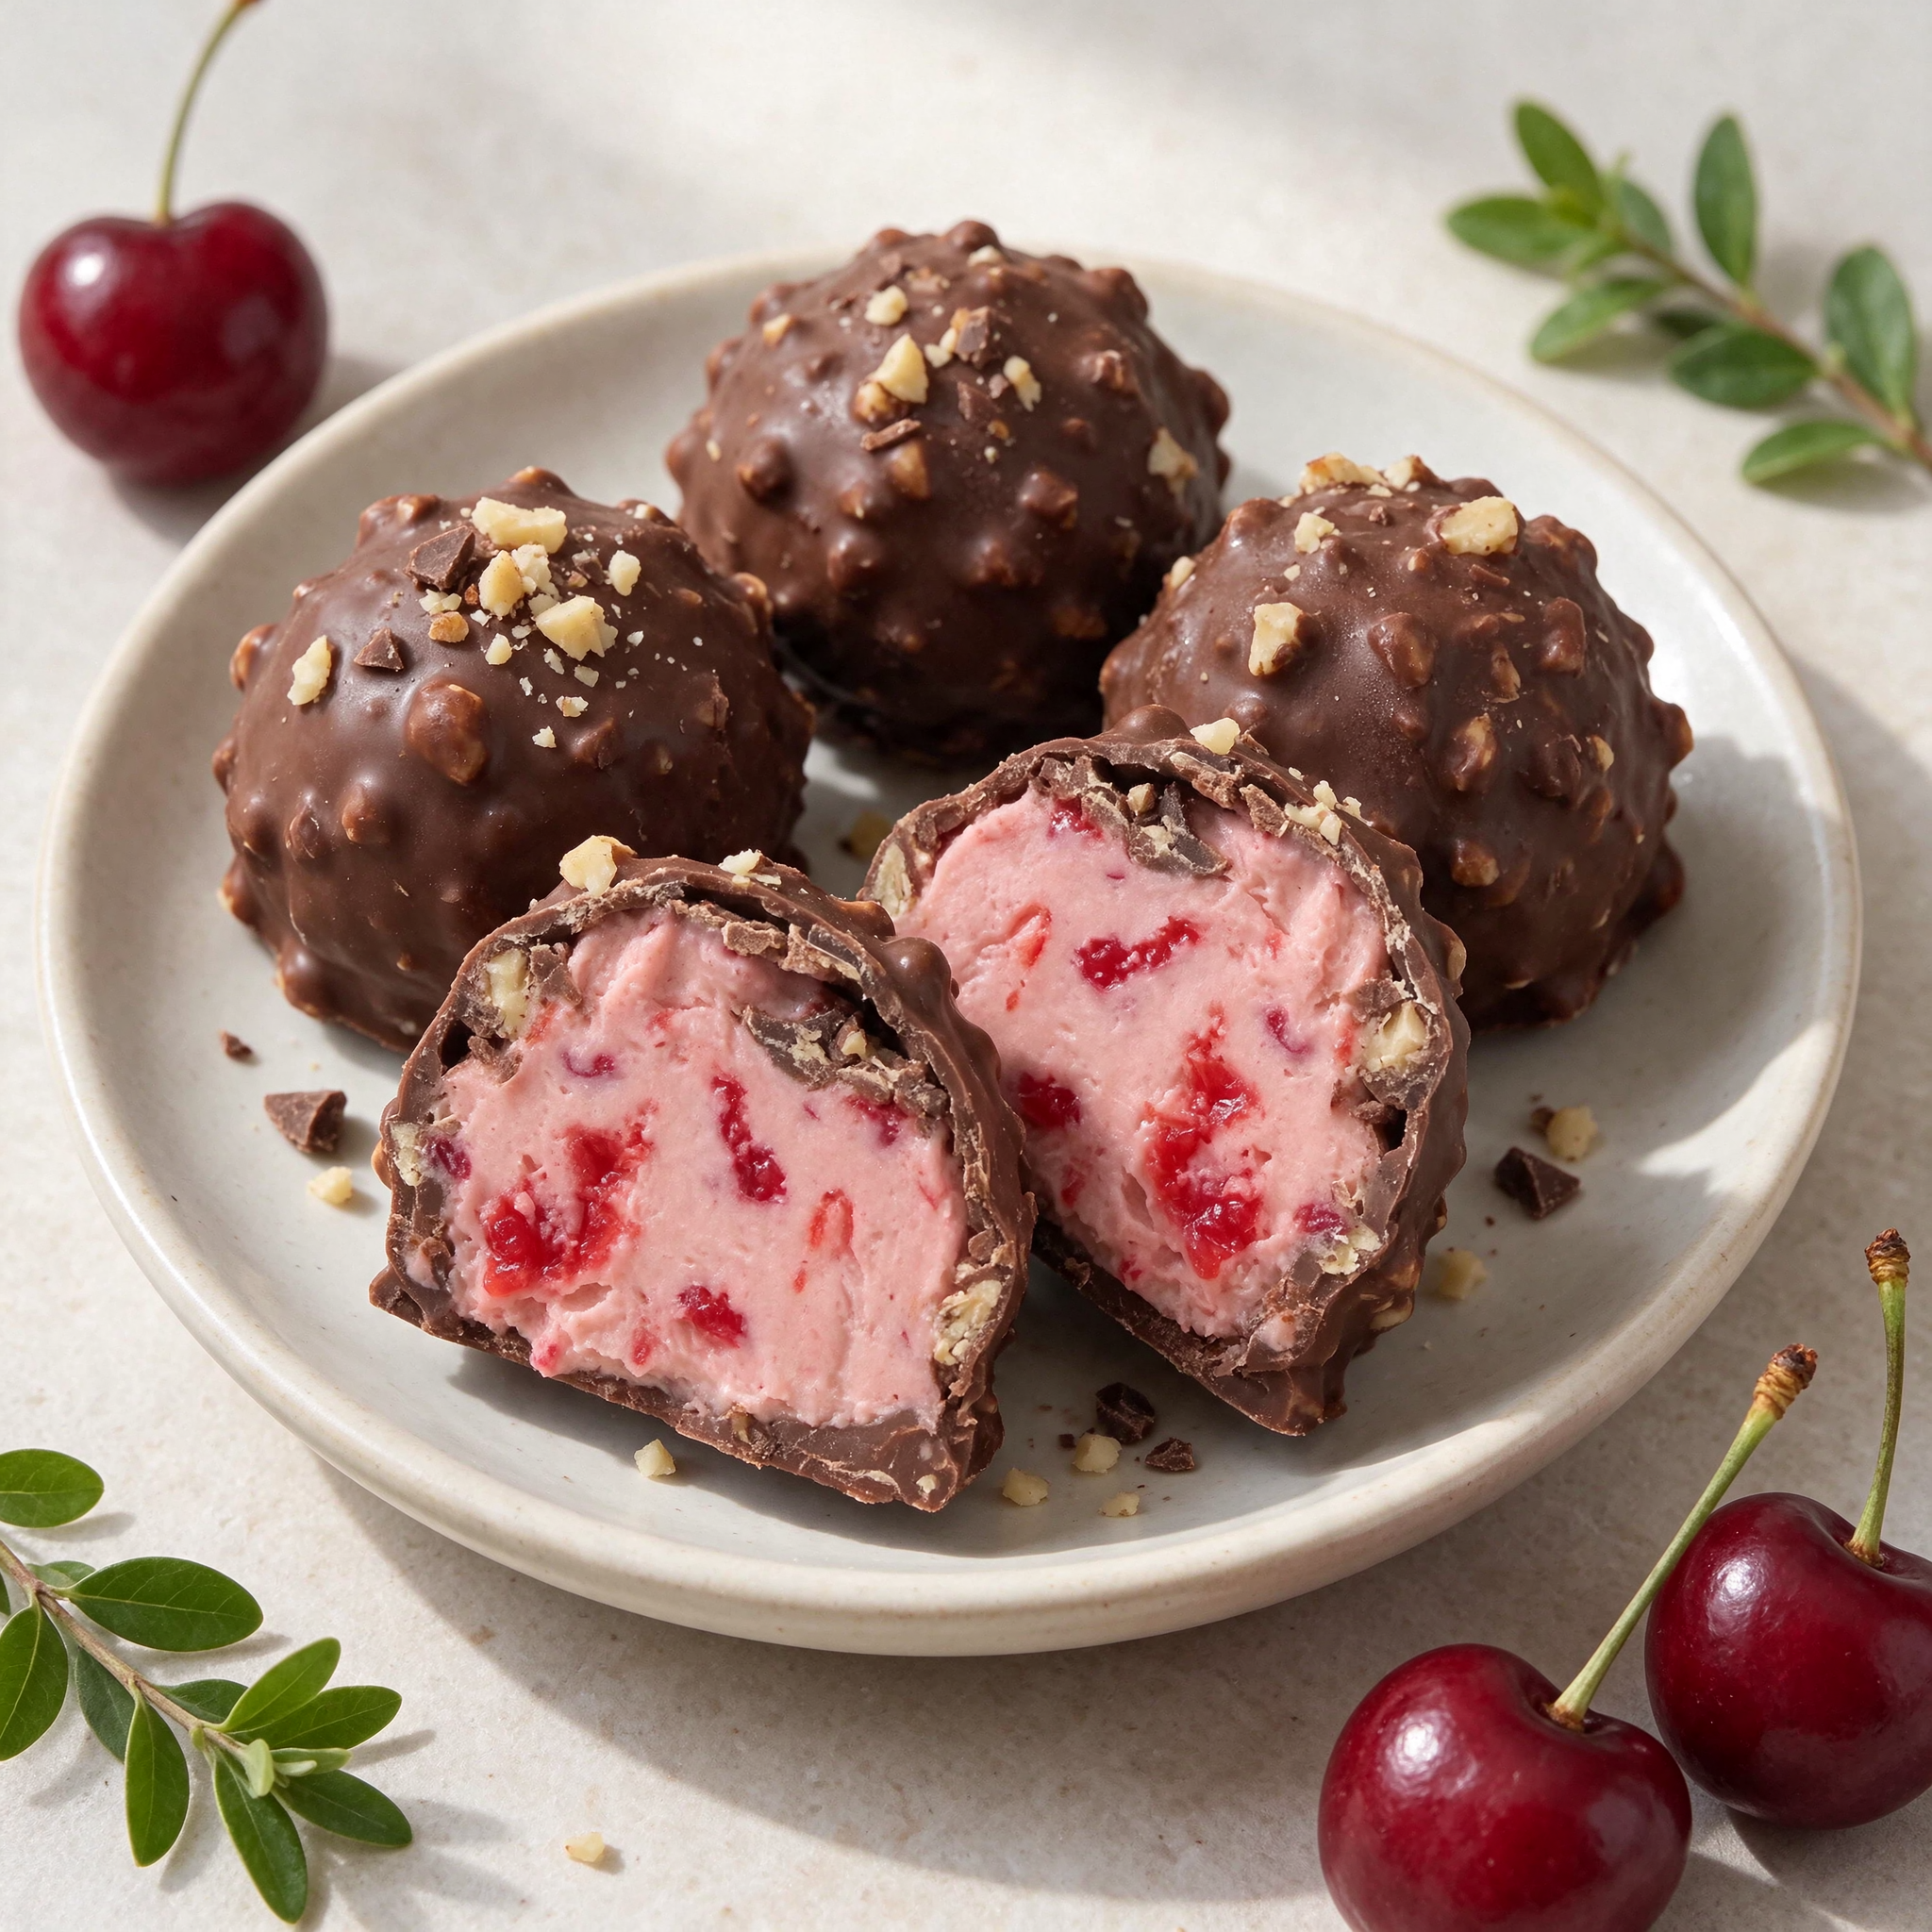
If you love the combination of sweet cherries, creamy chocolate, and crunchy peanuts, these Cherry Mash Truffles are going to become one of your favorite homemade treats! Inspired by the classic cherry mash candy, this delicious recipe brings together a soft, sweet cherry-flavored center and a rich chocolate coating with a satisfying peanut crunch.
These homemade Cherry Mash Truffles are perfect for holidays, Christmas dessert trays, Valentine’s Day, birthday celebrations, bake sales, or whenever you want something special to share with family and friends. They look beautiful on a dessert platter, taste like something from a candy shop, and are surprisingly simple to prepare at home.
One of the best things about this Cherry Mash Truffles recipe is that you don’t need an oven or complicated candy-making equipment. The cherry filling is prepared by combining a few simple ingredients, shaped into small bite-sized portions, and chilled until firm. Each piece is then dipped in a delicious chocolate and peanut coating that creates the perfect balance of creamy, crunchy, sweet, and rich flavors.
The bright cherry flavor makes these truffles stand out from traditional chocolate candies. Meanwhile, the crunchy peanuts add texture and a slightly salty contrast that balances the sweetness of the filling.
Whether you’re preparing homemade candy for Christmas gifts or simply looking for an easy no-bake chocolate dessert, these Cherry Mash Truffles are a wonderful choice. Make a batch ahead of time, refrigerate them, and enjoy a delicious homemade treat whenever you want!
Ingredients
This recipe uses simple ingredients that work together to create a soft cherry-flavored center and a crunchy chocolate exterior.
For the Cherry Filling:
- 1/2 cup unsalted butter, softened.
- 4 ounces cream cheese, softened.
- 3 cups powdered sugar, sifted.
- 1/3 cup maraschino cherries, finely chopped and thoroughly drained.
- 1 teaspoon vanilla extract.
- 1/4 teaspoon almond extract (optional).
- 1–2 tablespoons maraschino cherry juice, as needed.
- A few drops of red or pink food coloring (optional).
For the Chocolate Peanut Coating:
- 2 cups semi-sweet chocolate chips.
- 1 tablespoon coconut oil or shortening.
- 1 cup dry-roasted peanuts, finely chopped.
- 1/2 cup milk chocolate chips (optional, for a sweeter coating).
Ingredient Notes:
- Maraschino cherries: These give the truffles their signature sweet cherry flavor and beautiful color. Drain them very well before chopping to prevent excess moisture.
- Powdered sugar: This creates a thick, smooth filling that holds its shape when chilled.
- Butter: Softened butter helps make the cherry center creamy and rich.
- Cream cheese: Adds a slight tanginess and a smooth texture that balances the sweetness.
- Chocolate chips: Semi-sweet chocolate provides a delicious contrast to the sweet cherry filling.
- Peanuts: Finely chopped roasted peanuts give the coating a crunchy texture and a classic candy-inspired flavor.
- Coconut oil: Helps thin the chocolate and makes dipping easier.
Preparation
Follow these simple steps to make delicious homemade Cherry Mash Truffles with a creamy cherry center and crunchy chocolate peanut coating.
Step 1: Prepare the Cherries
Begin by draining the maraschino cherries thoroughly. Place them on a paper towel and gently pat them dry to remove as much moisture as possible.
Finely chop the cherries into small pieces. Smaller pieces distribute more evenly throughout the filling and make shaping the truffles easier.
Set the chopped cherries aside while you prepare the creamy mixture.
This step is especially important because excess cherry juice can make the filling too soft. If the cherries are particularly wet, allow them to sit on paper towels for several minutes before adding them to the mixture.
Step 2: Make the Creamy Cherry Filling
In a large mixing bowl, beat the softened butter and cream cheese together using an electric mixer.
Mix for approximately 2 minutes until the mixture becomes smooth, creamy, and fluffy.
Add the vanilla extract and almond extract if using. Mix again until incorporated.
Gradually add the powdered sugar, about half a cup at a time, mixing on low speed to prevent the sugar from scattering.
Continue mixing until a thick dough-like consistency forms.
Fold in the finely chopped maraschino cherries using a spatula. If desired, add a few drops of red or pink food coloring to create a more vibrant cherry-colored filling.
If the mixture feels too soft or sticky, add a little more powdered sugar until it becomes easy to handle.
Step 3: Shape and Chill the Truffles
Line a baking sheet with parchment paper or wax paper.
Using a small cookie scoop or tablespoon, portion the cherry mixture into equal-sized pieces.
Roll each portion gently between your palms to create smooth balls. Aim for approximately 1-inch truffles so they are easy to dip and serve.
Place each truffle on the prepared baking sheet, leaving a little space between them.
Once all the filling has been shaped, transfer the baking sheet to the refrigerator for at least 1–2 hours, or until the truffles are firm.
For quicker preparation, you can place them in the freezer for approximately 25–30 minutes.
Chilling is essential because firm truffles are much easier to dip into melted chocolate without losing their shape.
Step 4: Prepare the Chocolate Peanut Coating
Place the semi-sweet chocolate chips and coconut oil in a microwave-safe bowl.
Microwave in 20-second intervals, stirring thoroughly between each interval until the chocolate is completely melted and smooth.
Alternatively, melt the chocolate using a double boiler over gently simmering water.
Once the chocolate is melted, stir in the finely chopped roasted peanuts.
Make sure the peanuts are distributed evenly throughout the chocolate mixture.
The coating should be smooth enough for dipping while still containing plenty of crunchy peanut pieces.
If the chocolate becomes too thick, add a little more coconut oil and stir until smooth.
Step 5: Dip and Set the Cherry Mash Truffles
Remove the chilled cherry filling balls from the refrigerator or freezer.
Using a dipping fork or toothpick, carefully dip each truffle into the melted chocolate peanut mixture.
Turn each piece gently to ensure it is completely coated.
Allow the excess chocolate to drip back into the bowl before placing the truffle onto the parchment-lined baking sheet.
Repeat with the remaining truffles.
For an attractive finishing touch, sprinkle a few extra chopped peanuts over the tops before the chocolate sets.
Transfer the finished truffles to the refrigerator for approximately 20–30 minutes, or until the chocolate coating becomes completely firm.
Once set, your homemade Cherry Mash Truffles are ready to enjoy!
Variations
One of the best things about this recipe is how easy it is to customize. Here are some delicious ways to make different versions of Cherry Mash Truffles.
1. Dark Chocolate Cherry Truffles
Replace the semi-sweet chocolate chips with dark chocolate. The slightly bitter chocolate creates a wonderful contrast with the sweet cherry filling.
2. White Chocolate Cherry Truffles
Use melted white chocolate instead of semi-sweet chocolate. This creates a sweeter, creamier candy with a beautiful appearance.
3. Coconut Cherry Truffles
Add 1/3 cup of finely shredded coconut to the cherry filling. You can also sprinkle toasted coconut over the chocolate coating.
4. Almond Cherry Truffles
Replace the peanuts with finely chopped toasted almonds. Add a little almond extract to the filling for extra flavor.
5. Chocolate Cherry Cheesecake Truffles
Keep the cream cheese in the filling and add a few crushed graham crackers for a cheesecake-inspired texture.
6. Extra Crunchy Cherry Mash Candy
Increase the amount of chopped roasted peanuts in the chocolate coating for a thicker, crunchier exterior.
Cooking Notes
- Drain the maraschino cherries thoroughly before adding them to the filling.
- Use softened butter and cream cheese to prevent lumps.
- Add powdered sugar gradually to achieve the correct consistency.
- Chill the cherry filling until firm before dipping.
- Melt chocolate slowly to prevent burning or seizing.
- Stir the chocolate frequently while dipping to maintain a smooth consistency.
- Use finely chopped peanuts so they stick easily to the truffles.
- Allow the chocolate coating to set completely before transferring the candy to a storage container.
Important: Because this recipe contains cream cheese, the finished truffles should always be refrigerated. They are not shelf-stable candies.
Serving Suggestions
Cherry Mash Truffles are delicious on their own, but they can also be presented in several beautiful ways.
- Christmas Dessert Platters: Arrange them alongside chocolate fudge, peppermint bark, peanut butter balls, and homemade cookies.
- Valentine’s Day Treats: Place the truffles in small red or pink candy wrappers and arrange them in a decorative gift box.
- Holiday Candy Gifts: Package them in clear treat bags or small gift boxes tied with festive ribbons.
- Dessert Tables: Add them to dessert platters for birthdays, family gatherings, and celebrations.
- After-Dinner Treats: Serve one or two chilled truffles with coffee, tea, or hot chocolate.
- Party Favors: Place individual truffles in mini paper candy cups for an elegant homemade gift.
For the prettiest presentation, arrange the truffles in small candy liners and finish with a few extra chopped peanuts or a light chocolate drizzle.
Tips for Perfect Cherry Mash Truffles
1. Remove Excess Cherry Moisture
This is one of the most important steps. Wet cherries can make the filling too sticky and difficult to shape.
2. Use Room-Temperature Ingredients
Softened butter and cream cheese blend much more easily, creating a smooth and creamy filling.
3. Don’t Skip Chilling
Cold truffles maintain their shape when dipped into warm melted chocolate.
4. Keep the Truffles Similar in Size
Using a cookie scoop ensures even portions and makes the finished candy look professional.
5. Choose Good-Quality Chocolate
Good-quality chocolate chips or melting chocolate create a smoother coating and better flavor.
6. Work in Small Batches
Keep most of the cherry balls refrigerated while dipping a few at a time. This prevents them from becoming too soft.
7. Use Dry-Roasted Peanuts
Roasted peanuts provide the best crunchy texture and a delicious salty contrast.
8. Make Them Ahead
These truffles can be prepared ahead of a holiday gathering, making dessert preparation much easier.
Prep Time, Cooking Time, and Total Time
| Time | Duration |
|---|---|
| Prep Time | 25 minutes |
| Chilling Time | 1 hour 30 minutes |
| Cooking Time | 0 minutes |
| Coating and Setting | 30 minutes |
| Total Time | Approximately 2 hours 25 minutes |
The recipe is no-bake. Total time includes chilling and chocolate setting.
Estimated Yield: 24–30 truffles, depending on their size.
Nutritional Information
The following nutritional information is an estimate based on approximately 30 medium-sized truffles.
| Nutrient | Amount per truffle |
|---|---|
| Calories | 185 kcal |
| Protein | 3 g |
| Total Fat | 11 g |
| Saturated Fat | 6 g |
| Carbohydrates | 21 g |
| Sugar | 18 g |
| Sodium | 45 mg |
Nutritional values may vary depending on the brands of chocolate, cream cheese, butter, and peanuts used, as well as the final size of each truffle.
Frequently Asked Questions (FAQs)
1. What are Cherry Mash Truffles made of?
Cherry Mash Truffles are made with a sweet cherry-flavored filling, usually prepared with powdered sugar, butter, cream cheese, vanilla, and chopped maraschino cherries. The filling is shaped into small balls, chilled, and covered in melted chocolate mixed with crunchy peanuts.
2. Can I use fresh cherries instead of maraschino cherries?
You can use fresh cherries, but they will create a different flavor and texture. Fresh cherries contain more natural moisture and may make the filling too soft. If using fresh cherries, remove the pits, chop them finely, and cook them briefly to reduce excess moisture. Cool completely before adding them to the filling.
3. Why is my cherry filling too sticky?
The filling may be too sticky because the cherries contain excess liquid or the powdered sugar hasn’t been added in sufficient quantity. Add more powdered sugar gradually until the mixture becomes thick enough to roll. Refrigerating the mixture also helps make it easier to handle.
4. How long do Cherry Mash Truffles need to chill?
For the best results, refrigerate the shaped truffles for 1–2 hours before dipping. If you’re short on time, place them in the freezer for approximately 25–30 minutes.
5. Can I make Cherry Mash Truffles without peanuts?
Yes! You can replace the peanuts with chopped almonds, toasted pecans, shredded coconut, or crispy rice cereal. You can also use plain melted chocolate for a smooth coating.
6. What kind of chocolate is best for this recipe?
Semi-sweet chocolate is an excellent choice because it balances the sweetness of the cherry filling. Milk chocolate creates a sweeter coating, while dark chocolate provides a richer flavor.
7. Can I make these truffles ahead of time?
Absolutely! These homemade truffles are perfect for preparing ahead. You can make them 2–3 days before serving and keep them refrigerated in an airtight container.
8. How should I store Cherry Mash Truffles?
Store the finished truffles in an airtight container in the refrigerator. Because the filling contains cream cheese, they should not be left at room temperature for extended periods.
9. Can Cherry Mash Truffles be frozen?
Yes. Arrange the finished truffles in a single layer in a freezer-safe container, separating layers with parchment paper. Freeze for up to 2 months for best quality. Thaw them overnight in the refrigerator before serving.
10. Why is my chocolate coating too thick?
Chocolate can become thick if it is overheated or if it cools too much. Add a small amount of coconut oil or shortening and stir gently until the desired consistency is reached.
11. Can I use almond bark instead of chocolate chips?
Yes! Almond bark or candy coating works very well for dipping. Follow the melting instructions on the package and mix in the chopped peanuts before coating the truffles.
12. Are Cherry Mash Truffles good for Christmas gifts?
Definitely! Their chocolate coating, cherry center, and crunchy peanut texture make them a wonderful homemade Christmas candy. Place them in decorative candy cups and package them in festive gift boxes.
Conclusion
These homemade Cherry Mash Truffles are the perfect combination of sweet cherries, creamy filling, rich chocolate, and crunchy roasted peanuts. Every bite delivers a delicious contrast of textures and flavors that makes this candy-inspired dessert truly special.
Whether you’re preparing Christmas treats, Valentine’s Day sweets, homemade holiday gifts, or an easy no-bake dessert for your next family gathering, this recipe is simple, delicious, and sure to impress.
The best part is that you can prepare these truffles ahead of time, customize them with your favorite chocolate and nuts, and keep them refrigerated until you’re ready to serve.
Once you try these Cherry Mash Truffles, you’ll understand why homemade chocolate cherry candies are such a wonderful addition to any dessert table. Make a batch, share them with loved ones, and enjoy every delicious bite!
Print
Cherry Mash Truffles – Easy Homemade Chocolate Cherry Candy
- Total Time: 2 hours 25 minutes
Description
Cherry Mash Truffles are going to become one of your favorite homemade treats! Inspired by the classic cherry mash candy, this delicious recipe brings together a soft, sweet cherry-flavored center and a rich chocolate coating with a satisfying peanut crunch.
Ingredients
For the Cherry Filling:
- 1/2 cup unsalted butter, softened.
- 4 ounces cream cheese, softened.
- 3 cups powdered sugar, sifted.
- 1/3 cup maraschino cherries, finely chopped and thoroughly drained.
- 1 teaspoon vanilla extract.
- 1/4 teaspoon almond extract (optional).
- 1–2 tablespoons maraschino cherry juice, as needed.
- A few drops of red or pink food coloring (optional).
For the Chocolate Peanut Coating:
- 2 cups semi-sweet chocolate chips.
- 1 tablespoon coconut oil or shortening.
- 1 cup dry-roasted peanuts, finely chopped.
- 1/2 cup milk chocolate chips (optional, for a sweeter coating).
Instructions
Step 1: Prepare the Cherries
Begin by draining the maraschino cherries thoroughly. Place them on a paper towel and gently pat them dry to remove as much moisture as possible.
Finely chop the cherries into small pieces. Smaller pieces distribute more evenly throughout the filling and make shaping the truffles easier.
Set the chopped cherries aside while you prepare the creamy mixture.
This step is especially important because excess cherry juice can make the filling too soft. If the cherries are particularly wet, allow them to sit on paper towels for several minutes before adding them to the mixture.
Step 2: Make the Creamy Cherry Filling
In a large mixing bowl, beat the softened butter and cream cheese together using an electric mixer.
Mix for approximately 2 minutes until the mixture becomes smooth, creamy, and fluffy.
Add the vanilla extract and almond extract if using. Mix again until incorporated.
Gradually add the powdered sugar, about half a cup at a time, mixing on low speed to prevent the sugar from scattering.
Continue mixing until a thick dough-like consistency forms.
Fold in the finely chopped maraschino cherries using a spatula. If desired, add a few drops of red or pink food coloring to create a more vibrant cherry-colored filling.
If the mixture feels too soft or sticky, add a little more powdered sugar until it becomes easy to handle.
Step 3: Shape and Chill the Truffles
Line a baking sheet with parchment paper or wax paper.
Using a small cookie scoop or tablespoon, portion the cherry mixture into equal-sized pieces.
Roll each portion gently between your palms to create smooth balls. Aim for approximately 1-inch truffles so they are easy to dip and serve.
Place each truffle on the prepared baking sheet, leaving a little space between them.
Once all the filling has been shaped, transfer the baking sheet to the refrigerator for at least 1–2 hours, or until the truffles are firm.
For quicker preparation, you can place them in the freezer for approximately 25–30 minutes.
Chilling is essential because firm truffles are much easier to dip into melted chocolate without losing their shape.
Step 4: Prepare the Chocolate Peanut Coating
Place the semi-sweet chocolate chips and coconut oil in a microwave-safe bowl.
Microwave in 20-second intervals, stirring thoroughly between each interval until the chocolate is completely melted and smooth.
Alternatively, melt the chocolate using a double boiler over gently simmering water.
Once the chocolate is melted, stir in the finely chopped roasted peanuts.
Make sure the peanuts are distributed evenly throughout the chocolate mixture.
The coating should be smooth enough for dipping while still containing plenty of crunchy peanut pieces.
If the chocolate becomes too thick, add a little more coconut oil and stir until smooth.
Step 5: Dip and Set the Cherry Mash Truffles
Remove the chilled cherry filling balls from the refrigerator or freezer.
Using a dipping fork or toothpick, carefully dip each truffle into the melted chocolate peanut mixture.
Turn each piece gently to ensure it is completely coated.
Allow the excess chocolate to drip back into the bowl before placing the truffle onto the parchment-lined baking sheet.
Repeat with the remaining truffles.
For an attractive finishing touch, sprinkle a few extra chopped peanuts over the tops before the chocolate sets.
Transfer the finished truffles to the refrigerator for approximately 20–30 minutes, or until the chocolate coating becomes completely firm.
Once set, your homemade Cherry Mash Truffles are ready to enjoy!
Notes
- Drain the maraschino cherries thoroughly before adding them to the filling.
- Use softened butter and cream cheese to prevent lumps.
- Add powdered sugar gradually to achieve the correct consistency.
- Chill the cherry filling until firm before dipping.
- Melt chocolate slowly to prevent burning or seizing.
- Stir the chocolate frequently while dipping to maintain a smooth consistency.
- Use finely chopped peanuts so they stick easily to the truffles.
- Allow the chocolate coating to set completely before transferring the candy to a storage container.
- Prep Time: 25 minutes
- Chilling Time: 1 hour 30 minutes
Nutrition
- Calories: 185 kcal
- Sodium: 45 mg
- Fat: 11 g
- Protein: 3 g
