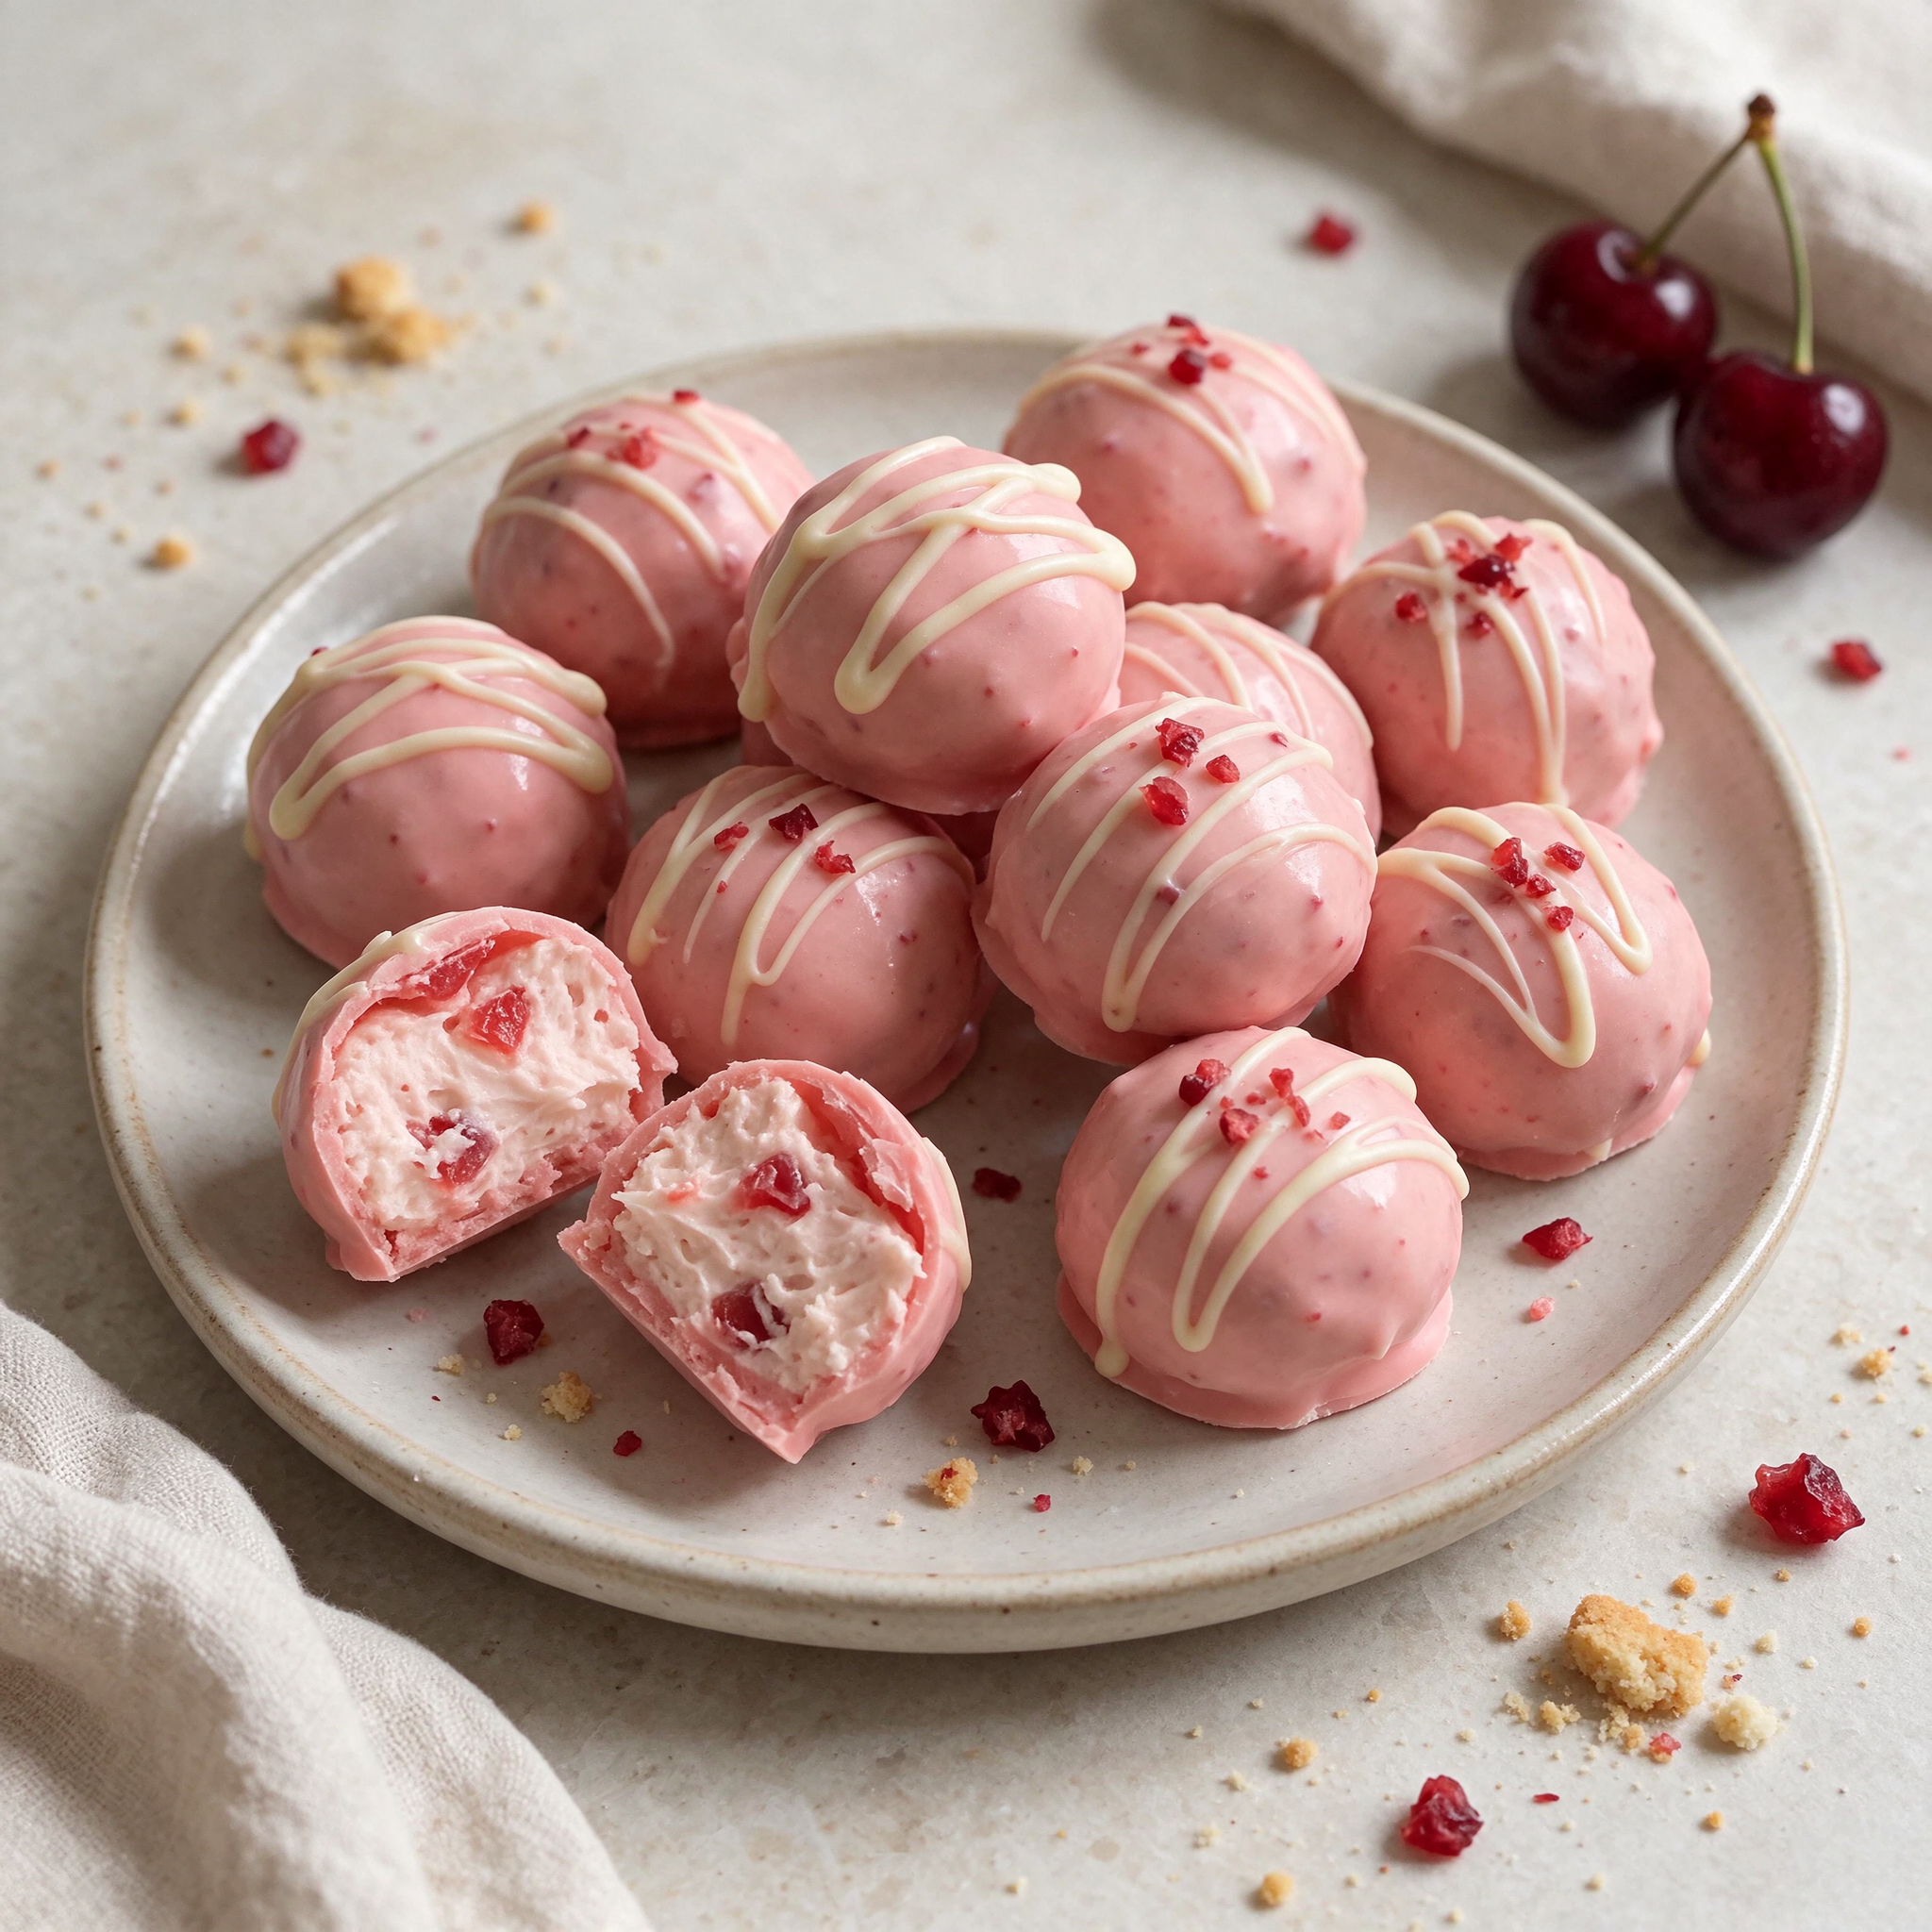
Cherry Chip Cheesecake Bites are going to become one of your favorite homemade treats! These adorable bite-sized desserts combine a rich, creamy cheesecake center filled with little pieces of sweet cherries, all wrapped in a beautiful pink chocolate coating and finished with a delicate white chocolate drizzle.
Every bite delivers the perfect combination of smooth, tangy cream cheese, sweet cherry flavor, and a delicious chocolate shell. They look like something you would find in a fancy candy shop, but they are surprisingly easy to make at home with simple ingredients.
What makes these Cherry Chip Cheesecake Bites especially wonderful is their no-bake preparation. Instead of making a traditional cheesecake and waiting for it to bake, you simply prepare the creamy filling, shape it into small balls, chill until firm, and dip each one into melted pink candy coating. A little white chocolate drizzle and some crushed cherry pieces create a beautiful finishing touch.
These homemade cheesecake bites are perfect for Christmas dessert trays, Valentine’s Day celebrations, birthday parties, baby showers, holiday gatherings, and homemade edible gifts. Their pretty pink color makes them especially attractive for festive dessert tables, while their individual size makes them easy to serve and enjoy.
The secret to their delicious texture is using softened cream cheese combined with crushed vanilla cookies or graham crackers. The cream cheese creates a rich cheesecake flavor, while the cookie crumbs help the mixture hold its shape. Finely chopped maraschino cherries add little bursts of fruity sweetness throughout the center.
The outside coating provides another delicious layer. Pink candy melts or white chocolate tinted with pink food coloring create a smooth shell that sets beautifully around the creamy filling. A white chocolate drizzle adds an elegant bakery-style appearance.
Whether you are preparing a special dessert for someone you love or simply craving an easy homemade cherry treat, these Cherry Chip Cheesecake Bites are a delicious choice. Make a batch, chill them until perfectly firm, and enjoy a sweet little dessert that everyone will want to try!
Ingredients
These easy Cherry Chip Cheesecake Bites require simple ingredients to create their creamy cherry center and beautiful pink chocolate coating.
For the Cherry Cheesecake Filling
- 8 ounces full-fat cream cheese, softened.
- 1 1/2 cups finely crushed vanilla sandwich cookies or vanilla wafers.
- 1/3 cup powdered sugar.
- 1/3 cup maraschino cherries, finely chopped and thoroughly drained.
- 1 teaspoon vanilla extract.
- 1/4 teaspoon almond extract (optional).
- 2 tablespoons cherry baking chips or finely chopped dried cherries.
- 1–2 tablespoons additional cookie crumbs, if needed for consistency.
For the Pink Chocolate Coating
- 12 ounces pink candy melts or pink confectionery coating.
- 1 teaspoon coconut oil or vegetable shortening, if needed.
For the White Chocolate Drizzle
- 1/2 cup white chocolate chips.
- 1 teaspoon coconut oil or vegetable shortening.
Optional Decorations
- 1 tablespoon finely chopped dried cherries.
- A few tiny pieces of maraschino cherries, thoroughly dried.
- Pink or red dessert sprinkles.
- White chocolate curls.
Ingredient Notes
Cream Cheese: Cream cheese gives these cheesecake bites their signature rich and creamy texture. Full-fat block cream cheese works best because it creates a firmer filling that is easier to shape.
Vanilla Cookies: Finely crushed vanilla wafers or vanilla sandwich cookies provide structure and a delicious cheesecake-style flavor. Graham cracker crumbs are another excellent option.
Maraschino Cherries: These provide the sweet cherry flavor and little red pieces throughout the filling. Drain and pat them completely dry before chopping.
Powdered Sugar: Powdered sugar adds sweetness and helps create a smooth filling without a grainy texture.
Pink Candy Melts: These create the beautiful pink exterior and make dipping much easier. They are designed to melt smoothly and set into a firm coating.
White Chocolate: White chocolate adds a beautiful decorative drizzle and complements the cherry flavor perfectly.
Almond Extract: A little almond extract enhances the natural flavor of cherries and gives the filling a delicious bakery-inspired taste.
Preparation
Follow these five simple steps to prepare beautiful homemade Cherry Chip Cheesecake Bites with a creamy cherry-filled center and smooth pink chocolate coating.
Step 1: Prepare the Cherries and Cookie Crumbs
Begin by draining the maraschino cherries thoroughly.
Place the cherries on a layer of paper towels and gently pat them dry to remove as much moisture as possible. This step is important because excess cherry juice can make the cheesecake mixture too soft and difficult to shape.
Finely chop the cherries into very small pieces. Smaller pieces distribute more evenly throughout the filling and make it easier to roll the mixture into smooth balls.
Next, crush the vanilla cookies into fine crumbs using a food processor. If you don’t have a food processor, place the cookies in a sealed plastic bag and crush them with a rolling pin.
Measure out approximately 1 1/2 cups of finely crushed cookies.
Set aside the cherries and cookie crumbs while you prepare the cheesecake filling.
Step 2: Make the Creamy Cherry Cheesecake Filling
In a large mixing bowl, add the softened cream cheese and powdered sugar.
Using an electric hand mixer, beat the ingredients on medium speed until smooth, creamy, and fluffy.
Add the vanilla extract and almond extract if using. Mix again until everything is well combined.
Gradually add the finely crushed vanilla cookies, mixing on low speed until a thick, dough-like mixture forms.
Fold in the finely chopped maraschino cherries and cherry baking chips using a silicone spatula.
Make sure the cherry pieces are evenly distributed throughout the filling so every cheesecake bite contains delicious little bursts of cherry flavor.
The mixture should be thick enough to roll between your hands without sticking excessively.
If the filling feels too soft, add one tablespoon of additional cookie crumbs at a time until it reaches the desired consistency.
If it feels too dry, add a small amount of softened cream cheese and mix gently.
Cover the bowl and refrigerate the mixture for approximately 30 minutes to make shaping easier.
Step 3: Shape and Chill the Cheesecake Bites
Line a baking sheet with parchment paper or wax paper.
Remove the chilled cheesecake mixture from the refrigerator.
Using a small cookie scoop or tablespoon, portion the mixture into equal-sized pieces.
Roll each portion gently between your palms to form smooth, round balls approximately 1 inch in diameter.
Place each cheesecake ball onto the prepared baking sheet, leaving a little space between them.
Continue until all the mixture has been shaped.
Once finished, transfer the baking sheet to the freezer for approximately 20–30 minutes, or until the cheesecake balls are firm enough to dip.
Alternatively, refrigerate them for 1–2 hours.
This chilling step is very important because firm cheesecake balls are easier to handle and maintain their round shape when dipped into warm melted chocolate.
Step 4: Dip in Pink Chocolate Coating
Place the pink candy melts in a microwave-safe bowl.
Microwave in 20-second intervals, stirring thoroughly after each interval until the coating is completely melted and smooth.
If the coating seems too thick, add a small amount of coconut oil or vegetable shortening and stir until it reaches a smooth dipping consistency.
Remove a few chilled cheesecake balls from the refrigerator or freezer at a time, keeping the remaining ones cold.
Using a dipping fork or toothpick, carefully dip each cheesecake ball into the melted pink coating.
Turn gently to cover the entire surface.
Lift the ball out of the chocolate and allow the excess coating to drip back into the bowl.
Place the coated cheesecake bite onto the parchment-lined baking sheet.
Repeat with the remaining cheesecake balls.
If you notice that the coating begins to thicken while dipping, gently rewarm it in the microwave for a few seconds and stir again.
Allow the pink coating to set before adding the white chocolate decoration.
Step 5: Add the White Chocolate Drizzle and Serve
Place the white chocolate chips and coconut oil in a small microwave-safe bowl.
Microwave in 15–20-second intervals, stirring between each interval until completely melted and smooth.
Transfer the melted white chocolate into a small piping bag or a plastic sandwich bag with a tiny corner snipped off.
Drizzle thin lines of white chocolate over each pink cheesecake bite.
For an extra decorative touch, sprinkle a few finely chopped dried cherries or tiny red dessert sprinkles over the tops before the drizzle sets.
Allow the chocolate decoration to firm completely.
Transfer the finished Cherry Chip Cheesecake Bites to an airtight container and refrigerate until ready to serve.
Arrange them on a beautiful dessert platter and enjoy their creamy cherry filling, delicate pink coating, and sweet white chocolate finish!
Print
Cherry Chip Cheesecake Bites – Easy No-Bake Cherry Cheesecake Treats
- Total Time: 1 hour 35 minutes
Description
These adorable bite-sized desserts combine a rich, creamy cheesecake center filled with little pieces of sweet cherries, all wrapped in a beautiful pink chocolate coating and finished with a delicate white chocolate drizzle.
Ingredients
For the Cherry Cheesecake Filling
- 8 ounces full-fat cream cheese, softened.
- 1 1/2 cups finely crushed vanilla sandwich cookies or vanilla wafers.
- 1/3 cup powdered sugar.
- 1/3 cup maraschino cherries, finely chopped and thoroughly drained.
- 1 teaspoon vanilla extract.
- 1/4 teaspoon almond extract (optional).
- 2 tablespoons cherry baking chips or finely chopped dried cherries.
- 1–2 tablespoons additional cookie crumbs, if needed for consistency.
For the Pink Chocolate Coating
- 12 ounces pink candy melts or pink confectionery coating.
- 1 teaspoon coconut oil or vegetable shortening, if needed.
For the White Chocolate Drizzle
- 1/2 cup white chocolate chips.
- 1 teaspoon coconut oil or vegetable shortening.
Optional Decorations
- 1 tablespoon finely chopped dried cherries.
- A few tiny pieces of maraschino cherries, thoroughly dried.
- Pink or red dessert sprinkles.
- White chocolate curls.
Instructions
Begin by draining the maraschino cherries thoroughly.
Place the cherries on a layer of paper towels and gently pat them dry to remove as much moisture as possible. This step is important because excess cherry juice can make the cheesecake mixture too soft and difficult to shape.
Finely chop the cherries into very small pieces. Smaller pieces distribute more evenly throughout the filling and make it easier to roll the mixture into smooth balls.
Next, crush the vanilla cookies into fine crumbs using a food processor. If you don’t have a food processor, place the cookies in a sealed plastic bag and crush them with a rolling pin.
Measure out approximately 1 1/2 cups of finely crushed cookies.
Set aside the cherries and cookie crumbs while you prepare the cheesecake filling.
Step 2: Make the Creamy Cherry Cheesecake Filling
In a large mixing bowl, add the softened cream cheese and powdered sugar.
Using an electric hand mixer, beat the ingredients on medium speed until smooth, creamy, and fluffy.
Add the vanilla extract and almond extract if using. Mix again until everything is well combined.
Gradually add the finely crushed vanilla cookies, mixing on low speed until a thick, dough-like mixture forms.
Fold in the finely chopped maraschino cherries and cherry baking chips using a silicone spatula.
Make sure the cherry pieces are evenly distributed throughout the filling so every cheesecake bite contains delicious little bursts of cherry flavor.
The mixture should be thick enough to roll between your hands without sticking excessively.
If the filling feels too soft, add one tablespoon of additional cookie crumbs at a time until it reaches the desired consistency.
If it feels too dry, add a small amount of softened cream cheese and mix gently.
Cover the bowl and refrigerate the mixture for approximately 30 minutes to make shaping easier.
Step 3: Shape and Chill the Cheesecake Bites
Line a baking sheet with parchment paper or wax paper.
Remove the chilled cheesecake mixture from the refrigerator.
Using a small cookie scoop or tablespoon, portion the mixture into equal-sized pieces.
Roll each portion gently between your palms to form smooth, round balls approximately 1 inch in diameter.
Place each cheesecake ball onto the prepared baking sheet, leaving a little space between them.
Continue until all the mixture has been shaped.
Once finished, transfer the baking sheet to the freezer for approximately 20–30 minutes, or until the cheesecake balls are firm enough to dip.
Alternatively, refrigerate them for 1–2 hours.
This chilling step is very important because firm cheesecake balls are easier to handle and maintain their round shape when dipped into warm melted chocolate.
Step 4: Dip in Pink Chocolate Coating
Place the pink candy melts in a microwave-safe bowl.
Microwave in 20-second intervals, stirring thoroughly after each interval until the coating is completely melted and smooth.
If the coating seems too thick, add a small amount of coconut oil or vegetable shortening and stir until it reaches a smooth dipping consistency.
Remove a few chilled cheesecake balls from the refrigerator or freezer at a time, keeping the remaining ones cold.
Using a dipping fork or toothpick, carefully dip each cheesecake ball into the melted pink coating.
Turn gently to cover the entire surface.
Lift the ball out of the chocolate and allow the excess coating to drip back into the bowl.
Place the coated cheesecake bite onto the parchment-lined baking sheet.
Repeat with the remaining cheesecake balls.
If you notice that the coating begins to thicken while dipping, gently rewarm it in the microwave for a few seconds and stir again.
Allow the pink coating to set before adding the white chocolate decoration.
Step 5: Add the White Chocolate Drizzle and Serve
Place the white chocolate chips and coconut oil in a small microwave-safe bowl.
Microwave in 15–20-second intervals, stirring between each interval until completely melted and smooth.
Transfer the melted white chocolate into a small piping bag or a plastic sandwich bag with a tiny corner snipped off.
Drizzle thin lines of white chocolate over each pink cheesecake bite.
For an extra decorative touch, sprinkle a few finely chopped dried cherries or tiny red dessert sprinkles over the tops before the drizzle sets.
Allow the chocolate decoration to firm completely.
Transfer the finished Cherry Chip Cheesecake Bites to an airtight container and refrigerate until ready to serve.
Arrange them on a beautiful dessert platter and enjoy their creamy cherry filling, delicate pink coating, and sweet white chocolate finish!
Notes
- Always use softened block cream cheese for a smooth filling.
- Drain maraschino cherries thoroughly before chopping.
- Pat the cherries dry to prevent excess moisture.
- Use finely crushed vanilla cookies to create a smooth, firm cheesecake mixture.
- Add cookie crumbs gradually because different cookies absorb moisture differently.
- Chill the filling before shaping to make rolling easier.
- Freeze or refrigerate the shaped balls until firm before dipping.
- Melt candy coating slowly to avoid overheating.
- Add coconut oil gradually if the coating is too thick.
- Work with a few cheesecake balls at a time and keep the remaining ones chilled.
- Allow the pink coating to set before adding the white chocolate drizzle.
- Store the finished bites in the refrigerator because the filling contains cream cheese.
- Prep Time: 25 minutes
- Initial Chilling Time: 30 minutes
Nutrition
- Calories: 155 kcal
- Sugar: 13 g
- Sodium: 95 mg
- Protein: 2 g
Variations
One of the best things about Cherry Chip Cheesecake Bites is how easy they are to customize. You can change the coating, filling, and decorations to create different delicious versions.
1. White Chocolate Cherry Cheesecake Bites
Replace the pink candy melts with melted white chocolate. The white coating creates an elegant appearance and pairs beautifully with the sweet cherry filling.
2. Chocolate Covered Cherry Cheesecake Bites
Use milk chocolate or semi-sweet chocolate for the outside coating instead of pink candy melts. The rich chocolate shell creates a delicious contrast with the creamy cherry center.
3. Oreo Cherry Cheesecake Bites
Replace the vanilla cookie crumbs with finely crushed chocolate sandwich cookies. The chocolate cookie flavor creates a delicious combination with the cherry filling.
4. Cherry Almond Cheesecake Bites
Add 1/2 teaspoon almond extract to the cheesecake mixture and use chopped toasted almonds instead of cherry baking chips. Almond and cherry are a wonderful flavor combination.
5. Strawberry Cherry Cheesecake Bites
Add a small amount of finely crushed freeze-dried strawberries to the filling. This creates a fruity variation with an extra layer of sweetness.
6. Dark Chocolate Cherry Truffles
Dip the cheesecake balls in melted dark chocolate and finish with a white chocolate drizzle. This version is perfect for people who enjoy a richer, less sweet chocolate dessert.
7. Valentine’s Day Cherry Cheesecake Bites
Use bright pink candy melts and decorate with heart-shaped sprinkles, white chocolate drizzle, and tiny red cherry pieces.
8. Cherry Cheesecake Coconut Bites
Add 1/4 cup finely shredded coconut to the cheesecake filling. You can also sprinkle toasted coconut over the pink coating before it sets.
COOKING NOTES
- Always use softened block cream cheese for a smooth filling.
- Drain maraschino cherries thoroughly before chopping.
- Pat the cherries dry to prevent excess moisture.
- Use finely crushed vanilla cookies to create a smooth, firm cheesecake mixture.
- Add cookie crumbs gradually because different cookies absorb moisture differently.
- Chill the filling before shaping to make rolling easier.
- Freeze or refrigerate the shaped balls until firm before dipping.
- Melt candy coating slowly to avoid overheating.
- Add coconut oil gradually if the coating is too thick.
- Work with a few cheesecake balls at a time and keep the remaining ones chilled.
- Allow the pink coating to set before adding the white chocolate drizzle.
- Store the finished bites in the refrigerator because the filling contains cream cheese.
Important Tip: Avoid using wet or juicy cherry pieces in the filling. Excess moisture can cause the cheesecake mixture to become sticky and make the pink chocolate coating harder to apply neatly.
Make-Ahead Note: You can prepare and shape the cheesecake balls one day ahead. Store them covered in the refrigerator and dip them in pink chocolate when you’re ready to finish the dessert.
Serving Suggestions
These Cherry Chip Cheesecake Bites are perfect for dessert tables, holiday celebrations, and special occasions. Their beautiful pink appearance makes them especially attractive when served on decorative platters.
Here are some delicious ways to serve them:
1. Valentine’s Day Dessert Table
Arrange the cheesecake bites on a pink or white serving platter alongside chocolate-covered strawberries, heart-shaped cookies, and mini cupcakes.
2. Christmas Dessert Platters
Serve them with chocolate fudge, peppermint bark, sugar cookies, and other homemade holiday treats.
3. Birthday Parties
Place each cheesecake bite in a small paper candy liner and arrange them on a tiered dessert stand.
4. Baby Showers
Their soft pink coating makes these treats perfect for pink-themed baby showers and celebrations.
5. Afternoon Coffee and Tea
Enjoy one or two cheesecake bites with coffee, cappuccino, or hot tea for a delicious afternoon treat.
6. Homemade Dessert Gifts
Arrange the finished bites in decorative gift boxes with mini cupcake liners. Keep refrigerated and give them as homemade gifts for friends and family.
7. Dessert Charcuterie Boards
Add them to a dessert board with fresh strawberries, raspberries, cookies, chocolate pieces, and marshmallows.
8. Romantic Dinner Desserts
Serve two or three chilled cheesecake bites on a small dessert plate with fresh cherries and a little chocolate drizzle.
Tips for the Best Cherry Chip Cheesecake Bites
1. Use Full-Fat Cream Cheese
Full-fat cream cheese creates a richer flavor and firmer consistency, making the filling easier to shape.
2. Remove Excess Moisture from Cherries
This is one of the most important steps. Wet cherries can make the cheesecake mixture too soft and sticky.
3. Crush Cookies Finely
Fine cookie crumbs create a smoother filling and help the cheesecake balls hold their shape.
4. Chill Before Rolling
Refrigerating the mixture makes it much easier to shape into neat, round portions.
5. Keep the Balls Cold
Cold cheesecake balls are less likely to fall apart during dipping.
6. Melt the Coating Slowly
Overheated candy melts can become thick and difficult to work with. Use short microwave intervals and stir frequently.
7. Use a Dipping Fork
A dipping fork makes it easier to coat the cheesecake balls evenly and remove excess chocolate.
8. Make the White Chocolate Drizzle Thin
A slightly thinner drizzle creates delicate decorative lines without covering the beautiful pink coating.
9. Decorate Before the Coating Sets
If you’re adding dried cherry pieces or sprinkles, add them while the pink coating is still slightly wet.
10. Refrigerate Until Serving
Because these cheesecake bites contain cream cheese, keep them refrigerated until ready to enjoy.
Prep Time, Cooking Time, and Total Time
| Preparation Details | Time |
|---|---|
| Prep Time | 25 minutes |
| Cooking Time | 0 minutes |
| Initial Chilling Time | 30 minutes |
| Freezing Time | 25 minutes |
| Decorating Time | 15 minutes |
| Total Time | Approximately 1 hour 35 minutes |
Yield: Approximately 20–24 cheesecake bites.
Recipe Type: No-Bake Dessert / Cheesecake Truffles
Cuisine: American-Inspired
Occasion: Christmas, Valentine’s Day, Birthdays, Baby Showers, Holiday Parties, Family Gatherings.
Nutritional Information
The following nutritional information is an estimate per cheesecake bite, based on approximately 24 servings and including the pink coating and white chocolate drizzle.
| Nutrient | Approximate Amount per Bite |
|---|---|
| Calories | 155 kcal |
| Protein | 2 g |
| Total Fat | 9 g |
| Saturated Fat | 5 g |
| Carbohydrates | 17 g |
| Sugar | 13 g |
| Sodium | 95 mg |
| Fiber | 0.3 g |
Nutritional values may vary depending on the type of cookies, cream cheese, candy melts, and chocolate used, as well as the final size of each cheesecake bite.
FAQs
1. Are Cherry Chip Cheesecake Bites baked or no-bake?
This version is completely no-bake. The cheesecake filling is prepared by combining softened cream cheese, powdered sugar, crushed cookies, and chopped cherries. The mixture is shaped into balls, chilled until firm, and dipped in melted pink candy coating.
2. Can I make Cherry Chip Cheesecake Bites ahead of time?
Absolutely! These cheesecake bites are perfect for preparing ahead. You can make the filling, shape the balls, and refrigerate them overnight. Dip them in pink chocolate and add the white chocolate drizzle before serving.
3. How long do Cherry Chip Cheesecake Bites last?
Store them in an airtight container in the refrigerator for approximately 3–4 days. For the best texture and flavor, enjoy them within the first 2–3 days.
4. Can I freeze these cherry cheesecake bites?
Yes! Arrange the finished cheesecake bites in a single layer until firm, then transfer them to a freezer-safe container. Separate layers with parchment paper and freeze for up to 2 months for the best quality. Thaw overnight in the refrigerator before serving.
5. What can I use instead of pink candy melts?
You can use white chocolate mixed with a small amount of oil-based pink food coloring. You can also use pink confectionery coating or strawberry-flavored candy coating.
6. Why is my cheesecake mixture too sticky?
The mixture may be too sticky because the cream cheese is very soft, the cherries contain excess moisture, or the cookie crumbs are insufficient. Add a little more crushed vanilla cookies and refrigerate the mixture until firm.
7. Why are my cheesecake balls falling apart when dipping?
This usually happens when the cheesecake balls are not cold enough or the filling is too soft. Freeze the shaped balls for 20–30 minutes before dipping and work with a few at a time.
8. Can I use fresh cherries instead of maraschino cherries?
Yes, but fresh cherries contain natural moisture and may make the filling softer. Remove the pits, chop the cherries finely, and pat them dry thoroughly before adding them to the mixture.
9. What cookies are best for the cheesecake filling?
Vanilla wafers, graham crackers, shortbread cookies, and vanilla sandwich cookies are all excellent options. Each provides a slightly different flavor and texture.
10. Can I make these cheesecake bites without a food processor?
Yes! Place the cookies in a sealed plastic bag and crush them using a rolling pin. Continue crushing until you have fine, even crumbs.
11. Why is my pink chocolate coating too thick?
Candy melts can become thick if they cool too much or are not melted properly. Add a small amount of coconut oil or vegetable shortening and stir until smooth. Avoid adding water because even a little moisture can cause the coating to seize.
12. Can I use chocolate chips instead of candy melts?
Yes, but chocolate chips may require a little coconut oil or shortening to create a smooth dipping consistency. Pink candy melts are generally easier to use when you want a bright, uniform pink coating.
13. How do I get a smooth chocolate coating?
Make sure the cheesecake balls are chilled and the coating is fully melted. Dip each ball carefully, remove excess coating, and place it on parchment paper without touching it again until the coating sets.
14. Are Cherry Chip Cheesecake Bites good for Valentine’s Day?
Definitely! Their pretty pink coating, creamy cherry filling, and white chocolate drizzle make them perfect for Valentine’s Day. Add heart-shaped sprinkles or arrange them in a decorative gift box for an extra-special presentation.
15. Do Cherry Chip Cheesecake Bites need refrigeration?
Yes. Because the filling contains cream cheese, these treats should be refrigerated in an airtight container. Avoid leaving them at room temperature for more than two hours, or one hour when temperatures exceed 90°F (32°C).
Conclusion
These Cherry Chip Cheesecake Bites are the perfect little homemade dessert for anyone who loves creamy cheesecake, sweet cherries, and delicious chocolate-covered treats. With their rich cherry cheesecake center, beautiful pink coating, and delicate white chocolate drizzle, they look just as wonderful as they taste.
The no-bake preparation makes them especially convenient for busy holidays, parties, and special celebrations. Simply mix the filling, shape the cheesecake balls, chill until firm, and dip them in melted pink chocolate for a beautiful bakery-style finish.
Whether you’re making them for Christmas, Valentine’s Day, birthdays, baby showers, or simply because you’re craving something sweet, these little cheesecake treats are sure to impress.
You can also customize them with chocolate coatings, different cookie crumbs, extra cherry pieces, or your favorite decorations.
Make a batch ahead of time, keep them chilled, and serve them whenever you want a delicious bite-sized dessert.
If you’re looking for a beautiful, creamy, and easy no-bake cherry dessert, these Cherry Chip Cheesecake Bites are definitely worth adding to your recipe collection!
