Introduction
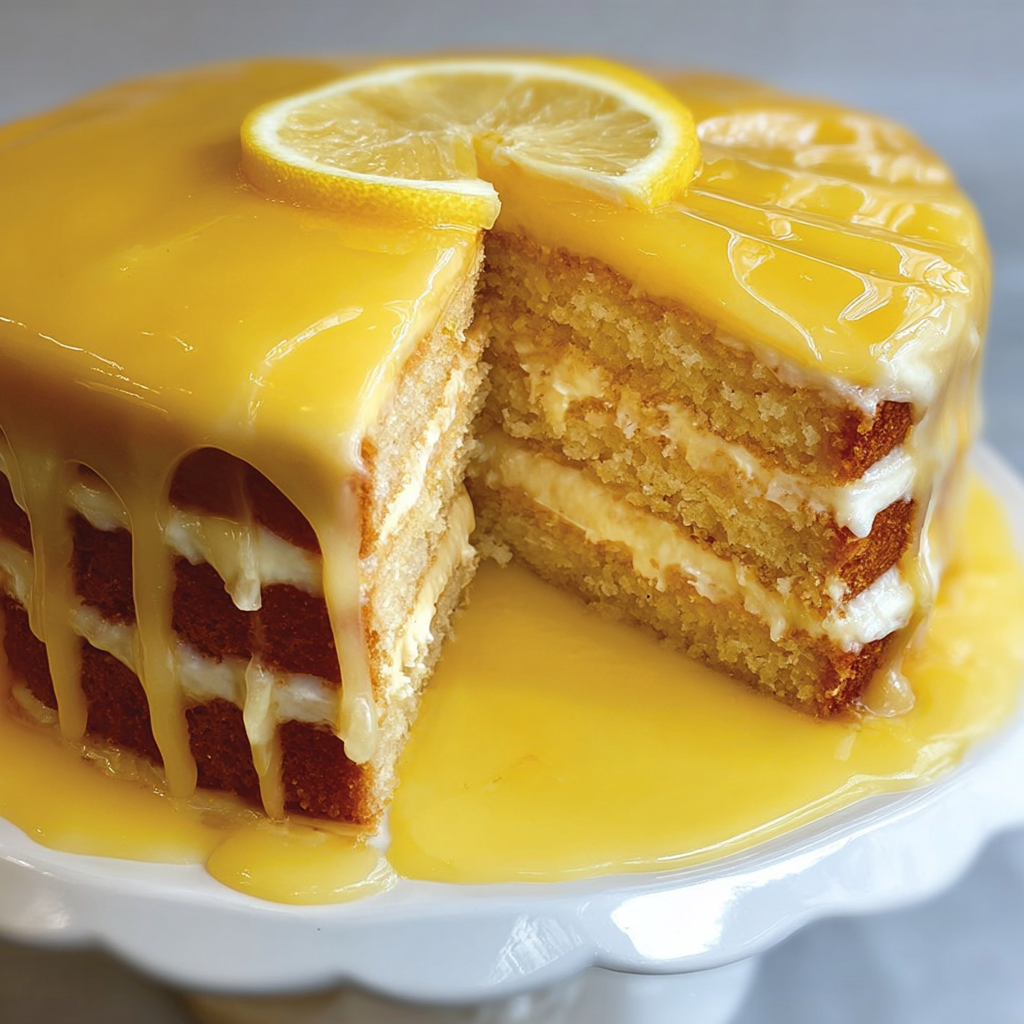
When it involves the pinnacle of citrus desserts, the Lemon Curd Layer Cake stands in a league of its own. This isn’t just a standard lemon-flavored sponge; it is a symphony of textures and sharp, vibrant flavors designed for the true lemon enthusiast. Often found in high-end European patisseries, this cake has gained massive popularity in America for its sophisticated “mirror glaze” finish and its ability to balance intense tartness with buttery sweetness.
What sets this specific recipe apart is the construction. We utilize a tender buttermilk-based sponge that remains moist even after being chilled—a necessity for a cake that features a silky curd filling. The crowning glory is the high-gloss lemon glaze, which gives the cake a reflective, professional look that is guaranteed to stop the scroll on any Facebook or Instagram feed. Whether you are celebrating a spring wedding, a summer birthday, or simply want to brighten a rainy afternoon, this cake is the ultimate sunshine on a plate.
Ingredients
For the Lemon Buttermilk Sponge:
- 2 ½ cups (315g) All-purpose flour, sifted
- 1 ½ cups (300g) Granulated sugar
- 1 cup (225g) Unsalted butter, softened to room temperature
- 4 Large eggs, room temperature
- ¾ cup Full-fat buttermilk
- ¼ cup Freshly squeezed lemon juice (about 2 large lemons)
- 2 tbsp Fresh lemon zest (finely grated)
- 1 tsp Baking powder
- ½ tsp Baking soda
- ½ tsp Fine sea salt
- 1 tsp Pure vanilla extract
For the Homemade Lemon Curd Filling:
- 4 Large egg yolks
- ¾ cup Granulated sugar
- ½ cup Fresh lemon juice
- 1 tbsp Lemon zest
- 6 tbsp Unsalted butter, cubed and cold
- A pinch of salt
For the Cream Cheese Stabilizing Layer:
- 4 oz (115g) Full-fat cream cheese, softened
- 2 tbsp Unsalted butter
- 1 cup Powdered sugar, sifted
For the Lemon Mirror Glaze:
- 1 cup White chocolate chips (high quality)
- ½ cup Heavy whipping cream
- 2 tbsp Lemon juice
- 1 drop Yellow gel food coloring (optional, for that vibrant neon look)
- 1 ½ tsp Unflavored gelatin powder bloomed in 1 tbsp cold water
Preparation
Step 1: Prepare the Lemon Sponge
Preheat your oven to 175°C (350°F). Grease and flour two 8-inch round cake pans. In a medium bowl, whisk the flour, baking powder, baking soda, and salt. In a large stand mixer, cream the butter and sugar on high for 5 minutes until pale and fluffy. Add the eggs one at a time, beating well after each. Stir in the vanilla, lemon juice, and lemon zest.
Step 2: Mix and Bake
Turn the mixer to low. Add the dry ingredients in three parts, alternating with the buttermilk. Do not overmix, as this will make the cake tough. Divide the batter evenly between the pans. Bake for 30–35 minutes or until a toothpick comes out clean. Let the cakes cool in the pans for 10 minutes before transferring to a wire rack to cool completely.
Step 3: Craft the Lemon Curd
While the cake bakes, create the curd. In a small saucepan over medium-low heat, whisk egg yolks, sugar, and lemon juice. Whisk constantly for about 8–10 minutes until the mixture thickens enough to coat the back of a spoon. Remove from heat and immediately whisk in the cold butter cubes and zest until smooth. Strain through a fine-mesh sieve and press plastic wrap directly onto the surface. Chill in the fridge for at least 2 hours.
Step 4: The Internal Assembly
Once the cakes are cold, slice each in half horizontally to create four thin layers (or keep as two thick layers for a simpler look). Beat the cream cheese, butter, and powdered sugar until stiff. On the first layer of cake, pipe a “dam” of cream cheese frosting around the edge. Fill the center with a generous layer of chilled lemon curd. Repeat until the cake is stacked. Apply a very thin “crumb coat” of frosting over the entire exterior and chill for 1 hour.
Step 5: The Glossy Glaze Finish
Heat the heavy cream until it just begins to simmer. Pour it over the white chocolate chips and bloomed gelatin. Let sit for 2 minutes, then stir until perfectly smooth. Add the lemon juice and food coloring. Let the glaze cool until it reaches approximately 32°C (90°F)—it should be pourable but thick. Place the chilled cake on a rack over a tray and pour the glaze over the top in one smooth motion, allowing it to run down the sides.
Variations
- Strawberry Lemonade: Add a layer of fresh sliced strawberries on top of the lemon curd filling.
- Lemon Poppyseed: Add 2 tablespoons of poppyseeds to the dry ingredients of the sponge batter.
- White Chocolate Lemon: Use a white chocolate ganache frosting instead of cream cheese for a sweeter, richer profile.
Cooking Note
The temperature of the glaze is critical. If it is too hot, it will melt your crumb coat and run right off the cake. If it is too cold, it will set too quickly and leave lumps. Aim for a “lukewarm” feel that clings to a spoon.
Serving Suggestions
Serve this cake chilled but allow it to sit at room temperature for 15 minutes before slicing. It pairs beautifully with a dry sparkling wine, a hot Earl Grey tea, or a scoop of vanilla bean ice cream to balance the tartness.
Tips
- Room Temp Ingredients: Always ensure your eggs and buttermilk are at room temperature to prevent the batter from curdling.
- Straining the Curd: Never skip straining your lemon curd; it removes any small bits of cooked egg, ensuring a professional, silky mouthfeel.
- The “Dam” Technique: The cream cheese border is vital. It prevents the slippery lemon curd from leaking out the sides under the weight of the cake.
Timing & Nutrition
- Prep Time: 45 minutes
- Cooking Time: 35 minutes
- Total Time: 3 hours (includes chilling)
Nutritional Information (Per Slice – based on 12 slices):
- Calories: 485 kcal
- Protein: 6g
- Sodium: 210mg
- Total Fat: 24g
- Carbohydrates: 62g
FAQs
Q: Can I make the curd in advance? A: Yes! Lemon curd stays fresh in an airtight jar in the fridge for up to 1 week.
Q: Why did my glaze lose its shine? A: Chilling the cake in a very humid fridge can sometimes dull the mirror finish. Try to store it in a cake box to protect the surface.
Q: Can I use bottled lemon juice? A: For this recipe, fresh is a must. Bottled juice lacks the essential oils and “zing” found in fresh lemons.
Conclusion
The Lemon Curd Layer Cake is a masterclass in citrus baking. By combining a structural buttermilk sponge with a vibrant, homemade curd and a show-stopping mirror glaze, you create a dessert that tastes as good as it looks. It is a rewarding project for any home baker looking to step into the world of professional-style patisserie. Give this recipe a try for your next special occasion and watch it become an instant favorite!
Print
Ultimate Lemon Curd Layer Cake Recipe: The Best Glossy Citrus Cake
- Total Time: 3 hours (includes chilling)
Description
When it involves the pinnacle of citrus desserts, the Lemon Curd Layer Cake stands in a league of its own. This isn’t just a standard lemon-flavored sponge; it is a symphony of textures and sharp, vibrant flavors designed for the true lemon enthusiast
Ingredients
For the Lemon Buttermilk Sponge:
-
2 ½ cups (315g) All-purpose flour, sifted
-
1 ½ cups (300g) Granulated sugar
-
1 cup (225g) Unsalted butter, softened to room temperature
-
4 Large eggs, room temperature
-
¾ cup Full-fat buttermilk
-
¼ cup Freshly squeezed lemon juice (about 2 large lemons)
-
2 tbsp Fresh lemon zest (finely grated)
-
1 tsp Baking powder
-
½ tsp Baking soda
-
½ tsp Fine sea salt
-
1 tsp Pure vanilla extract
For the Homemade Lemon Curd Filling:
-
4 Large egg yolks
-
¾ cup Granulated sugar
-
½ cup Fresh lemon juice
-
1 tbsp Lemon zest
-
6 tbsp Unsalted butter, cubed and cold
-
A pinch of salt
For the Cream Cheese Stabilizing Layer:
-
4 oz (115g) Full-fat cream cheese, softened
-
2 tbsp Unsalted butter
-
1 cup Powdered sugar, sifted
For the Lemon Mirror Glaze:
-
1 cup White chocolate chips (high quality)
-
½ cup Heavy whipping cream
-
2 tbsp Lemon juice
-
1 drop Yellow gel food coloring (optional, for that vibrant neon look)
-
1 ½ tsp Unflavored gelatin powder bloomed in 1 tbsp cold water
Instructions
Preheat your oven to 175°C (350°F). Grease and flour two 8-inch round cake pans. In a medium bowl, whisk the flour, baking powder, baking soda, and salt. In a large stand mixer, cream the butter and sugar on high for 5 minutes until pale and fluffy. Add the eggs one at a time, beating well after each. Stir in the vanilla, lemon juice, and lemon zest.
Turn the mixer to low. Add the dry ingredients in three parts, alternating with the buttermilk. Do not overmix, as this will make the cake tough. Divide the batter evenly between the pans. Bake for 30–35 minutes or until a toothpick comes out clean. Let the cakes cool in the pans for 10 minutes before transferring to a wire rack to cool completely.
While the cake bakes, create the curd. In a small saucepan over medium-low heat, whisk egg yolks, sugar, and lemon juice. Whisk constantly for about 8–10 minutes until the mixture thickens enough to coat the back of a spoon. Remove from heat and immediately whisk in the cold butter cubes and zest until smooth. Strain through a fine-mesh sieve and press plastic wrap directly onto the surface. Chill in the fridge for at least 2 hours.
Once the cakes are cold, slice each in half horizontally to create four thin layers (or keep as two thick layers for a simpler look). Beat the cream cheese, butter, and powdered sugar until stiff. On the first layer of cake, pipe a “dam” of cream cheese frosting around the edge. Fill the center with a generous layer of chilled lemon curd. Repeat until the cake is stacked. Apply a very thin “crumb coat” of frosting over the entire exterior and chill for 1 hour.
Heat the heavy cream until it just begins to simmer. Pour it over the white chocolate chips and bloomed gelatin. Let sit for 2 minutes, then stir until perfectly smooth. Add the lemon juice and food coloring. Let the glaze cool until it reaches approximately 32°C (90°F)—it should be pourable but thick. Place the chilled cake on a rack over a tray and pour the glaze over the top in one smooth motion, allowing it to run down the sides.
Notes
The temperature of the glaze is critical. If it is too hot, it will melt your crumb coat and run right off the cake. If it is too cold, it will set too quickly and leave lumps. Aim for a “lukewarm” feel that clings to a spoon.
- Prep Time: 45 minutes
- Cook Time: 35 minutes
Nutrition
- Calories: 485 kcal
- Sodium: 210mg
- Fat: 24g
- Carbohydrates: 62g
- Protein: 6g