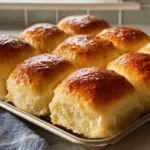
Description
This easy no yeast dinner rolls recipe uses simple pantry ingredients to create soft, tender rolls without commercial yeast or a lengthy rising period. Whether you need a quick side dish for a family dinner, warm bread for a holiday meal, or something homemade to serve alongside a bowl of soup, these rolls are a wonderful option.
Ingredients
Main ingredients
- 2 cups (250 g) all-purpose flour: Provides the structure for the rolls. Measure carefully to avoid making the dough too dry.
- 1 tablespoon baking powder: Acts as the leavening agent and helps the rolls rise without yeast.
- 1 tablespoon granulated sugar: Adds a subtle sweetness and helps improve the flavor and browning.
- 1/2 teaspoon salt: Balances the flavor and prevents the rolls from tasting bland.
- 3 tablespoons (42 g) cold unsalted butter: Adds richness and tenderness. Cut it into small cubes before mixing.
- 3/4 cup (180 ml) milk: Brings the dough together and helps create a soft crumb. You may need a little more or less depending on your flour.
- 1 large egg, optional: Adds richness and structure. If you use an egg, slightly reduce the milk if the dough becomes too sticky.
- 1 tablespoon melted butter for brushing: Gives the baked rolls a glossy appearance and buttery flavor.
Optional ingredients for extra flavor
- 1/2 teaspoon garlic powder for savory rolls
- 1 teaspoon dried parsley or Italian seasoning
- 1/4 cup shredded cheddar cheese
- 1 teaspoon honey instead of some or all of the sugar
- A pinch of black pepper for a savory variation
Instructions
Preheat your oven to 375°F (190°C). Lightly grease a baking sheet or line it with parchment paper.
You can also use a round baking dish if you prefer the rolls to sit close together. When the rolls touch during baking, their sides tend to stay soft, while rolls baked separately develop more golden edges.
Prepare your ingredients before mixing the dough. Measure the flour, baking powder, sugar, and salt. Cut the butter into small cubes and measure the milk.
Having everything ready makes the process easier because baking powder begins working once it comes into contact with moisture.
Step 2: Combine the dry ingredients
In a large mixing bowl, whisk together the all-purpose flour, baking powder, sugar, and salt.
Whisking distributes the baking powder evenly throughout the flour, helping the rolls rise more consistently. It also breaks up small lumps and prevents concentrated pockets of salt or leavening.
Make sure your baking powder is fresh. Old baking powder can lose its effectiveness, resulting in dense rolls that do not rise properly.
If you want to make savory dinner rolls, you can add garlic powder, dried herbs, or black pepper at this stage.
Step 3: Cut the butter into the flour
Add the cold butter cubes to the dry ingredients.
Using your fingertips, a pastry cutter, or two forks, work the butter into the flour until the mixture resembles coarse crumbs. Small pieces of butter are perfectly fine.
The butter adds flavor and tenderness to the finished rolls. Keeping it cold helps create a softer texture rather than a greasy dough.
Avoid melting the butter before mixing it into the flour. Cold butter is easier to distribute and helps prevent the dough from becoming overly soft.
If you are short on time, you can use a pastry cutter to incorporate the butter more quickly.
Step 4: Add the milk and form the dough
Gradually pour the milk into the flour mixture, stirring gently with a wooden spoon or spatula.
If you are using the optional egg, whisk it separately and add it with the milk. Begin with the recommended amount of liquid, then add a small splash more only if the dough appears too dry.
Mix just until the ingredients come together into a soft dough. It should be slightly tacky but not excessively wet.
Avoid vigorous mixing or kneading. Unlike traditional yeast bread, this quick dough does not require extensive kneading, and overworking it can develop too much gluten, making the rolls tough.
If the dough feels extremely sticky, sprinkle a small amount of flour over your hands and work surface rather than adding large quantities of flour directly to the bowl.
Step 5: Shape the dinner rolls
Lightly flour your work surface and turn the dough out onto it.
Gently bring the dough together and divide it into 8 equal portions. You can use a kitchen scale for evenly sized rolls or divide the dough by eye.
Roll each portion gently between your hands to form a ball. Avoid compressing the dough too firmly because this can make the finished rolls dense.
Place the dough balls on the prepared baking sheet, leaving a little space between them if you want golden sides. For softer pull-apart rolls, arrange them closer together in a greased baking dish.
If the dough begins sticking to your hands, dust your fingers lightly with flour. Use only as much flour as necessary to keep the dough manageable.
Once shaped, the rolls can go straight into the oven. There is no yeast-based rising period required.
Step 6: Bake until lightly golden
Place the baking sheet in the preheated oven and bake for approximately 15–20 minutes, depending on the size of the rolls and your oven.
The tops should become lightly golden, and the rolls should feel set rather than wet or doughy. If you have made larger rolls, they may need a few additional minutes.
Avoid overbaking because quick bread rolls can become dry if left in the oven too long.
If the tops are browning too quickly before the centers are cooked, reduce the oven temperature slightly and continue baking until done.
For food safety, make sure the centers are fully baked, especially if you have included an egg. If you are uncertain, check the center of a roll by breaking it open after a brief cooling period.
Step 7: Brush with melted butter
Remove the rolls from the oven and place the pan on a heatproof surface.
While the rolls are still warm, brush the tops generously with melted butter. This adds flavor, gives the rolls an attractive finish, and helps keep the crust pleasantly tender.
For extra flavor, mix a small amount of garlic powder or chopped parsley into the melted butter before brushing.
If you prefer a slightly crisp top, leave the rolls unbrushed or use only a thin layer of butter.
Step 8: Cool slightly and serve warm
Allow the rolls to rest for approximately 5 minutes before serving. This gives the interior time to settle and makes the rolls easier to handle.
Serve them warm alongside your favorite meal. You can also split them open and spread them with additional butter, honey, jam, or your favorite savory spread.
These rolls are best enjoyed fresh from the oven, when the centers are soft and the buttery flavor is at its peak.
Notes
For the best Grandma’s Easy No Yeast Dinner Rolls, remember that this recipe produces quick bread rolls rather than traditional yeast bread.
The texture will be tender and slightly more biscuit-like than the airy, stretchy crumb of a yeast-raised dinner roll. This is normal for a quick dough made with baking powder.
Measure the flour carefully. Too much flour is one of the most common reasons homemade rolls turn out dry or heavy. Spoon flour into the measuring cup and level it rather than packing it down.
Use fresh baking powder. Since baking powder provides the lift, its freshness has a major impact on the finished result.
Do not overmix. Stir only until the dough comes together. Excessive mixing can make the rolls tough.
Add liquid gradually. Flour absorbs moisture differently depending on the brand, humidity, and measuring method. The dough should be soft and manageable, not dry or soupy.
Bake immediately after shaping. Baking powder starts reacting when it is moistened, so you do not need a long resting period.
Brush with butter after baking. This simple step improves flavor and gives the rolls a softer, more appealing finish.
- Prep Time: 10–15 minutes
- Resting Time: 5 minutes
- Cook Time: 15–20 minutes
Nutrition
- Calories: 180–220
- Sodium: 250–350 mg
- Protein: 4–5 g