Description
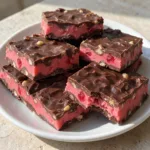
Christmas Cherry Mash Bars are a must-try! Combining a sweet and creamy cherry filling with a rich chocolate topping and crunchy roasted peanuts, these homemade dessert bars are inspired by the classic old-fashioned Cherry Mash candy.
Ingredients
For the Cherry Filling
1. Unsalted Butter (½ cup)
Butter creates a rich, smooth texture and helps bring the filling together. Use softened butter so it blends easily with the other ingredients.
2. Granulated Sugar (2 cups)
Sugar provides sweetness and structure to the cherry layer. It helps create the classic candy-like texture of traditional cherry mash bars.
3. Evaporated Milk (⅓ cup)
Evaporated milk adds creaminess and helps create a smooth filling. It is thicker and richer than regular milk, making it a great ingredient for homemade candy.
4. Marshmallow Creme (1 cup)
Marshmallow creme gives the cherry filling a soft, fluffy, and slightly chewy texture. It also helps hold the ingredients together.
5. Maraschino Cherries (½ cup, finely chopped and well drained)
Maraschino cherries provide the signature cherry flavor and beautiful pink color. Drain them thoroughly and pat them dry with paper towels to prevent excess moisture from affecting the filling.
6. Cherry Extract (½ teaspoon)
Cherry extract enhances the fruity flavor and gives the filling a delicious cherry aroma. Adjust the amount according to your preference.
7. Red or Pink Food Coloring (a few drops, optional)
A little food coloring creates a brighter pink filling that looks especially festive for Christmas.
8. Powdered Sugar (½ cup, if needed)
Powdered sugar can help thicken the filling if it feels too soft to spread.
For the Chocolate Peanut Topping
1. Semi-Sweet Chocolate Chips (2 cups)
Semi-sweet chocolate provides a rich chocolate flavor that balances the sweetness of the cherry filling.
2. Creamy Peanut Butter (½ cup)
Peanut butter adds richness and helps create a smooth, spreadable chocolate topping.
3. Roasted Salted Peanuts (1 cup, roughly chopped)
Chopped roasted peanuts add crunch and a slightly salty flavor that complements the sweet cherry center.
4. Coconut Oil (1 teaspoon, optional)
Coconut oil helps make the chocolate topping smoother and easier to spread.
Instructions
Step 1: Prepare the Baking Pan
Start by preparing an 8-by-8-inch square baking pan.
Line the pan with parchment paper, leaving some extra paper hanging over the sides. This will make it easier to lift the finished bars out of the pan after chilling.
Lightly grease the parchment paper if desired.
Set the prepared pan aside while you make the cherry filling.
Before starting, drain the maraschino cherries thoroughly. Place them on paper towels and gently pat them dry to remove as much moisture as possible.
This step is important because excess liquid can make the cherry layer too soft.
Step 2: Make the Cherry Filling
In a medium saucepan, combine the butter, granulated sugar, and evaporated milk.
Place the saucepan over medium heat and stir continuously until the butter melts and the sugar dissolves.
Bring the mixture to a gentle boil, stirring frequently to prevent sticking.
For a firmer, traditional candy-style filling, use a candy thermometer and cook to approximately 234–240°F (112–116°C), adjusting for the texture you prefer.
Remove the saucepan from the heat.
Stir in the marshmallow creme until completely melted and smooth.
Add the finely chopped, well-drained maraschino cherries and cherry extract.
Mix everything thoroughly until the cherries are evenly distributed.
If you want a brighter pink color, add a few drops of red or pink food coloring and stir until the color is uniform.
Allow the mixture to cool slightly before spreading.
If the filling seems too soft, gradually add a little powdered sugar until it reaches a thick, spreadable consistency.
Step 3: Spread and Chill the Cherry Layer
Pour the prepared cherry filling into the parchment-lined baking pan.
Use a spatula to spread it evenly across the bottom.
Smooth the surface so the finished bars will have a neat and attractive appearance.
Place the pan in the refrigerator for approximately 30–45 minutes, or until the cherry layer is firm enough to support the chocolate topping.
Chilling is important because it helps keep the cherry and chocolate layers separate and makes the bars easier to cut later.
Step 4: Prepare the Chocolate Peanut Topping
Place the semi-sweet chocolate chips, creamy peanut butter, and optional coconut oil in a microwave-safe bowl.
Microwave in 20–30-second intervals, stirring after each interval until the mixture is completely melted and smooth.
Alternatively, melt everything in a heatproof bowl over a saucepan of gently simmering water.
Once the chocolate mixture is smooth, fold in the chopped roasted peanuts.
Stir until the peanuts are evenly distributed throughout the chocolate.
Pour the chocolate peanut mixture over the chilled cherry filling.
Use a spatula to spread it evenly, making sure the entire surface is covered.
For an extra attractive finish, sprinkle a few additional chopped peanuts over the top.
Step 5: Chill, Slice, and Serve
Return the baking pan to the refrigerator and chill for approximately 2–3 hours, or until the chocolate topping is completely firm.
Once set, use the parchment paper to lift the entire dessert out of the pan.
Place it on a cutting board.
For clean, professional-looking slices, use a sharp knife warmed briefly under hot water and wiped dry before cutting.
Cut into small squares or rectangular bars, depending on your preferred serving size.
Arrange the Christmas Cherry Mash Bars on a festive serving platter or place them in decorative holiday candy boxes.
Serve chilled or slightly softened, and enjoy the delicious combination of sweet cherry filling, rich chocolate, and crunchy peanuts!
Notes
- Drain the cherries properly: Excess moisture can make the filling too soft and prevent the bars from setting correctly.
- Use room-temperature butter: Softened butter blends more easily with the other filling ingredients.
- Stir continuously: When heating the butter, sugar, and evaporated milk, stir frequently to prevent burning or sticking.
- Use a candy thermometer: If you want a traditional firm candy texture, monitoring the temperature helps achieve more consistent results.
- Allow the cherry layer to chill: Make sure the filling is firm before adding the chocolate topping.
- Melt chocolate slowly: Use short microwave intervals and stir frequently to prevent scorching.
- Use roasted peanuts: Their crunchy texture and salty flavor provide the perfect contrast to the sweet cherry filling.
- Don’t rush the final chilling: The chocolate needs enough time to become completely firm before slicing.
- Warm your knife: A slightly warm, dry knife helps create smooth, clean edges.
- Prep Time: 25 minutes
- Chilling Time: 2–3 hours
- Cook Time: 10 minutes
Nutrition
- Calories: 285 kcal
- Sugar: 29 g
- Sodium: 95 mg
- Fiber: 2 g
- Protein: 4 g