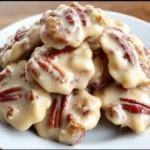
Description
If you love homemade candy with a rich buttery flavor, sweet vanilla aroma, and plenty of crunchy pecans, these Vanilla Pecan Pralines are a recipe worth adding to your collection. This classic Southern-inspired confection combines sugar, butter, cream, vanilla, and pecans to create delicious candies with a wonderfully rich flavor and a satisfying texture. Whether you are preparing homemade sweets for the holidays, making a special gift for friends, or simply craving an old-fashioned Southern treat, vanilla pecan pralines are an excellent choice.
Ingredients
1. Pecans
- 2 cups (approximately 200–220 g) pecan halves or chopped pecans
Pecans are the star ingredient in this recipe. Their buttery, mildly sweet flavor pairs beautifully with the caramelized sugar mixture. You can use pecan halves for a more decorative appearance or chopped pecans for a more evenly distributed nutty texture.
For a deeper flavor, lightly toast the pecans before adding them to the candy mixture. Allow them to cool before using them so that they do not introduce unnecessary heat or moisture into the prepared candy.
2. Granulated sugar
- 1 cup (200 g) granulated sugar
Granulated sugar provides sweetness and helps form the candy’s structure. When heated and then cooled, the sugar mixture develops the characteristic consistency of pralines.
Measure the sugar accurately because changing the sugar-to-liquid ratio can affect how the pralines set.
3. Brown sugar
- 1 cup (approximately 200 g) packed light brown sugar
Brown sugar contributes a rich caramel flavor and helps give the pralines their classic Southern character. Its molasses content adds depth and complements the buttery pecans.
Light brown sugar creates a balanced flavor, while dark brown sugar produces a deeper, more pronounced molasses taste.
4. Heavy cream
- 1/2 cup (120 ml) heavy cream
Heavy cream adds richness and helps create a smooth, creamy candy mixture. The fat in the cream contributes to the pralines’ luxurious flavor and tender texture.
Measure the cream before starting, and keep it ready beside the stove.
5. Unsalted butter
- 4 tablespoons (56 g) unsalted butter
Butter enhances the richness of the candy and adds a smooth, buttery flavor. Using unsalted butter allows you to control the salt level more precisely.
Cut the butter into smaller pieces so it melts evenly when added to the saucepan.
6. Vanilla extract
- 2 teaspoons pure vanilla extract
Vanilla gives these pralines their distinctive aroma and enhances the flavor of both the caramel and the pecans.
Pure vanilla extract is ideal, but a good-quality vanilla flavoring can also be used. Add the vanilla near the end of cooking to preserve its aroma.
7. Salt
- 1/4 teaspoon salt
A small amount of salt balances the sweetness and highlights the buttery flavor of the pecans. If you use salted butter, reduce the additional salt according to your taste.
8. Optional ingredients
You can customize the recipe with a few additional ingredients if desired.
- 1/4 teaspoon ground cinnamon for a warm, spiced flavor
- 1/2 teaspoon maple extract for a maple-pecan variation
- A small pinch of flaky sea salt for a sweet-and-salty finish
- 1 tablespoon light corn syrup to help reduce unwanted sugar crystallization
- A small amount of extra butter for greasing the parchment paper if needed
Instructions
Before you begin cooking, measure all the ingredients and place them within easy reach. Candy-making moves quickly once the mixture reaches the correct temperature, so preparing everything in advance is essential.
Line a large baking sheet or countertop-safe tray with parchment paper. You can also use a silicone baking mat. Make sure the surface is heat-resistant and large enough to hold all the pralines without crowding them.
Measure the pecans, granulated sugar, brown sugar, heavy cream, butter, vanilla extract, and salt.
If you are using a candy thermometer, attach it securely to the side of a heavy-bottomed saucepan. The thermometer should measure the candy mixture without touching the bottom of the pan.
Choose a saucepan large enough to accommodate bubbling sugar and cream. Avoid filling the pan too close to the top because the mixture can expand while boiling.
Step 2: Prepare the pecans
For the best flavor, consider lightly toasting the pecans before preparing the candy mixture.
Preheat your oven to 350°F (175°C). Spread the pecans in a single layer on a baking sheet and toast them for approximately 5–8 minutes, checking frequently to prevent burning.
Alternatively, toast them in a dry skillet over medium-low heat, stirring regularly until fragrant.
Allow the pecans to cool completely. If you are using pecan halves and prefer smaller pieces, chop them into medium-sized pieces. Avoid chopping them too finely, as larger pieces provide a more satisfying texture.
Toasting is optional, but it enhances the nutty aroma and creates a richer flavor that works beautifully with vanilla and caramel.
Step 3: Combine the sugars, cream, butter, and salt
Place the granulated sugar, brown sugar, heavy cream, butter, and salt in a heavy-bottomed saucepan.
Set the pan over medium heat and stir gently as the butter melts and the sugars begin to dissolve.
Continue stirring until the mixture becomes smooth and the sugar is mostly dissolved. Scrape the sides of the saucepan carefully if needed, but avoid splashing sugar crystals onto the sides of the pan.
Once the mixture begins to boil, reduce unnecessary stirring. Excessive agitation can encourage sugar crystallization, which may cause the finished pralines to become grainy rather than smooth.
If you choose to use corn syrup, add it with the other ingredients. It can help limit crystallization, although correct cooking and cooling technique remain important.
Step 4: Cook the candy mixture to the correct temperature
Allow the mixture to boil gently while monitoring the temperature with a candy thermometer.
For a typical soft praline mixture, a target near 235–240°F (113–116°C) is a useful starting point, but the ideal temperature depends on your preferred texture, recipe proportions, and local conditions.
At the lower end of this range, the candy may remain softer. At the higher end, it may set more firmly. Small differences in temperature can noticeably affect the final result.
Stir carefully and monitor the thermometer throughout the process. Avoid leaving the saucepan unattended.
If you do not have a candy thermometer, you can use a cold-water test. Drop a small amount of the mixture into a cup of cold water and observe its consistency. A soft ball that can be gathered between your fingers after cooling suggests that the mixture is approaching the soft-ball stage. Use caution because hot sugar can cause severe burns.
Do not taste the hot mixture or touch it directly.
Step 5: Remove the saucepan from the heat
When the mixture reaches the desired temperature, remove the saucepan from the heat immediately.
Let the mixture rest briefly, following the consistency cues in your recipe. A short cooling period can help prepare the candy for the next stage, but allowing it to cool too much may make it difficult to spoon.
This is an important stage because the temperature of the mixture affects the way the sugar crystallizes as the pralines cool.
Avoid vigorous stirring immediately after removing the pan from the heat if your recipe calls for a brief resting period. When you begin stirring again, do so in a controlled manner.
Step 6: Add the vanilla and pecans
Stir in the vanilla extract and prepared pecans.
The mixture may bubble slightly when the vanilla is added, so keep your hands and face away from the saucepan.
Continue stirring until the pecans are evenly distributed throughout the candy mixture. Depending on the recipe and the temperature, the mixture may begin to thicken and lose some of its glossy appearance.
The goal is a thick, spoonable mixture that holds together rather than spreading like a thin sauce.
If the mixture is too fluid, the pralines may spread excessively. If it becomes too thick before you finish portioning it, the candies may form rough, uneven shapes.
Work steadily but carefully. Do not rush so much that you risk spilling the hot mixture.
Step 7: Spoon the pralines onto parchment paper
Using a sturdy spoon, drop small portions of the mixture onto the prepared parchment paper or silicone mat.
Aim for approximately 1–2 tablespoons per praline, depending on the size you prefer.
Leave space between the portions because the mixture may spread slightly before setting.
For a more uniform appearance, use the same spoon or scoop for each portion. If the mixture is thick enough, gently shape each praline into a rounded mound with the back of the spoon.
You can arrange a few pecan pieces on top of each portion before the candy sets if you want a more decorative finish.
Remember that the mixture is still very hot at this stage. Keep children and pets away from the preparation area, and avoid touching the candies until they have cooled completely.
Step 8: Allow the pralines to cool and set
Leave the pralines undisturbed at room temperature until they are firm enough to lift from the parchment paper.
Depending on their size, the room temperature, humidity, and cooking temperature, this may take approximately 30–60 minutes or longer.
Do not move the pralines too early. Their structure develops as the sugar mixture cools, and handling them while warm can cause them to deform or break.
Once completely cool, gently lift each praline from the parchment paper and transfer it to an airtight container.
The finished candies should have a pleasant pecan flavor, a pronounced vanilla aroma, and a texture that matches your chosen cooking temperature and recipe. Traditional Southern pralines are often slightly crumbly and tender rather than stretchy like caramel.
Step 9: Serve and enjoy
Arrange the cooled Vanilla Pecan Pralines on a serving platter or place them in small paper candy cups.
They are delicious on their own, but they also pair wonderfully with coffee, tea, hot chocolate, and other after-dinner drinks.
For gifts, arrange the candies in a decorative tin or food-safe box with parchment paper between layers if needed.
If you are making the pralines for a celebration, prepare them in advance so that they have enough time to cool and set properly.
Notes
The most important part of making Vanilla Pecan Pralines is controlling the sugar mixture. The ingredients are simple, but temperature and crystallization determine whether the candy becomes creamy, grainy, soft, or firm.
Use a heavy-bottomed saucepan. A thick pan distributes heat more evenly and reduces the chance of scorching the sugar mixture.
Measure the ingredients accurately. Sugar and liquid ratios influence the final consistency. Large deviations can prevent the candy from setting properly.
Monitor the temperature. A candy thermometer provides a reliable way to track the cooking stage. Check that the thermometer is positioned correctly and does not touch the bottom of the pan.
Avoid excessive stirring during boiling. Once the mixture has reached a steady boil, unnecessary stirring or scraping sugar crystals from the sides may encourage crystallization.
Add vanilla near the end. Vanilla extract has a delicate aroma, and adding it late helps preserve more of its flavor.
Use room-temperature pecans. Toasted pecans should be cooled before being added to the candy mixture.
Work promptly after adding the pecans. The mixture can thicken rapidly as it cools, so have the parchment paper ready before cooking.
Be careful with hot sugar. Boiling sugar is much hotter than boiling water and can cause serious burns. Keep children away from the saucepan and never handle the hot candy directly.
Consider humidity. High humidity can affect how quickly sugar candies set and how they behave during storage. Make pralines in a cool, dry environment when possible.
Let the candy cool completely. Placing warm pralines in an airtight container can trap condensation and create unwanted moisture.
- Prep Time: 15 minutes
- Cooling and Setting Time: 30–60 minutes
- Cook Time: 15–25 minutes
Nutrition
- Calories: 130–160 per praline
- Sodium: 20–50 mg per praline
- Protein: 1–2 g per praline