Ingredients
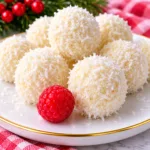
This recipe makes approximately 20–24 raspberry coconut balls, depending on the size.
- 2 cups (about 170 g) unsweetened finely shredded coconut, plus extra for rolling
- ½ cup (about 120 ml) sweetened condensed milk
- ½ cup (about 15–20 g) freeze-dried raspberries, finely crushed into powder
- 1 teaspoon vanilla extract
- ⅛ teaspoon salt
- ½ cup (about 85 g) white chocolate melting wafers, optional, for drizzling
Instructions
Place the freeze-dried raspberries in a food processor and pulse until they become a fine powder.
If you don’t have a food processor, put the raspberries in a sealed food storage bag and crush them with a rolling pin.
For a smoother texture, remove any large seeds or pieces by passing the powder through a fine-mesh sieve. Set aside.
Step 2: Mix the Coconut Ingredients
In a large mixing bowl, combine the finely shredded coconut, raspberry powder, vanilla extract, and salt.
Stir until the raspberry powder is evenly distributed throughout the coconut. The mixture should begin to develop a lovely pink color.
Step 3: Add the Sweetened Condensed Milk
Pour in the sweetened condensed milk gradually, stirring after each addition.
Mix until the coconut mixture becomes moist and holds together when pressed between your fingers.
You may not need every drop of condensed milk, depending on the texture of your coconut. The mixture should be sticky enough to roll but not so wet that it spreads.
Step 4: Chill the Mixture
Cover the bowl and refrigerate for approximately 30 minutes.
Chilling allows the coconut to absorb some of the moisture and makes the mixture easier to shape. If it still feels too sticky after chilling, mix in a little extra shredded coconut.
Step 5: Shape the Coconut Balls
Scoop approximately 1 tablespoon of the mixture at a time.
Roll each portion gently between your palms to form a small, even ball. If the mixture sticks to your hands, lightly dampen your palms or chill it for another 10–15 minutes.
Roll the balls in extra shredded coconut for a pretty snowy finish.
Arrange them on a parchment-lined baking sheet.
Step 6: Add the White Chocolate Drizzle
If you’d like a decorative finish, melt the white chocolate wafers according to the package directions.
Transfer the melted chocolate to a small piping bag or use a spoon to drizzle thin lines over the coconut balls.
For an extra raspberry touch, sprinkle a little crushed freeze-dried raspberry powder over the chocolate before it sets.
Step 7: Chill Until Firm
Place the finished raspberry coconut balls in the refrigerator for another 20–30 minutes, or until the white chocolate has set and the balls feel firm.
Serve chilled and enjoy!
Notes
Use freeze-dried raspberries, not fresh raspberries. Fresh berries contain a lot of moisture, which can make the coconut mixture too soft and difficult to roll. Freeze-dried fruit provides a stronger flavor without adding excess liquid.
Add condensed milk gradually. Different coconut brands absorb moisture differently. Start with less and add more only until the mixture holds together.
Chill before rolling. A short chilling period makes shaping much easier and helps prevent the mixture from sticking to your hands.
Use finely shredded coconut. Larger coconut flakes can make the balls rougher and harder to shape evenly.
Don’t overheat the white chocolate. Melt it gently and stir frequently. Overheating can make white chocolate thick or grainy.
Keep the finished treats refrigerated. Sweetened condensed milk makes this a refrigerated dessert, not a shelf-stable candy.