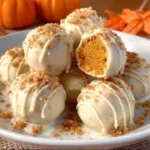
Description
No-Bake Pumpkin Cheesecake Balls are exactly what you need. These little bites are creamy, sweet, full of pumpkin flavor, and incredibly easy to prepare. With no oven required, they are perfect for busy days when you want a homemade dessert without spending hours baking.
Ingredients
For the pumpkin cheesecake mixture
- 8 ounces (226 g) cream cheese, softened: Creates the rich, creamy cheesecake base. Use full-fat block cream cheese for the best consistency.
- 1/2 cup (120 g) pumpkin puree: Adds authentic pumpkin flavor and beautiful color. Use plain pumpkin puree, not pumpkin pie filling.
- 1/2 cup (60 g) powdered sugar: Sweetens the mixture and creates a smooth texture.
- 1 teaspoon vanilla extract: Enhances the overall flavor and complements the pumpkin spice.
- 1 teaspoon ground cinnamon: Adds warmth and classic autumn flavor.
- 1/2 teaspoon pumpkin pie spice: Creates a delicious blend of cinnamon, nutmeg, ginger, and other warming spices.
- 1 1/2 cups (approximately 150 g) graham cracker crumbs: Help absorb moisture and give the cheesecake mixture enough structure to form balls.
- 1/4 cup (30 g) additional graham cracker crumbs, if needed: Useful for adjusting the consistency if the pumpkin mixture is too soft.
For the coating
Choose one or combine several options:
- 1 cup crushed graham crackers: Creates a classic crunchy coating.
- 1 cup white chocolate chips: Perfect for making a sweet white chocolate shell.
- 1 cup milk chocolate chips: Adds a rich chocolate finish.
- 1 teaspoon coconut oil, optional: Helps melted chocolate become smoother and easier to dip.
- 1/2 teaspoon cinnamon: Adds extra pumpkin spice flavor to the graham cracker coating.
Instructions
Begin by measuring the pumpkin puree. Make sure you are using 100% plain pumpkin puree rather than canned pumpkin pie filling.
Pumpkin pie filling already contains added sugar and spices, which can change the sweetness and flavor of the recipe.
If the pumpkin puree looks watery, place it in a fine-mesh strainer lined with a paper towel or clean cheesecloth. Allow some excess moisture to drain before using it.
This step is important because too much moisture can make the cheesecake mixture sticky and difficult to roll.
Set the prepared pumpkin puree aside while you prepare the cream cheese mixture.
Step 2: Beat the cream cheese until smooth
Place the softened cream cheese in a large mixing bowl.
Using an electric hand mixer, beat the cream cheese on medium speed until it becomes smooth, creamy, and free of lumps.
Scrape down the sides of the bowl with a spatula to ensure everything is evenly mixed.
Room-temperature cream cheese is important for this recipe. Cold cream cheese can create small lumps that are difficult to remove, even with an electric mixer.
Continue beating until the cream cheese has a soft, fluffy consistency.
Step 3: Add the pumpkin puree and flavorings
Add the prepared pumpkin puree to the cream cheese.
Mix on low speed until the pumpkin is fully incorporated and the mixture develops a uniform orange color.
Add the powdered sugar, vanilla extract, ground cinnamon, and pumpkin pie spice.
Beat gently until everything is combined.
At this stage, the mixture should look smooth, creamy, and fragrant. You should be able to smell the warm cinnamon and pumpkin spice.
Avoid adding too much pumpkin puree because excess moisture can make the mixture too soft to shape.
Step 4: Add the graham cracker crumbs
Gradually add the graham cracker crumbs to the pumpkin cream cheese mixture.
Start by adding approximately 1 cup, then mix until incorporated. Add the remaining crumbs gradually until the mixture becomes thick enough to hold its shape.
The exact amount may vary depending on how moist your pumpkin puree is and the consistency of your cream cheese.
The finished mixture should resemble a soft cheesecake dough. It may feel slightly sticky, but it should be firm enough to scoop and shape after chilling.
If it is still too soft, add another tablespoon of graham cracker crumbs at a time.
Do not add too many crumbs at once, because an excessive amount can make the cheesecake balls dry and dense.
Step 5: Chill the cheesecake mixture
Cover the mixing bowl with plastic wrap or place the mixture in an airtight container.
Refrigerate for approximately 1–2 hours, or until the mixture becomes firm enough to handle.
Chilling is one of the most important steps in this no-bake pumpkin cheesecake recipe. It allows the crumbs to absorb moisture and gives the cream cheese mixture time to firm up.
If you skip this step, the mixture may stick to your hands and become difficult to roll into neat balls.
For convenience, you can prepare the mixture the night before and leave it covered in the refrigerator until you are ready to shape it.
Step 6: Roll the mixture into cheesecake balls
Line a baking sheet or large plate with parchment paper.
Remove the chilled mixture from the refrigerator.
Using a small cookie scoop or tablespoon, portion the mixture into approximately 18–24 equal pieces.
Roll each portion gently between your palms until it forms a smooth ball.
Place the finished balls on the prepared baking sheet, leaving a little space between each one.
If the mixture begins to soften while you are working, return it to the refrigerator for 10–15 minutes.
Try to keep the balls approximately the same size so they look attractive when arranged on a serving platter.
Step 7: Chill the shaped balls again
Once all the cheesecake balls have been shaped, place the baking sheet in the refrigerator for another 30–45 minutes.
This second chilling period helps the balls maintain their shape when you add the coating.
If you plan to dip them in melted chocolate, you can place them in the freezer for approximately 10–15 minutes instead.
They should be firm but not completely frozen.
Step 8: Prepare the coating
If you prefer a simple graham cracker coating, place the crushed graham crackers in a shallow bowl. Add a little cinnamon if desired and mix well.
For a chocolate coating, place the chocolate chips in a microwave-safe bowl.
Microwave in 20–30-second intervals, stirring between each interval, until the chocolate is completely melted and smooth.
If the chocolate is too thick, add a small amount of coconut oil and stir until the mixture becomes easier to work with.
Be careful not to overheat the chocolate, as it can become thick or grainy.
You can use white chocolate for a beautiful pumpkin cheesecake appearance or milk chocolate for a richer dessert.
Step 9: Coat the pumpkin cheesecake balls
Remove the chilled cheesecake balls from the refrigerator.
For the graham cracker version, roll each ball in the crumbs until completely coated. Gently press the crumbs onto the surface if necessary.
For the chocolate version, place one cheesecake ball into the melted chocolate. Use a fork to lift it out, allowing the excess chocolate to drip back into the bowl.
Place the coated ball on parchment paper.
Repeat with the remaining cheesecake balls.
If you want a decorative finish, drizzle the coated balls with contrasting melted chocolate and sprinkle a little cinnamon or crushed graham crackers on top before the chocolate sets.
Work in small batches to prevent the cheesecake balls from becoming too warm.
Step 10: Refrigerate until firm and serve
Once all the cheesecake balls have been coated and decorated, return them to the refrigerator.
Chill for approximately 20–30 minutes, or until the coating has set completely.
Transfer the finished treats to a serving plate or airtight container.
The inside should be creamy, smooth, and full of pumpkin spice flavor, while the outside provides a delicious contrast through the graham cracker crumbs or chocolate coating.
Serve chilled for the best texture.
Enjoy these delicious homemade No-Bake Pumpkin Cheesecake Balls with family and friends!
Notes
Although this recipe does not require baking, a few important details will help you achieve the best results.
Use plain pumpkin puree. Pumpkin pie filling already contains sugar and spices, which can make the mixture too sweet and change its consistency.
Remove excess pumpkin moisture. Watery puree is one of the main reasons no-bake pumpkin cheesecake balls become too soft. Drain or blot the puree before mixing.
Use softened cream cheese. Room-temperature cream cheese blends more easily and produces a smooth filling without lumps.
Add graham cracker crumbs gradually. Different pumpkin purees contain different amounts of moisture. Adjust the crumbs until the mixture holds its shape.
Do not skip refrigeration. Chilling allows the mixture to firm up and makes rolling much easier.
Keep the coating at the right temperature. Melted chocolate should be smooth and fluid but not excessively hot.
Keep the finished balls refrigerated. Since these treats contain cream cheese, they should not be left at room temperature for extended periods.
Use clean hands or food-safe gloves. This makes shaping easier and keeps the balls looking neat.
- Prep Time: 25 minutes
- Chilling Time: 2 hours
- Cook Time: 0 minutes
Nutrition
- Calories: 110–150 per ball
- Sodium: 80–130 mg per ball
- Protein: 2 g per ball