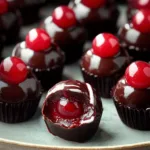
Ingredients
For the Cherry Centers
- 24 maraschino cherries with stems, if available
- 3 tablespoons maraschino cherry juice
- 1 tablespoon unsalted butter, softened
- 3 cups powdered sugar, plus extra for adjusting
- 1/2 teaspoon vanilla extract
- 1/4 teaspoon almond extract, optional
For the Chocolate Coating
- 16 ounces dark chocolate melting wafers or semi-sweet chocolate
- 1 teaspoon coconut oil, optional, if needed for thinning
Optional Decoration
- White chocolate melting wafers
- Red or green holiday sprinkles
- Edible pearl sprinkles
Instructions
Place the maraschino cherries in a fine-mesh strainer and allow the excess syrup to drain.
Transfer them to several layers of paper towels and gently pat them dry.
Let the cherries air-dry for approximately 30–60 minutes, turning them occasionally. They should be as dry as possible before wrapping them in fondant.
If using cherries with stems, handle them gently to avoid pulling the stems off.
This step is essential because excess cherry syrup can prevent the fondant from sticking properly.
Step 2: Prepare the Fondant Mixture
Place the softened butter in a medium mixing bowl.
Add the powdered sugar, vanilla extract, almond extract, and 3 tablespoons of maraschino cherry juice.
Mix with a sturdy spatula until the ingredients begin to form a thick dough.
If the mixture is too sticky to handle, gradually add more powdered sugar, one tablespoon at a time.
If it feels too dry and crumbly, add a few drops of cherry juice.
The finished fondant should be soft, smooth, and pliable, similar to modeling dough. It should hold its shape without sticking excessively to your fingers.
Step 3: Wrap Each Cherry in Fondant
Line a baking sheet with parchment paper.
Take approximately 1 tablespoon of fondant and flatten it into a small circle in your palm.
Place one dried maraschino cherry in the center.
Carefully wrap the fondant around the cherry, gently pinching the edges together to seal it completely.
Roll the wrapped cherry between your palms until the surface is smooth.
If the cherry has a stem, leave the stem uncovered for a traditional candy-shop appearance.
Place the finished cherry on the prepared baking sheet.
Repeat with the remaining cherries.
Step 4: Chill the Cherry Centers
Place the baking sheet in the refrigerator for approximately 30–45 minutes, or until the fondant is firm enough to dip.
Chilling helps the fondant stay in place when it comes into contact with the melted chocolate.
Do not freeze the centers completely solid. Very cold fillings can cause condensation or cracking in the chocolate coating.
Step 5: Melt the Chocolate
Place the dark chocolate melting wafers in a microwave-safe bowl.
Heat in 20–30-second intervals, stirring thoroughly after each interval until the chocolate is completely melted and smooth.
If the chocolate is too thick for dipping, add a small amount of coconut oil and stir until incorporated.
Alternatively, melt the chocolate gently in a double boiler, making sure no water or steam enters the chocolate.
Keep the chocolate warm and fluid while working.
Step 6: Dip the Cherry Cordials
Remove a few chilled cherry centers from the refrigerator at a time.
Hold each cherry by its stem and dip it into the melted chocolate, turning gently until the fondant is completely covered.
If the cherries are stemless, use a dipping fork to lower them into the chocolate and lift them out.
Allow the excess chocolate to drip back into the bowl.
Place each dipped cherry onto the parchment-lined baking sheet.
If desired, use a small spoon to cover any exposed areas around the stem.
Step 7: Add Festive Decorations
While the chocolate coating is still wet, add a few red or green sprinkles.
For a more elegant appearance, melt a small amount of white chocolate in a separate bowl.
Transfer it to a small piping bag or zip-top bag with a tiny corner cut off.
Drizzle thin lines over the chocolate-covered cherries.
You can also add a tiny edible pearl or a little red sugar for a beautiful Christmas finish.
Step 8: Let the Chocolate Set
Allow the chocolate to set at room temperature in a cool, dry place or place the tray in the refrigerator for approximately 15–20 minutes.
Once the chocolate shell is firm, carefully transfer the cordials to an airtight container, separating layers with parchment paper.
Step 9: Allow the Centers to Mature
For a traditional soft, syrupy cherry cordial center, allow the finished candies to mature in a cool, dry location for several days.
The fondant gradually softens as moisture from the cherry moves into it. This process creates the characteristic liquid-like center.
Because this homemade version uses fresh maraschino cherries and a butter-based fondant, store the candies in the refrigerator during maturation. Check that the chocolate shell remains intact and keep the candies in a covered, food-safe container.
The center may become softer over time, but the exact result depends on the cherry moisture, fondant consistency, and storage conditions.
Notes
Dry the cherries thoroughly. Moisture on the outside of the cherries can make the fondant slide off and cause problems during dipping.
Use a firm fondant. The mixture should be soft enough to wrap around the cherries but not so sticky that it loses its shape.
Add powdered sugar gradually. Different brands and moisture levels can affect the consistency. Adjust slowly until the fondant is easy to handle.
Keep the fondant covered. It can dry out while you work. Cover the bowl with plastic wrap when you’re not using it.
Chill before dipping. Firm centers are much easier to coat without losing their shape.
Avoid overheating chocolate. Gentle melting produces a smoother coating and makes dipping easier.
Don’t rush the resting period. Traditional cherry cordials develop their softer centers over time. They will not become syrupy immediately after dipping.
Use melting wafers for convenience. If using regular chocolate instead, follow the appropriate melting or tempering method for the type of chocolate.