Description
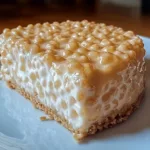
This Giant Rice Krispy Treat Cheesecake is the ultimate dessert for anyone who loves classic crispy rice cereal treats and rich, creamy cheesecake. It combines two nostalgic favorites into one impressive dessert that is perfect for birthdays, family gatherings, potlucks, holidays, celebrations, and weekend baking projects.
Ingredients
For the Giant Rice Krispy Treat Layer:
- 8 cups crispy rice cereal
- 6 cups mini marshmallows
- 5 tablespoons unsalted butter
- 1 teaspoon vanilla extract
- Pinch of salt
For the Creamy Cheesecake Filling:
- 24 ounces full-fat cream cheese, softened
- 1 cup powdered sugar
- 2 teaspoons vanilla extract
- 1 tablespoon fresh lemon juice
- 1 ½ cups heavy whipping cream, cold
Optional Toppings:
- Mini marshmallows
- Extra crispy rice cereal
- Melted white chocolate
- Melted milk chocolate
- Caramel sauce
- Chocolate chips
- Whipped cream
- Rainbow sprinkles
- Crushed Rice Krispie treats
Instructions
Lightly grease a 9-inch springform pan with nonstick spray or softened butter. Line the bottom with parchment paper for easier removal.
Make sure the springform pan is securely closed before beginning because the Rice Krispy mixture will be pressed around the sides.
Place the butter in a large saucepan over low heat. Allow it to melt completely without letting it brown.
Keeping the heat low helps prevent the butter and marshmallows from becoming too hot.
Add the mini marshmallows to the melted butter. Stir continuously with a lightly buttered spatula until the marshmallows are almost completely melted and smooth.
Remove the saucepan from the heat as soon as the mixture becomes creamy.
Stir in the vanilla extract and a small pinch of salt. The vanilla adds flavor while the salt balances the sweetness of the marshmallows.
Immediately add the crispy rice cereal to the warm marshmallow mixture.
Fold gently until the cereal is completely coated. Work quickly because the mixture becomes harder to spread as it cools.
While the cereal mixture is still warm, transfer it into the prepared springform pan.
Using lightly buttered hands or a buttered spatula, press the mixture firmly across the bottom and up the sides of the pan.
Create an even layer around the entire pan while leaving a large cavity in the center for the cheesecake filling.
Press the Rice Krispy mixture firmly around the sides so the cheesecake shell holds its shape.
Try to keep the walls approximately the same thickness throughout. Avoid making the shell extremely thin because it needs enough structure to hold the creamy filling.
Set aside to cool and firm up.
Place the softened cream cheese in a large mixing bowl.
Beat until smooth and creamy with no large lumps remaining.
Softened cream cheese is important because cold cream cheese can create a lumpy cheesecake filling.
Add the powdered sugar, vanilla extract, and fresh lemon juice.
Beat again until the mixture becomes smooth, creamy, and well combined.
The lemon juice adds a subtle brightness without making the cheesecake taste strongly lemony.
In a separate bowl, beat the cold heavy whipping cream until stiff peaks form.
Do not overbeat the cream. Stop once it becomes thick enough to hold its shape.
Gently fold the whipped cream into the cream cheese mixture.
Fold slowly rather than mixing aggressively. This helps maintain the light and fluffy texture of the cheesecake filling.
Spoon the cheesecake filling into the cooled Rice Krispy shell.
Spread the filling evenly from the center toward the edges. Smooth the top with a spatula.
Cover the cheesecake loosely and refrigerate for at least 6 hours, preferably overnight.
The chilling time allows the cheesecake filling to firm up and gives the Rice Krispy shell time to fully set.
Once completely chilled, carefully release the springform pan.
Run a thin knife around the edge if necessary before opening the pan.
Transfer the cheesecake to a serving plate.
Decorate the top with whipped cream, mini marshmallows, extra crispy rice cereal, chocolate drizzle, caramel sauce, or colorful sprinkles.
For a dramatic presentation, add a few small pieces of Rice Krispy treats around the top of the cheesecake.
Use a sharp knife to cut the cheesecake into slices.
For cleaner slices, warm the knife under hot water, dry it completely, then slice. Wipe the knife between cuts.
Serve chilled and enjoy the combination of creamy cheesecake and chewy crispy cereal.
Notes
The most important part of this recipe is working quickly when forming the Giant Rice Krispy Treat Cheesecake shell. The marshmallow mixture becomes sticky and firm as it cools.
Lightly butter your hands or spatula before pressing the cereal mixture into the pan. This makes shaping the crust much easier.
Do not press the Rice Krispy mixture too aggressively. It should be firm enough to hold together but still slightly soft and chewy.
Make sure the cream cheese is fully softened before preparing the filling. This creates a smoother cheesecake texture.
For the best results, refrigerate the cheesecake overnight before slicing. The longer chilling time gives the filling a firmer consistency and makes slicing easier.
- Prep Time: 30 minutes
- Chill Time: 6 hours
- Cook Time: 10 minutes
Nutrition
- Calories: 520
- Sodium: 330 mg
- Protein: 7 g