Description
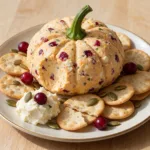
Cranberry Pumpkin Cheese Ball is the perfect recipe! Shaped like an adorable little pumpkin and filled with creamy cheese, sweet dried cranberries, sharp cheddar, and delicious seasonings, this festive appetizer is guaranteed to become a favorite at your holiday gatherings.
Ingredients
For the Pumpkin Cheese Ball
- 16 ounces full-fat cream cheese, softened.
- 1 1/2 cups shredded sharp cheddar cheese.
- 1/2 cup finely chopped dried cranberries.
- 1/4 cup finely chopped dried apricots (optional).
- 2 tablespoons sour cream.
- 1 tablespoon honey.
- 1 teaspoon garlic powder.
- 1/2 teaspoon onion powder.
- 1/2 teaspoon smoked paprika.
- 1/4 teaspoon ground black pepper.
- 1 tablespoon finely chopped fresh parsley.
- 1/4 teaspoon salt, or to taste.
- 1–2 tablespoons additional shredded cheddar, if needed.
For the Pumpkin Decoration
- 1 small fresh pumpkin stem, washed and completely dried.
- 1 teaspoon finely chopped parsley (optional).
- A little additional paprika for color, if desired.
For Serving
- Round buttery crackers.
- Ritz-style crackers.
- Wheat crackers.
- Pretzel crisps.
- Toasted baguette slices.
- Celery sticks.
- Carrot sticks.
- Cucumber slices.
- Bell pepper strips.
Instructions
Begin by removing the cream cheese from the refrigerator and allowing it to soften at room temperature for approximately 30–45 minutes.
Softened cream cheese blends much more easily and creates a smooth mixture without lumps.
While the cream cheese softens, finely chop the dried cranberries and dried apricots.
Shred the sharp cheddar cheese using a box grater if you’re not using pre-shredded cheese.
Wash and finely chop the fresh parsley, then set everything aside.
If you’re using a real pumpkin stem, clean it carefully and allow it to dry completely. Remove any loose pieces and make sure it is suitable for use as a food decoration.
For an extra orange appearance, measure out the smoked paprika and have it ready to mix into the filling.
Step 2: Make the Creamy Cheese Mixture
In a large mixing bowl, add the softened cream cheese and sour cream.
Using an electric hand mixer, beat the ingredients on medium speed until smooth, creamy, and fluffy.
Add the shredded cheddar cheese, garlic powder, onion powder, smoked paprika, honey, salt, and black pepper.
Mix until all the seasonings are evenly incorporated.
Next, add the chopped dried cranberries, dried apricots, and fresh parsley.
Using a silicone spatula, gently fold the ingredients into the cheese mixture.
Continue mixing until the cranberries, apricots, and herbs are distributed evenly throughout.
The mixture should be thick, creamy, and firm enough to shape.
If it feels too soft, add a little additional shredded cheddar and refrigerate it for 20–30 minutes.
Taste the mixture and adjust the seasonings if needed.
Step 3: Shape the Cheese Ball Like a Pumpkin
Place a large piece of plastic wrap on a clean kitchen surface.
Transfer the cheese mixture into the center of the plastic wrap.
Gather the edges and gently shape the mixture into a large round ball.
Wrap it securely and smooth the surface with your hands.
To create the pumpkin ridges, use several pieces of kitchen twine.
Wrap the twine around the cheese ball vertically, crossing at the top and bottom to divide the ball into approximately 6–8 sections.
Tie the twine gently enough to create visible indentations without cutting too deeply into the cheese mixture.
Alternatively, use several folded strips of plastic wrap to create the pumpkin grooves.
Transfer the wrapped cheese ball to a bowl to help maintain its rounded shape.
Refrigerate for at least 3–4 hours, or preferably overnight, until completely firm.
Step 4: Create the Pumpkin Shape and Add the Stem
Once the cheese ball is firm, remove it from the refrigerator.
Carefully remove the plastic wrap and kitchen twine.
You should now see beautiful pumpkin-like ridges running from the top to the bottom of the cheese ball.
If any sections look uneven, gently smooth them using a clean spatula or your fingers.
Place the cheese ball on a wooden serving board or decorative platter.
Carefully insert the clean, dry pumpkin stem into the center of the top.
Press gently to secure it without damaging the shape.
If the stem is too large or heavy, use a small piece of food-safe decorative support to keep it upright.
For an extra festive appearance, arrange a few dried cranberries and fresh parsley around the base.
Step 5: Chill and Serve
Place the finished Cranberry Pumpkin Cheese Ball in the refrigerator for another 20–30 minutes to help it maintain its shape.
When ready to serve, remove it from the refrigerator approximately 10–15 minutes beforehand so the cream cheese becomes soft enough to spread easily.
Arrange buttery crackers, pretzel crisps, toasted baguette slices, and fresh vegetables around the pumpkin-shaped cheese ball.
You can also sprinkle a little smoked paprika around the serving platter and add a few fresh herbs for decoration.
Serve with a small cheese knife or spreader and enjoy this creamy, colorful, and delicious fall appetizer!
Notes
- Always soften cream cheese before mixing.
- Use full-fat block cream cheese for the best consistency.
- Freshly shredded cheddar generally blends better than pre-shredded cheese.
- Chop dried cranberries and apricots into small pieces.
- Avoid adding too much sour cream because excess moisture can make the mixture difficult to shape.
- Add paprika gradually until you achieve your preferred orange color.
- Refrigerate the mixture before shaping if it feels too soft.
- Use kitchen twine to create evenly spaced pumpkin ridges.
- Don’t pull the twine too tightly because it can cut into the cheese mixture.
- Refrigerate the shaped cheese ball for several hours to help it hold its pumpkin appearance.
- Use a small, dry pumpkin stem for the most realistic presentation.
- Insert the stem shortly before serving.
- Keep the finished cheese ball refrigerated until ready to serve.
- Prep Time: 20 minutes
- Chilling Time: 3–4 hours
Nutrition
- Calories: 215 kcal
- Sugar: 5 g
- Sodium: 290 mg
- Fat: 18 g
- Protein: 7 g